はじめに
- この資料は、WebRTCハンズオン勉強会用の資料です。
- 資料の全体はこちらのINDEXを参照してください。
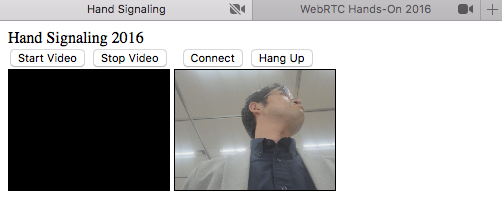
今日作るもの
本編で作成する最終的なアプリのデモをお見せします。
-
https://yusuke84.github.io/webrtc-handson-2016/client/
- シグナリングサーバが無いと動きません
ハンズオン用ソースコード
-
https://github.com/yusuke84/webrtc-handson-2016
- handsonブランチをローカルにダウンロードしハンズオンを開始してください
- STEP1〜STEP4までの各ブランチに各STEPの完成形のソースコードが格納されています
- masterブランチはgh-pages用のブランチです
- 2016と書かれていますが、この記事と同じくメンテナンスは実施しています
動作確認済みブラウザ
- Chrome M71 for OSX
- Firefox 64 for OSX
- Safari 12 for OSX
STEP1
getUserMediaを使ってカメラマイクを操作しよう
navigator.mediaDevices.getUserMedia({video: true, audio: true})
    .then(function (stream) { // success
    }).catch(function (error) { // error
    return;
});
getUserMediaに必要な処理を追加する
-
./client/webrtc.jsに追記してください
// getUserMediaでカメラ、マイクにアクセス
async function startVideo() {
    try{
        localStream = await navigator.mediaDevices.getUserMedia({video: true, audio: false});
        playVideo(localVideo,localStream);
    } catch(err){
        console.error('mediaDevice.getUserMedia() error:', err);
    }
}

// Videoの再生を開始する
async function playVideo(element, stream) {
    element.srcObject = stream;
    try {
        await element.play();
    } catch(erro) {
        console.log('error auto play:' + error);
    }
}
実装する際のポイント(1)
- VideoとAudioの選択
{video: true, audio: true}
- 最低でも640x480以上、出来たら1280x720が良いけどだめならよしなにやってください
{ audio: true, video: { width: {min: 640, ideal: 1280}, height: {min: 480,ideal: 720} } }
- 絶対に640x480がいいです…それ以外だったら動作しなくてもOK
{ audio: true, video: { width: {min: 640, max: 640}, height: {min: 480, max: 480} } }
- フレームレートの設定(一例/Chrome限定)
{ audio: true, video: { frameRate: { min: 10, max: 15 } } }
実装する際のポイント(2)
- 結構gUMのConstraintsは闇ですw
- 詳しく知りたい方は: https://goo.gl/9DWMGZ
実装する際のポイント(3)
- Videoの再生は明示的に実施するようにする
- play()はpromiseベースの非同期関数なので実行時はasync/await等と組み合わせ
// Videoの再生を開始する
async function playVideo(element, stream) {
    element.srcObject = stream;
    try {
        await element.play();
    } catch(erro) {
        console.log('error auto play:' + error);
    }
}
使用する上の注意点
- 許可を求めるダイアログが出てくる
- 複数のカメラやマイクが接続されている場合は、適切なものを選択する必要あり
Chrome

Firefox

Safari

使用する上の注意点
- Safariは複数のタブでカメラデバイスを共有できない
- 1台の端末上で検証する場合は、複数のカメラを接続するか、片方はブラックアウトを許容する
使用する上の注意点
- ホスティング先に注意
| スキーマ\ブラウザ | Chrome | Firefox | Safari |
|---|---|---|---|
| http://localhost/ | ◯ | ◯ | x ※1 |
| http://domain.jp | x | ◯ | x ※1 |
| file://index.html | x | ◯ | x |
| https://domain.jp | ◯ | ◯ | ◯ |
*1 : 事前に開発者向けオプションで許可する必要あり
STEP2
手動シグナリングでWebRTCをつなげよう
WebRTCによるP2P通信を行うまでの情報のやり取り(シグナリング)を手動で体験できるようにします。
WebRTCのAPIを利用するための準備処理を追加する
-
./client/webrtc.jsに追記する
// WebRTCを利用する準備をする
function prepareNewConnection(isOffer) {
    const pc_config = {"iceServers":[ {"urls":"stun:stun.webrtc.ecl.ntt.com:3478"} ]};
    const peer = new RTCPeerConnection(pc_config);

    // リモートのMediaStreamTrackを受信した時
    peer.ontrack = evt => {
        console.log('-- peer.ontrack()');
        playVideo(remoteVideo, evt.streams[0]);
    };

    // ICE Candidateを収集したときのイベント
    peer.onicecandidate = evt => {
        if (evt.candidate) {
            console.log(evt.candidate);
        } else {
            console.log('empty ice event');
            sendSdp(peer.localDescription);
        }
    };

    // ローカルのMediaStreamを利用できるようにする
    if (localStream) {
        console.log('Adding local stream...');
        localStream.getTracks().forEach(track => peer.addTrack(track, localStream));
    } else {
        console.warn('no local stream, but continue.');
    }

    return peer;
}

// 手動シグナリングのための処理を追加する
function sendSdp(sessionDescription) {
    console.log('---sending sdp ---');
    textForSendSdp.value = sessionDescription.sdp;
    textForSendSdp.focus();
    textForSendSdp.select();
}
実装する際のポイント(1)
- ICE Servers
- NAT越えを手助けするユーティリティであるSTUNサーバ、TURNサーバのURIや認証情報を指定する
- ローカル環境で試験する場合はSTUN/TURN共に設定せずともつながるが、練習のためにSkyWayが提供するSTUNサーバを設定してみる
const pc_config = {"iceServers":[ {"urls":"stun:stun.webrtc.ecl.ntt.com:3478"} ]};
実装する際のポイント(2)
- リモートのMediaStreamTrackを受信した時の処理
- MediaStreamの操作はTrack単位で行うのが基本
    peer.ontrack = evt => {
        console.log('-- peer.ontrack()');
        playVideo(remoteVideo, evt.streams[0]);
    };
実装する際のポイント(3)
-
ICE Candidateの収集作業には2種類の方法がある
-
Vanilla ICE
- 接続候補情報(P2PするためのIPアドレスやポート番号の候補情報、Candidateという)を全て収集した後に相手と交換する
- 処理が単純明快
- ICE Candidateが全てで尽くしてから相手に送る事で実現
    peer.onicecandidate = evt => {
        if (evt.candidate) {
            console.log(evt.candidate);
        } else {
            console.log('empty ice event');
            sendSdp(peer.localDescription);
        }
    };
- Trickle ICE
- Candidate情報を発見する都度相手と交換する
- P2P接続するまでの時間を短縮できる可能性がある
    peer.onicecandidate = evt => {
        if (evt.candidate) {
            console.log(evt.candidate);
            sendIceCandidate(evt.candidate);
        } else {
            console.log('empty ice event');
        }
    };
- STEP2ではVanilla ICEで実装を進めます
実装する際のポイント(4)
- ローカルのストリームを利用できるように準備する
- addTrack関数を利用して必要なTrackをPeerConnectionオブジェクトに追加する
if (localStream) {
    console.log('Adding local stream...');
    localStream.getTracks().forEach(track => peer.addTrack(track, localStream));
} else {
    console.warn('no local stream, but continue.');
}
実装する際のポイント(5)
- シグナリングで交換する情報をテキストエリアに表示する(コピペ用)
function sendSdp(sessionDescription) {
    console.log('---sending sdp ---');
    textForSendSdp.value = sessionDescription.sdp;
    textForSendSdp.focus();
    textForSendSdp.select();
}
Offer側の処理を追加する
-
./client/webrtc.jsに追記する
// Connectボタンが押されたらWebRTCのOffer処理を開始
function connect() {
    if (! peerConnection) {
        console.log('make Offer');
        peerConnection = prepareNewConnection(true);
    }
    else {
        console.warn('peer already exist.');
    }
}

function prepareNewConnection(isOffer) {
  // :
  // :
    // Offer側でネゴシエーションが必要になったときの処理
    peer.onnegotiationneeded = async () => {
        try {
            if(isOffer){
                if(negotiationneededCounter === 0){
                    let offer = await peer.createOffer();
                    console.log('createOffer() succsess in promise');
                    await peer.setLocalDescription(offer);
                    console.log('setLocalDescription() succsess in promise');
                    sendSdp(peer.localDescription);
                    negotiationneededCounter++;
                }
            }
        } catch(err){
            console.error('setLocalDescription(offer) ERROR: ', err);
        }
    }
  // :
  // :
};
実装する際のポイント(1)
- WebRTCはOffer/Answerモデル(電話のようなイメージ)なので、接続を要求する側がまずはOffer処理を実施する
- ブラウザにてネゴシエーションする必要性が生じたら
onnegotiationneededイベントが発火する - negotiationneededCounterについては、Chromeの仕様で
addTrackの回数分同イベントが発火するので、最初のイベント以外は無視するために利用(M66で治る予定) - createOfferでSDP(ブラウザが利用可能なWebRTCの通信に必要な各種情報)が生成される
- 生成されたSDPは
setLocalDescriptionにてセットする- SDPを加工する事ができるように自身のSDPであっても生成とセットのプロセスが分離されている
-
setLocalDescriptionが完了するとpeer.onicecandidateイベントが非同期で発火するようになる(つまりCandidate情報の収集をブラウザが開始する)
- ブラウザにてネゴシエーションする必要性が生じたら
    peer.onnegotiationneeded = async () => {
        try {
            if(isOffer){
                if(negotiationneededCounter === 0){
                    let offer = await peer.createOffer();
                    console.log('createOffer() succsess in promise');
                    await peer.setLocalDescription(offer);
                    console.log('setLocalDescription() succsess in promise');
                    negotiationneededCounter++;
                }
            }
        } catch(err){
            console.error('setLocalDescription(offer) ERROR: ', err);
        }
    }
Answer側の処理を追加する
-
./client/webrtc.jsに追記する - このFunctionの利用タイミングは後ほど解説
// Answer SDPを生成する
async function makeAnswer() {
    console.log('sending Answer. Creating remote session description...' );
    if (! peerConnection) {
        console.error('peerConnection NOT exist!');
        return;
    }
    try{
        let answer = await peerConnection.createAnswer();
        console.log('createAnswer() succsess in promise');
        await peerConnection.setLocalDescription(answer);
        console.log('setLocalDescription() succsess in promise');
        sendSdp(peerConnection.localDescription);
    } catch(err){
        console.error(err);
    }
}
SDPをセットする処理を追加する
-
./client/webrtc.jsに追記する - Offer側とAnswer側両方の処理を追加する
// Receive remote SDPボタンが押されたらOffer側とAnswer側で処理を分岐
function onSdpText() {
    const text = textToReceiveSdp.value;
    if (peerConnection) {
        console.log('Received answer text...');
        const answer = new RTCSessionDescription({
            type : 'answer',
            sdp : text,
        });
        setAnswer(answer);
    }
    else {
        console.log('Received offer text...');
        const offer = new RTCSessionDescription({
            type : 'offer',
            sdp : text,
        });
        setOffer(offer);
    }
    textToReceiveSdp.value ='';
}

// Offer側のSDPをセットする処理
async function setOffer(sessionDescription) {
    if (peerConnection) {
        console.error('peerConnection alreay exist!');
    }
    peerConnection = prepareNewConnection(false);
    try{
        await peerConnection.setRemoteDescription(sessionDescription);
        console.log('setRemoteDescription(answer) succsess in promise');
        makeAnswer();
    } catch(err){
        console.error('setRemoteDescription(offer) ERROR: ', err);
    }
}

// Answer側のSDPをセットする場合
async function setAnswer(sessionDescription) {
    if (! peerConnection) {
        console.error('peerConnection NOT exist!');
        return;
    }
    try{
        await peerConnection.setRemoteDescription(sessionDescription);
        console.log('setRemoteDescription(answer) succsess in promise');
    } catch(err){
        console.error('setRemoteDescription(answer) ERROR: ', err);
    }
}
実装する際のポイント(1)
- PeerConnectionオブジェクトが存在する場合はOffer側、そうじゃない場合はAnswer側として処理を分岐
- 相手から受信したOffer/AnswerのSDP情報は
RTCSessionDescriptionを使ってオブジェクト化する - Offer側は相手からのAnswerSDPをセット
- Answer側は相手からのOfferSDPをセット
const answer = new RTCSessionDescription({
    type : 'answer',
    sdp : text,
});
setAnswer(answer);
const offer = new RTCSessionDescription({
    type : 'offer',
    sdp : text,
});
setOffer(offer);
実装する際のポイント(2)
- Offerをセットする側、つまりAnswer側の処理
- まだWebRTCを利用する準備を全く行っていないので、
prepareNewConnection()のisOffer引き数をfalseで実行する - 相手から受領したSDPのセットは
setRemoteDescriptionを利用する -
OfferのSDPをセット→AnswerのSDPを生成→AnswerのSDPをセットという順番
async function setOffer(sessionDescription) {
    if (peerConnection) {
        console.error('peerConnection alreay exist!');
    }
    peerConnection = prepareNewConnection(false);
    try{
        await peerConnection.setRemoteDescription(sessionDescription);
        console.log('setRemoteDescription(answer) succsess in promise');
        makeAnswer();
    } catch(err){
        console.error('setRemoteDescription(offer) ERROR: ', err);
    }
}
実装する際のポイント(3)
- Answerをセットする側、つまりOffer側の処理
- 相手から受領したSDPを
setRemoteDescriptionでセットする
async function setAnswer(sessionDescription) {
    if (! peerConnection) {
        console.error('peerConnection NOT exist!');
        return;
    }
    try{
        await peerConnection.setRemoteDescription(sessionDescription);
        console.log('setRemoteDescription(answer) succsess in promise');
    } catch(err){
        console.error('setRemoteDescription(answer) ERROR: ', err);
    }
}
試してみる
- 手動シグナリング手順
- 2つのブラウザでアプリを開く
-
Start Videoを双方でクリック -
Offer側でConnectをクリック -
Offer側のSDP to sendのSDPをコピーしてAnswer側のSDP to receiveにペースト -
Answer側のReceive remote SDPをクリックし、SDP to sendに表示されたSDPをコピー -
Offer側のReceive remote SDPにペーストしてReceive remote SDPをクリック
WebRTCのデバッグ方法
以下の方法でデバッグができます。ぜひ手動シグナリングでP2P接続した状態で確認してみてください。
-
Chrome
chrome://webrtc-internals
-
Firefox
about:webrtc
-
Safari
- 今のところ無し
切断処理を実装する
-
./client/webrtc.jsに追記する
// WebRTCを利用する準備をする
function prepareNewConnection() {
   // :
   // :
    // ICEのステータスが変更になったときの処理
    peer.oniceconnectionstatechange = function() {
        console.log('ICE connection Status has changed to ' + peer.iceConnectionState);
        switch (peer.iceConnectionState) {
            case 'closed':
            case 'failed':
                if (peerConnection) {
                    hangUp();
                }
                break;
            case 'disconnected':
                break;
        }
    };
   // :
   // :
}

// P2P通信を切断する
function hangUp(){
    if (peerConnection) {
        if(peerConnection.iceConnectionState !== 'closed'){
            peerConnection.close();
            peerConnection = null;
            negotiationneededCounter = 0;
            cleanupVideoElement(remoteVideo);
            textForSendSdp.value = '';
            return;
        }
    }
    console.log('peerConnection is closed.');
}
   // :
   // :
// ビデオエレメントを初期化する
function cleanupVideoElement(element) {
    element.pause();
    element.srcObject = null;
}
実装する際のポイント(1)
-
prepareNewConnection()の中に新しいイベント追加する - 次ページの
close()メソッドが実行されると、実行した方と相手側双方でICEの状態が変化する-
ICEの状態がclosedになればP2P通信経路が閉じられたことになる→通信終了 - ネットワークの状態等が変更になりP2P通信経路が維持できなくなった場合には
failedとなる - 一時的に通信が切れた場合は
dissconnectedとなるが、自動的に再接続が試行されるため、切断とはみなさない
-
    // ICEのステータスが変更になったときの処理
    peer.oniceconnectionstatechange = function() {
        console.log('ICE connection Status has changed to ' + peer.iceConnectionState);
        switch (peer.iceConnectionState) {
            case 'closed':
            case 'failed':
                if (peerConnection) {
                    hangUp();
                }
                break;
            case 'dissconnected':
                break;
        }
    };
実装する際のポイント(2)
- peerConnectionオブジェクトの
close()メソッドを実行する
function hangUp(){
    if (peerConnection) {
        if(peerConnection.iceConnectionState !== 'closed'){
            peerConnection.close();
            peerConnection = null;
            negotiationneededCounter = 0;
            cleanupVideoElement(remoteVideo);
            textForSendSdp.value = '';
            return;
        }
    }
    console.log('peerConnection is closed.');
}
ICEのステータス遷移(参考)
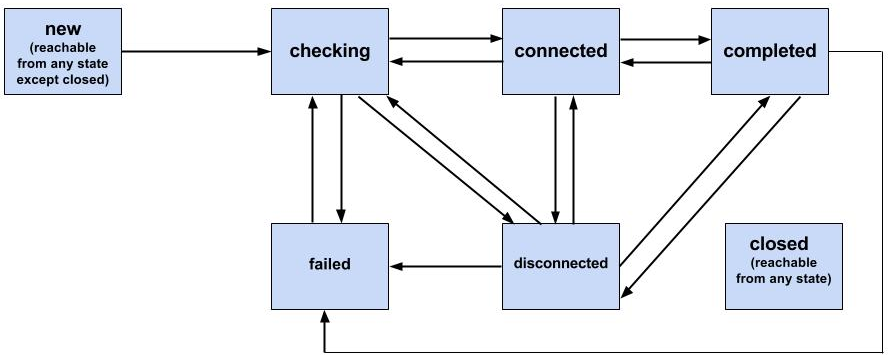
引用元:https://www.w3.org/TR/webrtc/#idl-def-rtcicetransport
STEP3
シグナリングサーバを作成しよう
STEP2では手動でSDPをコピペし、WebRTCをつなげるところを実装しました。STEP3ではシグナリングサーバを実装し、SDPの交換を自動で実施できるようにします。
シグナリングサーバとは?
シグナリングサーバには以下のような機能があるべきです。
- SDP、Candidate情報を交換するための仲介者
- 接続してくるクライアントの管理
- 電話で言うと電話番号を管理するイメージ
- だれがだれとWebRTCをつなげたいのかを把握し適切な相手に必要な情報を転送する
今回のハンズオンでは時間も限られているので以下の機能のみ実装します
- SDP、Candidate情報を交換するための仲介者
シグナリングサーバを実装する
-
./server/signaing.jsに追記する - node+wsで簡易シグナリングサーバ
"use strict";

const WebSocketServer = require('ws').Server;
const port = 3001;
const wsServer = new WebSocketServer({ port: port });

wsServer.on('connection', function(ws) {
    console.log('-- websocket connected --');
    ws.on('message', function(message) {
        wsServer.clients.forEach(function each(client) {
            if (isSame(ws, client)) {
                console.log('- skip sender -');
            }
            else {
                client.send(message);
            }
        });
    });
});

function isSame(ws1, ws2) {
    // -- compare object --
    return (ws1 === ws2);
}

console.log('websocket server start. port=' + port);
実装する際のポイント(1)
- WebSocketにてサーバに接続しメッセージを送るともう片方に転送される
- 接続管理は全く行っていないので、利用する際は必ず2クライアントが接続した状態で実施すること
- こんな感じで動けばOK
$ node ./signaling.js
websocket server start. port=3001
:
:
-
wsモジュールが無くて動かない場合は事前にnpm install wsとかでインストールしてあげてください
node が使えない場合
-
@massie_g さんがChromeアプリ版の簡易シグナリングサーバを公開されているので、そちらをご利用ください。
- https://chrome.google.com/webstore/detail/simple-message-server/bihajhgkmpfnmbmdnobjcdhagncbkmmp
- Chromeに追加し実行すると
ws://localhost:3001/でクライアントからの接続を待ちます
STEP4
シグナリングサーバを使ってWebRTCをつなげよう
- STEP1で作成した手動シグナリングのソースコードを修正し、シグナリングサーバに対応させます。
- ICEの処理をTrickle ICE方式に変更します。
- 同じファイルを修正していくので、今の動くコードは別のファイルに退避することを勧めします。
シグナリングサーバへ接続する処理を実装する
-
client/webrtc.jsに追記する
const wsUrl = 'ws://localhost:3001/';
const ws = new WebSocket(wsUrl);
ws.onopen = (evt) => {
    console.log('ws open()');
};
ws.onerror = (err) => {
    console.error('ws onerror() ERR:', err);
};
ws.onmessage = (evt) => {
    console.log('ws onmessage() data:', evt.data);
    const message = JSON.parse(evt.data);
    switch(message.type){
        case 'offer': {
            console.log('Received offer ...');
            textToReceiveSdp.value = message.sdp;
            setOffer(message);
            break;
        }
        case 'answer': {
            console.log('Received answer ...');
            textToReceiveSdp.value = message.sdp;
            setAnswer(message);
            break;
        }
        case 'candidate': {
            console.log('Received ICE candidate ...');
            const candidate = new RTCIceCandidate(message.ice);
            console.log(candidate);
            addIceCandidate(candidate);
            break;
        }
        default: {
            console.log("Invalid message");
            break;
         }
    }
};
実装する際のポイント(1)
-
ws.onmessageでシグナリングサーバからメッセージを受信した際のイベントを定義する -
offer、answerそれぞれのメッセージを受信した際には、setOffer()、setAnswer()する - Trickle ICEで
ICE candidateメッセージを受信した場合は、RTCIceCandidateを使ってオブジェクト化しaddIceCandidate()を実行する
    switch(message.type){
        case 'offer': {
            console.log('Received offer ...');
            textToReceiveSdp.value = message.sdp;
            setOffer(message);
            break;
        }
        case 'answer': {
            console.log('Received answer ...');
            textToReceiveSdp.value = message.sdp;
            setAnswer(message);
            break;
        }
        case 'candidate': {
            console.log('Received ICE candidate ...');
            const candidate = new RTCIceCandidate(message.ice);
            console.log(candidate);
            addIceCandidate(candidate);
            break;
        }
        default: {
            console.log("Invalid message");
            break;
         }
    }
ICE candidate 送信時、受信時の処理を追加する
-
client/webrtc.jsに追記する
// ICE candaidate受信時にセットする
function addIceCandidate(candidate) {
    if (peerConnection) {
        peerConnection.addIceCandidate(candidate);
    }
    else {
        console.error('PeerConnection not exist!');
        return;
    }
}

// ICE candidate生成時に送信する
function sendIceCandidate(candidate) {
    console.log('---sending ICE candidate ---');
    const message = JSON.stringify({ type: 'candidate', ice: candidate });
    console.log('sending candidate=' + message);
    ws.send(message);
}
実装のポイント(1)
- ICE candidateを受信したら、都度
addIceCandidateを利用してブラウザにセットしていく
peerConnection.addIceCandidate(candidate);
- ICE candidate生成時には、JSONに変換しシグナリングサーバに送信
    const message = JSON.stringify({ type: 'candidate', ice: candidate });
    ws.send(message);
SDP交換時の処理を修正する
-
client/webrtc.jsを修正する
function sendSdp(sessionDescription) {
    console.log('---sending sdp ---');
    textForSendSdp.value = sessionDescription.sdp;
    /*---
     textForSendSdp.focus();
     textForSendSdp.select();
     ----*/
    const message = JSON.stringify(sessionDescription);
    console.log('sending SDP=' + message);
    ws.send(message);
}
実装する際のポイント(1)
- Textエリアへの表示とともに、JSONに変換しシグナリングサーバに送信する
    const message = JSON.stringify(sessionDescription);
    console.log('sending SDP=' + message);
    ws.send(message);
peer.onicecandidateを修正する
-
client/webrtc.jsを修正する
peer.onicecandidate = evt => {
    if (evt.candidate) {
        console.log(evt.candidate);
        sendIceCandidate(evt.candidate);
    } else {
        console.log('empty ice event');
        // sendSdp(peer.localDescription);
    }
};
実装する際のポイント(1)
-
onicecandidateが発火する度にsendIceCandidateを利用してICE Candidateをシグナリングサーバに送信する - Vanilla ICEにて最後にまとめて送信してた処理はコメントアウトする
        if (evt.candidate) {
            console.log(evt.candidate);
            sendIceCandidate(evt.candidate);
        } else {
切断処理を高速化する
-
client/webrtc.jsを修正する
// P2P通信を切断する
function hangUp(){
    if (peerConnection) {
        if(peerConnection.iceConnectionState !== 'closed'){
            peerConnection.close();
            peerConnection = null;
            negotiationneededCounter = 0;
            const message = JSON.stringify({ type: 'close' });
            console.log('sending close message');
            ws.send(message);
            cleanupVideoElement(remoteVideo);
            textForSendSdp.value = '';
            textToReceiveSdp.value = '';
            return;
        }
    }
    console.log('peerConnection is closed.');
}
ws.onmessage = function(evt) {
  // :
    case 'close': {
        console.log('peer is closed ...');
        hangUp();
        break;
    }
    default: {
        console.log("Invalid message");
        break;
    }
};
実装する際のポイント(1)
- シグナリングサーバを利用して切断する意図を相手に伝えることで切断処理を高速化する
if(peerConnection.iceConnectionState !== 'closed'){
      // :
    const message = JSON.stringify({ type: 'close' });
    console.log('sending close message');
    ws.send(message);
      // :
}
実装する際のポイント(2)
- closeメッセージを受信した場合、
hangUp()を実行しリニアに切断処理を行う
ws.onmessage = function(evt) {
  // :
    case 'close': {
        console.log('peer is closed ...');
        hangUp();
        break;
    }
  // :
};
試してみる
- シグナリングサーバを使った接続
- シグナリングサーバを起動する
- 2つのブラウザでアプリを開く
-
Start Videoを双方でクリック -
Offer側でConnectをクリック
まだ時間に余裕がある方!
- 応用編の課題を用意しています。ぜひ挑戦してみてください!