はじめに
Googleカレンダー便利ですよね。
プロジェクトにGoogleの非公開カレンダーを使ってスケジュールを管理できたら便利かと思いAPIを使って実装してみることにしました。
まず今回PHPライブラリーgoogle-api-php-clientを使用します。
こちらのバージョンが2.0になり多くの変更点がありました。
(※2017/02/24現在ver.v2.1.2)
webで公開されている情報の多くがv2.0以降に対応していないので以前のソースコードを使用して実装するとエラーが発生し接続ができません。
ということでGoogle社より公開されているクイックスタートを元に接続を行いたいと思います。
こちらのサンプルコードは最終的に接続したカレンダーの日付の近い予定を最大10件分表示することができます。
https://developers.google.com/google-apps/calendar/quickstart/php
必要な環境
- コマンドライン
- PHP5.4以上
- Composer
- インターネット環境(今回はmacを使用します。)
- Googleカレンダーを有効にしたGoogleアカウント
事前準備
1.PCにComposerをインストール
2.作業用ディレクトリの作成
3.作業用ディレクトリにcomposer.pharをインストール
$ curl -s http://getcomposer.org/installer | php
Google カレンダーAPIの設定
非公開カレンダーにアクセスする場合GoogleカレンダーAPIの設定が必要になります。
Google APIsより設定を行います。
1.**[Project]より[プロジェクトを作成]**を選択。
プロジェクト名に任意の名前をつけます。

2.ライブラリの画面に遷移しCalendarと入力すると表示される Google Calendar API を選択して追加。 [有効にする] を選択します。

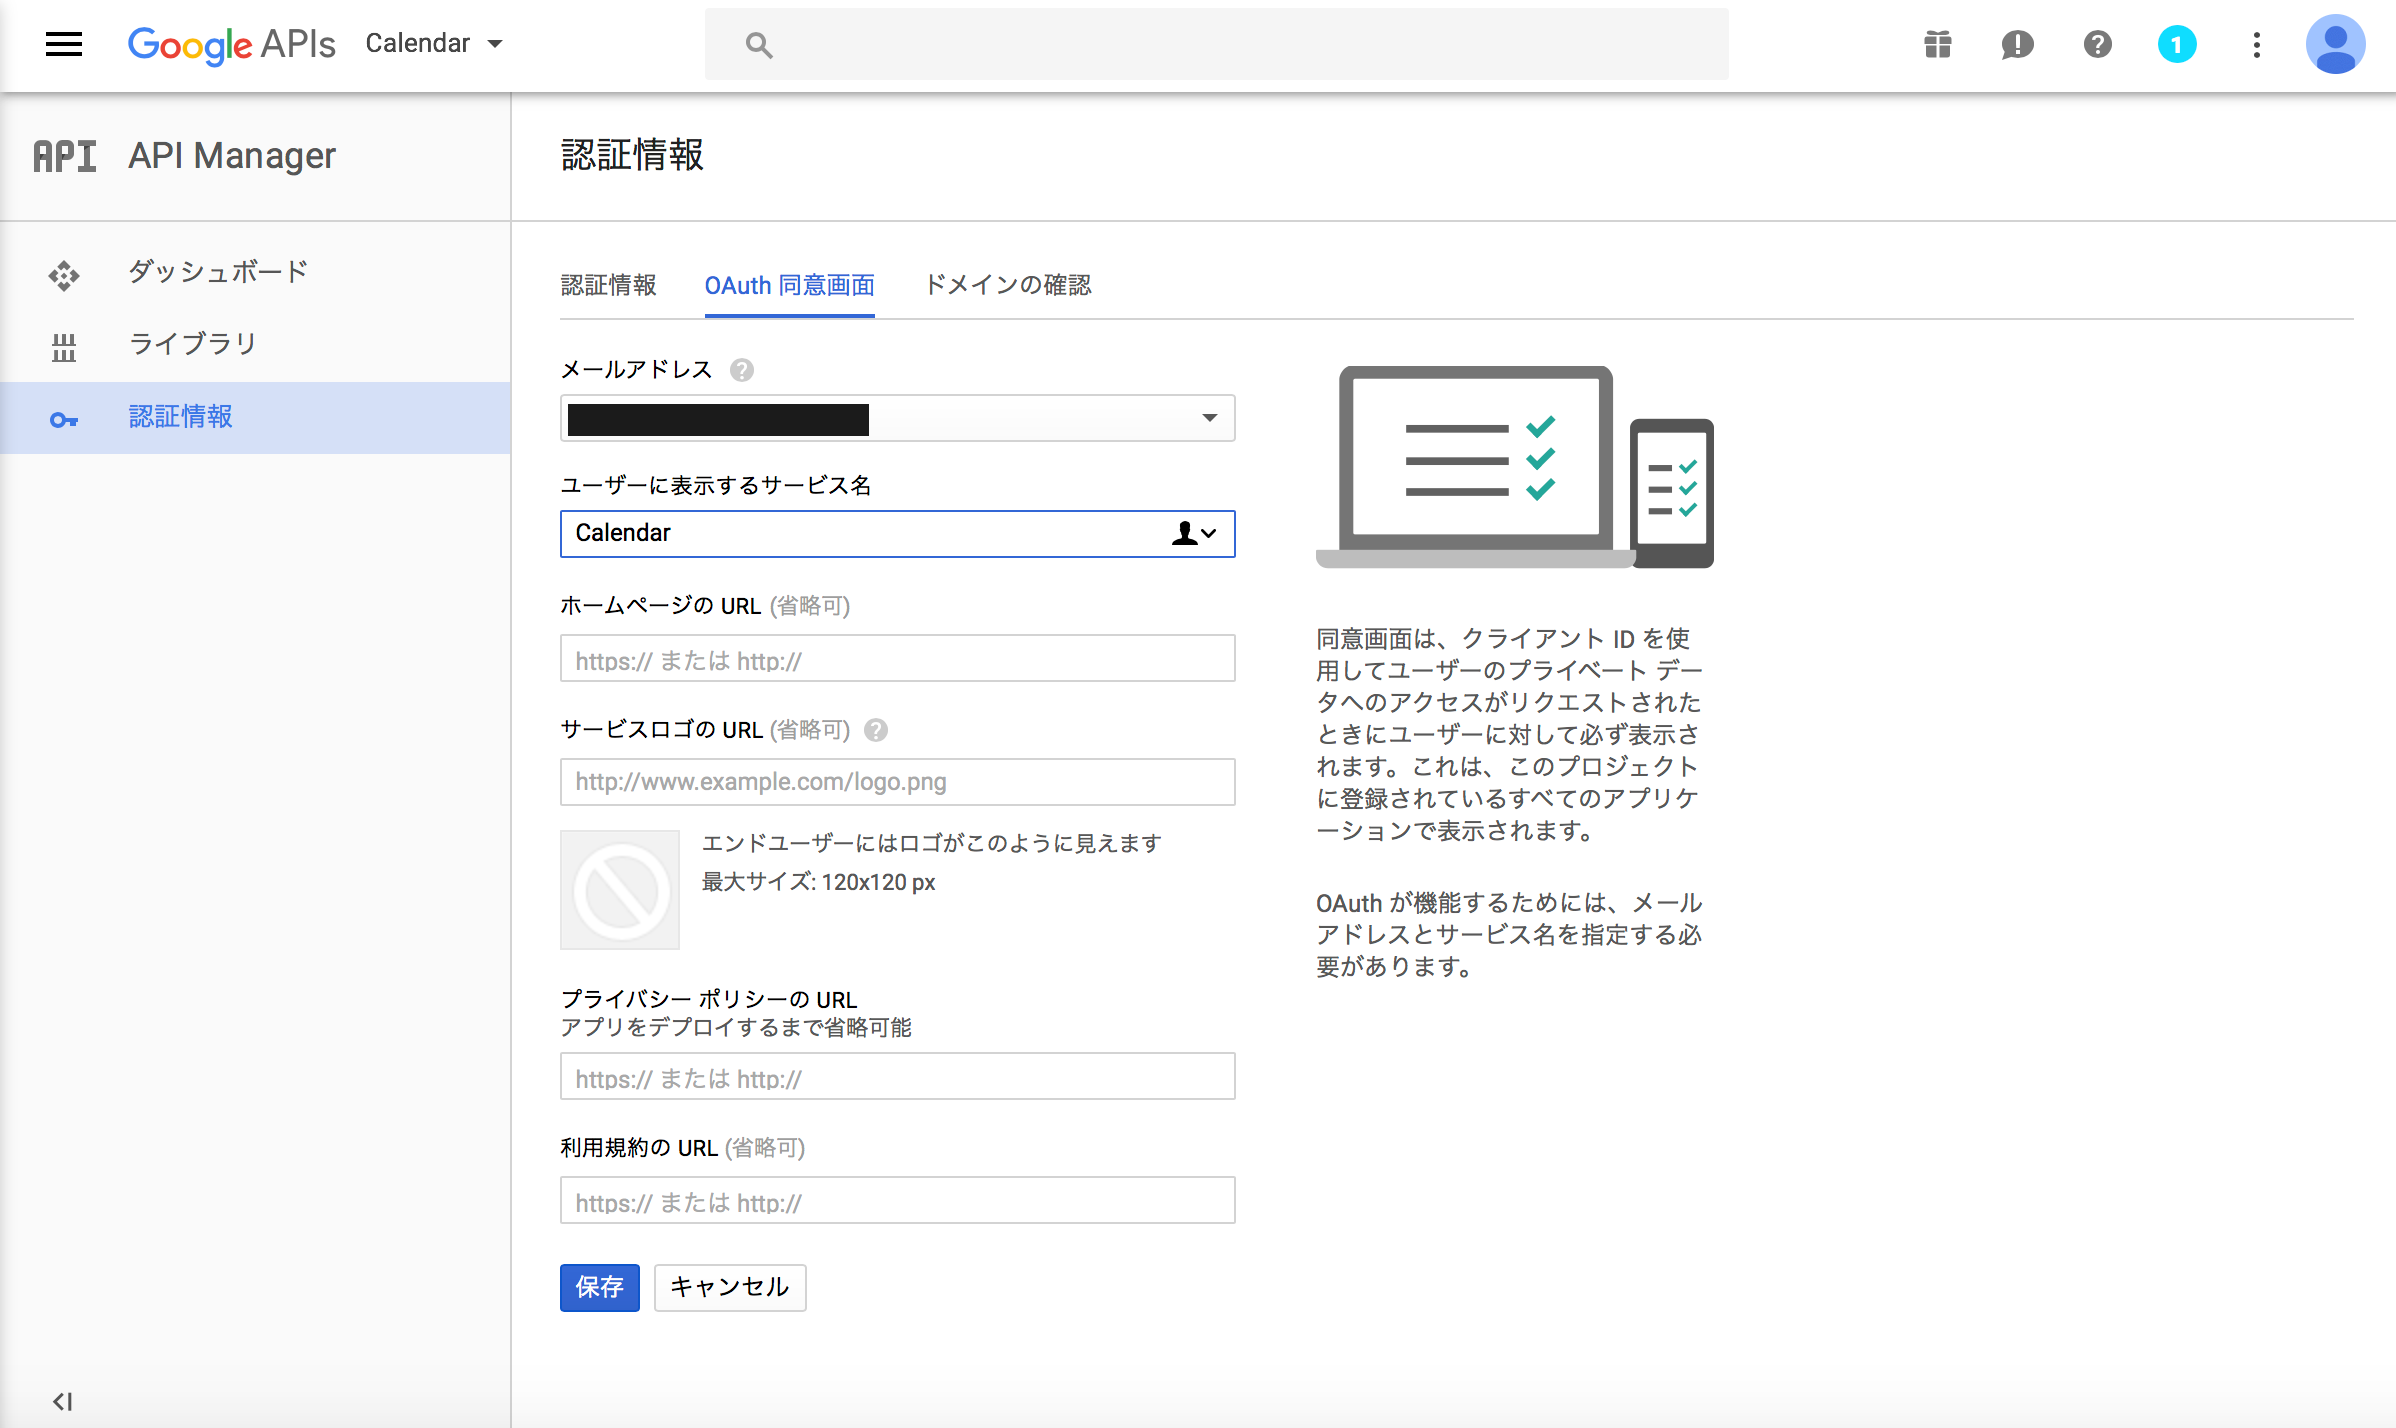
3.[認証情報] の画面に遷移し [OAuth同意] タブに移動。 [ユーザーに表示するサービス名] に任意の名前を入力し、 [保存] を選択。
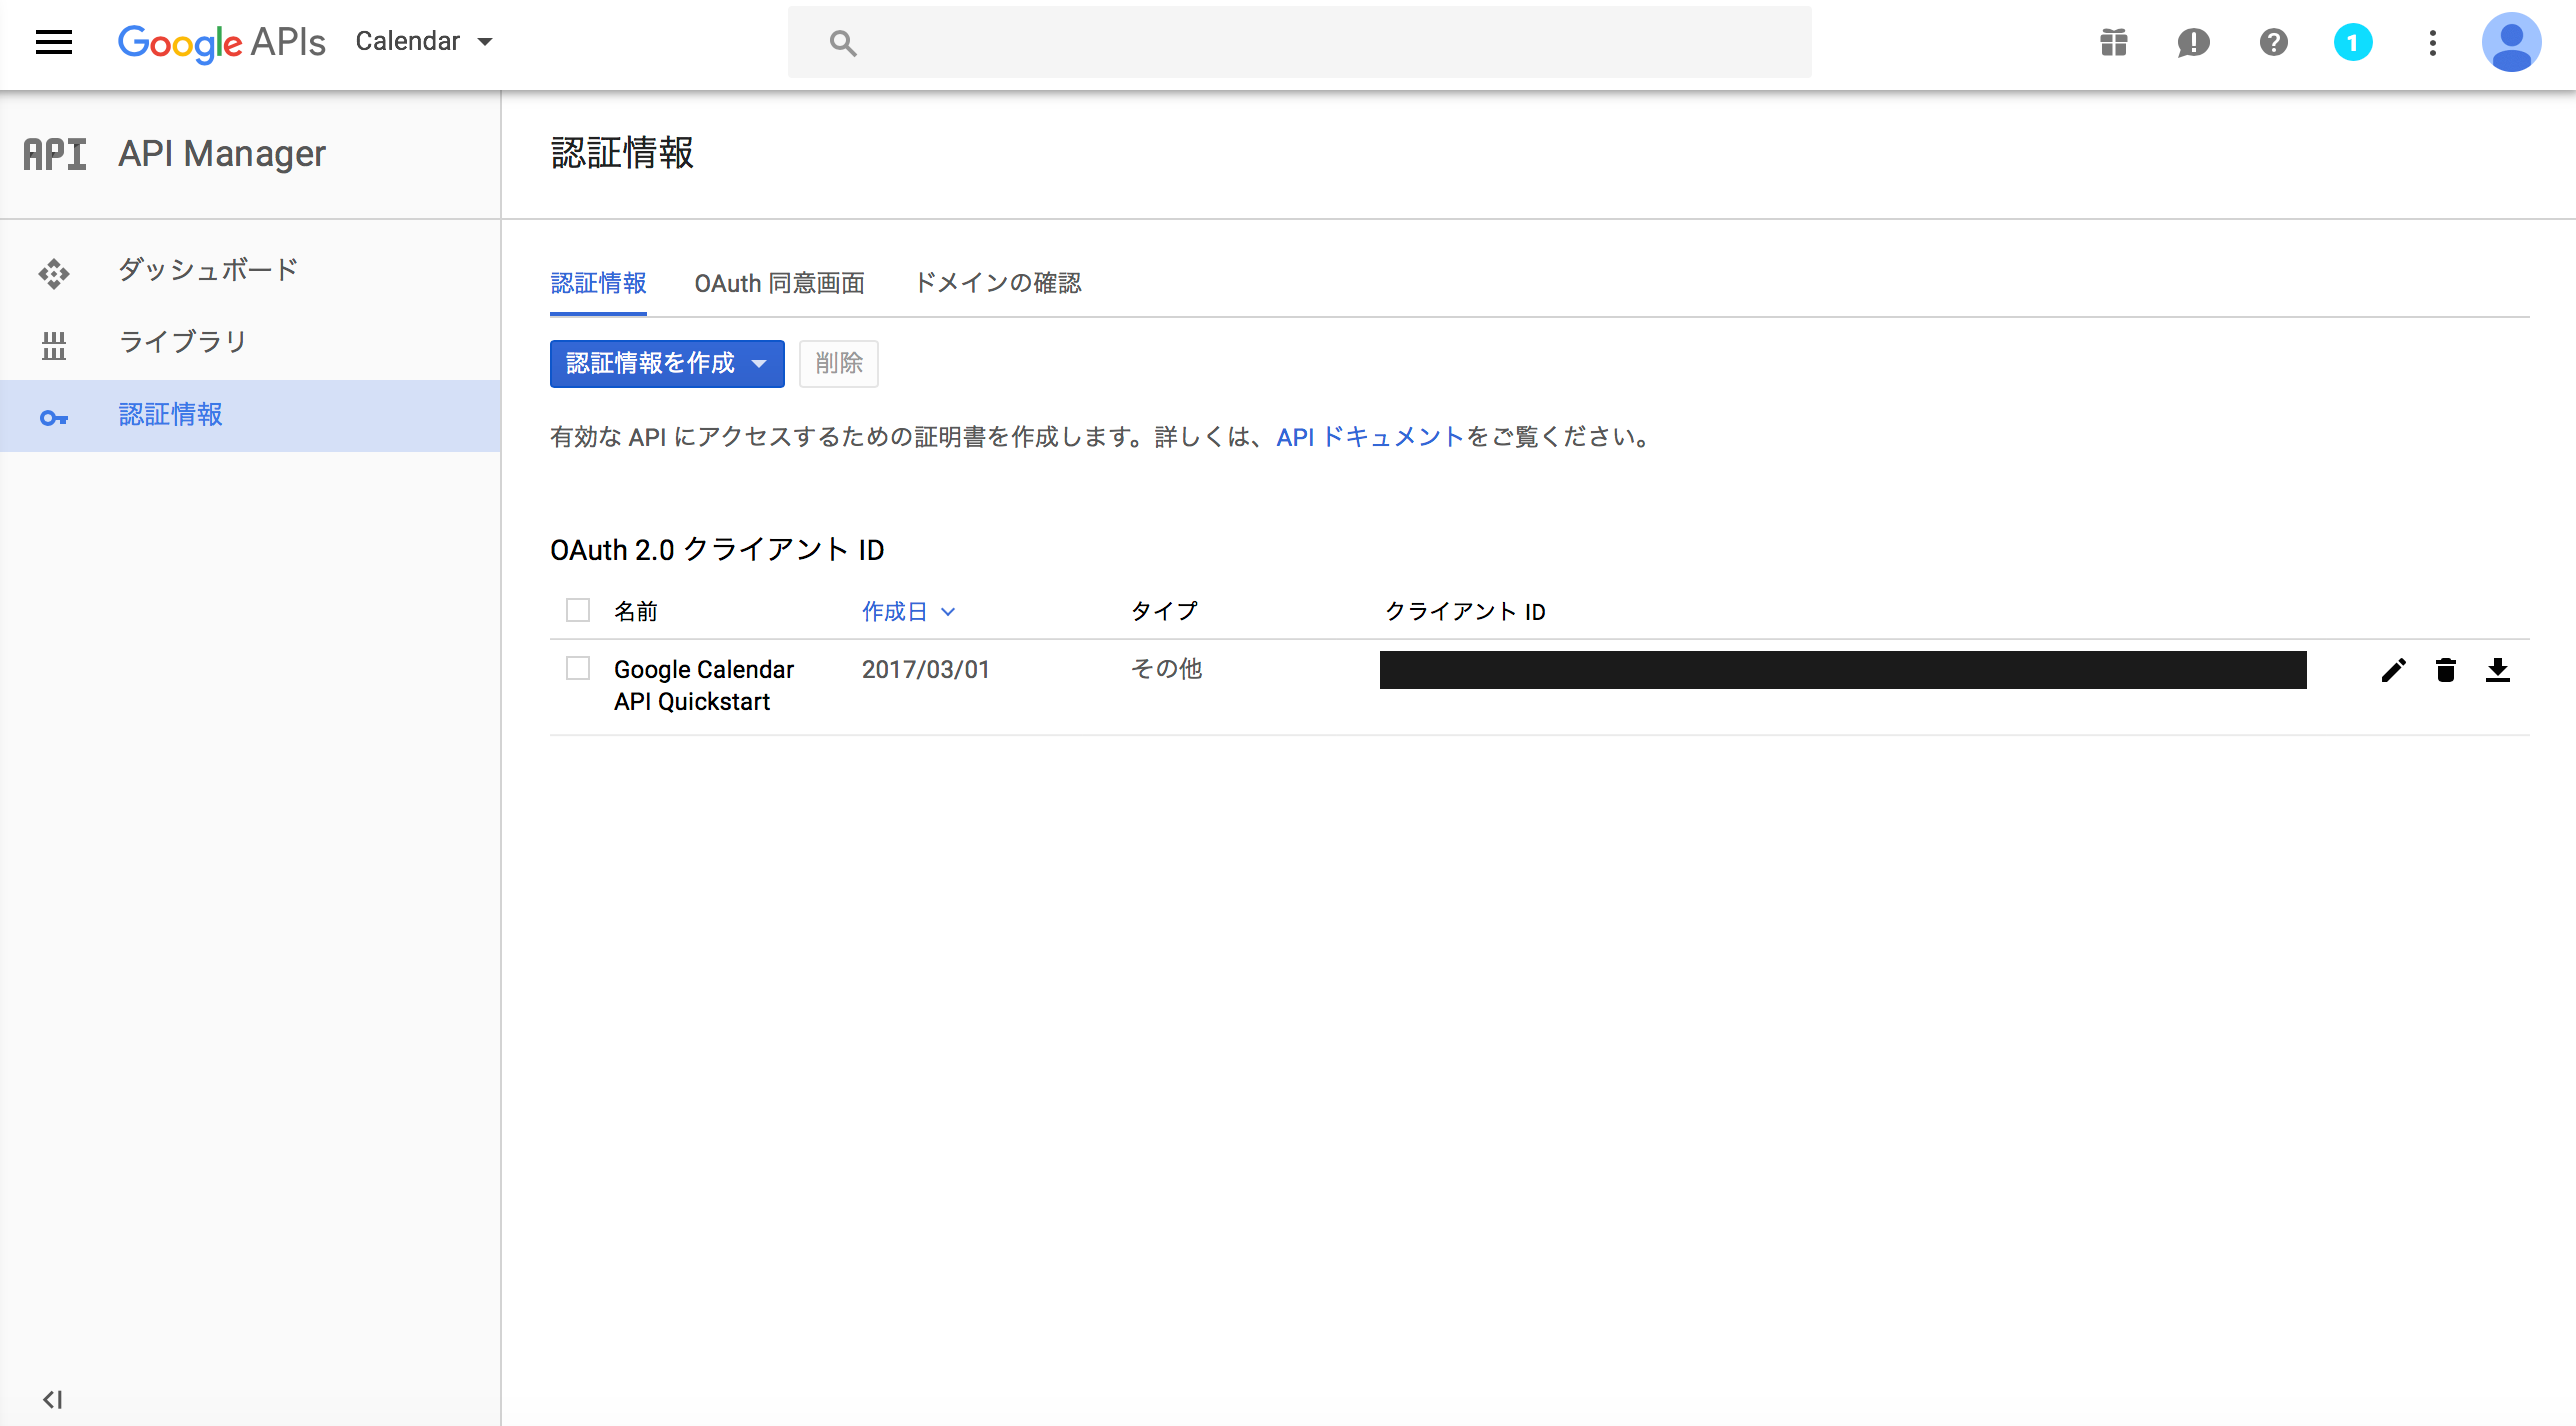
- **[認証情報]の画面に遷移し[認証情報を作成]から[OAuthクライアントID]**を選択。

5.[その他]を選択して任意の名前をつけ作成を選択。(ウェブ アプリケーションでも可)

6.その後表示される認証情報の画面の右側ダウンロードアイコンをクリックするとjsonファイルがダウンロードされます。こちらのファイルを任意の名前に変更。ここではclient_secret.jsonと設定しプロジェクト内に移動させます。
Googleクライアントライブラリをのインストール
作業用ディレクトリにて下記コマンドを実行することでComposerを使用しGoogleクライアントライブラリをインストールします。
php composer.phar require google/apiclient:^2.0
サンプルコードの作成
任意の名前でphpファイルを作成ここでは quickstart.phpと設定し下記コードを記載します。
require_once __DIR__ . '/vendor/autoload.php';


define('APPLICATION_NAME', 'Google Calendar API PHP Quickstart');
define('CREDENTIALS_PATH', '~/.credentials/calendar-php-quickstart.json');
define('CLIENT_SECRET_PATH', __DIR__ . '/client_secret.json');
// If modifying these scopes, delete your previously saved credentials
// at ~/.credentials/calendar-php-quickstart.json
define('SCOPES', implode(' ', array(
  Google_Service_Calendar::CALENDAR_READONLY)
));

if (php_sapi_name() != 'cli') {
  throw new Exception('This application must be run on the command line.');
}

/**
 * Returns an authorized API client.
 * @return Google_Client the authorized client object
 */
function getClient() {
  $client = new Google_Client();
  $client->setApplicationName(APPLICATION_NAME);
  $client->setScopes(SCOPES);
  $client->setAuthConfig(CLIENT_SECRET_PATH);
  $client->setAccessType('offline');

  // Load previously authorized credentials from a file.
  $credentialsPath = expandHomeDirectory(CREDENTIALS_PATH);
  if (file_exists($credentialsPath)) {
    $accessToken = json_decode(file_get_contents($credentialsPath), true);
  } else {
    // Request authorization from the user.
    $authUrl = $client->createAuthUrl();
    printf("Open the following link in your browser:\n%s\n", $authUrl);
    print 'Enter verification code: ';
    $authCode = trim(fgets(STDIN));

    // Exchange authorization code for an access token.
    $accessToken = $client->fetchAccessTokenWithAuthCode($authCode);

    // Store the credentials to disk.
    if(!file_exists(dirname($credentialsPath))) {
      mkdir(dirname($credentialsPath), 0700, true);
    }
    file_put_contents($credentialsPath, json_encode($accessToken));
    printf("Credentials saved to %s\n", $credentialsPath);
  }
  $client->setAccessToken($accessToken);

  // Refresh the token if it's expired.
  if ($client->isAccessTokenExpired()) {
    $client->fetchAccessTokenWithRefreshToken($client->getRefreshToken());
    file_put_contents($credentialsPath, json_encode($client->getAccessToken()));
  }
  return $client;
}

/**
 * Expands the home directory alias '~' to the full path.
 * @param string $path the path to expand.
 * @return string the expanded path.
 */
function expandHomeDirectory($path) {
  $homeDirectory = getenv('HOME');
  if (empty($homeDirectory)) {
    $homeDirectory = getenv('HOMEDRIVE') . getenv('HOMEPATH');
  }
  return str_replace('~', realpath($homeDirectory), $path);
}

// Get the API client and construct the service object.
$client = getClient();
$service = new Google_Service_Calendar($client);

// Print the next 10 events on the user's calendar.
$calendarId = 'primary';
$optParams = array(
  'maxResults' => 10,
  'orderBy' => 'startTime',
  'singleEvents' => TRUE,
  'timeMin' => date('c'),
);
$results = $service->events->listEvents($calendarId, $optParams);

if (count($results->getItems()) == 0) {
  print "No upcoming events found.\n";
} else {
  print "Upcoming events:\n";
  foreach ($results->getItems() as $event) {
    $start = $event->start->dateTime;
    if (empty($start)) {
      $start = $event->start->date;
    }
    printf("%s (%s)\n", $event->getSummary(), $start);
  }
}
コマンドラインでこちらのファイルを実行します。
php quickstart.php
上手くいくと下記のようなコマンドが表示されます。
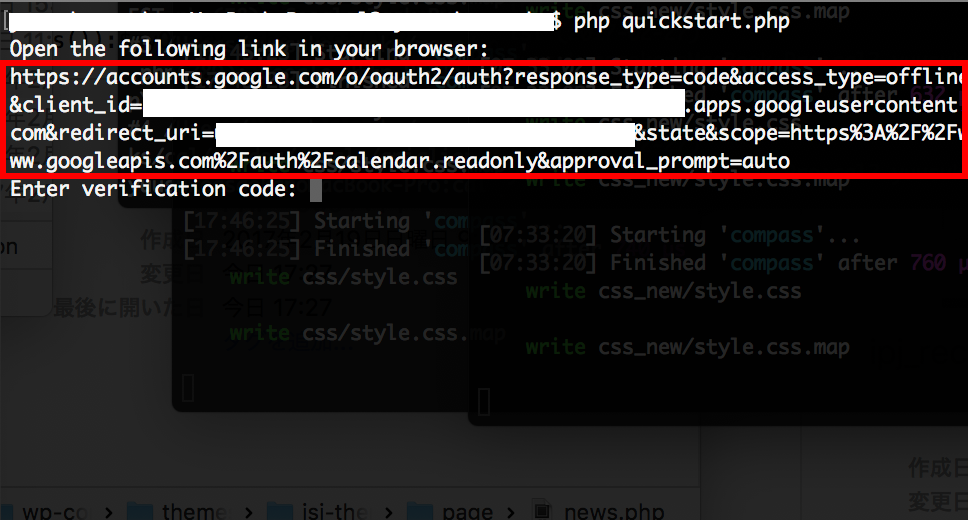
こちらに表示されたURLをブラウザを使用してアクセスします。
すると認証画面に遷移します。認証を許可するとブラウザ画面にコードが表示されます。
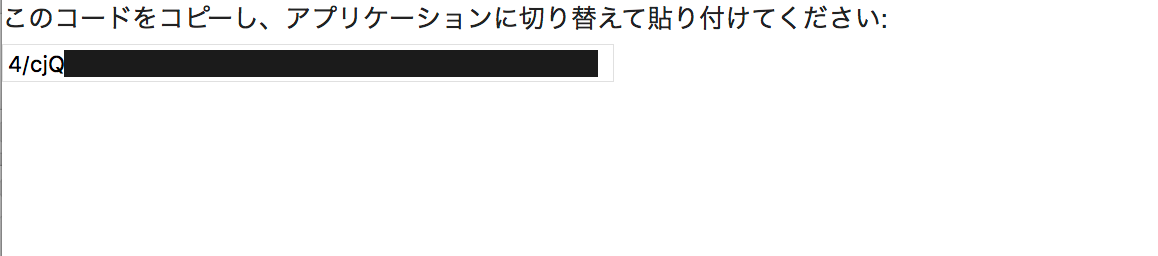
こちらのコードを先程のコマンドラインに打ち込んで実行を行うと認証が完了。
無事カレンダーに登録している情報が表示されました。

備考
※ブラウザで実行する場合
下記の部分を削除して実行。
if (php_sapi_name() != 'cli') {
  throw new Exception('This application must be run on the command line.');
}
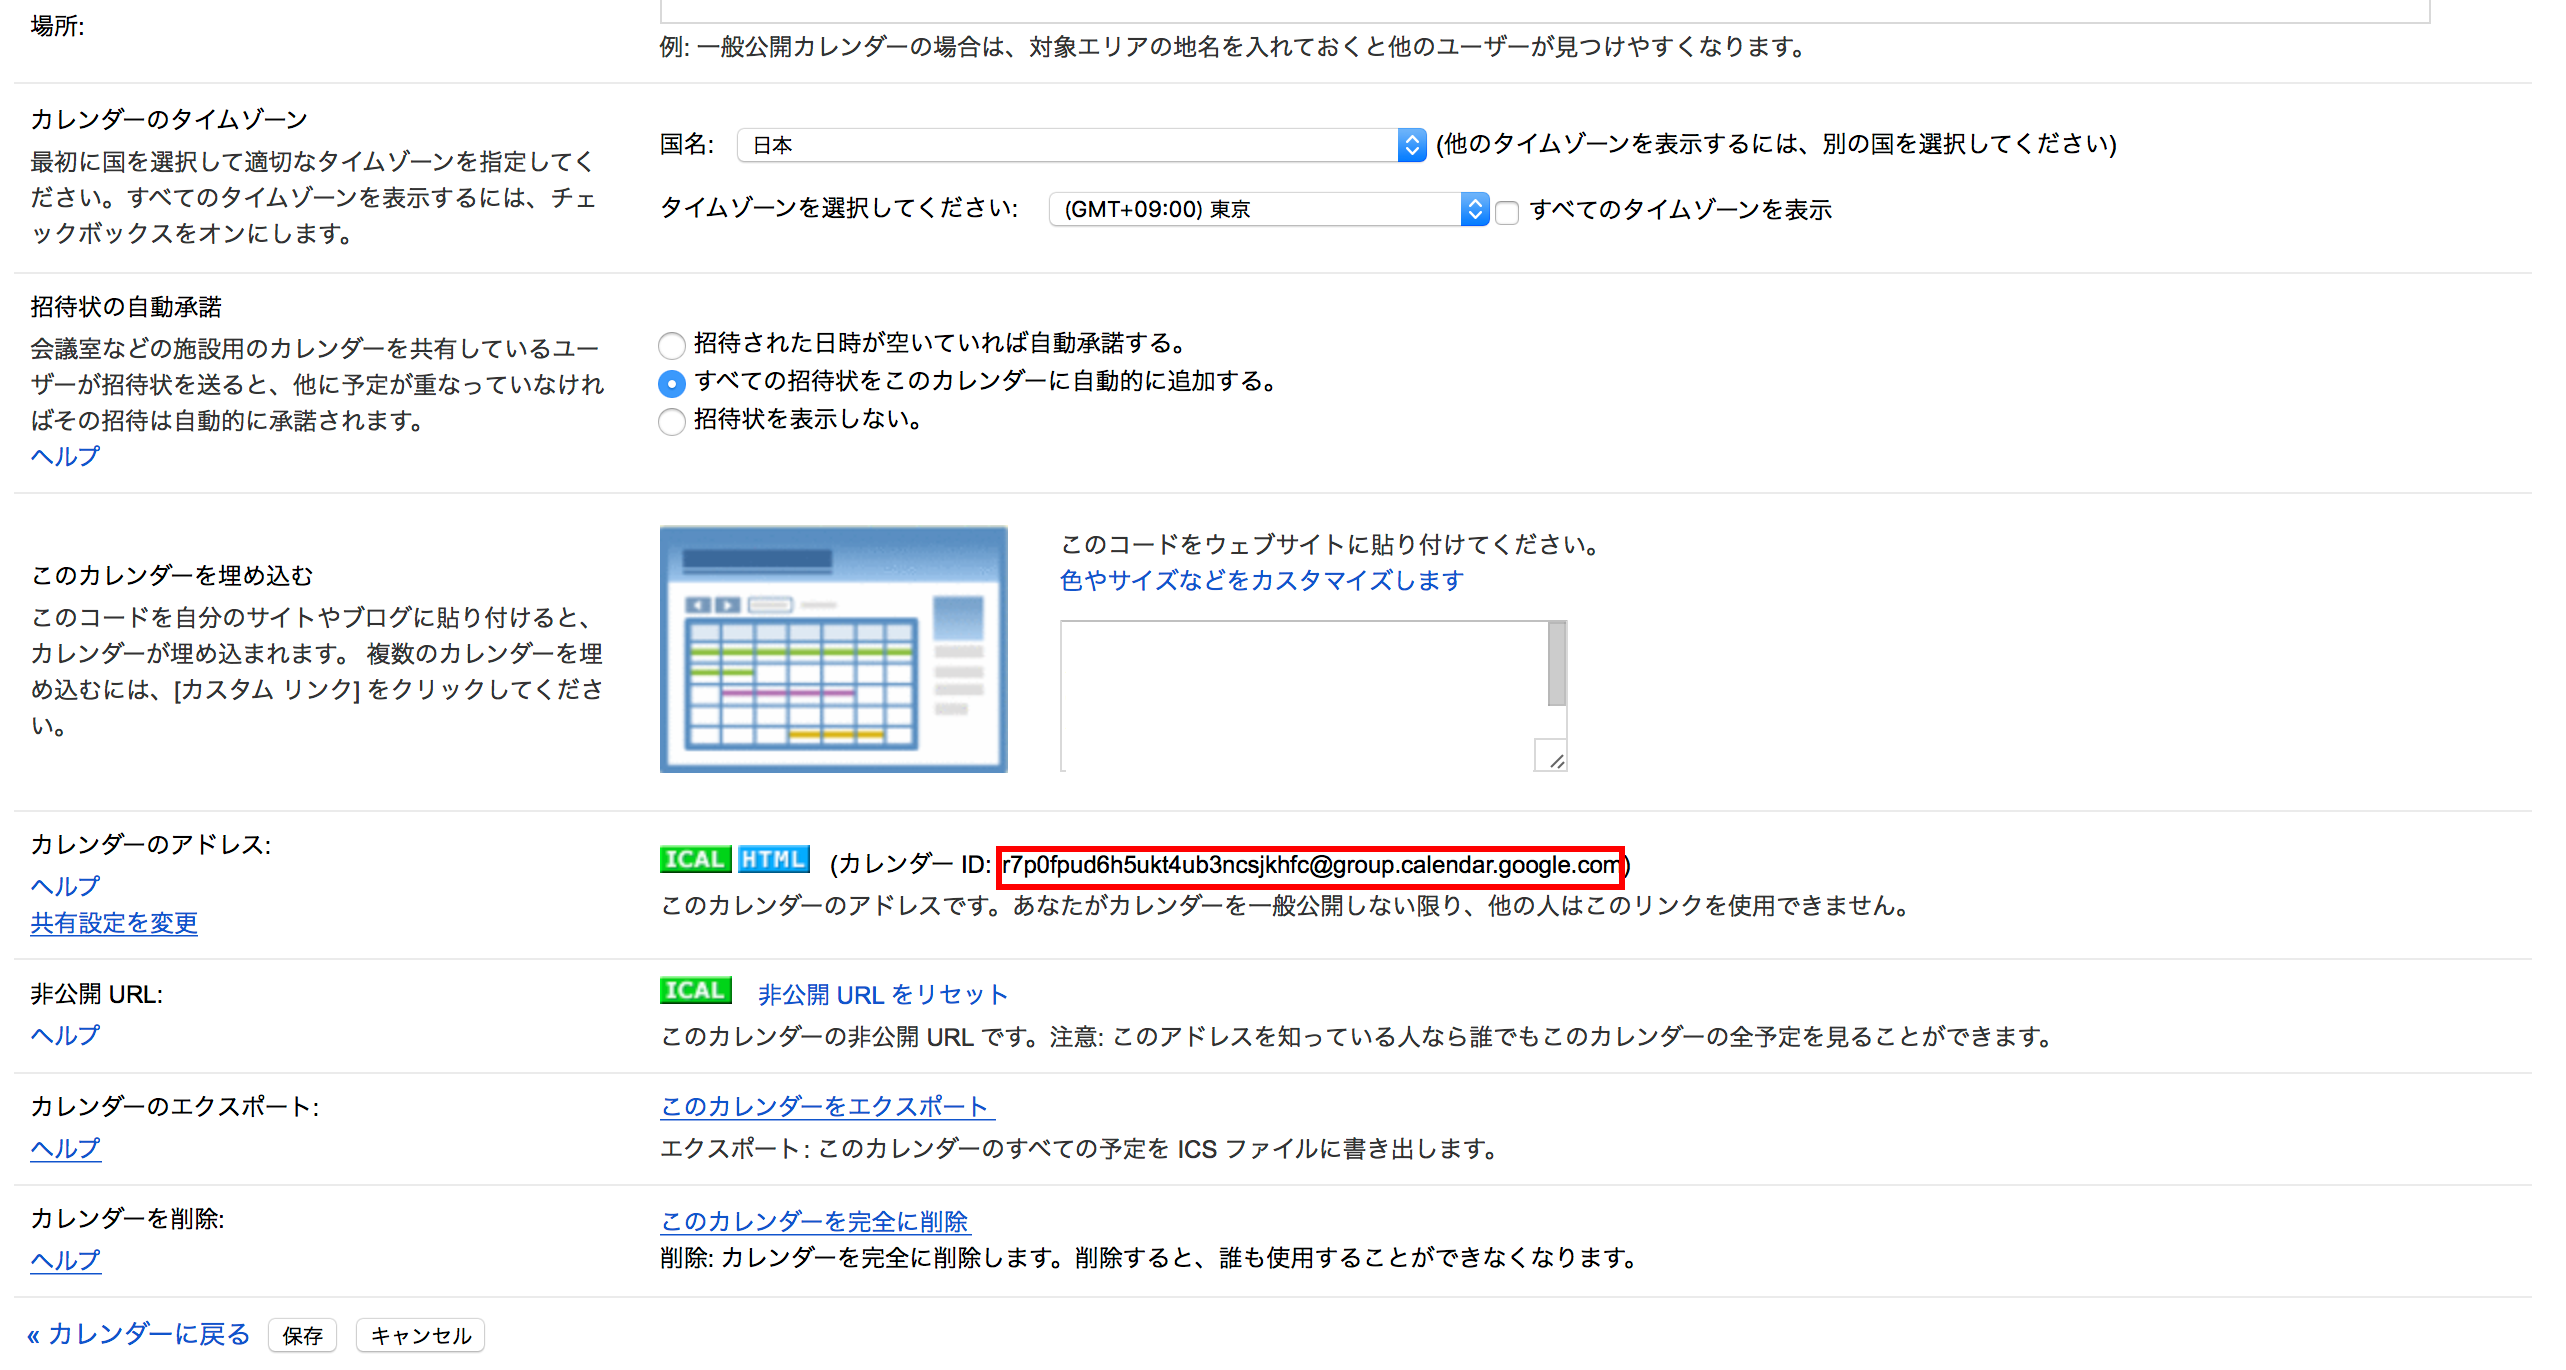
※同アカウントの別カレンダーの読み込み
Googleカレンダーより**[設定]→[カレンダー]より指定のカレンダー名を選択。
カレンダーIDが表示されるのでコード内のprimary**をカレンダーIDに変更。
$calendarId = 'primary';
※認証について
calendar-php-quickstart.json
に登録されるようなので2回目以降は認証は不要です。
サーバー上に設置する際は上書きできるようパーミッションの設定には注意してください。
※取得できる情報
こちらに色々載っておりますので参考にしてみてください。
https://developers.google.com/google-apps/calendar/v3/reference/