PHPでWebアプリを作っています.
ケチなので全部タダでやりたくてbitbucketを使っています.
今回,CIをやりたくなったのでタダでできるCIサービスを探したらWerckerが良さそうとのことだったので使ってみました.
PHP用の情報が少なくて苦労しました(最新版の公式ドキュメントの言語別ページにはそもそもphpが無かった).
構成
メインのアプリはprivateで開発したいのでbitbucketのプライベートリポジトリを使いつつ,
一部のコードをライブラリ化してgithubで公開しています.
なので,
- メインのリポジトリはBitbucketのプライベートリポジトリ
- submoduleとしてgithubのパブリックリポジトリを参照している
という構成になっています.
また,PHPを使っていて,フレームワークはFuelPHP,PHPUnit用のテストコードがあります.DBはMySQLです.(この記事の内容は他のフレームワークにも応用できます)
bitbucketにpushするたびにPHPUnitを走らせるCI環境を作りたいと思います.
Werckerの登録・設定
werckerに登録してアプリケーションの設定をしていきます.
この辺は他のページに解説があるので詳細は省略.
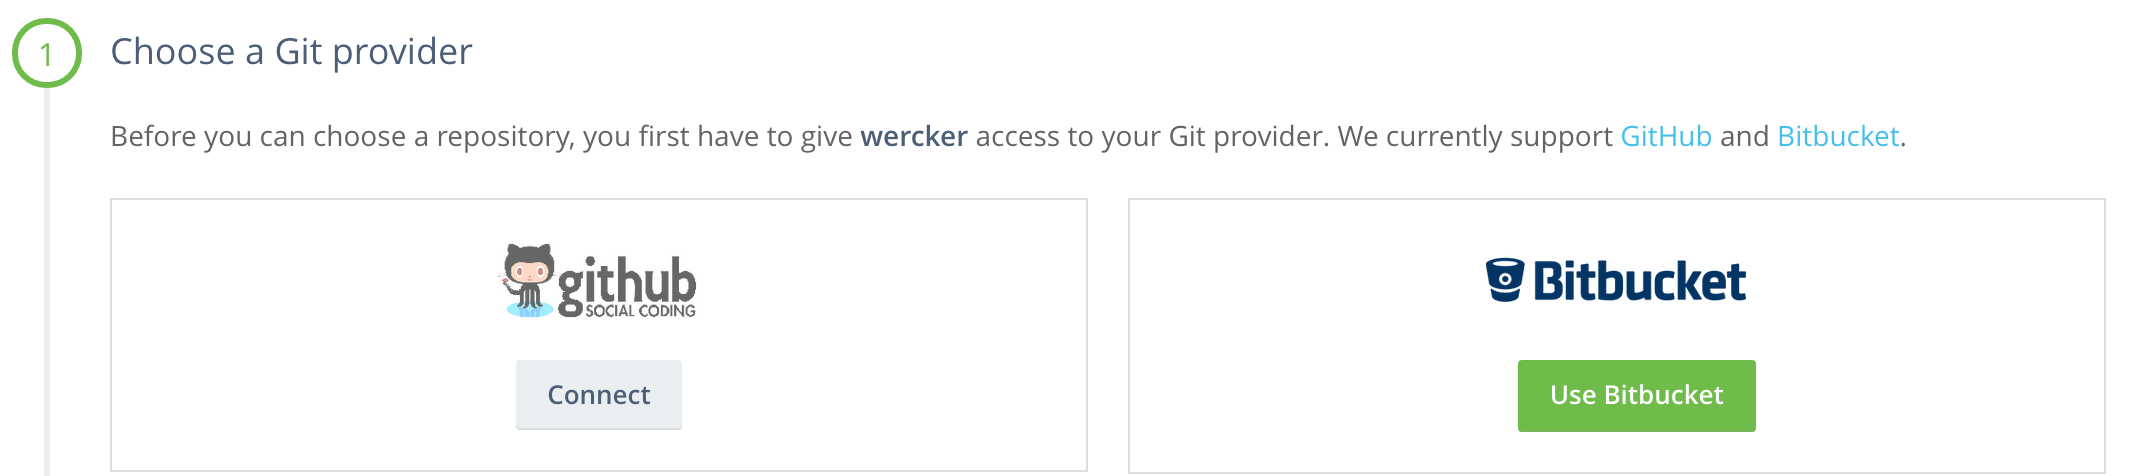
1.Choose a Git provider ではメインのアプリがbitbucketなのでbitbucketを選びます.
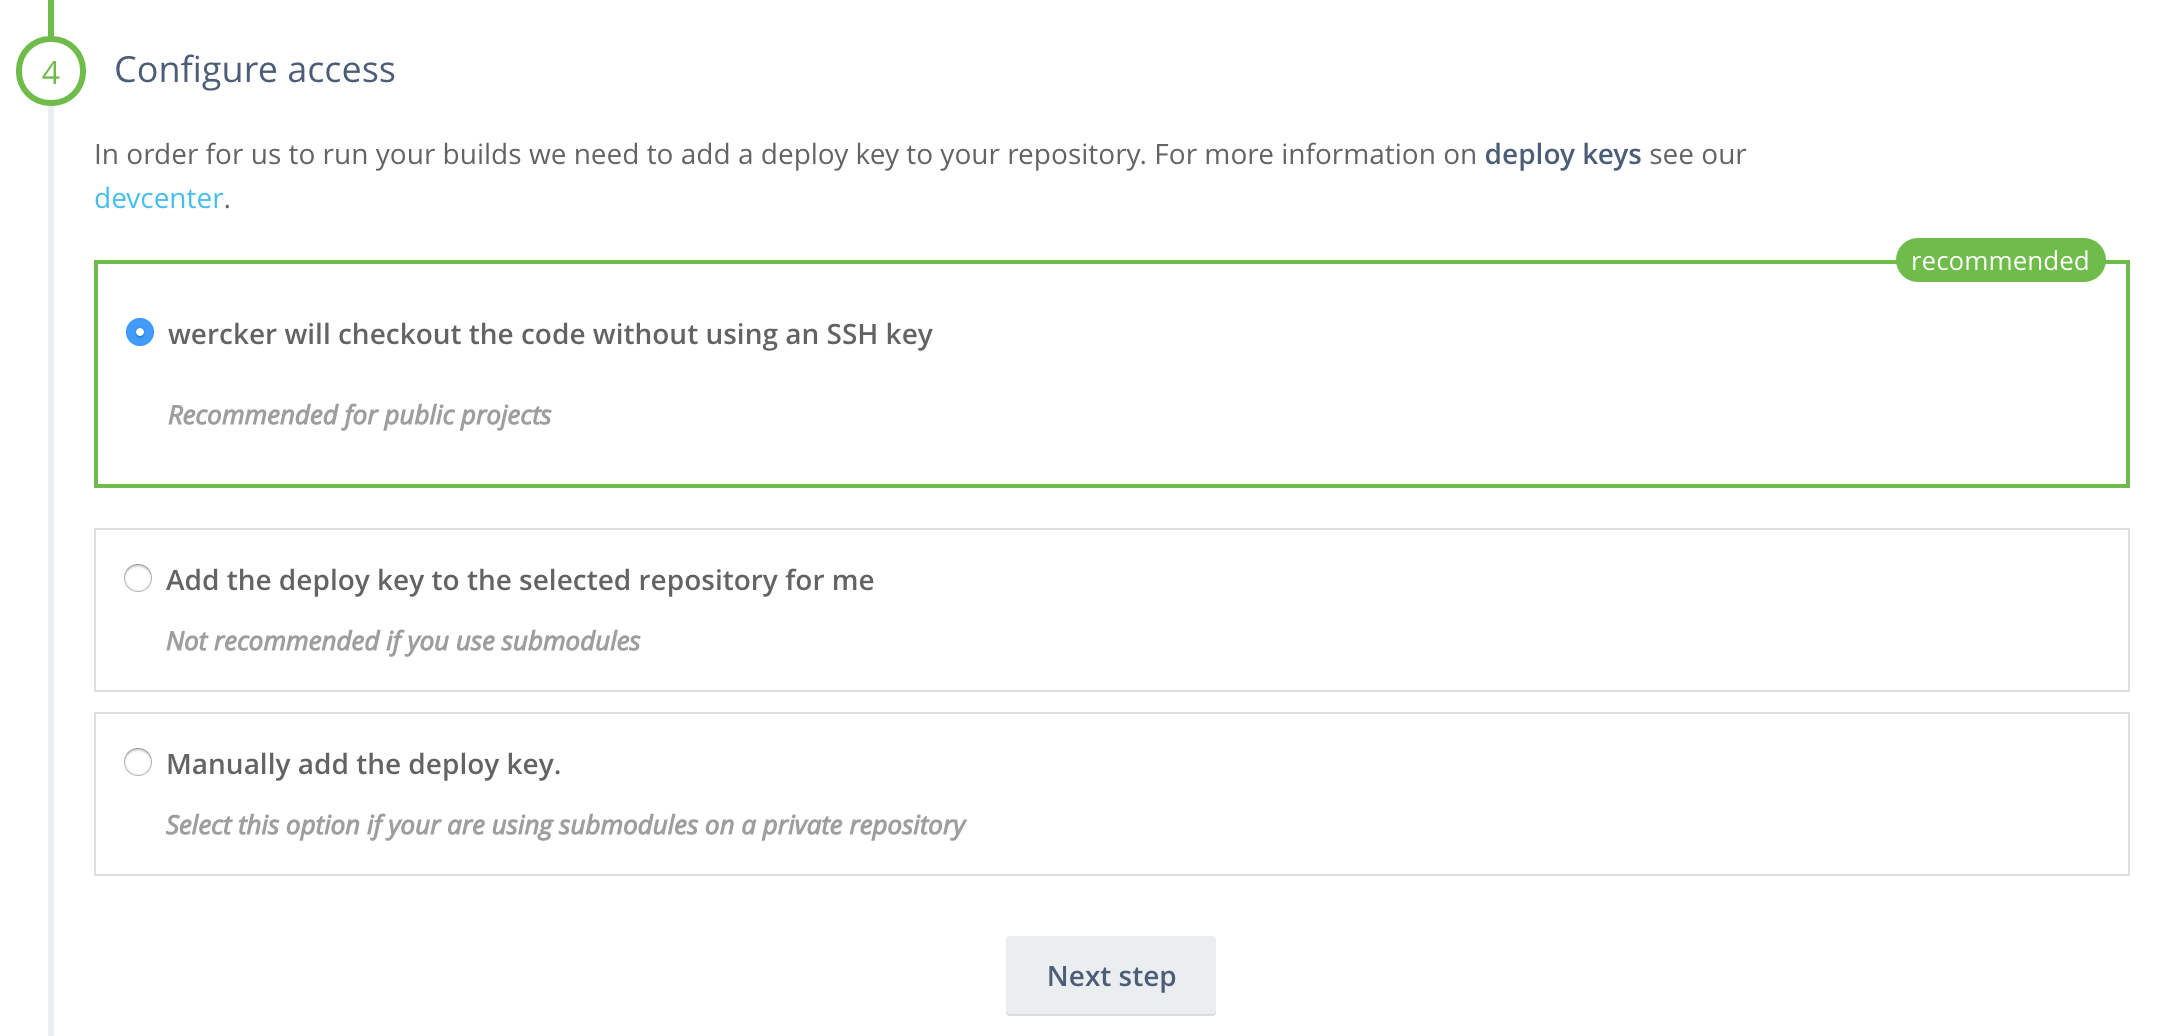
4.Configure access ではrecommendされたとおり,
Add the deploy key to the selected repository for me
Not recommended if you use submodules
を選びます.これで,WerckerがSSHキーペアを作成して,bitbucketのリポジトリのデプロイキーに勝手に登録してくれます.
wercker.yml作成
まず最終的なwercker.ymlを載せておきます.
box: boedy/wercker-php
services:
  - id: mysql
    env:
      MYSQL_ROOT_PASSWORD: rootpasswd
      MYSQL_USER: testuser
      MYSQL_PASSWORD: testpasswd
      MYSQL_DATABASE: testdb

build:
  steps:
    - add-ssh-key:
        keyname: MYPACKAGE_KEY
        host: github.com
    - add-to-known_hosts:
        hostname: github.com
        fingerprint: 16:27:ac:a5:76:28:2d:36:63:1b:56:4d:eb:df:a6:48
    - script:
        name: Submodules
        code: |
          git submodule init
          git submodule update
    - script:
        name: Update apt
        code: |
          sudo apt-get update
    - script:
        name: Install phpunit
        code: |
          sudo apt-get install -y phpunit
    - script:
        name: Install dependencies
        code: |
          sudo apt-get install -y php5-mysql curl libcurl3 libcurl3-dev php5-curl
          docker-php-ext-install bcmath
          docker-php-ext-install pdo_mysql curl
          composer install
    - script:
        name: Create config directory
        code: |
          mkdir fuel/app/config/test
    - create-file:
        name: Create DB config file
        filename: fuel/app/config/test/db.php
        overwrite: true
        content: |-
          <?php
          return array(
              'default' => array(
                  'connection'  => array(
                      'dsn'        => 'mysql:host=$MYSQL_PORT_3306_TCP_ADDR;port=$MYSQL_PORT_3306_TCP_PORT;dbname=testdb',
                      'username'   => 'testuser',
                      'password'   => 'testpasswd',
                  ),
              ),
          );
    - script:
        name: echo DB configuration
        code: |
          cat fuel/app/config/test/db.php
    - script:
        name: Migration
        code: |-
          FUEL_ENV=test php oil r migrate
    - script:
        name: echo PHP information
        code: |-
          php -v
          php -i
    - script:
        name: Run phpunit
        code: |-
          php oil test
これを作る過程でいちいちハマりポイントがありました.
1つずつ潰していきます.
box指定
http://old-devcenter.wercker.com/articles/languages/php.html
にPHP用の設定の仕方が書いてあるのでこの通りに進めてみた…ら,1行目
box: wercker/php
でいきなりエラー.
Failed step: setup environment - GET https://registry.hub.docker.com/v1/repositories/wercker/php/images returned 404
だそうで.
現在WerckerはDockerベースのversion2になっているらしく,box: wercker/phpはもう古いみたい.しかし,新しいバージョンのドキュメントにはPHPの例が無い( http://devcenter.wercker.com/docs/languages/index.html )
どうも,Docker Hubのリポジトリを指定してやればよいみたい.探してみたらWercker用のPHPコンテナ? https://registry.hub.docker.com/u/boedy/wercker-php/ があったので,これを指定.
box: boedy/wercker-php
service指定
mysqlを使いたくて http://old-devcenter.wercker.com/articles/services/ を参考に
services:
  - wercker/mysql
とかやっても,これも古いのでエラー.
services:
  - id: mysql
    env:
      MYSQL_ROOT_PASSWORD: rootpasswd
      MYSQL_USER: testuser
      MYSQL_PASSWORD: testpasswd
      MYSQL_DATABASE: testdb
が正解.これで https://registry.hub.docker.com/_/mysql/ を使ってくれる. http://devcenter.wercker.com/docs/services/mariadb.html にmariadbの例が書いてあったので,docker hubの説明に加えてそれも参考にした.
ちなみにMYSQL_ROOT_PASSWORD以外の環境変数はオプションだが,これらを指定しておくと勝手にDBを作ってくれるので便利.
wercker phpとかwercker mysqlとかでググるとまだ古い情報が出てきてしまうので迷ってしまった.
git submodule
build:
  steps:
    - script:
        name: Submodules
        code: |
          git submodule init
          git submodule update
とかやると,
Cloning into 'fuel/packages/hoge'...
Host key verification failed.
fatal: Could not read from remote repository.

Please make sure you have the correct access rights
and the repository exists.
Clone of 'git@github.com:fuga/hoge.git' into submodule path 'fuel/packages/hoge' failed
でエラー.
SSH Keyの設定をしなければいけません.
SSH key pairの作成
これも古い記事ですが,http://blog.wercker.com/2013/12/03/Using-private-repos.html を参考にSSH key pairを作ります.
-
Application settings -> SSH keys
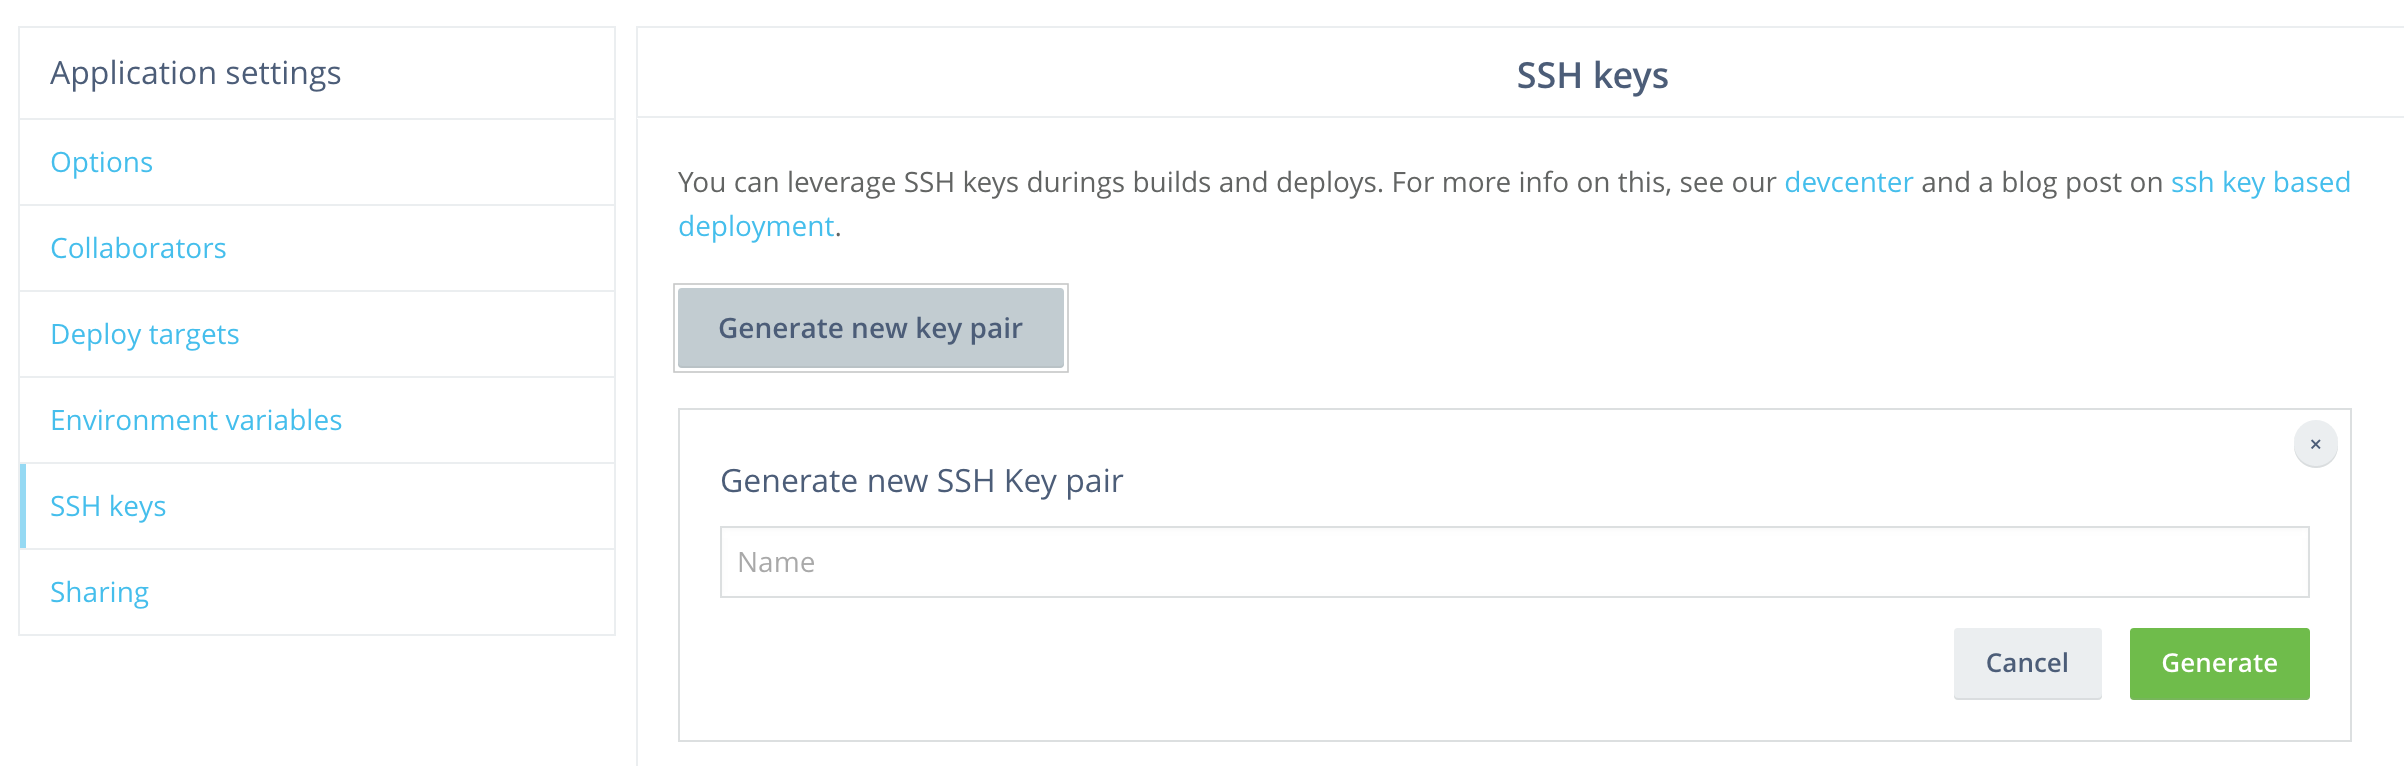
-
公開鍵をgithubのリポジトリのデプロイキーとして登録.
-
1.で作ったSSH key pairを,環境変数に設定
Application settings -> Environment variables

環境変数名を適当に決めて(MYPACKAGE_KEYとか),SSH Key Pairを選んで1.で作ったキーペアを指定. -
3で設定した環境変数名でwercker.ymlのbuildセクションの先頭に追記
build:
  steps:
    - add-ssh-key:
        keyname: MYPACKAGE_KEY
        host: github.com
    - add-to-known_hosts:
        hostname: github.com
        fingerprint: 16:27:ac:a5:76:28:2d:36:63:1b:56:4d:eb:df:a6:48
ここで,http://blog.wercker.com/2013/12/03/Using-private-repos.html にはadd-ssh-key.keynameしか言及がないが,http://devcenter.wercker.com/docs/git/submodules.html も参考にしてhostやadd-to-known_hostsセクションも記述しないとうまくいかない.(Bitbucketだけ使うならadd-ssh-key.keynameだけでもいいのかもしれない.)
また,現在このページに書いてあるFinger printは間違っているので https://help.github.com/articles/what-are-github-s-ssh-key-fingerprints/ を参照して正しいフィンガープリントに書き換える. 直ったみたいですね.
PHPUnitのインストール
PHPUnitがインストールされていない(PHP box with composer and phpunit installedって書いてあったのに…).まだ開発中だからですかね.
なので自前で用意します.
    - script:
        name: Update apt
        code: |
          sudo apt-get update
    - script:
        name: Install phpunit
        code: |
          sudo apt-get install -y phpunit
依存パッケージのインストール
基本的にはcomposerでインストールします.
その他いくつかaptで入れます.
    - script:
        name: Install dependencies
        code: |
          sudo apt-get install -y php5-mysql curl libcurl3 libcurl3-dev php5-curl
          docker-php-ext-install bcmath
          docker-php-ext-install pdo_mysql curl
          composer install
今回,利用しているとあるパッケージ("moontoast/math": "*")をcomposerでインストールする際にPHPエクステンションbcmathが無いと言われた
Installing dependencies (including require-dev)
Your requirements could not be resolved to an installable set of packages.

  Problem 1
    - moontoast/math dev-master requires ext-bcmath * -> the requested PHP extension bcmath is missing from your system.
    - moontoast/math 1.1.0 requires ext-bcmath * -> the requested PHP extension bcmath is missing from your system.
    - moontoast/math 1.0.1 requires ext-bcmath * -> the requested PHP extension bcmath is missing from your system.
    - moontoast/math 1.0.0 requires ext-bcmath * -> the requested PHP extension bcmath is missing from your system.
    - Installation request for moontoast/math * -> satisfiable by moontoast/math[1.0.0, 1.0.1, 1.1.0, dev-master].
ので,
docker-php-ext-install bcmath
でインストールしています.
また,mysqlをservicesに追加したもののphpのmysqlドライバは入っていないので入れます.
これがないとDBを使ったテストで
PDOException: could not find driver
とか言われます.
docker-php-ext-install pdo_mysqlだけではダメで,sudo apt-get install -y php5-mysqlも必要なことに注意.
さらに,今回はcurlも入れています.
設定ファイル作成
今回使用しているフレームワーク,FuelPHPのDB接続設定ファイルを作成します.FuelPHPはこんなフォーマットですが,他のフレームワークでやるときもこんな感じでいいのではないでしょうか.
werckerにはファイルを作成するstepcreate-fileが用意されている(詳細は https://github.com/wercker/step-create-file )ので,それを利用します.ディレクトリ作成のstepはないようなので直接mkdir.
DBの接続情報は上で行ったmysqlの設定の通りに指定.hostとportはMYSQL_PORT_3306_TCP_ADDRとMYSQL_PORT_3306_TCP_PORTという環境変数を参照します.
    - script:
        name: Create config directory
        code: |
          mkdir fuel/app/config/test
    - create-file:
        name: Create config file of DB
        filename: fuel/app/config/test/db.php
        overwrite: true
        content: |-
          <?php
          return array(
              'default' => array(
                  'connection'  => array(
                      'dsn'        => 'mysql:host=$MYSQL_PORT_3306_TCP_ADDR;port=$MYSQL_PORT_3306_TCP_PORT;dbname=testdb',
                      'username'   => 'testuser',
                      'password'   => 'testpasswd',
                  ),
              ),
          );
テスト実行
DBマイグレーションを実行して,PHPUnitを呼びます.
FuelPHPなのでテストコマンドがoilというコマンドにラップされていますが,他のフレームワークの場合は適宜phpunitコマンドを直接呼んだりそのフレームワークのコマンドに書き換えれば良いと思います.
    - script:
        name: Migration
        code: |-
          FUEL_ENV=test php oil r migrate
    - script:
        name: Run phpunit
        code: |-
          php oil test