iPhoneでデータを一覧表示する場合UITableViewを使うのが一般的だと思います。
でも項目数が多いとカスタムセルを作らなくちゃいけないし、
カスタムセル内のラベルの位置とかいちいち調整しなくてちゃならないし…めんどくさいです。
PC用やWeb用のGUIライブラリには大抵用意されていたGridなんちゃらというアレが欲しい!
ということで作ってみました。
Grid表示ViewControllerを作成
Grid表示機能はGridTableVCというViewControllerとして定義されています。
これをrootViewControllerなどにセットして利用します。
GridTableVC *vc = [[GridTableVC alloc] init];
self.window.rootViewController = vc;
[vc release];
データを用意する
データは配列で、各要素はどんなクラスでも対応可能です。
ここではname,mamil,memoなどのプロパティを持つUserというクラスが定義されているものとして例を書いています。
NSMutableArray *rows = [[NSMutableArray alloc] init];
[rows addObject:[[[User alloc] initWithName:@"山田太郎" mail:@"yamada1@example.com" phone:@"09011110001" memo:@"テスト"] autorelease]];
[rows addObject:[[[User alloc] initWithName:@"山田二郎" mail:@"yamada2@example.com" phone:@"09011110002" memo:@"テスト"] autorelease]];
[rows addObject:[[[User alloc] initWithName:@"山田三郎" mail:@"yamada3@example.com" phone:@"09011110003" memo:@"テスト"] autorelease]];
vc.rows = rows;
[rows release];
列情報を定義する
列情報はGridに表示する各列に関する情報で、GridColumnというクラスが定義されています。
propertyNameはモデルクラスのプロパティ名、headerTextは列ヘッダに表示するテキスト、widthは列の幅になります。
colsに列情報の配列を指定しますが、配列の先頭が一番左の列として扱われます。
NSMutableArray *cols = [[NSMutableArray alloc] init];
[cols addObject:[[[GridColumn alloc] initWithPropertyName:@"name" headerText:@"名前" width:150] autorelease]];
[cols addObject:[[[GridColumn alloc] initWithPropertyName:@"mail" headerText:@"メールアドレス" width:300] autorelease]];
[cols addObject:[[[GridColumn alloc] initWithPropertyName:@"phone" headerText:@"電話番号" width:150] autorelease]];
vc.cols = cols;
[cols release];
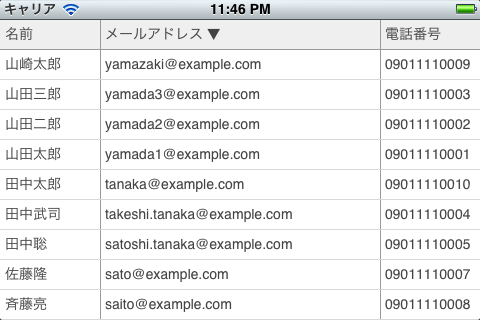
以上の手順でこのように表示されます。
レンダラーで表示内容をカスタマイズ
さらにGridTableVCは3種類のカスタムレンダラー機能があるので、もうちょっと表示内容を工夫することもできます。
TextRendererは表示する文字列自体の加工、LabelRendererは文字列の見た目の加工、RowRendererは行全体の加工ができます。
col.textRenderer = ^(NSObject *val) {
	NSString *valStr = (NSString*)val;
	NSString *part1 = [valStr substringWithRange:NSMakeRange(0, 3)];
	NSString *part2 = [valStr substringWithRange:NSMakeRange(3, 4)];
	NSString *part3 = [valStr substringWithRange:NSMakeRange(7, 4)];
	return [NSString stringWithFormat:@"%@-%@-%@", part1, part2, part3];
};
col.labelRenderer = ^(UILabel *label, NSObject *val) {
	NSString *valStr = (NSString*)val;
	if ([valStr hasPrefix:@"080"]) {
		label.textColor = [UIColor redColor];
	}
};
vc.rowRenderer = ^(UITableViewCell *cell, int rowIndex) {
	if (rowIndex % 2 == 1) {
		cell.contentView.backgroundColor = [UIColor colorWithRed:0.9 green:1.0 blue:1.0 alpha:1];
	}
};
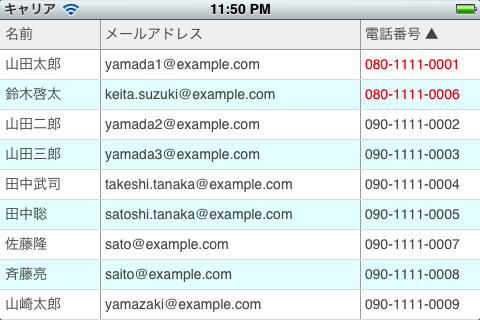
以上の3つのレンダラーを設定するとこんな感じになります。
まとめ
あと列ヘッダをタップするとその列でソートすることができます。
同じ列ヘッダをタップすると昇順/降順ソートが切り替わります。
ソースはGitHubに公開しているのでご自由にどうぞ
https://github.com/yuch/GridTable
まだまだ未完成ですがちょいちょい更新していきたいと思います。
要望&プルリクエストお待ちしております。

