Spring勉強会 第八回
今回はSpringBatchです。
複数回に分けて記載します。八回ではcsvファイルから社員情報を読み取り、
log.infoでログに吐き出すってとこまでやります。
PJ作成
まずはプロジェクトエクスプローラ内で右クリックし、SpringBatchプロジェクトを作成します。
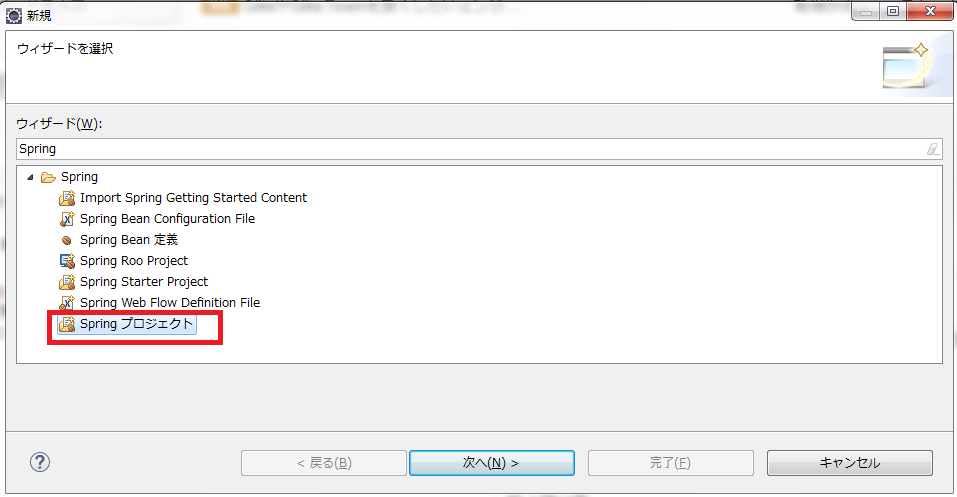
次へを押します。
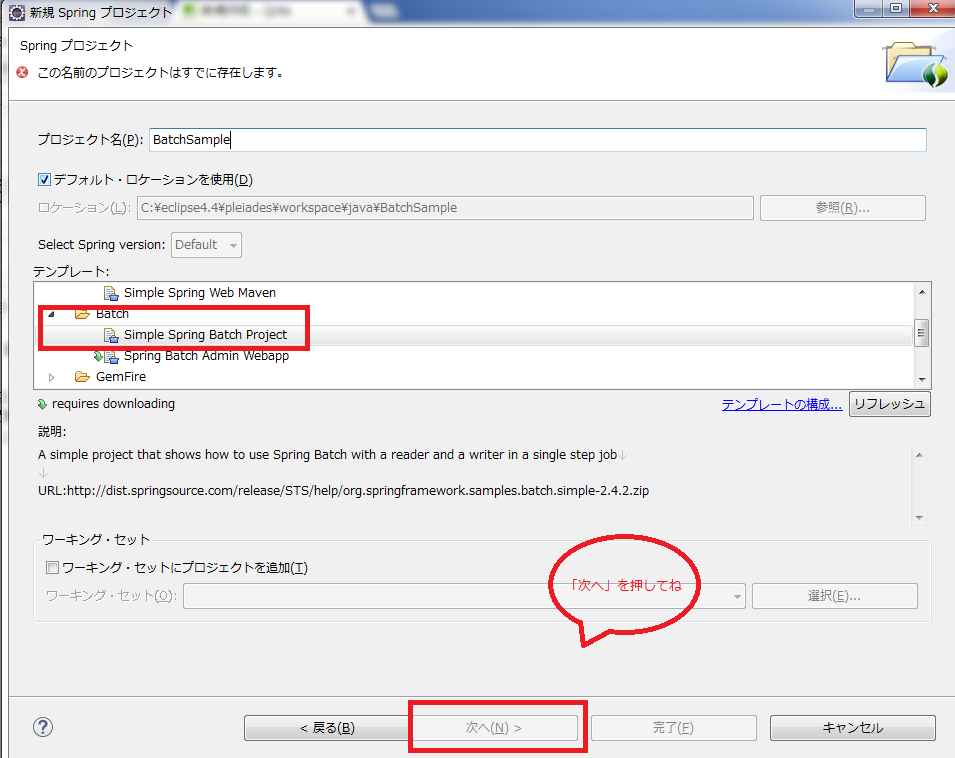
押すと以下のような画面が出るので、「SimpleSpringBatchProject」を選択します。
今回はプロジェクト名を「BatchSample」にして、「次へ」を押します。
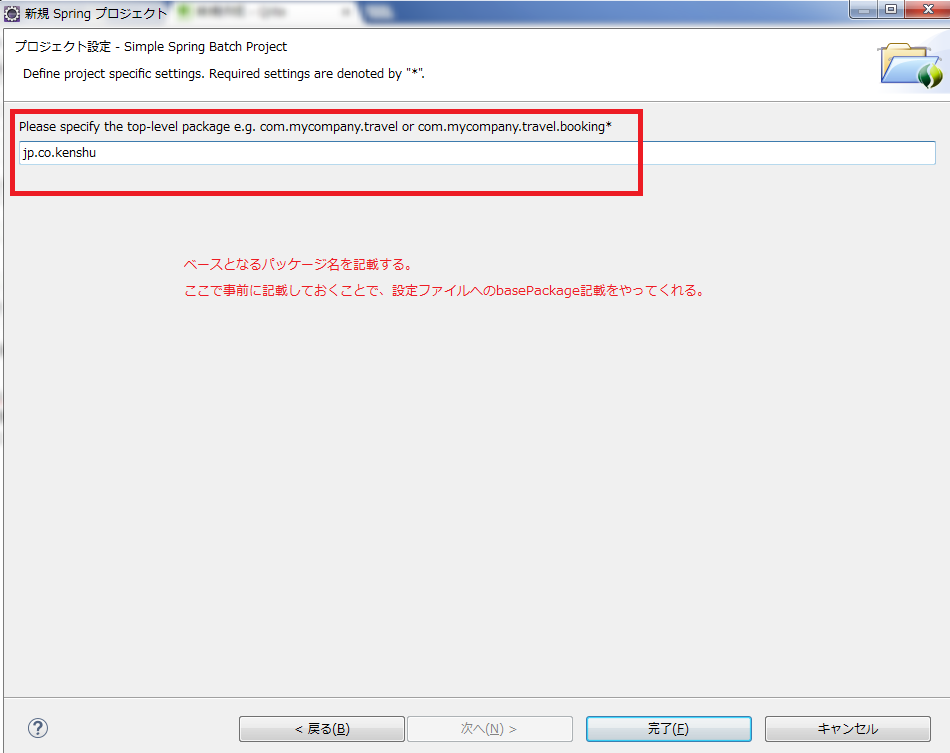
ベースとなるパッケージを指定したら、完了を押して作成完了です!!
作成されたPJは以下のような構成になってます。
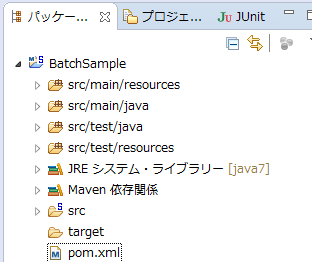
WEBの構成と大枠は変わりません。
javaファイルはsrc/main/javaに配置し、リソースはresources下に配置します。
pomは必要なライブラリを管理するMaven設定ファイルになります。
動かしてみる1(HelloWorld!)
SpringBatchの規約、というか実行単位について説明を掲載すべきだとは思いますが、
先に単語を羅列しても「??」で眠くなると思うので、まずは動かしてみてから解説に入ろうと思います。
PJを作成した段階で、以下のようなExampleが作成されているかと思います。

まずはこれらを実行し、HelloWorldをログに吐き出してみます。
ExampleItemReader.java
ExampleItemReaderは以下のような記述がされてます。
@Component("reader")
public class ExampleItemReader implements ItemReader<String> {

    private String[] input = {"Hello world!", null};

    private int index = 0;

    /**
     * Reads next record from input
     */
    public String read() throws Exception {
        if (index < input.length) {
            return input[index++];
        } else {
            return null;
        }

    }

}
後ほど、解説にも書きますが、このjavaファイルを識別する(外部設定ファイルからBeanとして実行する)には、
@Component("reader")
が必要になります。サンプルでは「reader」という識別子でこのバッチファイルを特定します。
ExampleItemReader.javaが中でやろうとしていることとしては、
private String[] input = {"Hello world!", null};
をreadメソッドで読み込んで、returnしているだけです。
public String read() throws Exception {
    if (index < input.length) {
        return input[index++];
    } else {
        return null;
    }
}
配列の要素数分だけ読み込み、returnされる形になります。
ExampleItemWriter.java
ExampleItemWriterは以下のような内容になってます。
@Component("writer")
public class ExampleItemWriter implements ItemWriter<Object> {

    private static final Log log = LogFactory.getLog(ExampleItemWriter.class);

    /**
     * @see ItemWriter#write(java.util.List)
     */
    public void write(List<? extends Object> data) throws Exception {
        log.info(data);
    }

}
writerも同じです。外部ファイルからBeanとして呼び出すために、「writer」という識別子を定義しています。
※@ComponentなのでDIされるイメージですね。
@Component("writer")
writerで行っていることは、writeメソッドに渡ってきたdataをlogに出力しているだけです。
この仮引数dataは「 ExampleItemReader.javaで読み込まれた文字列が渡ってきます。」
なので、今回のこのサンプルを実行すると、HelloWorldがログに出力されます。
実行!!
PJを右クリックし、以下の構成で実行してみましょう。
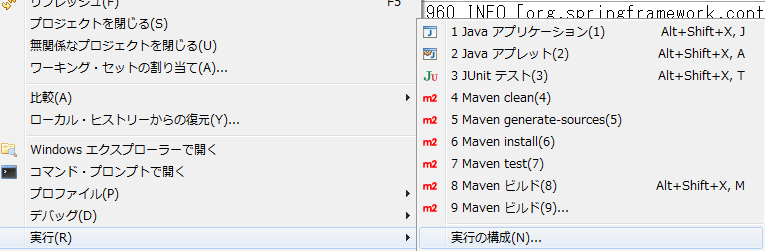
構成を選択したら、以下のような画面が表示されるので、構成を記述します。
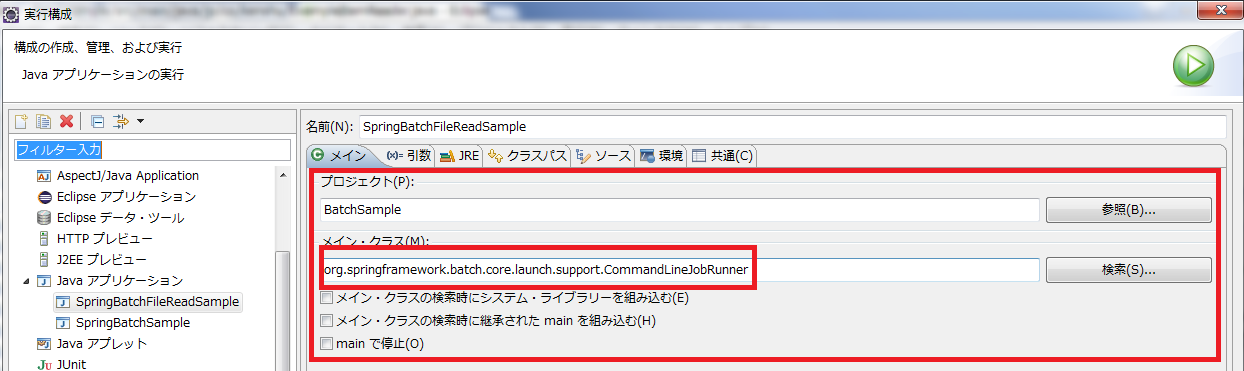
SpringBatchでjavaバッチを実行するには
org.springframework.batch.core.launch.support.CommandLineJobRunnerをメインクラスに指定して実行します。
続いて引数の指定です。引数タブを選択し、以下のように記述してください。

「launch-context.xml 」をロードし、実行するjobに「job1」を指定してます。
そのまま実行を押してください。
実行したら以下のようなログがconsoleに流れます。
2015-06-10 17:15:06,012 INFO [org.springframework.context.support.ClassPathXmlApplicationContext] - <Refreshing org.springframework.context.support.ClassPathXmlApplicationContext@10c624a: startup date [Wed Jun 10 17:15:06 JST 2015]; root of context hierarchy>
2015-06-10 17:15:06,080 INFO [org.springframework.beans.factory.xml.XmlBeanDefinitionReader] - <Loading XML bean definitions from class path resource [launch-context.xml]>
2015-06-10 17:15:06,346 INFO [org.springframework.beans.factory.xml.XmlBeanDefinitionReader] - <Loading XML bean definitions from class path resource [META-INF/spring/module-context.xml]>
2015-06-10 17:15:06,382 INFO [org.springframework.beans.factory.support.DefaultListableBeanFactory] - <Overriding bean definition for bean 'job1': replacing [Generic bean: class [org.springframework.batch.core.configuration.xml.SimpleFlowFactoryBean]; scope=; abstract=false; lazyInit=false; autowireMode=0; dependencyCheck=0; autowireCandidate=true; primary=false; factoryBeanName=null; factoryMethodName=null; initMethodName=null; destroyMethodName=null] with [Generic bean: class [org.springframework.batch.core.configuration.xml.JobParserJobFactoryBean]; scope=; abstract=false; lazyInit=false; autowireMode=0; dependencyCheck=0; autowireCandidate=true; primary=false; factoryBeanName=null; factoryMethodName=null; initMethodName=null; destroyMethodName=null]>
2015-06-10 17:15:06,383 INFO [org.springframework.beans.factory.support.DefaultListableBeanFactory] - <Overriding bean definition for bean 'job2': replacing [Generic bean: class [org.springframework.batch.core.configuration.xml.SimpleFlowFactoryBean]; scope=; abstract=false; lazyInit=false; autowireMode=0; dependencyCheck=0; autowireCandidate=true; primary=false; factoryBeanName=null; factoryMethodName=null; initMethodName=null; destroyMethodName=null] with [Generic bean: class [org.springframework.batch.core.configuration.xml.JobParserJobFactoryBean]; scope=; abstract=false; lazyInit=false; autowireMode=0; dependencyCheck=0; autowireCandidate=true; primary=false; factoryBeanName=null; factoryMethodName=null; initMethodName=null; destroyMethodName=null]>
2015-06-10 17:15:06,384 INFO [org.springframework.beans.factory.support.DefaultListableBeanFactory] - <Overriding bean definition for bean 'job3': replacing [Generic bean: class [org.springframework.batch.core.configuration.xml.SimpleFlowFactoryBean]; scope=; abstract=false; lazyInit=false; autowireMode=0; dependencyCheck=0; autowireCandidate=true; primary=false; factoryBeanName=null; factoryMethodName=null; initMethodName=null; destroyMethodName=null] with [Generic bean: class [org.springframework.batch.core.configuration.xml.JobParserJobFactoryBean]; scope=; abstract=false; lazyInit=false; autowireMode=0; dependencyCheck=0; autowireCandidate=true; primary=false; factoryBeanName=null; factoryMethodName=null; initMethodName=null; destroyMethodName=null]>
2015-06-10 17:15:06,625 INFO [org.springframework.beans.factory.config.PropertyPlaceholderConfigurer] - <Loading properties file from class path resource [batch.properties]>
2015-06-10 17:15:06,639 INFO [org.springframework.beans.factory.support.DefaultListableBeanFactory] - <Overriding bean definition for bean 'itemReader': replacing [Generic bean: class [org.springframework.batch.item.file.FlatFileItemReader]; scope=step; abstract=false; lazyInit=false; autowireMode=0; dependencyCheck=0; autowireCandidate=false; primary=false; factoryBeanName=null; factoryMethodName=null; initMethodName=null; destroyMethodName=null; defined in class path resource [launch-context.xml]] with [Root bean: class [org.springframework.aop.scope.ScopedProxyFactoryBean]; scope=; abstract=false; lazyInit=false; autowireMode=0; dependencyCheck=0; autowireCandidate=true; primary=false; factoryBeanName=null; factoryMethodName=null; initMethodName=null; destroyMethodName=null; defined in BeanDefinition defined in class path resource [launch-context.xml]]>
2015-06-10 17:15:06,655 INFO [org.springframework.beans.factory.support.DefaultListableBeanFactory] - <Pre-instantiating singletons in org.springframework.beans.factory.support.DefaultListableBeanFactory@22c2: defining beans [org.springframework.beans.factory.config.PropertyPlaceholderConfigurer#0,itemProcessor,itemWriter,exampleConfiguration,reader,writer,job2_reader,job2_writer,org.springframework.context.annotation.internalConfigurationAnnotationProcessor,org.springframework.context.annotation.internalAutowiredAnnotationProcessor,org.springframework.context.annotation.internalRequiredAnnotationProcessor,org.springframework.context.annotation.internalCommonAnnotationProcessor,org.springframework.jdbc.datasource.init.DataSourceInitializer#0,org.springframework.batch.core.scope.internalStepScope,org.springframework.beans.factory.config.CustomEditorConfigurer,org.springframework.batch.core.configuration.xml.CoreNamespacePostProcessor,jobRepository,step1,job1,job2_step1,job2,job3_step1,job3,itemReader,dataSource,jobLauncher,transactionManager,scopedTarget.itemReader]; root of factory hierarchy>
2015-06-10 17:15:06,910 INFO [org.springframework.batch.core.repository.support.JobRepositoryFactoryBean] - <No database type set, using meta data indicating: HSQL>
2015-06-10 17:15:07,041 INFO [org.springframework.jdbc.datasource.init.ResourceDatabasePopulator] - <Executing SQL script from class path resource [org/springframework/batch/core/schema-hsqldb.sql]>
2015-06-10 17:15:07,050 INFO [org.springframework.jdbc.datasource.init.ResourceDatabasePopulator] - <Done executing SQL script from class path resource [org/springframework/batch/core/schema-hsqldb.sql] in 9 ms.>
2015-06-10 17:15:07,125 INFO [org.springframework.batch.core.launch.support.SimpleJobLauncher] - <No TaskExecutor has been set, defaulting to synchronous executor.>
2015-06-10 17:15:07,236 INFO [org.springframework.batch.core.launch.support.SimpleJobLauncher] - <Job: [FlowJob: [name=job1]] launched with the following parameters: [{}]>
2015-06-10 17:15:07,236 DEBUG [org.springframework.batch.core.job.AbstractJob] - <Job execution starting: JobExecution: id=0, version=0, startTime=null, endTime=null, lastUpdated=Wed Jun 10 17:15:07 JST 2015, status=STARTING, exitStatus=exitCode=UNKNOWN;exitDescription=, job=[JobInstance: id=0, version=0, JobParameters=[{}], Job=[job1]]>
2015-06-10 17:15:07,241 DEBUG [org.springframework.batch.core.job.flow.support.SimpleFlow] - <Resuming state=job1.step1 with status=UNKNOWN>
2015-06-10 17:15:07,241 DEBUG [org.springframework.batch.core.job.flow.support.SimpleFlow] - <Handling state=job1.step1>
2015-06-10 17:15:07,245 INFO [org.springframework.batch.core.job.SimpleStepHandler] - <Executing step: [step1]>
2015-06-10 17:15:07,245 DEBUG [org.springframework.batch.core.step.AbstractStep] - <Executing: id=0>
2015-06-10 17:15:07,252 DEBUG [org.springframework.batch.repeat.support.RepeatTemplate] - <Starting repeat context.>
2015-06-10 17:15:07,253 DEBUG [org.springframework.batch.repeat.support.RepeatTemplate] - <Repeat operation about to start at count=1>
2015-06-10 17:15:07,253 DEBUG [org.springframework.batch.core.scope.context.StepContextRepeatCallback] - <Preparing chunk execution for StepContext: org.springframework.batch.core.scope.context.StepContext@1fac6e2>
2015-06-10 17:15:07,253 DEBUG [org.springframework.batch.core.scope.context.StepContextRepeatCallback] - <Chunk execution starting: queue size=0>
2015-06-10 17:15:07,269 DEBUG [org.springframework.batch.repeat.support.RepeatTemplate] - <Starting repeat context.>
2015-06-10 17:15:07,269 DEBUG [org.springframework.batch.repeat.support.RepeatTemplate] - <Repeat operation about to start at count=1>
2015-06-10 17:15:07,269 DEBUG [org.springframework.batch.repeat.support.RepeatTemplate] - <Repeat is complete according to policy and result value.>
2015-06-10 17:15:07,270 INFO [jp.co.kenshu.ExampleItemWriter] - <[Hello world!]>
2015-06-10 17:15:07,270 DEBUG [org.springframework.batch.core.step.item.ChunkOrientedTasklet] - <Inputs not busy, ended: false>
2015-06-10 17:15:07,270 DEBUG [org.springframework.batch.core.step.tasklet.TaskletStep] - <Applying contribution: [StepContribution: read=1, written=1, filtered=0, readSkips=0, writeSkips=0, processSkips=0, exitStatus=EXECUTING]>
2015-06-10 17:15:07,271 DEBUG [org.springframework.batch.core.step.tasklet.TaskletStep] - <Saving step execution before commit: StepExecution: id=0, version=1, name=step1, status=STARTED, exitStatus=EXECUTING, readCount=1, filterCount=0, writeCount=1 readSkipCount=0, writeSkipCount=0, processSkipCount=0, commitCount=1, rollbackCount=0, exitDescription=>
2015-06-10 17:15:07,272 DEBUG [org.springframework.batch.repeat.support.RepeatTemplate] - <Repeat operation about to start at count=2>
2015-06-10 17:15:07,272 DEBUG [org.springframework.batch.core.scope.context.StepContextRepeatCallback] - <Preparing chunk execution for StepContext: org.springframework.batch.core.scope.context.StepContext@1fac6e2>
2015-06-10 17:15:07,272 DEBUG [org.springframework.batch.core.scope.context.StepContextRepeatCallback] - <Chunk execution starting: queue size=0>
2015-06-10 17:15:07,272 DEBUG [org.springframework.batch.repeat.support.RepeatTemplate] - <Starting repeat context.>
2015-06-10 17:15:07,272 DEBUG [org.springframework.batch.repeat.support.RepeatTemplate] - <Repeat operation about to start at count=1>
2015-06-10 17:15:07,272 DEBUG [org.springframework.batch.repeat.support.RepeatTemplate] - <Repeat is complete according to policy and result value.>
2015-06-10 17:15:07,272 DEBUG [org.springframework.batch.core.step.item.ChunkOrientedTasklet] - <Inputs not busy, ended: true>
2015-06-10 17:15:07,272 DEBUG [org.springframework.batch.core.step.tasklet.TaskletStep] - <Applying contribution: [StepContribution: read=0, written=0, filtered=0, readSkips=0, writeSkips=0, processSkips=0, exitStatus=EXECUTING]>
2015-06-10 17:15:07,272 DEBUG [org.springframework.batch.core.step.tasklet.TaskletStep] - <Saving step execution before commit: StepExecution: id=0, version=2, name=step1, status=STARTED, exitStatus=EXECUTING, readCount=1, filterCount=0, writeCount=1 readSkipCount=0, writeSkipCount=0, processSkipCount=0, commitCount=2, rollbackCount=0, exitDescription=>
2015-06-10 17:15:07,273 DEBUG [org.springframework.batch.repeat.support.RepeatTemplate] - <Repeat is complete according to policy and result value.>
2015-06-10 17:15:07,273 DEBUG [org.springframework.batch.core.step.AbstractStep] - <Step execution success: id=0>
2015-06-10 17:15:07,274 DEBUG [org.springframework.batch.core.step.AbstractStep] - <Step execution complete: StepExecution: id=0, version=4, name=step1, status=COMPLETED, exitStatus=COMPLETED, readCount=1, filterCount=0, writeCount=1 readSkipCount=0, writeSkipCount=0, processSkipCount=0, commitCount=2, rollbackCount=0>
2015-06-10 17:15:07,275 DEBUG [org.springframework.batch.core.job.flow.support.SimpleFlow] - <Completed state=job1.step1 with status=COMPLETED>
2015-06-10 17:15:07,275 DEBUG [org.springframework.batch.core.job.flow.support.SimpleFlow] - <Handling state=job1.end1>
2015-06-10 17:15:07,276 DEBUG [org.springframework.batch.core.job.flow.support.SimpleFlow] - <Completed state=job1.end1 with status=COMPLETED>
2015-06-10 17:15:07,276 DEBUG [org.springframework.batch.core.job.AbstractJob] - <Job execution complete: JobExecution: id=0, version=1, startTime=Wed Jun 10 17:15:07 JST 2015, endTime=null, lastUpdated=Wed Jun 10 17:15:07 JST 2015, status=COMPLETED, exitStatus=exitCode=COMPLETED;exitDescription=, job=[JobInstance: id=0, version=0, JobParameters=[{}], Job=[job1]]>
2015-06-10 17:15:07,277 INFO [org.springframework.batch.core.launch.support.SimpleJobLauncher] - <Job: [FlowJob: [name=job1]] completed with the following parameters: [{}] and the following status: [COMPLETED]>
2015-06-10 17:15:07,277 INFO [org.springframework.context.support.ClassPathXmlApplicationContext] - <Closing org.springframework.context.support.ClassPathXmlApplicationContext@10c624a: startup date [Wed Jun 10 17:15:06 JST 2015]; root of context hierarchy>
2015-06-10 17:15:07,277 INFO [org.springframework.beans.factory.support.DefaultListableBeanFactory] - <Destroying singletons in org.springframework.beans.factory.support.DefaultListableBeanFactory@22c2: defining beans [org.springframework.beans.factory.config.PropertyPlaceholderConfigurer#0,itemProcessor,itemWriter,exampleConfiguration,reader,writer,job2_reader,job2_writer,org.springframework.context.annotation.internalConfigurationAnnotationProcessor,org.springframework.context.annotation.internalAutowiredAnnotationProcessor,org.springframework.context.annotation.internalRequiredAnnotationProcessor,org.springframework.context.annotation.internalCommonAnnotationProcessor,org.springframework.jdbc.datasource.init.DataSourceInitializer#0,org.springframework.batch.core.scope.internalStepScope,org.springframework.beans.factory.config.CustomEditorConfigurer,org.springframework.batch.core.configuration.xml.CoreNamespacePostProcessor,jobRepository,step1,job1,job2_step1,job2,job3_step1,job3,itemReader,dataSource,jobLauncher,transactionManager,scopedTarget.itemReader]; root of factory hierarchy>
見えますか??
2015-06-10 17:15:07,270 INFO [jp.co.kenshu.ExampleItemWriter] - <[Hello world!]>
が出力されているのが。
これでサンプルのjavaバッチの動作確認は完了です。
SpringBatchの実行構成について
実行構成概要図
エクセルにまとめたファイルがあるので、そちらを貼り付けます。
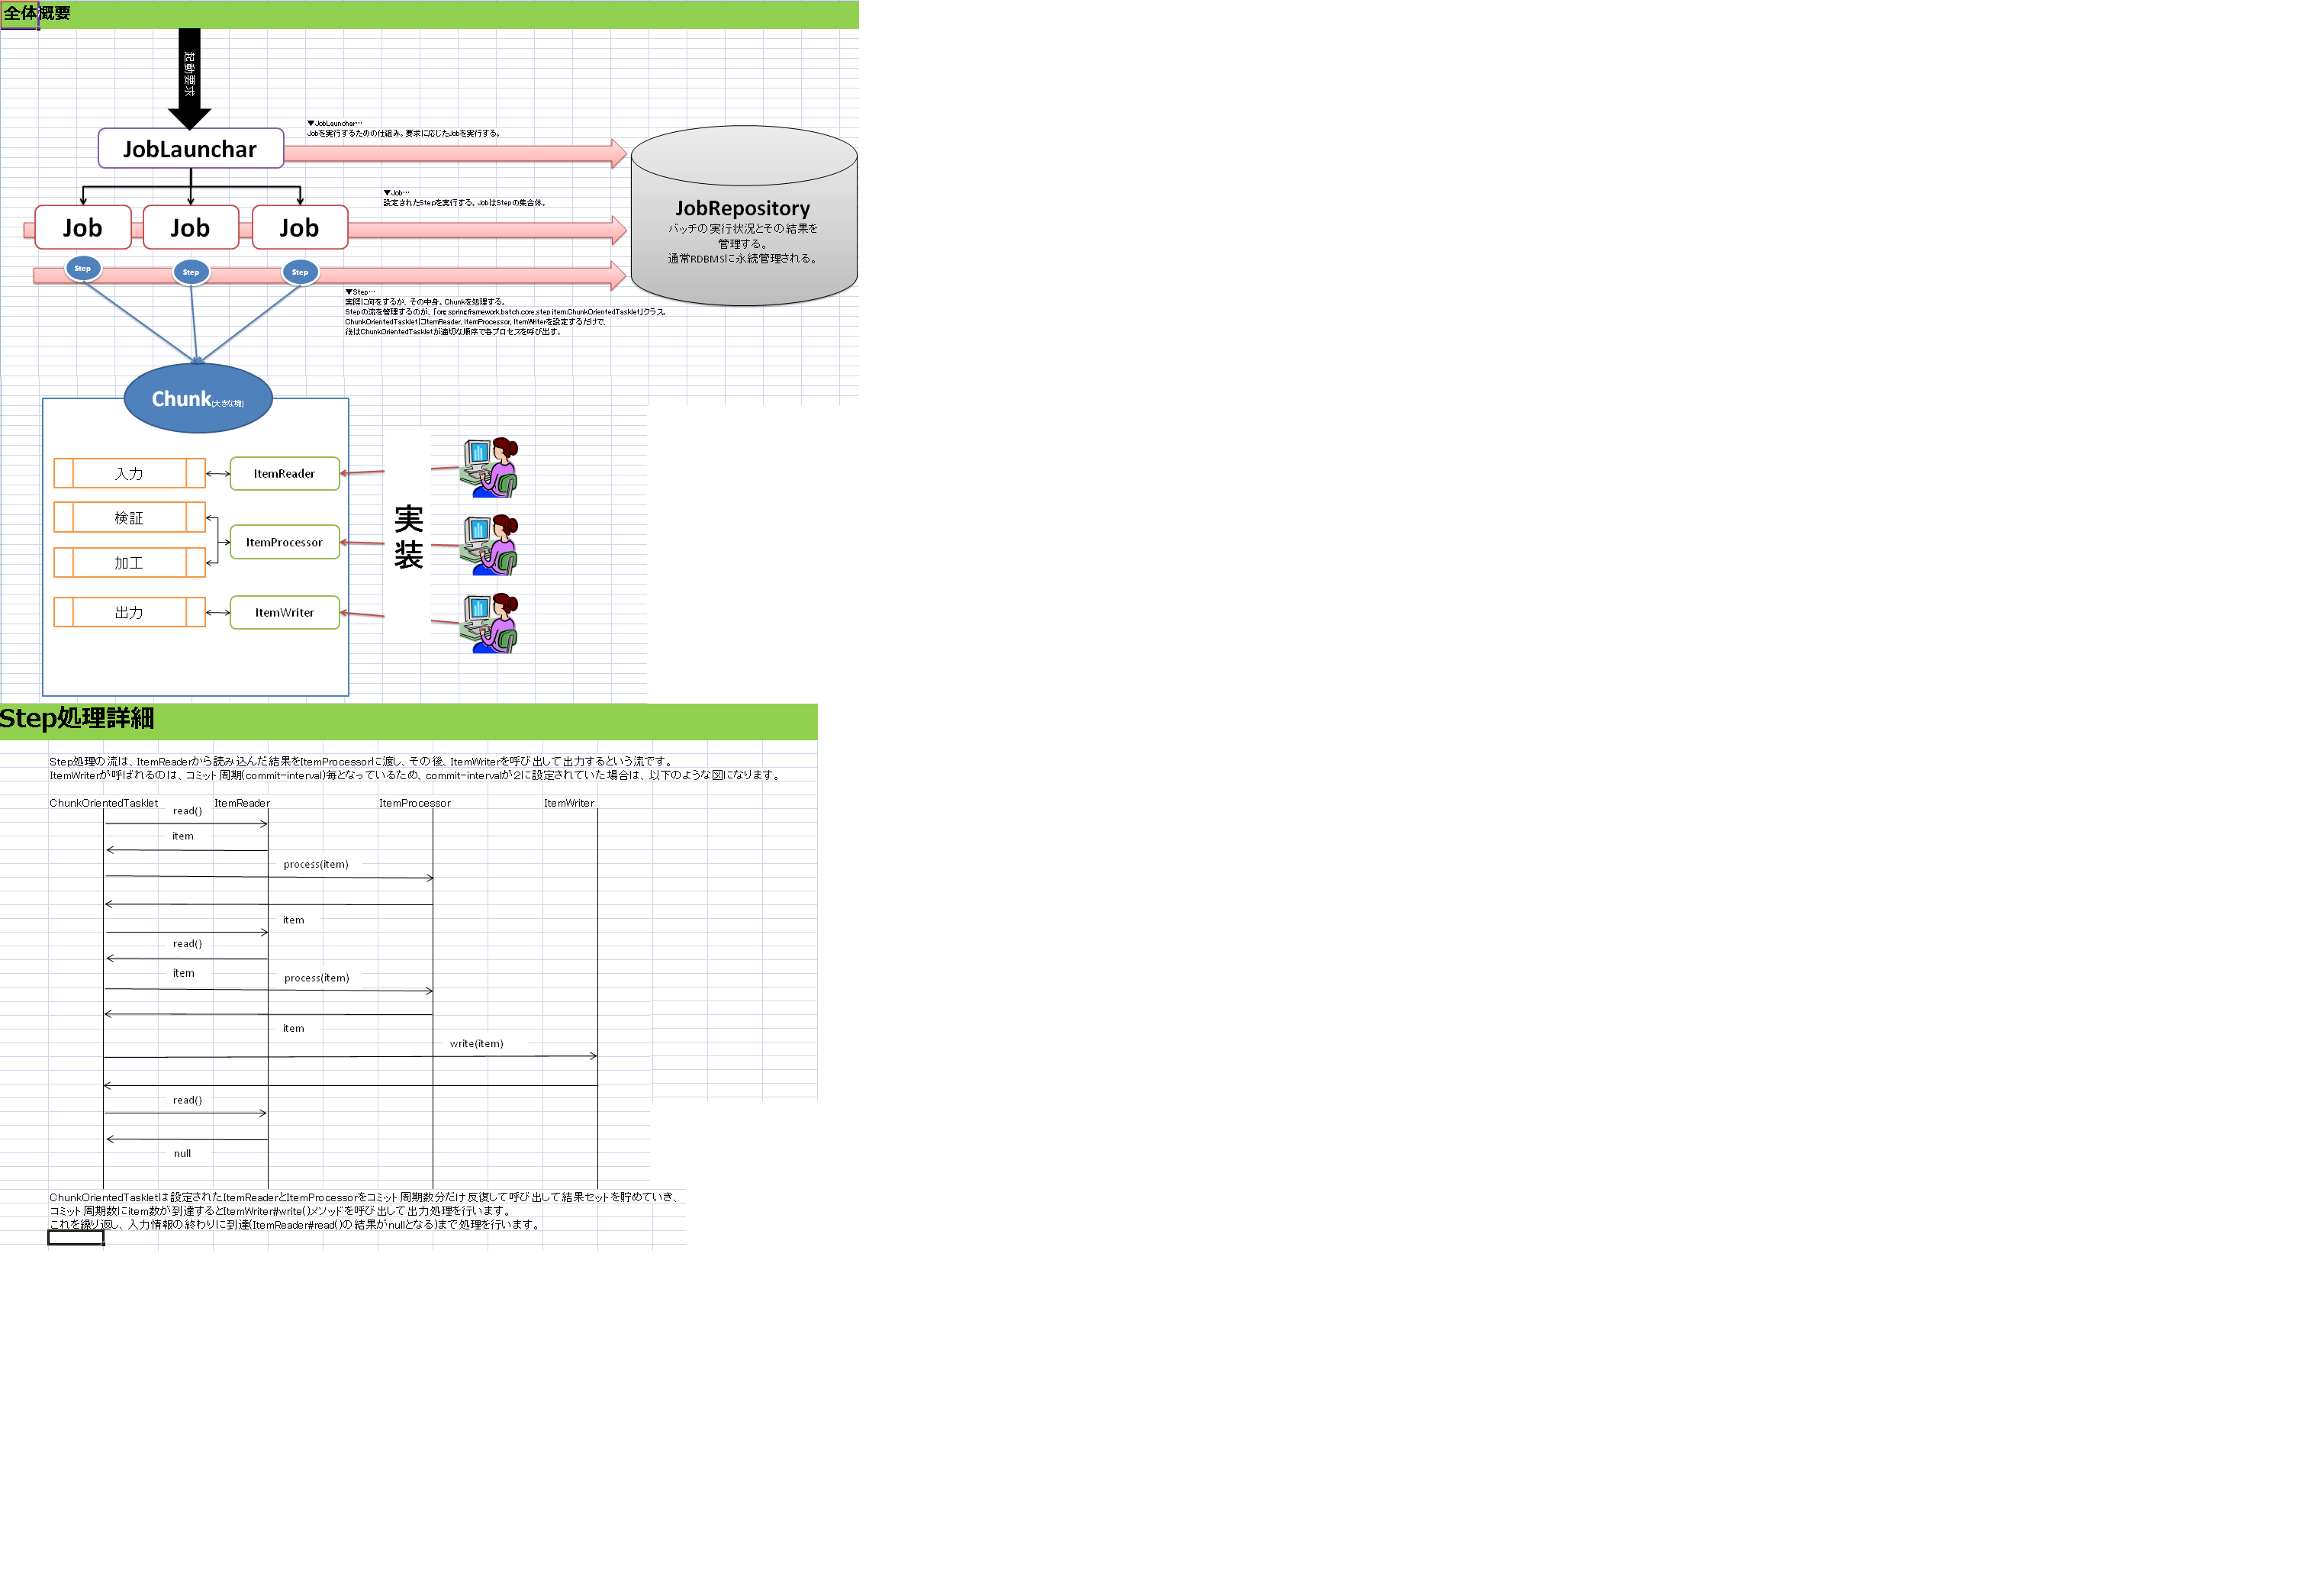
画像に全て記述したのですが、バッチは「Job」と呼ばれる単位で実行・管理されます。
Jobは「step」の集合体であり、stepは「Chunk(塊)」と呼ばれる処理体系で構成されています。
Chunkには
- 入力
- 検証
- 加工
- 出力
の一連の処理の塊が定義されています。
実装者はそれぞれ、
- ItemReader(入力)
- ItemProcessor(検証 or 加工)
- ItemWriter(出力)
の三つを必要に応じてコーディングするスタイルをとります。
上記Stepは上記一連の処理を順番に処理しますが、コミット周期(commit-interval)に定義された値に応じて、ItemReaderとItemProcessorのやり取りが複数回行われます。
最後にItemWriterにて、最終処理を行い、処理した結果をDBに記録するなり、ファイルに吐き出すなりして一つのStepが完了します。
launch-context.xmlとmodule-context.xmlについて
続いて、実際にバッチを実行する際にどのような経路を辿って実行されるかを解説します。
サンプルの実行時に以下のような構成で実行しました。
▼メインクラス
org.springframework.batch.core.launch.support.CommandLineJobRunner
▼引数
classpath:launch-context.xml job1
解説の画像に記載してますが、「JobLaunchar」がJobを実行する仕組みとなってます。
今回要求したJobは、引数に指定した「job1」になります。
そのため、job1が実行されますが、
classpath:launch-context.xml
が指定されてます。
そのため、バッチ実行時にこのファイルの設定が反映されます。
launch-context.xmlでは以下の記述に注目してください。
<context:component-scan base-package="jp.co.kenshu" />
これはバッチPJとして、「jp.co.kenshu」パッケージをベースとするということです。なので、開発者はこのパッケージの下にバッチファイルを作成します。
<import resource="classpath:/META-INF/spring/module-context.xml" />
記述されたとおりです。module-context.xmlをimportしているため、このファイルに記載された内容を実行時に参照します。
module-context.xmlには以下の記載がされています。
<?xml version="1.0" encoding="UTF-8"?>
<beans xmlns="http://www.springframework.org/schema/beans"
    xmlns:xsi="http://www.w3.org/2001/XMLSchema-instance" xmlns:batch="http://www.springframework.org/schema/batch"
    xsi:schemaLocation="
    http://www.springframework.org/schema/batch http://www.springframework.org/schema/batch/spring-batch-2.1.xsd
    http://www.springframework.org/schema/beans http://www.springframework.org/schema/beans/spring-beans-3.0.xsd">

    <description>Example job to get you started. It provides a skeleton for
        a typical batch application.
    </description>

    <batch:job id="job1">
        <batch:step id="step1">
            <batch:tasklet transaction-manager="transactionManager"
                start-limit="100">
                <batch:chunk reader="reader" writer="writer" commit-interval="1"/>
            </batch:tasklet>
        </batch:step>
    </batch:job>
</beans>
注目すべきは、
<batch:job id="job1">
        <batch:step id="step1">
            <batch:tasklet transaction-manager="transactionManager"
                start-limit="100">
                <batch:chunk reader="reader" writer="writer" commit-interval="1"/>
            </batch:tasklet>
        </batch:step>
</batch:job>
です。
idに「job1」と記載されてます。
実行時の引数に指定した「job1」はこのidに指定したbatchを実行していることがわかります。
次に注目すべきは以下です。
<batch:chunk reader="reader" writer="writer" commit-interval="1"/>
でました。chunkです。一連の処理の塊です。
今回塊に指定されているのはItemReaderとItemWriterのみです。サンプルにはItemProcessorは定義されていません。
▼ItemReader
reader="reader"
▼ItemWriter
writer="writer"
この、文字列はどこと関連しているかと言うと…
▼ExampleItemReader.java
@Component("reader")
public class ExampleItemReader implements ItemReader<String> {

    private String[] input = {"Hello world!", null};

    private int index = 0;

    /**
     * Reads next record from input
     */
    public String read() throws Exception {
        if (index < input.length) {
            return input[index++];
        }
        else {
            return null;
        }

    }

}
の
@Component("reader")
です!!このComponentに指定されたreaderが今回よばれるItemReaderとなります。
ItemWriterも同様ですね。
▼ExampleItemWriter.java
@Component("writer")
public class ExampleItemWriter implements ItemWriter<Object> {

    private static final Log log = LogFactory.getLog(ExampleItemWriter.class);

    /**
     * @see ItemWriter#write(java.util.List)
     */
    public void write(List<? extends Object> data) throws Exception {
        log.info(data);
    }

}
なので、
@Component("writer")
が関連しているわけですね。
結果として、サンプルのバッチを実行すると、以下のような処理フローを踏んで実行されていることとなります。
- ItemReaderとして、「ExampleItemReader.java」がコールされる
- ItemReaderが「String[] input」を読み込み、「Hello world!」が読み込まれる
- ItemWriterとして、「ExampleItemWriter.java」が呼ばれる
- ItemWriterのwriteメソッドの仮引数には、ItemReaderで読み込まれた情報が渡る
- 「Hello world!」が渡され、それをlogで吐き出す
以上がサンプルバッチの挙動となります。
なお、writeメソッドの仮引数が
write(List<? extends Object> data)
と、List型になっている理由としては、ItemReaderとItemProcessorのやりとりが、複数回やり取りされることがあるためです。
今回はcommit-interval="1"と記述されているため、ItemWriterに渡ってくる情報としては単体ですが、これが2や3など、複数形で指定されていれば、それだけ多くの情報が渡ってくることになります。
次は以上を参考にcsvファイルを読み込むサンプルを作成してみます。
ItemReader/ItemWriterだけでなく、ItemProcessorもChunkとして取り扱ってみます。
社員csvを読み込み、ログに吐き出すサンプル
それでは実際に作って動かしてみましょう。
データの用意
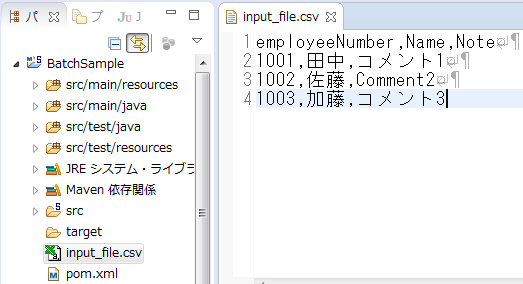
まずはcsvファイルを以下のように記述し、PJルート下に配置してください。
▼input_file.csv
employeeNumber,Name,Note
1001,田中,コメント1
1002,佐藤,Comment2
1003,加藤,コメント3
続いて、csvファイルをreadした際に情報をマッピングするentityを
jp.co.kenshu.mapping以下に作成
▼EmployeeData.java
package jp.co.kenshu.mapping;

public class EmployeeData {
    private String id = null;
    private String name = null;
    private String note = null;
    public String getId() {
        return id;
    }
    public void setId(String id) {
        this.id = id;
    }
    public String getName() {
        return name;
    }
    public void setName(String name) {
        this.name = name;
    }
    public String getNote() {
        return note;
    }
    public void setNote(String note) {
        this.note = note;
    }
}
これでデータ側の準備は完了です。
いよいよItemReader/ItemProcessor/ItemWriterの作成に入ります。
ItemWriterの作成
jp.co.kenshu下に以下のクラスを作成してください。
▼EMployeeWriter.java
package jp.co.kenshu;

import java.util.List;
import jp.co.kenshu.mapping.EmployeeData;
import org.apache.commons.logging.Log;
import org.apache.commons.logging.LogFactory;
import org.springframework.batch.item.ItemWriter;
import org.springframework.stereotype.Component;

@Component("itemWriter")
public class EmployeeWriter implements ItemWriter<EmployeeData> {

    private static final Log log = LogFactory.getLog(ExampleItemWriter.class);

    @Override
    public void write(List<? extends EmployeeData> data) throws Exception {
        for (EmployeeData emp : data) {
            log.info(emp.getId() + ":" + emp.getName() + "/" + emp.getNote());
        }
    }

}
先ほどのサンプルと異なるのは、
implements ItemWriter<EmployeeData>
ItemWriterがEmployeeData型を扱うということです。
型パラメータをEmployeeDataとしているため、writeメソッドも以下のような引数型となります。
public void write(List<? extends EmployeeData> data)
処理内容としては、logにidと名前、ノートを出力しているだけです。
ItemProcessor.javaの作成
続いて、加工処理を行うItemProcessorの作成です。
サンプルでは存在しなかったので、今回初登場です。
jp.co.kenshu下に以下のクラスを作成してください。
▼EmployeeProcessor.java
package jp.co.kenshu;

import jp.co.kenshu.mapping.EmployeeData;
import org.springframework.batch.item.ItemProcessor;
import org.springframework.stereotype.Component;

@Component("itemProcessor")
public class EmployeeProcessor implements ItemProcessor<EmployeeData, EmployeeData> {

    @Override
    public EmployeeData process(EmployeeData paramI) throws Exception {
        EmployeeData data = new EmployeeData();
        data.setId(paramI.getId());
        data.setName(paramI.getName() + "さん");
        data.setNote(paramI.getNote() + "以上です。");
        return data;
    }

}
クラスに「implements ItemProcessor」することで、このクラスはItemProcessorとして認識されます。
@Component("itemProcessor")
識別子は「itemProcessor」です。
処理内容としては、ItemReaderから渡ってきた、
EmployeeData paramI
を
EmployeeData data = new EmployeeData();
data.setId(paramI.getId());
data.setName(paramI.getName() + "さん");
data.setNote(paramI.getNote() + "以上です。");
のように加工して、加工したものをreturして、ItemWriterにつないでいます。
Job実行設定ファイルの修正
ここまでで、今回作成するJobの作成は完了です。
ItemReaderはどうした??と思うかもしれませんが、ItemReaderは今回は自作しません。
Springが提供するAPIをbean定義にてコールして利用します。
ではさっそく、ItemReaderのbean定義を記述しましょう。
▼launch-context.xmlへの追記
<bean id="itemReader" class="org.springframework.batch.item.file.FlatFileItemReader"
        scope="step">
        <property name="lineMapper">
            <bean class="org.springframework.batch.item.file.mapping.DefaultLineMapper">
                <property name="lineTokenizer">
                    <bean
                        class="org.springframework.batch.item.file.transform.DelimitedLineTokenizer">
                        <property name="delimiter" value="," />
                        <property name="names" value="id,name,note" />
                    </bean>
                </property>
                <property name="fieldSetMapper">
                    <bean
                        class="org.springframework.batch.item.file.mapping.BeanWrapperFieldSetMapper">
                        <property name="targetType"
                            value="jp.co.kenshu.mapping.EmployeeData" />
                    </bean>
                </property>
            </bean>
        </property>
        <property name="resource" value="#{jobParameters[inputFile]}" />
        <property name="linesToSkip" value="1" />
</bean>
idはitemReaderとしてます。使用するクラスは
class="org.springframework.batch.item.file.FlatFileItemReader"
です。
このクラスを使うことで、File読み込み処理を担ってくれます。
このクラスの「lineMapper」プロパティとして、
class="org.springframework.batch.item.file.mapping.DefaultLineMapper"
を使うと宣言することで、一行一行を読み込む際にどうするかの動作定義ができます。
このDefaultLineMapperクラスの「lineTokenizer」プロパティとして、
class="org.springframework.batch.item.file.transform.DelimitedLineTokenizer"
を使用してます。
そして、一行一行へのdelimiterとして
<property name="delimiter" value="," />
<property name="names" value="id,name,note" />
とし、「,で区切って、id,name,noteとして振り分ける」という動作を定義してます。
ではid,name,noteはどこのプロパティなのか??というのは
<property name="fieldSetMapper">
    <bean class="org.springframework.batch.item.file.mapping.BeanWrapperFieldSetMapper">
        <property name="targetType" value="jp.co.kenshu.mapping.EmployeeData" />
    </bean>
</property>
としているため、今回は「jp.co.kenshu.mapping.EmployeeData」をマッピングしています。
では、最後にどこのファイルを読取るのか??は
<property name="resource" value="#{jobParameters[inputFile]}" />
上記で、実行時指定引数に「inputFileで指定された値を使用する」と定義してます。
以上でItemReaderの定義は完了です。
最後に、Jobの実行定義を記述して完了です。
▼module-context.xmlの修正
<batch:job id="job3">
    <batch:step id="job3_step1">
        <batch:tasklet transaction-manager="transactionManager" start-limit="100">
            <batch:chunk reader="itemReader" processor="itemProcessor" writer="itemWriter" commit-interval="1" />
        </batch:tasklet>
    </batch:step>
</batch:job>
新規jobとして、job3を追記しました。
chunkとして、今回はItemReader/ItemProcessor/ItemWriterを定義してます。
<batch:chunk reader="itemReader" processor="itemProcessor" writer="itemWriter" commit-interval="1" />
それぞれ指定した識別子は先ほど作成した@Componentの識別子が該当します。
実行してみよう
では実行してみましょう。
PJを右クリックし、以下の構成で実行してください。
▼メインクラス
org.springframework.batch.core.launch.support.CommandLineJobRunner
▼引数
classpath:/launch-context.xml job3 inputFile=file:./input_file.csv
これで実行すると…
2015-06-11 13:02:02,767 INFO [jp.co.kenshu.ExampleItemWriter] - <1001:田中さん/コメント1以上です。>
2015-06-11 13:02:02,769 INFO [jp.co.kenshu.ExampleItemWriter] - <1002:佐藤さん/Comment2以上です。>
2015-06-11 13:02:02,771 INFO [jp.co.kenshu.ExampleItemWriter] - <1003:加藤さん/コメント3以上です。>
こんなlogが表示されるかと思います。
実行時引数に「job3」を指定しているため、module-context.xmlの
<batch:job id="job3">
が実行されます。
読み込むファイルを
inputFile=file:./input_file.csv
と指定しているため、
launch-context.xmlの
<property name="resource" value="#{jobParameters[inputFile]}" />
にバインドされます。
今回はPJ直下のinput-file.csvが読み込まれることになります。