ほぼ自分用メモです。
ハンズオンの話です。
今回は期待外のことは起こらなかったので、ほぼそのままです。
やったことと感想を中心に書きます。
ここまでの話はこちら
初心者だけどlastafluteを使ってみたい!〜”ちょっと前提”まで〜
手順1 URLを決める
今回は例示通り
/sea/land/[商品ID]?pay=[支払方法]
(例:/sea/land/3?pay=HAN)
というGETリクエストの対応する Action を作ることにします
手順2 Actionクラスを作る
手順2.1 Action名を決める
規約により
- SeaAction#land()
- SeaLandAction#index()
のどちらかです。
例えばSeaAction#land()は SeaAction クラスの land()メソッドのことです。
今回は例示通りSeaLandAction#index()にします
手順2.2 Actionのパッケージ(配置場所)を決める
規約により
- app.web.SeaLandAction
- app.web.sea.SeaLandAction
- app.web.sea.land.SeaLandAction
のどれかです。
今回は2番目のapp.web.sea.SeaLandActionにします
手順2.3 実際に作る
src/main/java/org/docksidestage/app/web/sea/
に
SeaLandAction クラスを作成しました。
この3つならパッケージはどこでも変わらないそうです。
(ちなみにこのパッケージだけ.gitignoreでgit管理されないみたいです)
手順3 Executeメソッドを準備
クラスは、[アプリ名]BaseActionクラスを継承します。
今回はHarborBaseActionクラスを継承します。
メソッドは
- Executeアノテーションを付ける
- 戻り値は HtmlResponse
- URLパラメーター /3 を受け取る引数を最初に定義
- GETパラメーターを受け取る Form を最後の引数に定義
ここまでで出来たのがこちら
public class SeaLandAction extends HarborBaseAction {

    @Execute
    public HtmlResponse index(int productId, SeaLandForm form) {
    	return null; //コンパイルエラーが嫌なので付けました
    }
}
手順4 Formを作る
Formクラスを定義
クラス名は [名前]Form です(規約)。
[名前]は任意ですが、Actionとイメージの近い名前がオススメだそうなので、
例示通り、SeaLandForm を作ります。
Actionの隣に置いたので、
src/main/java/org/docksidestage/app/web/sea/SeaLandForm
を作りました。
Formの実装
受け取る値をpublicフィールドに置きます。
型は自動で変換してくれます。
public class SeaLandForm {
    public CDef.PaymentMethod pay;
}
バリデーションはアノテーションで行ないます。
public class SeaLandForm {

    @Required
    public CDef.PaymentMethod pay;
}
手順5 HTMLテンプレートを作る
HTMLテンプレートファイルを作って、自動生成をします。
HTMLテンプレートのファイル名
規約により、
関連するActionクラスを識別できる名前にします。
今回はsea_land.jspです。
HTMLテンプレートのディレクトリ
規約により
src/main/webapp/WEB-INF/view/の下に作り、
その中で、今回の場合
-
sea/<-今回はこっちにします sea/land/
のどちらかの下に置くと決まっています。
FreeGenを叩いてパス自動生成
コンソールでDBFluteクライアントに移動します。
$ cd lastaflute-example-harbor/dbflute_maihamadb
$ sh manage.sh
ここでメニューが表示されるので12 (freegen) を入力して[Enter]
ここでは HarborHtmlPath に path_Sea_SeaLandJsp というパス定義が追加される
JavaでWeb開発したことがなかったので
正直何を言っているのかよくわかっていませんが、
git でdiffをとると
--- a/src/main/java/org/docksidestage/mylasta/action/HarborHtmlPath.java
+++ b/src/main/java/org/docksidestage/mylasta/action/HarborHtmlPath.java
@@ -53,6 +53,9 @@ public interface HarborHtmlPath {
     /** The path of the HTML: /purchase/purchase_list.jsp */
     HtmlNext path_Purchase_PurchaseListJsp = new HtmlNext("/purchase/purchase_l
ist.jsp");

+    /** The path of the HTML: /sea/sea_land.jsp */
+    HtmlNext path_Sea_SeaLandJsp = new HtmlNext("/sea/sea_land.jsp");
+
     /** The path of the HTML: /signin/signin.jsp */
     HtmlNext path_Signin_SigninJsp = new HtmlNext("/signin/signin.jsp");
となったので、そういうことみたいです。
JSPの実装(...はさておいて)
ここからほぼコピペです。
ここでもとりあえずコピペしました。
<c:import url="${viewPrefix}/common/default_layout.jsp">
<c:param name="contents">
<!-- <main> start main content -->
<div class="contents">
    <h2 class="pg-content-title"><la:caption key="labels.purchase.list.title"/></h2>
    <section class="purchase-result-box">
        <p>
            Payment Method: ${f:h(pay)} <la:errors property="pay"/>
        </p>
        <h3 class="pg-content-title-second">Search Results</h3>
        <table class="purchase-list-tbl">
            <thead>
                <tr>
                    <th>ID</th>
                    <th>Member Name</th>
                    <th>Product Name</th>
                    <th>Product Handle Code</th>
                    <th>Purchase Date</th>
                    <th>Purchase Price</th>
                </tr>
            </thead>
            <tbody>
                <c:forEach var="bean" items="${beans}">
                <tr>
                    <td>${f:h(bean.purchaseId)}</td>
                    <td>${f:h(bean.memberName)}</td>
                    <td>${f:h(bean.productName)}</td>
                    <td>${f:h(bean.productHandleCode)}</td>
                    <td>${f:h(bean.purchaseDate)}</td>
                    <td>${f:h(bean.purchasePrice)}</td>
                </tr>
                </c:forEach>
            </tbody>
        </table>
    </section>
</div>
<!-- </main> end of main content -->
</c:param>
</c:import>
これで何か表示されそうですね
手順6 Executeメソッドを実装
ひとまずreturnを書いておく
@Execute
public HtmlResponse index(int productId, SeaLandForm form) {
    return asHtml(path_Sea_SeaLandJsp);
}
validate()を呼ぶ
@Execute
public HtmlResponse index(int productId, SeaLandForm form) {
    validate(form, messages -> {}, () -> {
        return asHtml(path_Sea_SeaLandJsp);
    });
    return asHtml(path_Sea_SeaLandJsp);
}
DBFluteを使う
DBFluteを使って検索・更新などを行います
基点テーブルの Behavior を DI します。
ここでは、購入の一覧でしたから、基点テーブルは PURCHASE です。
@Resource
private PurchaseBhv purchaseBhv;

@Execute
public HtmlResponse index(int productId, SeaLandForm form) {
    ...
}
スイマセン。「DI?便利らしいけどどういうこと?」状態です。
ConditionBeaで検索します
@Execute
public HtmlResponse index(int productId, SeaLandForm form) {
    validate(form, messages -> {}, () -> {
        return asHtml(path_Sea_SeaLandJsp);
    });
    Integer userId = getUserBean().get().getUserId();
    ListResultBean<Purchase> purchaseList = purchaseBhv.selectList(cb -> {
        cb.setupSelect_Member();
        cb.setupSelect_Product();
        cb.query().setProductId_Equal(productId);
        cb.orScopeQuery(orCB -> {
            orCB.query().setMemberId_Equal(userId);
            orCB.query().queryMember().existsMemberFollowingByYourMemberId(followingCB -> {
                followingCB.query().setMyMemberId_Equal(userId);
            });
        });
        cb.query().existsPurchasePayment(paymentCB -> {
            paymentCB.query().setPaymentMethodCode_Equal_AsPaymentMethod(form.pay);
        });
        cb.query().addOrderBy_PurchaseDatetime_Desc();
    });
正直意味わかってないですが、
検索してるらしいです。
表示データのBeanを作る
SeaLandRowBean というクラスをActionの隣に作ります。
○○Beanを使ってjspに値を渡すみたいです。
Beanって何!?調べてみました↓
http://yyyank.blogspot.jp/2013/07/javabeansbeandtoentityvoformwhat-is.html
http://qiita.com/DQMerA/items/4b97057b8dcb82aa236b
これにはフィールドはprivateって書いてあるけど?
って感想ですが、そのうち分かるでしょう!
public class SeaLandRowBean {

    public Long purchaseId;
    public String memberName;
    public String productName;
    public String productHandleCode;
    public String purchaseDate;
    public Integer purchasePrice;
}
このBeanに値を設定します。
@Execute
public HtmlResponse index(int productId, SeaLandForm form) {
    validate(form, messages -> {}, () -> {
        return asHtml(path_Sea_SeaLandJsp);
    });
    ListResultBean<Purchase> purchaseList = purchaseBhv.selectList(cb -> {
        ...
    });
    List<SeaLandRowBean> beans = purchaseList.mappingList(purchase -> {
        SeaLandRowBean bean = new SeaLandRowBean();
        bean.purchaseId = purchase.getPurchaseId();
        purchase.getMember().alwaysPresent(member -> {
            bean.memberName = member.getMemberName();
        });
        purchase.getProduct().alwaysPresent(product -> {
            bean.productName = product.getProductName();
            bean.productHandleCode = product.getProductHandleCode();
        });
        bean.purchaseDate = toStringDate(purchase.getPurchaseDatetime()).get();
        bean.purchasePrice = purchase.getPurchasePrice();
        return bean;
    });
    return asHtml(path_Sea_SeaLandJsp);
}
表示データをResponseに設定
さっきのBeanをviewに渡します
@Execute
public HtmlResponse index(int productId, SeaLandForm form) {
    validate(form, messages -> {}, () -> {
        return asHtml(path_Sea_SeaLandJsp);
    });
    ListResultBean<Purchase> purchaseList = ...
    List<SeaLandRowBean> beans = ...
    return asHtml(path_Sea_SeaLandJsp).renderWith(data -> {
        data.register("beans", beans);
    });
}
手順7 ラフスケッチできた
今回の完成形です。
/**
 * @author yourname
 */
public class SeaLandAction extends HarborBaseAction {

    @Execute
    public HtmlResponse index(int productId, SeaLandForm form) {
        validate(form, messages -> {}, () -> {
            return asHtml(path_Sea_SeaLandJsp);
        });
        ListResultBean<Purchase> purchaseList = purchaseBhv.selectList(cb -> {
            cb.setupSelect_Member();
            cb.setupSelect_Product();
            cb.query().setProductId_Equal(productId);
            cb.orScopeQuery(orCB -> {
                orCB.query().setMemberId_Equal(userId);
                orCB.query().queryMember().existsMemberFollowingByYourMemberId(followingCB -> {
                    followingCB.query().setMyMemberId_Equal(userId);
                });
            });
            cb.query().existsPurchasePayment(paymentCB -> {
                paymentCB.query().setPaymentMethodCode_Equal_AsPaymentMethod(form.pay);
            });
            cb.query().addOrderBy_PurchaseDatetime_Desc();
        });
        List<SeaLandRowBean> beans = purchaseList.mappingList(purchase -> {
            SeaLandRowBean bean = new SeaLandRowBean();
            bean.purchaseId = purchase.getPurchaseId();
            purchase.getMember().alwaysPresent(member -> {
                bean.memberName = member.getMemberName();
            });
            purchase.getProduct().alwaysPresent(product -> {
                bean.productName = product.getProductName();
                bean.productHandleCode = product.getProductHandleCode();
            });
            bean.purchaseDate = toStringDate(purchase.getPurchaseDatetime()).get();
            bean.purchasePrice = purchase.getPurchasePrice();
            return bean;
        });
        return asHtml(path_Sea_SeaLandJsp).renderWith(data -> {
            data.register("beans", beans);
        });
    }
}
Bootしてアクセスしてみましょう
HarborBoot クラスの main() を実行してみます
色々ログが出て、、、
(中略)
Boot successful as development: url -> http://localhost:8090/harbor
http://localhost:8090/harbor/sea/land/3?pay=HAN
にアクセスすると・・・
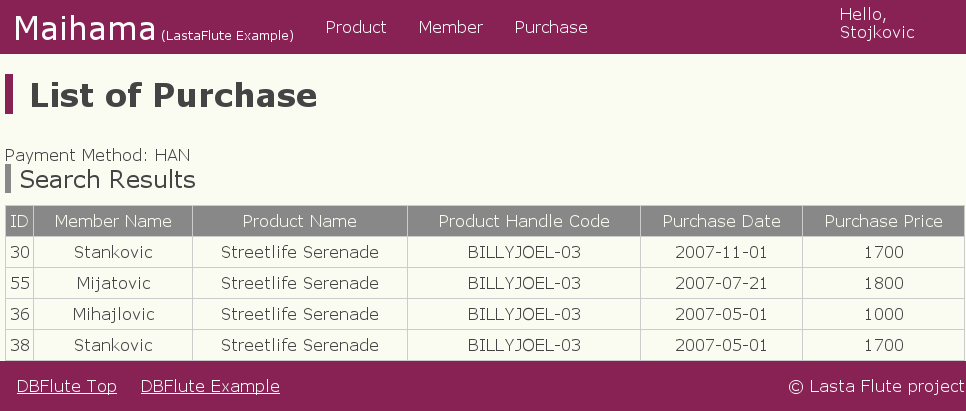
できた!
次は自分の作りたいのを作っていきます!