重い腰を上げ、作っているiOSアプリのプッシュ通知基盤をParseからFirebaseに乗り換えているので、備忘としてメモ。
実行環境
- Xcode 8.0 (Swift 3.0)
- CocoaPods 1.0.1
- Firebase/Messaging 3.7.1
実装
ドキュメントの説明がわりと丁寧なので、それを確認しながらやっていくのが良い。
Firebaseは、いくつかのサービス・機能群から構成される。プッシュ通知の実装に利用するのは、Firebase Cloud Messaging(FCM)。
Firebase Cloud Messaging | Firebase
準備
SDKのインストール
pod 'Firebase/Messaging'
cocoapodsを利用して、FCMのSDKをインストール。
Firebase/CoreというFirebaseのコア機能のSDKも一緒にバンドルされており、Firebase Analytics (アプリのアナリティクス機能を提供) も利用可能になる。
Firebaseプロジェクトを作成 & 設定ファイルのDL
Firebase Consoleで、プロジェクトを作成。「iOS アプリに Firebase を追加」から進み、設定ファイルをダウンロードする。
設定ファイルはGoogleService-Info.plistという名前でDLされる。これをXcodeのプロジェクトにコピー。今回は、staging環境とproduction環境で別のプロジェクトを作成し、別々の設定ファイルとして扱うことにした。(GoogleService-Info.plistとStaging-GoogleService-Info.plist)
APNs証明書の登録
AppleのDeveloperサイトでAPNs証明書を作成し、.p12ファイルとしてエクスポート。それをFirebaseに登録しておく。↓に親切に書かれてる。
APNs の SSL 証明書のプロビジョニング | Firebase
コードの実装
(メソッド実装入れ替えをオフに)
FCMでは、デフォルトだとMethod swizzling (メソッドの入れ替え) を行う仕様になっている。
FCM API では、FCM 登録トークンに対する APNs トークンのマッピングと、ダウンストリーム メッセージのコールバック処理中の分析データの取得という 2 つの主要領域でメソッドの実装入れ替えを行います。
https://firebase.google.com/docs/cloud-messaging/ios/client?hl=ja
今回はこれがちょっと嫌だったので、この入れ替えを行わない設定に変更。方法は簡単。
Info.plistに、キーFirebaseAppDelegateProxyEnabledを追加し、その値(Boolean)をNOにしておく。
PUSH通知のパーミッション取得
ここはFirebaseあんまり関係ないか。。
import UserNotifications

class HogeViewController: UIViewController {
    func registerPushNotification() {
        let application = UIApplication.shared

        if #available(iOS 10.0, *) {
            UNUserNotificationCenter.current().requestAuthorization(
                options: [.badge, .sound, .alert],
                completionHandler: { (granted: Bool, error: Swift.Error?) in
                    if let error = error {
                        print(error)
                        return
                    }

                    // PUSH通知許可
                    if granted {
                        application.registerForRemoteNotifications()
                        return
                    }
                    // PUSH通知拒否
                    print("PUSH通知拒否")
            })
        } else {
            if application.responds(to: #selector(application.registerUserNotificationSettings(_:))) {
                let settings = UIUserNotificationSettings(
                    types: [.alert, .badge, .sound],
                    categories: nil)
                application.registerUserNotificationSettings(settings)
                application.registerForRemoteNotifications()
            }
        }
    }
}
Firebase設定やデバイストークン取得
基本的には、ドキュメントとサンプルコードの通りに書いていけば大丈夫なはず。
import Firebase
import UserNotifications

@UIApplicationMain
class AppDelegate: UIResponder, UIApplicationDelegate {
    func application(_ application: UIApplication, didFinishLaunchingWithOptions launchOptions: [UIApplicationLaunchOptionsKey: Any]?) -> Bool {
        // UNUserNotificationCenter delegate
        if #available(iOS 10.0, *) {
            UNUserNotificationCenter.current().delegate = self
        }

        // Firebase setting
        configureFirebase()
        addRefreshFcmTokenNotificationObserver()

        return true
    }

    func applicationDidEnterBackground(_ application: UIApplication) {
        FIRMessaging.messaging().disconnect()
    }

    func applicationDidBecomeActive(_ application: UIApplication) {
        connectToFcm()
    }

    func application(_ application: UIApplication, didRegisterForRemoteNotificationsWithDeviceToken deviceToken: Data) {
        let deviceTokenStr: String = deviceToken.reduce("", { $0 + String(format: "%02X", $1) })
        print("APNsトークン: \(deviceTokenStr)")

        // APNsトークンを、FCM登録トークンにマッピング
        FIRInstanceID.instanceID().setAPNSToken(deviceToken, type: .prod)

        if let fcmToken = FIRInstanceID.instanceID().token() {
            print("FCMトークン: \(fcmToken)")
        }
    }

    func application(_ application: UIApplication, didReceiveRemoteNotification userInfo: [AnyHashable: Any]) {
        if #available(iOS 10.0, *) {
        } else {
            FIRMessaging.messaging().appDidReceiveMessage(userInfo)
        }
    }
}
// MARK: - UNUserNotificationCenterDelegate
@available(iOS 10.0, *)
extension AppDelegate: UNUserNotificationCenterDelegate {
    func userNotificationCenter(_ center: UNUserNotificationCenter, willPresent notification: UNNotification, withCompletionHandler completionHandler: @escaping (UNNotificationPresentationOptions) -> Void) {
        // Called when a notification is delivered to a foreground app.
        completionHandler([.badge, .sound, .alert])
    }

    func userNotificationCenter(_ center: UNUserNotificationCenter, didReceive response: UNNotificationResponse, withCompletionHandler completionHandler: @escaping () -> Void) {
        // Called to let your app know which action was selected by the user for a given notification.
        let userInfo: [AnyHashable: Any] = response.notification.request.content.userInfo
        FIRMessaging.messaging().appDidReceiveMessage(userInfo)
        completionHandler()
    }
}
// MARK: - Firebase setting
extension AppDelegate {
    func configureFirebase() {
        #if STAGING_ENV
            let firebasePlistFileName = "Staging-GoogleService-Info"
        #else
            let firebasePlistFileName = "GoogleService-Info"
        #endif
        if let path = Bundle.main.path(forResource: firebasePlistFileName, ofType: "plist") {
            let firebaseOptions: FIROptions = FIROptions(contentsOfFile: path)
            FIRApp.configure(with: firebaseOptions)
        }
    }

    func addRefreshFcmTokenNotificationObserver() {
        NotificationCenter.default.addObserver(
            self,
            selector: #selector(self.fcmTokenRefreshNotification(_:)),
            name: .firInstanceIDTokenRefresh,
            object: nil)
    }

    func fcmTokenRefreshNotification(_ notification: Notification) {
        if let refreshedFcmToken = FIRInstanceID.instanceID().token() {
            print("FCMトークン: \(fcmToken)")
        }
        connectToFcm()
    }

    func connectToFcm() {
        FIRMessaging.messaging().connect { (error: Error?) in
            if let error = error {
                print(error)
                return
            }
        }
    }
}
- 今回のように、メソッドの実装入れ替えを無効にした場合、明示的にAPNsトークンをFCM登録トークンにマッピングする必要がある。そのため、
application(_:didRegisterForRemoteNotificationsWithDeviceToken:)にて、FIRInstanceID.instanceID().setAPNSToken(deviceToken, type: .prod)を実装 - 同様に、メソッド入れ替えを無効にした場合、通知メッセージのコールバック処理中の分析データ取得をFirebaseが自動でやってくれない。これを実行するため、
FIRMessaging.messaging().appDidReceiveMessage(userInfo)を追加 - 利用する
GoogleService-Info.plistを環境(Scheme)毎に分けたかったので、configureFirebase()で条件分岐を実装- ファイル名を指定してパス取得、
FIROptionsのインスタンスを作成して、FIRApp.configure(with: firebaseOptions)で初期設定
- ファイル名を指定してパス取得、
- プッシュ通知のパーミッションを初めて取得した直後の
application(_:didRegisterForRemoteNotificationsWithDeviceToken:)では、FCMトークンがまだ生成されておらず、FIRInstanceID.instanceID().token()の値がnilになることがある- なので、オブザーバを利用して確実に取得するのがオススメらしい (
addRefreshFcmTokenNotificationObserver())
- なので、オブザーバを利用して確実に取得するのがオススメらしい (
プッシュ通知の送信
かんたんに試すには、Firebase consoleからメッセージを送るのが良い。最初に作成したプロジェクトを選択した後、左のカラムの「Notifications」から新規メッセージを作成できる。プッシュ通知の本文や添付するデータなどを指定可能。
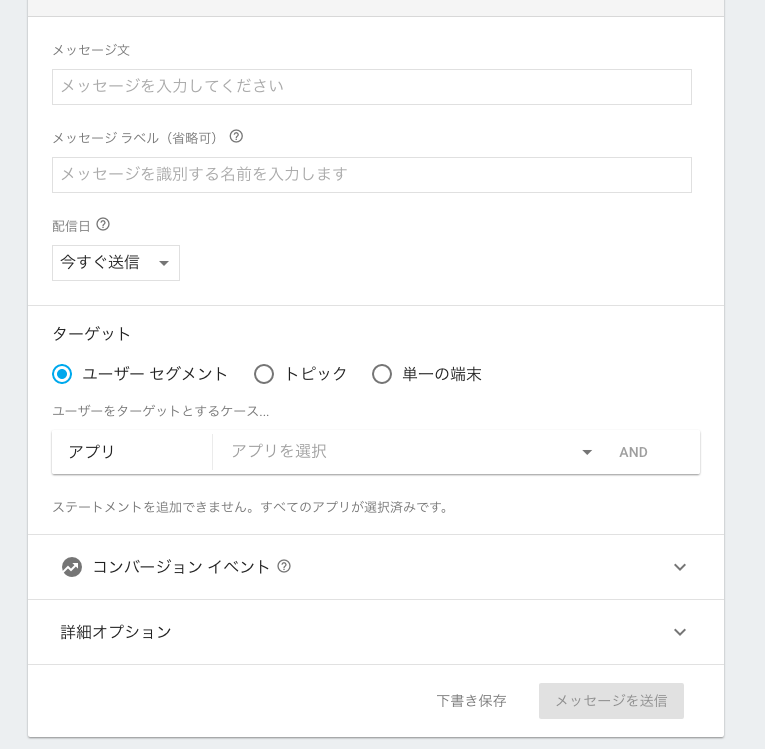
送信先としては、
- ユーザーセグメント
- アプリのバージョンや言語などを指定可
- トピック
- FCMトークンを指定
- 単一の端末に送信
の3パターンが選択できる。先のコードの中で取得したFCMトークンを入力(上記3の方法)して送信すると、無事プッシュ通知が端末に届くはず。
また、「トピック」を利用すると、一部のユーザに絞ってメッセージを送信可能。トピックは簡単に登録・登録解除をすることができ、アプリ内で簡単なコードを書くことで利用できる。
登録
FIRMessaging.messaging().subscribe(toTopic: "/topics/hogehoge")
登録解除
FIRMessaging.messaging().unsubscribe(fromTopic: "/topics/hogehoge")
※ちなみに、トピック名は/topics/というプレフィックスが必須らしく、ちょっとだけハマったのであった
おわり
まだ本番運用できていないので結論付けないが、アナリティクスやリアルタイムデータベースなども含めたサービス統合、BigQueryとの連携など、Firebaseを利用するメリットは大きいとは思う。アプリを新規リリースする場合などは、これを選択しておけば無難なのではという印象。
だが、他サービスからの移行は、やはり気持ち的に面倒である...w