Vagrant 公式サイト
http://www.vagrantup.com/
Vagrant Box 配布サイト
http://www.vagrantbox.es/
VirtualBoxのインストール
VagrantはVirtualBoxの機能を利用してするので、先にインストールしておきます。
VirtualBoxのダウンロード
https://www.virtualbox.org/
BOX(テンプレート)取得
CentOS 32bit
vagrant box add centos32 http://developer.nrel.gov/downloads/vagrant-boxes/CentOS-6.4-i386-v20130731.box
CentOS 64bit
※ WindowsのVirtualBoxで64bitのboxを使う場合は、BIOSでVirtualization Technologyを有効にする必要があります。
vagrant box add centos64 http://developer.nrel.gov/downloads/vagrant-boxes/CentOS-6.4-x86_64-v20130731.box
Ubuntu 32bit
vagrant box add precise32 http://files.vagrantup.com/precise32.box
インストールしたBoxの確認
vagrant box list
インストールしたBoxの削除
vagrant box remove centos32 virtualbox
vagrant box remove centos64 virtualbox
vagrant box remove precise32 virtualbox
仮想マシン用ディレクトリ作成
※ 作成するディレクトリ名は任意
CentOS 32bit
cd c:\
mkdir myCentos32VM
cd myCentos32VM
cd ~
mkdir myCentos32VM
cd myCentos32VM
CentOS 64bit
cd c:\
mkdir myCentos64VM
cd myCentos64VM
cd ~
mkdir myCentos64VM
cd myCentos64VM
Ubuntu 32bit
cd c:\
mkdir myPrecise32VM
cd myPrecise32VM
cd ~
mkdir myPrecise32VM
cd myPrecise32VM
Vagrant設定ファイル生成
ContOS 32bit
vagrant init centos32
ContOS 64bit
vagrant init centos64
Ubuntu 32bit
vagrant init precise32
仮想マシンインストール
vagrant up
仮想マシンの状態確認
vagrant status
仮想マシンのスリープ
vagrant suspend
仮想マシンのスリープからの復帰
vagrant resume
仮想マシンの終了
vagrant halt
仮想マシンの起動
vagrant up
仮想マシンの再起動
vagrant reload
仮想マシンの削除
vagrant destloy
仮想マシンへの接続
vagrant ssh
LANで仮想マシンにアクセス可能にする
CentOS 64bit
CentOS6以降から以下のファイルに記述するでパフォーマンスがあがります。
sudo vi /etc/resolv.conf
1行目に追記します。
single-request-reopen
IPv4のファイヤーウォールを無効にする
sudo service iptables save
sudo service iptables stop
sudo chkconfig iptables off
IPv6のファイヤーウォールを無効にする
sudo service ip6tables save
sudo service ip6tables stop
sudo chkconfig ip6tables off
Ubuntuの場合
ファイヤーウォールを無効にする
sudo iptables -X
sudo iptables -t nat -F
sudo iptables -t nat -X
sudo iptables -t mangle -F
sudo iptables -t mangle -X
sudo iptables -P INPUT ACCEPT
sudo iptables -P FORWARD ACCEPT
sudo iptables -P OUTPUT ACCEPT
sudo ufw disable
仮想環境を抜ける
exit
Vagrantfileを編集
# Create a private network, which allows host-only access to the machine
# using a specific IP.
config.vm.network :private_network, ip: "192.168.33.10"
Vagrant再起動
vagrant reload
Vagrant接続
vagrant ssh
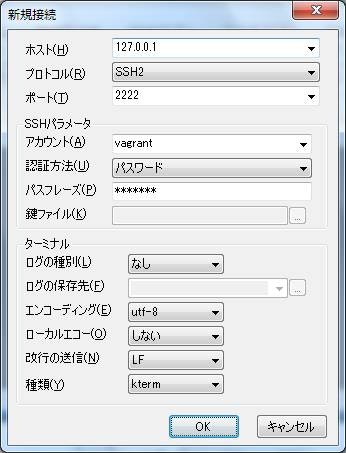
Windowsはコマンドプロンプトからsshでログインできないのでssh接続できるツールを使います。
Putty、TeraTerm、Poderosaあたりが有名なGUIツールです。git-bashを使ってssh接続することも可能ですが、現時点では日本語対応が不十分です。
ポート番号は複数のボックスをvagrant upしていると異なってくるので「vagrant ssh」で表示されるポート番号を参考にしましょう。パスワードは「vagrant」です。
Poderosaの接続設定
CentOS6系の場合
sudo vi /etc/resolv.conf
1行目に追記
options single-request-reopen
Webサーバーのインストール
手っ取り早くVagrantが動いているか確認するためにApacheをインストールしてみましょう。なおコマンド設定はCentOSのコマンドです。
Webサーバーをインストールします。
sudo yum install -y httpd
Webサーバーを起動します。
sudo service httpd start
Webサーバーを次回パソコンを起動したときに自動起動する設定をします。
sudo chkconfig httpd on
自動起動を無効にするには以下のコマンドを使用します。
sudo chkconfig httpd off
起動中のファイヤーウォールを停止します。
sudo service iptables stop
パソコンを再起動したとき、ファイヤーウォールが自動起動しないように、サービスから解除します。
sudo chkconfig iptables off
ブラウザで「http://192.168.33.10」にアクセスしたときにApacheウェブサーバーの初期画面が表示されたらOKです。
Vagrantの共有フォルダ
/vagrant = C:\myCentOS32VM
/vagrant = ~/myCentOS32VM
Webサーバーのドキュメントルートのシンボリックリンクを共有フォルダに作っておくと便利です。
sudo rm -rf /var/www/html
sudo ln -fs /vagrant /var/www/html
その他、FilezillaやCyberduckなどのSFTPツールを使ってデータを転送する方法もあります。
