概要
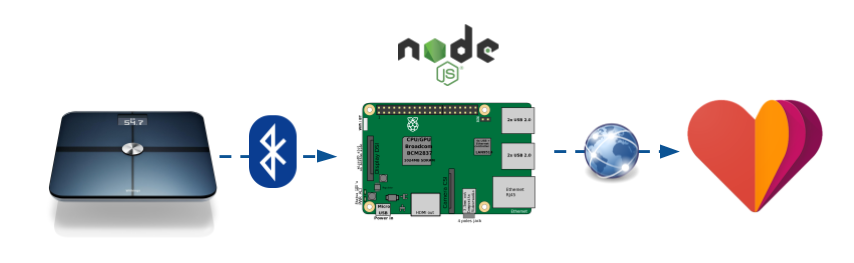
先日 Bluetooth 対応体重計を3000円でゲットしたのだが、アプリをいちいちたちあげて使うのがめんどくさい & Google Fit 未対応だったので Raspberry Pi 経由で自動的に Google Fit に記録がとれるようにしてみた。
アプリをたちあげることなく体重計に乗るだけで Google Fit へ記録されるので、毎日の体重管理がめっちゃシームレス。
ちなみに、こちらが 3000円で入手した Bluetooth 対応体重計。
関連記事
- 3000円の Bluetooth 対応体重計を Raspberry Pi を使って Google Fit に対応させてみた その1
- 3000円の Bluetooth 対応体重計を Raspberry Pi を使って Google Fit に対応させてみた その2
環境について
本記事は以下の環境を前提にしています
- Node.js v6.9.1
- macOS Sierra (開発環境)
- Raspberry Pi 3 -
RASPBIAN JESSIE LITE (本番環境)
そももそ Bluetooth ってなんなんだ?
Bluetooth 関連の開発は今回がはじめてなので、まずは Bluetooth ってなんなんだろうというところから調べてみた。
公式サイト によると、Bluetooth はバージョン2系とバージョン4系の二種類に分かれているらしい。
仕様の最も基本的な実装はバージョン2.0 / 2.1として採用されたBluetooth Basic Rate/Enhanced Data Rate (BR/EDR)とバージョン4.0 / 4.1 / 4.2.として採用されたBluetooth低エネルギー (LE)の2つです。
今回利用する体重計の製品仕様欄には「Bluetooth4.0以上対応」と書いてあったので、Bluetooth低エネルギー (略称:BLE)に対応すれば良いことになる。
Node.js で Bluetooth デバイスをスキャン
利用する Bluetooth の規格が大雑把にわかったので、 とりあえず試しに
noble という BLE を Node.js で扱うためのモジュールをつかってデバイスをスキャンしてみることにした。
README を参照しながらつくってみたのが以下のスクリプト。
const noble = require('noble')

// Bluetooth のステータスを監視
noble.on('stateChange', (state) => {
  console.log(`\nstateChange: ${state}\n`)

  if (state === 'poweredOn') {
    // Bluetooth がオンの場合は周辺機器のスキャンを開始
    noble.startScanning()
  } else {
    // Bluetooth がオフの場合は周辺機器のスキャンを停止
    noble.stopScanning()
  }
})

// 周辺機器が見つかったら、情報を出力
noble.on('discover', (peripheral) => {
  console.log('discover peripheral:')
  // 不必要な情報を削除
  delete peripheral._noble

  // 出力
  console.dir(peripheral)
})
実行した結果がこちら( 一部念のため伏せ字)。
$ node scan-ble.js

stateChange: poweredOn

discover peripheral:
Peripheral {
  id: 'xxxxxxxxxxxxx',
  uuid: 'xxxxxxxxxxxxx',
  address: 'xx:xx:xx:xx:xx:xx',
  addressType: 'unknown',
  connectable: true,
  advertisement:
   { localName: '000FatScale01',
     txPowerLevel: undefined,
     manufacturerData: undefined,
     serviceData: [],
     serviceUuids: [ 'fff0' ] },
  rssi: -67,
  services: null,
  state: 'disconnected' }
「000FatScale01」と名乗っているのが該当の体重計の模様。
Bluetooth のプロトコルについて
これで無事に体重計に接続できる見込みがついたが、接続後どのように通信をおこなえばいいかについて調べてみた。
公式サイトでは Bluetooth デバイスとやり取りするためのプロトコルについて以下のような記述があった。
接続確立後にデータ交換のためのクライアント/サーバープロトコルを定義します。属性はGeneric Attribute Profile(GATT)を使用して意味のあるサービスにグループ化されます。ATTはLE実装で使用され、BR/EDR実装で使用されることもあります。
要するに GATT という仕様にもとづいてデータのやりとりをおこなえばよいとのこと。
公式サイトの GATT のページ に概念図が掲載されていたので引用するとこういう構造になっている模様。

要するにGATTプロファイルの中に複数のサービスがあり、サービス
の中にはこれまた複数の特性(Characteristic)があり、特性の中に値(Value)や記述子(Descriptor)があるということのようだ。
サービスを探査して確かめる
noble には discoverServices() という周辺機器(Peripheral)が保持しているサービスを探査するメソッドが用意されているので、それを利用して「000FatScale01」が持っているサービスを調査してみることにした。
const noble = require('noble')
const FAT_SCALE = '000FatScale01'

// Bluetooth のステータスを監視
noble.on('stateChange', (state) => {
  console.log(`\nstateChange: ${state}\n`)

  if (state === 'poweredOn') {
    // Bluetooth がオンの場合は周辺機器のスキャンを開始
    noble.startScanning()
  } else {
    // Bluetooth がオフの場合は周辺機器のスキャンを停止
    noble.stopScanning()
  }
})

// 周辺機器が見つかったら、接続後サービスを探査
noble.on('discover', (peripheral) => {
  const localName = peripheral.advertisement.localName
  if (localName === FAT_SCALE) {
    console.log(`discover peripheral: ${FAT_SCALE}\n`)

    // スキャンを停止
    noble.stopScanning()

    // 接続後サービスを探査
    peripheral.once('connect', () => {
      peripheral.discoverServices()
    })

    // 探査されたサービスを出力
    peripheral.once('servicesDiscover', onServiceDiscover)

    // 見つかった 000FatScale01 に接続
    peripheral.connect()
  }
})

// 探査されたサービスの内容を出力
function onServiceDiscover (services) {
  services
    .forEach((service) => {
      // 不必要な情報を削除
      delete service._noble
      delete service._peripheralId

      // 内容を出力
      console.dir(service)
      console.log()
    })

  // 接続を解除
  this.disconnect()
}
探査結果は以下
$ node discover-services.js

stateChange: poweredOn

discover peripheral: 000FatScale01

Service {
  uuid: '180a',
  name: 'Device Information',
  type: 'org.bluetooth.service.device_information',
  includedServiceUuids: null,
  characteristics: null }

Service {
  uuid: 'fff0',
  name: null,
  type: null,
  includedServiceUuids: null,
  characteristics: null }
180a と fff0 という uuid をもつサービスが2つでてきた。
GATT サービスは標準で割り当てられているものと独自に定義するものの2種類があるらしく、180aは標準で定義されている「Device Information」という名前のサービスで、fff0 のほうは「000FatScale01」で独自に定義されているサービスということのようだ。
Device Information サービスの中身を読んでみる
とりあえず既知のサービスである「Device Information(0x180A)」のほうを読んでみることにしたい。
先程もふれたようにサービスは複数の「特性(Characteristic)」を保持している。
noble には discoverCharacteristics() というサービスから特性を探査するメソッドが用意されているので、これをつかって特性を探査することにする。
/** 中略 **/

// 探査されたサービスの中から
// Device Infomation サービスを見つけて
// その特性を探査
function onServiceDiscover (services) {
  services
    .forEach((service) => {
      // Device Information(0x180A)であれば
      // 特性(Characteristic)を探査
      if (service.uuid === '180a') {
        console.log('Discover Service: Device Information\n')
        service.once('characteristicsDiscover', onCharacteristicsDiscover)
        service.discoverCharacteristics()
      }
    })
}

// 探査された特性の内容を出力
function onCharacteristicsDiscover (characteristics) {
  console.log('Discover Characteristics:\n')
  characteristics
    .forEach(characteristic => {
      // 不要な情報を削除
      delete characteristic._noble
      console.dir(characteristic)
      console.log()
    })
}
その結果がこちら
$ node discover-characteristic.js

stateChange: poweredOn

discover peripheral: 000FatScale01

Discover Service: Device Information

Discover Characteristics:

Characteristic {
  _serviceUuid: '180a',
  uuid: '2a29',
  name: 'Manufacturer Name String',
  type: 'org.bluetooth.characteristic.manufacturer_name_string',
  properties: [ 'read' ],
  descriptors: null }

Characteristic {
  _serviceUuid: '180a',
  uuid: '2a24',
  name: 'Model Number String',
  type: 'org.bluetooth.characteristic.model_number_string',
  properties: [ 'read' ],
  descriptors: null }

Characteristic {
  _serviceUuid: '180a',
  uuid: '2a25',
  name: 'Serial Number String',
  type: 'org.bluetooth.characteristic.serial_number_string',
  properties: [ 'read' ],
  descriptors: null }

Characteristic {
  _serviceUuid: '180a',
  uuid: '2a26',
  name: 'Firmware Revision String',
  type: 'org.bluetooth.characteristic.firmware_revision_string',
  properties: [ 'read' ],
  descriptors: null }

Characteristic {
  _serviceUuid: '180a',
  uuid: '2a27',
  name: 'Hardware Revision String',
  type: 'org.bluetooth.characteristic.hardware_revision_string',
  properties: [ 'read' ],
  descriptors: null }

Characteristic {
  _serviceUuid: '180a',
  uuid: '2a28',
  name: 'Software Revision String',
  type: 'org.bluetooth.characteristic.software_revision_string',
  properties: [ 'read' ],
  descriptors: null }

Characteristic {
  _serviceUuid: '180a',
  uuid: '2a23',
  name: 'System ID',
  type: 'org.bluetooth.characteristic.system_id',
  properties: [ 'read' ],
  descriptors: null }

Characteristic {
  _serviceUuid: '180a',
  uuid: '2a2a',
  name: 'IEEE 11073-20601 Regulatory Certification Data List',
  type: 'org.bluetooth.characteristic.ieee_11073-20601_regulatory_certification_data_list',
  properties: [ 'read' ],
  descriptors: null }

Characteristic {
  _serviceUuid: '180a',
  uuid: '2a50',
  name: 'PnP ID',
  type: 'org.bluetooth.characteristic.pnp_id',
  properties: [ 'read' ],
  descriptors: null }
定義されているどおりの特性たちがずらずらとでてきました。
長くなったので、各々の特性の値(Value)を読むのは次の記事にて。