アプリケーションの中身
投稿が遅れてしまい、すみません。すみません。。。
さて、前々回は、Sencha Cmdはどこから入手するのか、と実際にダウンロードを、
前回は、SDKをダウンロードして、やっとのことでスタートアップが終了しました。
こんな画面でしたね。
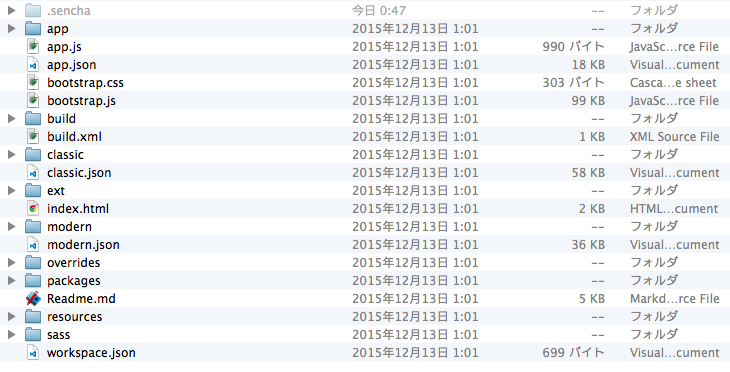
アプリケーションをジェネレートしたついでに、どんなものがジェネレートされたのか、ちょっと見てみましょうか。
これがジェネレートされたルートディレクトリです。
いろいろありますねぇ・・・。
ワタクシ的には見慣れないディレクトリがありました。
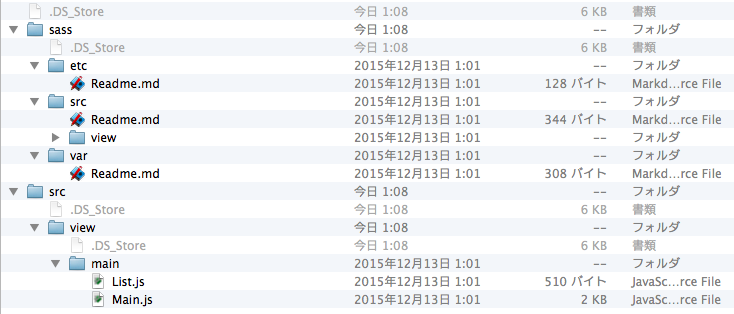
「classic」と「modern」。これらは一体なんでしょう?
はて。srcといってもviewがあるだけ、Main.jsとList.jsがあります。
じゃあmodernはというと・・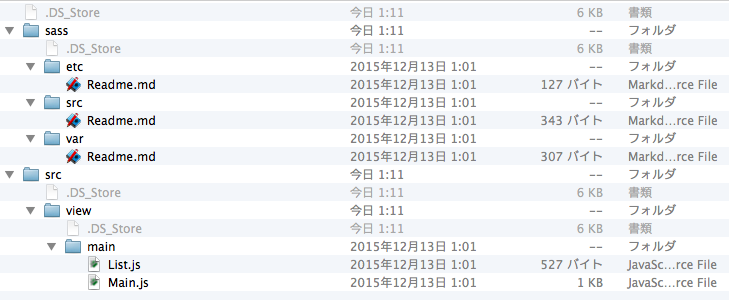
classicと構造が全く同じです。
困った。何が違うんだろう。
そこでワタクシは、ルートにあった「Readme.md」を徐ろに開いて見るわけです。
# MyApp

This folder is primarily a container for the top-level pieces of the application.
While you can remove some files and folders that this application does not use,
be sure to read below before deciding what can be deleted and what needs to be
kept in source control.

The following files are all needed to build and load the application.

 - `"app.json"` - The application descriptor which controls how the application is
   built and loaded.
 - `"app.js"` - The file that launches the application. This is primarily used to
   launch an instance of the `MyApp.Application` class.
 - `"index.html"` - The default web page for this application. This can be customized
   in `"app.json"`.
 - `"build.xml"` - The entry point for Sencha Cmd to access the generated build
   script. This file is a place where you can hook into these processes and tune
   them. See the comments in that file for more information.
 - `".sencha"` - This (typically hidden) folder contains the generated build scripts
   and configuration files for the application. This folder is required in order to
   build the application but its content should not need to be edited in most cases.
   The content of this folder is updated by "sencha app upgrade".

These files can be ignored from source control as they are regenerated by the build
process.

 - `"build"` - This folder contain the output of the build. The generated CSS file,
   consolidated resources and concatenated JavaScript file are all stored in this
   folder.
 - `"bootstrap.*"` - These files are generated by the build and watch commands to
   enable the application to load in "development mode".
最初に説明があったのはMyApp。ジェネレートしたアプリケーションでもコアな部分。これらを削除すると、アプリケーションは動かへんで、って言っているようです。
次に出てきたのは、基本的なアプリケーションの構造について。
# Other Folders

## Basic Application Structure

Applications that target a single toolkit will have the following structure.

    app/                # Contains JavaScript code
        model/          # Data model classes
        view/           # Views as well as ViewModels and ViewControllers
        store/          # Data stores
        controller/     # Global / application-level controllers

    overrides/          # JavaScript code that is automatically required

    sass/
        etc/            # Misc Sass code (all.scss is imported by default)
        var/            # Sass variable and mixin declarations
        src/            # Sass rules

    resources/          # Assets such as images, fonts, etc.

See the [Sass readme](sass/Readme.md) for details on the "sass" folder.
viewディレクトリは、ViewやViewModel、ViewControllerなどでございますと。MVVMでございますと。
そして次には、
## Universal Applications

In a Universal Application, the basic application structure above is retained but
only holds code, resources, etc. pieces that are used in both classic and modern
build profiles. The following additional directories are used to isolate code and
other files that are toolkit-specific:

    classic/                # Content specific to the classic toolkit
        src/
            model/          # Data model classes
            view/           # Views as well as ViewModels and ViewControllers
            store/          # Data stores
            controller/     # Global / application-level controllers

        overrides/          # JavaScript code that is automatically required

        sass/
            etc/            # Misc Sass code (all.scss is imported by default)
            var/            # Sass variable and mixin declarations
            src/            # Sass rules

        resources/          # Assets such as images, fonts, etc.

    modern/                 # Content specific to the modern toolkit
        src/
            model/          # Data model classes
            view/           # Views as well as ViewModels and ViewControllers
            store/          # Data stores
            controller/     # Global / application-level controllers

        overrides/          # JavaScript code that is automatically required

        sass/
            etc/            # Misc Sass code (all.scss is imported by default)
            var/            # Sass variable and mixin declarations
            src/            # Sass rules

        resources/          # Assets such as images, fonts, etc.
お、これですな。
読んでみると、基本構造以外に、これらのディレクトリを追加して、コードを分離させる的なことを言っている気がします。
それでいてでは、classicとmodernとはどういう役割があるのでしょう。
ユニバーサルアプリケーション
実はこの辺りの解説が、@martini3ozさんのブログ、Ext JS 6 で複数環境に対応する方法で詳しく載っています。
これを読んでしまうと、これ以上何も語ることがなくなってしまうのですが、ここではその投稿を参考にさせていただきながら、実際にコマンドを叩いてみましょう。
先述の投稿によると、 classicはExtJS5アプリケーションのサポートを提供するツールキッド です。
一方で modernはスマートフォンを含む全てのモダンブラウザをサポートするツールキッド ということのようです。
IEは11以降のようですね。
要するに、ベース部分は共通で実装して、このclassicやmodernで特有な制御を実装する、ということなのでしょう。そのような仕組みを上記のmarkdownでも題しているように ユニバーサルアプリケーション と呼んでいます。
さて、それではそれぞれを利用したアプリケーションをビルドしてみましょう。
ビルドに挑戦
挑戦というと大げさかもしれませんが。
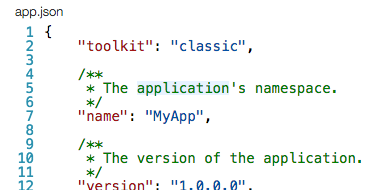
まずは、app.jsonを編集する必要があるようです。
コメントも含めておよそ600行近い設定ファイルです。
ここに
toolkit: "classic"
と記述します(もしくはmodern)。
どの辺りに設定を記述するといいかなとか、余計なことは考えず、1行目に漢設定です。
これでclassicをツールキッドとして選択した、ということになったのでしょうか。
では、早速もうビルドしたくてたまらないので、ビルドしてみましょう。
がしかーし。classic使ってビルドしたことがアプリケーションでもわかるようにしたいじゃないですか。当たり前ですが。
そんなわけで、冒頭で見たclassicディレクトリの中にあったJSファイル(Main.jsとList.js)あたりに、
クラッシックだ!とわかるように編集してみましょう。
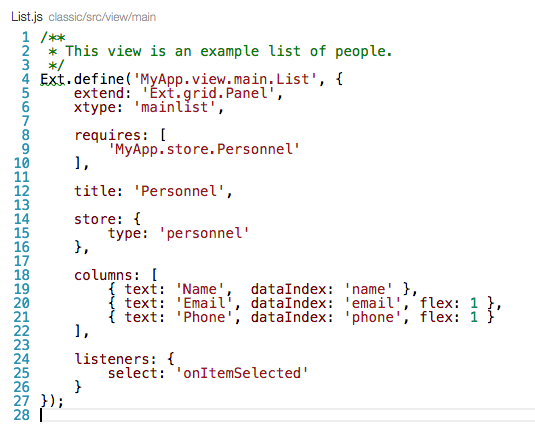
これはList.jsです。エディタの都合上、Extってなんやねんって波線つけられてますが、お気になさらず。
わかりやすい方法としては、やはりこのtitleを編集してみようかしらと。
こいつをtitle: 'クラッシックです'としましょう。
ではいよいよビルドですが、先ほどのapp.jsonの一番下に、ビルドの設定らしきものがありました。
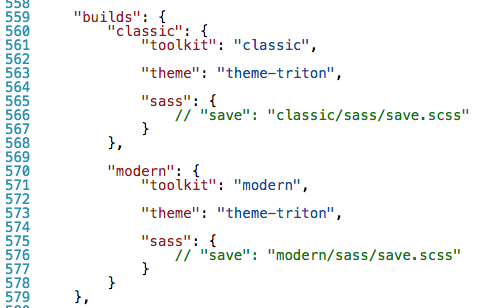
ビルド名(ここではclassicやmodern)とそれに対するツールキット、アプリケーションテーマ、sassのセーブ場所、がここでは記述されているようです。
はてしかし、これであれば、最初に書いたtoolkit : 'classic'って要らないんじゃないのかなって疑問にも思いましたが、ここはマニュアル通りで突き進むであります。
とりあえずビルド設定はこのまま行きましょう。
コマンドは
sencha app build classic
このclassicはビルド設定にあったビルド名です。
エラーもなく、無事ビルドが完了!
タイトルの部分が見事「クラッシックです」となったのがわかります。
こうなってくると「modern」もやってみたいですよね。
すると、こうなります。
あ、あれ?
クラッシックが表示されています。
実はこれ、Macのchromeで表示しているので、クラッシックが表示されているのです。
つまり、各ビルドが後勝ちになるわけではなくて、それぞれが環境に合わせて表示を切り替えてくれる、というもののようです。
実際、iOSシミュレータで確認してみると・・・?
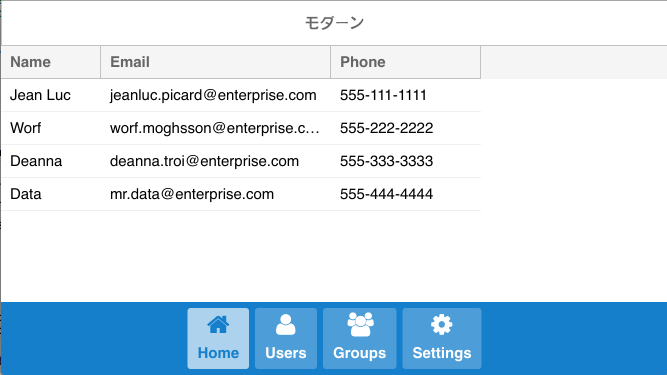
こんな感じで表示してくれました。ちなみにテーマはneptuneに設定してあります。
これが新しいSencha ExtJS6と Sencha Cmd6なのですね。
三回にわたってSencha Cmd6について書いていきました。載せているのは基本中の基本と呼べるようなコマンドでしたが、少しでも参考になればと思います。

