経緯
プログラムに大幅改修が入ったため旧環境と新環境でwebサーバーの負荷テストを行った。
apache jmeterとgatlingを比較して、gatlingを使うことになった。
負荷テスト初経験。scala未経験。。
各種バージョン
windows10 => ローカル
centos6 => gatling検証本番用サーバ
gatling => gatling-charts-highcharts-bundle-2.2.5
gatling
webサーバーに負荷をかけて、レスポンス等の性能を見ることができる。
結果はhtmlファイルで出力されるため、ブラウザで確認する。
使う
javaが入っていないと動かないのでjavaも入れておく。
gatlingはダウンロードしてきてzipを解凍すればOK。
linux用のshellとwindows用のbatファイルが用意されている。適当な場所に配置する。
ファイル構成
├─bin
│ gatling.bat => windows用 ガトリング実行バッチ
│ gatling.sh => linux, mac用 ガトリング実行シェル
│ recorder.bat => windows用 ブラウザ実行レコーダー
│ recorder.sh => linux, mac用 ブラウザ実行レコーダー
├─conf
│ gatling-akka.conf
│ gatling.conf
│ logback.xml
│ recorder.conf
├─lib
│ └─zinc
├─results => 結果格納ディレクトリ、指定しなければここにレポートが入る
└─user-files
├─bodies
├─data
└─simulations
└─computerdatabase
│ BasicSimulation.scala =>初期で入っているシナリオ
│
└─advanced
AdvancedSimulationStep01.scala =>初期で入っているシナリオ
AdvancedSimulationStep02.scala =>初期で入っているシナリオ
AdvancedSimulationStep03.scala =>初期で入っているシナリオ
AdvancedSimulationStep04.scala =>初期で入っているシナリオ
AdvancedSimulationStep05.scala =>初期で入っているシナリオ
ブラウジングをキャプチャする
bin\recorder.bat(windows)を動かす。linux,macではrecorder.shを動かすといいかと思われる。
起動するとjava swingで作成された感じの下記画面が表示される。
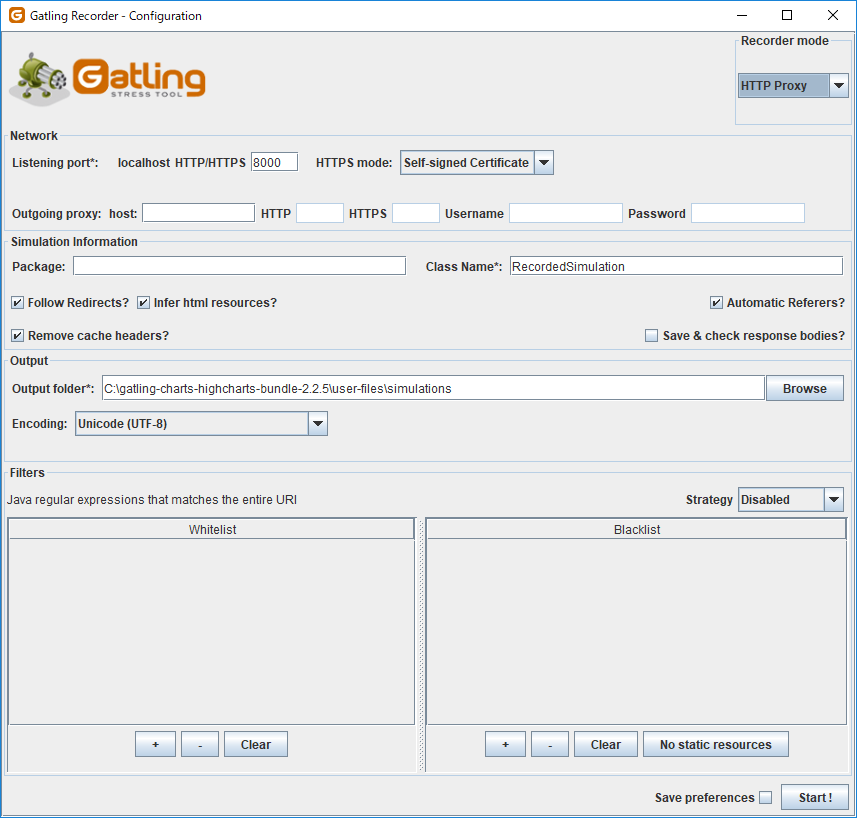
実行した手順がクラスとして保存される。class nameを変えておけばその名前で保存される。
プロキシの設定が必要なので、設定>ネットワークとインターネット>手動プロキシセットアップ(windows)からアドレス[http://localhost] ポート8000に設定する。
startボタンを押下して、ブラウザで対象ページを操作、Executed Eventsにツラツラと読み込んだページの情報がでてくる。操作完了後 Stop&Saveを押下する。
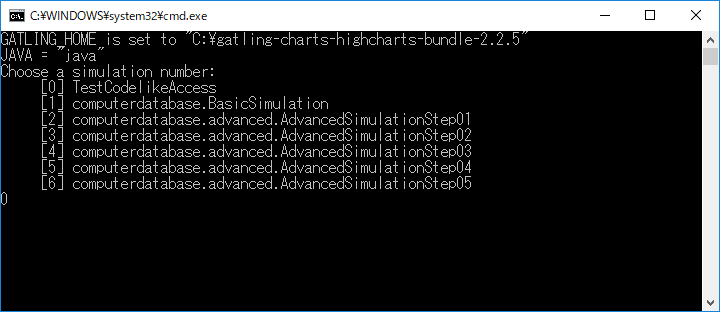
user-files\simulationsにソースが保存される。テストする場合はbin\gatling.bat(windows)を実行して、保存したクラスを選択する。
シナリオを作成する
user-files\simulations配下にscala形式でファイルを作成する必要がある。
ブラウジングキャプチャよりソースが見やすいので、簡単なものであれば基本的にこっちでやったほうがよさげ。
下記作成例
上から4行はおまじない。テストクラスを作成する場合に必要っぽい。
Simulationクラスを継承したクラスを作成して、テストシナリオを作成する。
1クラスにまとめることができるが、同じような記述を行う場合はCommonクラスを作ってまとめるとソースが見やすくなる。
import scala.concurrent.duration._
import io.gatling.core.Predef._
import io.gatling.http.Predef._
import io.gatling.jdbc.Predef._

import info.codelike.accessgogle.Common

class TestCodelikeAccess extends Simulation {
  val com = new Common()

  val codelikeAccess = scenario("Top Access").exec(http("Top Access Request").get("/")).pause(1)

  setUp(
    codelikeAccess.inject(constantUsersPerSec(10) during(10 seconds)).protocols(com.httpProtocol)
  )
}
scenarioでシナリオを定義、引数がシナリオ名。execにアクセスするページを記載する。
トップページのため"/"となっている。pauseでアクセス毎に休止する時間を指定できる。
負荷定義はsetUpで行う。上記が10秒間で毎秒10ユーザーアクセスのつもり。。
package info.codelike.accessgogle

import scala.concurrent.duration._
import io.gatling.core.Predef._
import io.gatling.http.Predef._
import io.gatling.jdbc.Predef._

/**
* 共通情報定義クラス
*/
class Common{
  var baseUrl = "http://codelike.info"
  val pcAgent = "Mozilla/5.0 (Windows NT 6.1; WOW64) AppleWebKit/537.36 (KHTML, like Gecko) Chrome/30.0.1599.101 Safari/537.36"

  var httpProtocol = http
    .baseURL(baseUrl)
    .inferHtmlResources(BlackList(),WhiteList(".*codelike.info.*"))
    .acceptHeader("text/html,application/xhtml+xml,application/xml;q=0.9,image/webp,*/*;q=0.8")
    .acceptLanguageHeader("ja,en-US;q=0.8,en;q=0.6")
    .acceptEncodingHeader("gzip,deflate,sdch")
    .userAgentHeader(pcAgent)
    .header("Cache-Control", "max-age=0")
    .header("Authorization", "Basic dGVzdHVzZXI6YXV0b3dheTEyMw==")
    .connectionHeader("keep-alive")
}
userAgentHeaderでスマホのユーザーエージェントなど定義してやるとスマホとしてアクセスしたりもできる。
inferHtmlResourcesでHTMLから呼び出している各種リソースにアクセスする(画像やCSSなど)、消しておくとページへのアクセスのみ
出力結果
bin\gatling.bat を起動してテストを実行する。
終わると結果を出力したフォルダが表示される。デフォルトはresultの下に設置される。
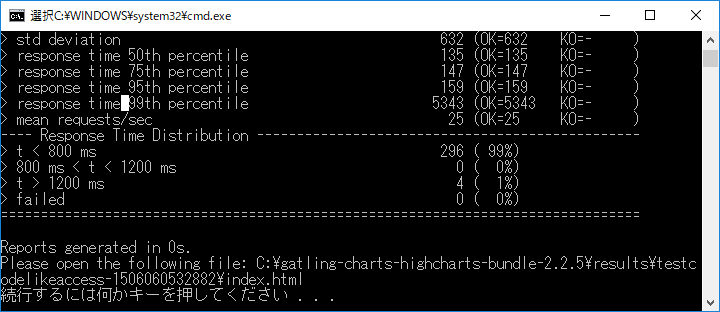
HTMLファイル形式で結果出力されて下記のような感じになる。
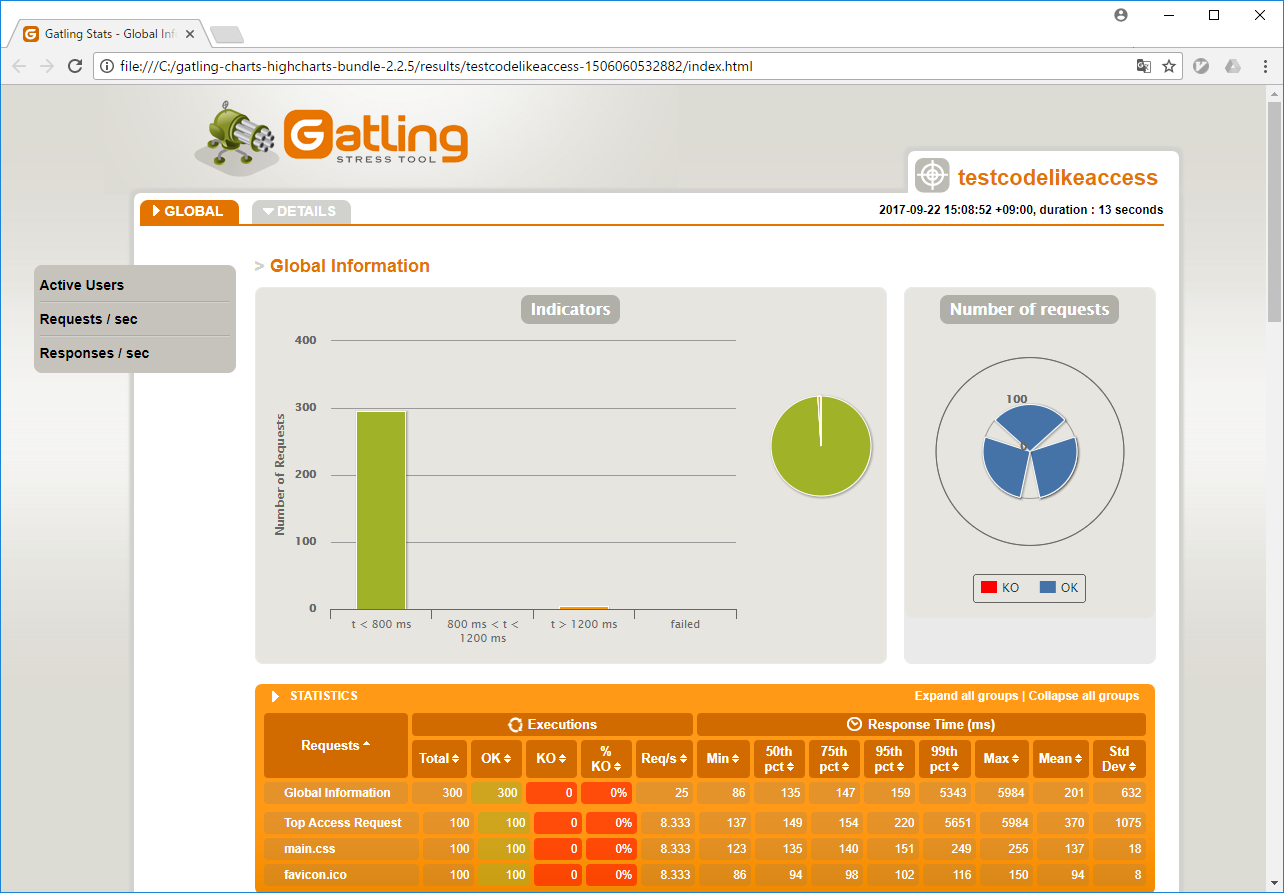
リダイレクトが発生している場合はその分request, responseが増えるので注意が必要。
レスポンスをファイル出力する
import java.io.PrintWriter
/*--- 省略 ・・・・・・・---*/
      .exec(
        http("test_form").post("/form/hoge/")
        .formParam("hoge", "hoge")
        .formParam("fuga", "fuga")
        .check(status.is(200))
        .check(bodyString.saveAs("response"))
      )
      .exec(session => {
        val file1 = new PrintWriter("response.html")
        file1.write(session("response").as[String])
        file1.close()
        session
      })
bodyStringでレスポンスが取れるので、saveAs(任意名)で保存して置いて、最後にsession(任意名)でアクセスしてファイルに書き込むといい。
上記では書き込みにPrintWriterを使った。
その他
下記のようにシェルを作っておけばgatling.batを使わずに、シェルをたたくだけで複数シナリオ実行できる。
-rf でファイルの保存先、 -s で実行クラスを指定する。
#!/bin/sh

rm -rf /usr/src/reportfile
mkdir /usr/src/reportfile
./gatling.sh -rf /usr/src/reportfile -s TestCodelikeAccess
./gatling.sh -rf /usr/src/reportfile -s TestCodelikeAccess2