概要
ESP-WROOM-02にI2Cで接続したINA219の電流値をWebSocketを使ってandroidのプログラムに通信を行いました。
今回はESP-WROOM-02をアクセスポイントとし、スマートフォンがESP-WROOM-02にアクセスするような形になります。なお、IPアドレスは今回は決め打ちとしています。
背景
ESP-WROOM-02にarduinoIDEをつかってプログラムを書き込めると言うことを知り、せっかくなのでWiFi経由で何かデータを送ってみようと思いつきました。
センサーで取得したデータを送信するのにいい方法はないか、探しているとWebSocketが使えそうだったので使って見ました。
参考にしたページ
ESP-WROOM-02側の準備
-
ESP-WROOM-02にはAdafruit_INA219をI2C接続を行います。
-
Adafruit_INA219にはarduino用のライブラリが用意されているので、ライブラリをインストールします。
-
ここに記載されているWebSocketライブラリをインストールします。
sensor.ino
# include <Arduino.h>

# include <ESP8266WiFi.h>
# include <ESP8266WiFiMulti.h>
# include <WebSocketsServer.h>
# include <Hash.h>
# include <Adafruit_INA219.h>
# include <Wire.h>

//ESP8266WiFiMulti WiFiMulti;

Adafruit_INA219 ina219;

WebSocketsServer webSocket = WebSocketsServer(80);

# define USE_SERIAL Serial

/* Set these to your desired credentials. */
const char *ssid = "ESPap";

void webSocketEvent(uint8_t num, WStype_t type, uint8_t * payload, size_t lenght) {

  switch (type) {
    case WStype_DISCONNECTED:
      USE_SERIAL.printf("[%u] Disconnected!\n", num);
      break;
    case WStype_CONNECTED:
      {
        IPAddress ip = webSocket.remoteIP(num);
        USE_SERIAL.printf("[%u] Connected from %d.%d.%d.%d url: %s\n", num, ip[0], ip[1], ip[2], ip[3], payload);

        // send message to client
        webSocket.sendTXT(num, "Connected");
      }
      break;
    case WStype_TEXT:
      USE_SERIAL.printf("[%u] get Text: %s\n", num, payload);

      // send message to client
      // webSocket.sendTXT(num, "message here");

      // send data to all connected clients
      // webSocket.broadcastTXT("message here");
      break;
    case WStype_BIN:
      USE_SERIAL.printf("[%u] get binary lenght: %u\n", num, lenght);
      hexdump(payload, lenght);

      // send message to client
      // webSocket.sendBIN(num, payload, lenght);
      break;
  }

}

void Response(){
  char ma[10];

 float shuntvoltage = 0;
 float busvoltage = 0;
 float current_mA = 0;
 float loadvoltage = 0;
 float power = 0;
 shuntvoltage = ina219.getShuntVoltage_mV();
 busvoltage = ina219.getBusVoltage_V();
 current_mA = ina219.getCurrent_mA();
 loadvoltage = busvoltage + (shuntvoltage / 1000);
 power = current_mA * loadvoltage;
// Serial.print("Bus Voltage: "); Serial.print(busvoltage); Serial.println(" V");
// Serial.print("Shunt Voltage: "); Serial.print(shuntvoltage); Serial.println(" mV");
// Serial.print("Load Voltage: "); Serial.print(loadvoltage); Serial.println(" V");
// Serial.print("Current: "); Serial.print(current_mA); Serial.println(" mA");
// Serial.print("Power: "); Serial.print(power); Serial.println(" mW");
// Serial.println("");

  dtostrf(current_mA,4,1,ma);
  webSocket.broadcastTXT(ma);
//  USE_SERIAL.print("WebSocket");USE_SERIAL.print(ma);USE_SERIAL.print("; ina:");USE_SERIAL.println(current_mA);

}


void setup() {
  // USE_SERIAL.begin(921600);
  USE_SERIAL.begin(115200);

  //Serial.setDebugOutput(true);
  //USE_SERIAL.setDebugOutput(true);

  USE_SERIAL.println();
  USE_SERIAL.println();
  USE_SERIAL.println();

  // INA219初期設定
  uint32_t currentFrequency;
  Serial.begin(115200);
  Serial.println("Hello!");
  Serial.println("Measuring voltage and current with INA219 ...");
  ina219.begin();

  // WiFi 初期設定
  for (uint8_t t = 4; t > 0; t--) {
    USE_SERIAL.printf("[SETUP] BOOT WAIT %d...\n", t);
    USE_SERIAL.flush();
    delay(1000);
  }
  //    WiFiMulti.addAP("SSID", "passpasspass");
  //    while(WiFiMulti.run() != WL_CONNECTED) {
  //        delay(100);
  //    }

  WiFi.softAPConfig(IPAddress(192, 168, 10, 2), IPAddress(192, 168, 10, 1), IPAddress(255, 255, 255, 0));
  WiFi.softAP(ssid);
  IPAddress myIP = WiFi.softAPIP();
  Serial.print("AP IP address: ");
  Serial.println(myIP);

  // WebSocket初期設定
  webSocket.begin();
  webSocket.onEvent(webSocketEvent);
}

void loop() {
  webSocket.loop();
  Response();
  delay(100);
}
Android側の準備
- build.gradleに以下の設定を追加します。
build.gradle
dependencies {
    compile 'com.neovisionaries:nv-websocket-client:1.26'
}
- WebSocket用のクラスを作成します。
MyWebSocket.java
public class MyWebSocket extends Thread {

    // Sensor Server IP
    private static final String SERVER = "ws://192.168.10.2";

    // The timeout value in milliseconds for socket connection.
    private static final int TIMEOUT = 5000;

    private static getSensorListener sensorListener = null;

    private WebSocket ws;

    public MyWebSocket() {
    }

    /**
     * Connect to the server.
     */
    public static WebSocket connect() throws Exception
    {
        return new WebSocketFactory()
                .setConnectionTimeout(TIMEOUT)
                .createSocket(SERVER)
                .addListener(new WebSocketAdapter() {
                    // A text message arrived from the server.
                    public void onTextMessage(WebSocket websocket, String message) {
                        Log.d("WebSocket","message :" + message);
                        sensorListener.getSensorData(message);
                    }
                })
                .addExtension(WebSocketExtension.PERMESSAGE_DEFLATE)
                .connect();
    }

    public void run(){
        try {
            ws = connect();
        } catch (Exception e) {
            e.printStackTrace();
        }

    }

    /**
     * リスナーを追加する
     * @param listener
     */
    public void setListener(getSensorListener listener){
        sensorListener = listener;
        Log.d("MyWebSocket","set Listener");
    }

    /**
     * リスナーを削除する
     */
    public void removeListener(){
        sensorListener = null;
        Log.d("MyWebSocket","remove Listener");
    }

    public void sendText(String message){
        ws.sendText(message);
    }

}
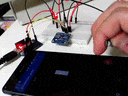
作成結果
上記のプログラムを使って作成したプログラムの動作画像が以下のとおりです。
可変抵抗を使って流れる電流を変更しています。