TDD is dead. Long live testing.あたりにすごく考えさせられたりしつつ、Java+SeleniumなWebアプリケーションの自動テストプロジェクト構築 を書いたわけなんですが、これだけだとテストは自分が手でやらなければならなくて、寝ている時間に障害発生したらどうするんだとかそんなことを思ってしまいやっぱり睡眠の質があんまり上がらないわけです。朝起きて、おそるおそるテストを走らせて、くずおれるみたいな展開は健康によくありません。
そんなときはJenkinsさんの出番です。頼れる執事に定期的にテストを実行しておいてもらえれば、障害の起き始めた時間が明確に特定でき、ごめんなさいの報告や問題解決のためのログ解析など色々なものの精度が上がって捗ります。
やりたいこと
- JenkinsからSeleniumのテストを含むプロジェクトを自動的に実行したい
- 対象WebDriverはFirefoxDriverとChromeDriver
環境
- Ubuntu 12.04 LTS
- Jenkins ver. 1.560
手順
ソフトウェアのインストール
必要なソフトウェアをapt-getでかき集めてくる。インストールするものは以下の通り。
- Xvfb
- Firefox
- Google Chrome (+chromedriver)
まず仮想的なディスプレイをXvfbで作って、そのディスプレイ上でFirefoxやGoogle Chromeを動かす、といった流れ。
$ sudo apt-get update
$ sudo apt-get install xvfb firefox
これでXvfbとFirefoxがインストールされる。で、続いてChromeをインストール。
$ wget -q -O - https://dl-ssl.google.com/linux/linux_signing_key.pub | sudo apt-key add -
$ sudo sh -c 'echo "deb http://dl.google.com/linux/chrome/deb/ stable main" >> /etc/apt/sources.list.d/google.list'
$ sudo apt-get update
$ sudo apt-get install google-chrome-stable
先の記事でも書いたように、Firefoxはパスが通っただけでSelenium(のFirefoxDriver)から実行可能な一方、Google ChromeはSelenium(のChromeDriver)との橋渡しをするchromedriverという実行可能ファイルが別に必要になる。
そのため、今回は適当なディレクトリ/opt/chromedriver/を作って、そこにchromedriverを置いておくことにする。
$ sudo mkdir /opt/chromedriver
$ cd /opt/chromedriver
$ sudo wget http://chromedriver.storage.googleapis.com/2.9/chromedriver_linux64.zip
$ sudo unzip chromedriver_linux64.zip
$ sudo chmod +x chromedriver
最新バージョンのURLはhttp://chromedriver.storage.googleapis.com/index.htmlで参照可能。
Jenkinsの設定
Jenkinsのジョブ実行時に仮想ディスプレイを仕込むには、Xvfbプラグインを使うのが便利。以下の手順でJenkinsにインストールしていく。
-
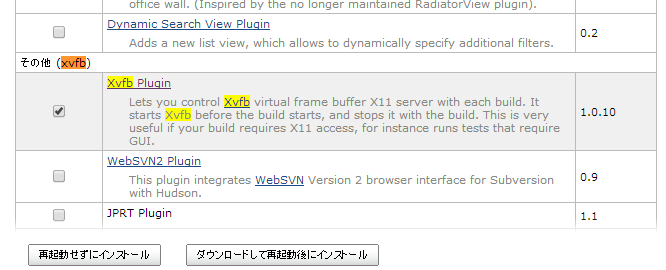
Jenkinsのダッシュボードから、[Jenkinsの管理]メニューを選択し、[プラグインの管理]を選択、[利用可能]タブのうち[Xvfb Plugin]をチェックし、[再起動せずにインストール]を押す。

-
[プラグインのインストール/アップグレード]画面に切り替わるので、[成功]が表示されるまで待つ
-
[Jenkinsの管理]に戻り、[システムの設定]を選択する
-
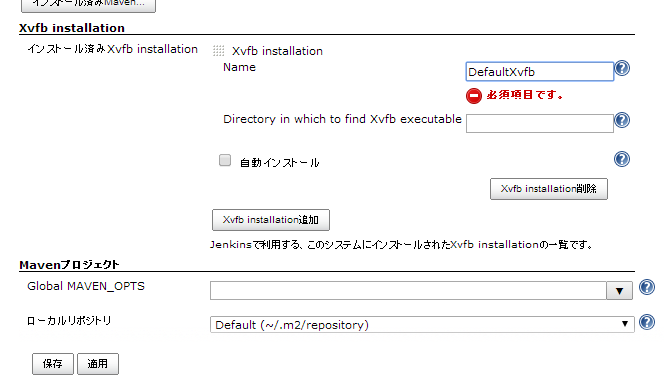
[Xvfb installation]項目中の[Xvfb installation追加]ボタンを押す
-
いくつかのフィールドが現れるので、[Name]に DefaultXvfb などとだけ入力し(自由)、[Directory in which to find Xvfb executable]には何も入力せず(これでXvfbがパスから検索される)、[自動インストール]のチェックをはずした状態にして、[保存]を押す。

これでJenkinsのジョブでXvfbによる仮想ディスプレイが利用できる状態になる。
Jenkinsジョブの設定
Jenkins中にMavenプロジェクト実行用のジョブを作成、設定していく。
- [新規ジョブ作成]を選択し、[ジョブ名]に適当な名前を設定し、[Maven2/3プロジェクトのビルド]をチェックして[OK]ボタンを押す
- [ソースコード管理]にMavenプロジェクトをダウンロードするための設定を行う。プロジェクトがSubversionにあれば[Subversion]をチェックし[リポジトリURL]に適当なURLを設定する、など
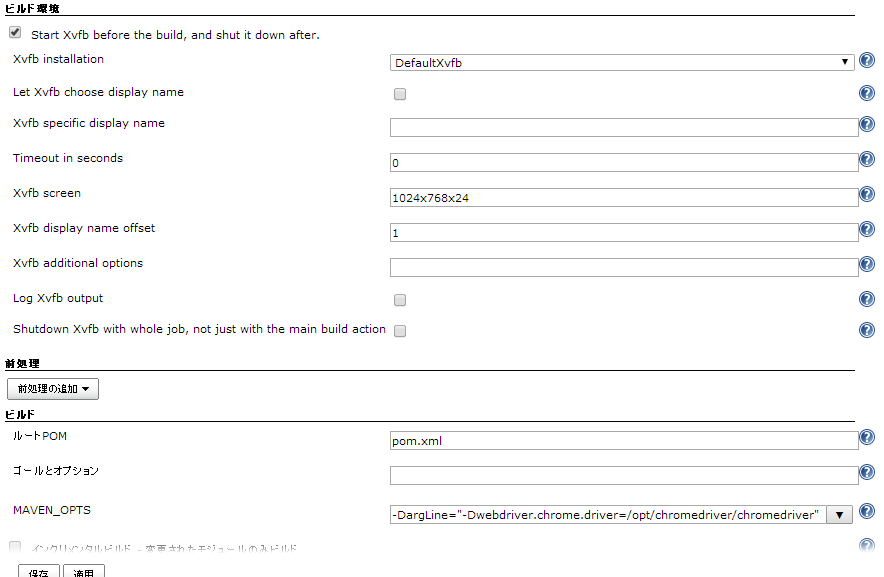
- [ビルド環境]の[Start Xvfb before the build, and shut it down after.]をチェックする
- 同項目の[高度な設定...]を押し、以下の値を設定する
- Timeout in seconds: 0
- Xvfb screen: 1024x768x24
- Xvfb display name offset: 1
- [ビルド]の[高度な設定...]を押し、MAVEN_OPTS入力のためのフィールドを表示する
- MAVEN_OPTS: -DargLine="-Dwebdriver.chrome.driver=/opt/chromedriver/chromedriver"
以下のように設定されていればJenkinsでSeleniumを使ったテストが動く(はず)

[保存]ボタンを押して設定を保存して終わり。
テストの実行
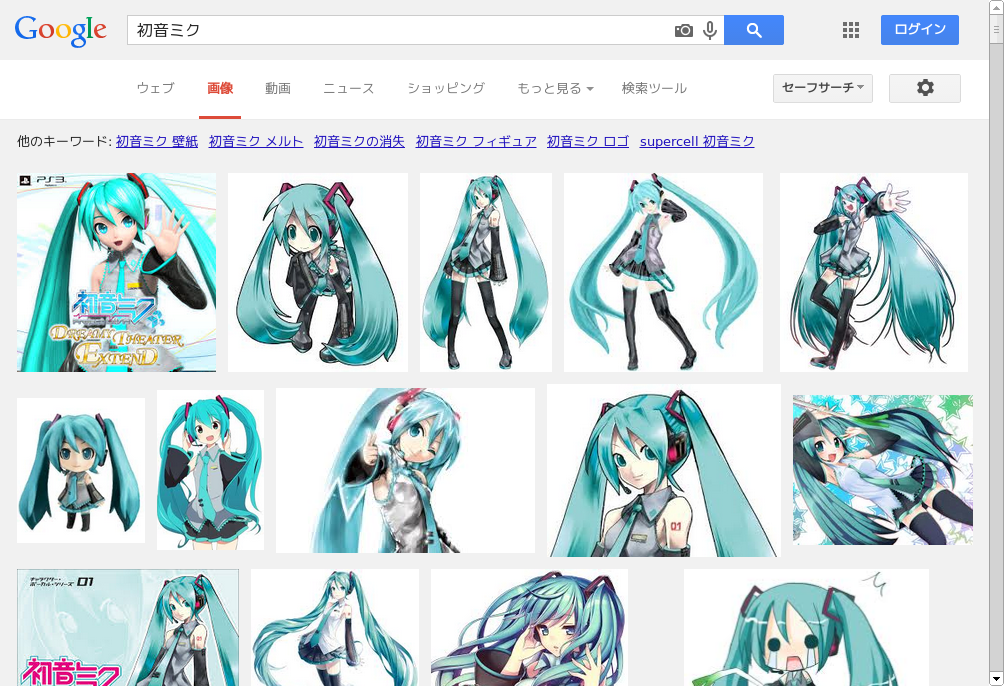
なお、今回はこんな感じのテストコードを書いた。FirefoxとChromeそれぞれについてブラウザを開き、ページwww.google.co.jpを開いてミクさんの画像を検索してブラウザのスクリーンショットを撮ってワークスペースに保存する。
package net.yzwlab.test;

import java.io.File;
import java.util.ArrayList;

import junit.framework.TestCase;

import org.apache.commons.io.FileUtils;
import org.junit.Test;
import org.openqa.selenium.By;
import org.openqa.selenium.Keys;
import org.openqa.selenium.OutputType;
import org.openqa.selenium.TakesScreenshot;
import org.openqa.selenium.WebDriver;
import org.openqa.selenium.WebElement;
import org.openqa.selenium.chrome.ChromeDriver;
import org.openqa.selenium.firefox.FirefoxDriver;
import org.openqa.selenium.support.ui.ExpectedConditions;
import org.openqa.selenium.support.ui.Wait;
import org.openqa.selenium.support.ui.WebDriverWait;

public class ImageSearchTest extends TestCase {
	public interface WebDriverFactory {

		public WebDriver create();

	}

	public static Iterable<WebDriverFactory> getDriverFactories() {
		ArrayList<WebDriverFactory> factories = new ArrayList<WebDriverFactory>();
		factories.add(new WebDriverFactory() {
			@Override
			public WebDriver create() {
				return new FirefoxDriver();
			}
		});
		factories.add(new WebDriverFactory() {
			@Override
			public WebDriver create() {
				return new ChromeDriver();
			}
		});
		return factories;
	}

	@Test
	public void testImage() throws Exception {
		for (WebDriverFactory factory : getDriverFactories()) {
			WebDriver driver = factory.create();
			try {
				driver.get("http://www.google.co.jp");
				Wait<WebDriver> wait = new WebDriverWait(driver, 30);

				WebElement inputField = wait.until(ExpectedConditions
						.visibilityOfElementLocated(By
								.xpath("//input[@type='text']")));
				assertEquals(driver.getTitle(), "Google");
				inputField.sendKeys("初音ミク");
				inputField.sendKeys(Keys.ENTER);
				wait.until(ExpectedConditions.titleContains("初音ミク"));

				WebElement imageButton = wait.until(ExpectedConditions
						.visibilityOfElementLocated(By
								.xpath("//a[contains(@href,'tbm=isch')]")));
				imageButton.sendKeys(Keys.ENTER);
				Thread.sleep(10000);

				FileUtils.copyFile(((TakesScreenshot) driver)
						.getScreenshotAs(OutputType.FILE), new File(driver
						.getClass().getName() + "-miku-search.png"));
			} finally {
				driver.quit();
			}
		}
	}
}
ジョブの[ビルド実行]を選択し、コードの実行が成功したら、[ワークスペース]を開く。
うまく動作をしていれば以下のような画像ができているはず。
- org.openqa.selenium.chrome.ChromeDriver-miku-search.png
- org.openqa.selenium.firefox.FirefoxDriver-miku-search.png
天使ですね。
これでJenkinsさんの手によって、「Chrome, Firefoxの両方で、ミクさんの画像を検索する」ということが可能であるかを確認できるようになりました。
たとえば、Jenkinsの[定期的に実行]機能を使えば、Googleの検索ページがChromeとFirefoxで表示できて、ミクさんの名で検索できるか、すなわちFirefoxユーザとChromeユーザの平和が定期的に確認できるわけです。
IEは知らない。
あっ、人のサイトをむやみにテストするのはやめておきましょう、と、念のため。
