VagrantをSoftLayer上で動かし、簡単にですがchefとの連携も行ったので、記録を残しておきます。
(2016/3/4のSoftLayer勉強会で発表した内容の詳細版です。発表資料はこちら。)
Vagrantは、仮想サーバーの作成・削除・再構築を容易に行えるツールです。仮想サーバー作成の後工程として、シェルスクリプトやChefやAnsibleやPuppetとの連携もできますので、vagrant upコマンドのみで、サーバーを立ち上げ、必要なミドルウェアを入れる事も可能ですので、開発環境を準備する時などに便利なツールかと思います。
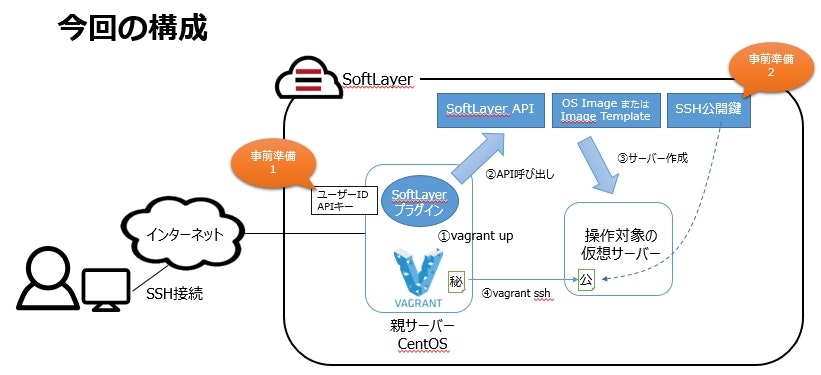
今回の構成図
今回は、下図のような構成をSoftLayer上に作ります。
Vagrantコマンドを実行する親サーバーをSoftLayer上に1台作ります(これは手動で作成します)。
そこに、Vagrant自体やSoftLayer用プラグインをインストールします。
親サーバーでvagrant upコマンドを実行すると、プラグインを介してSoftLayerのAPIが呼び出され、SoftLayerが用意しているOSイメージや、イメージテンプレートを基にして仮想サーバーが作られます。
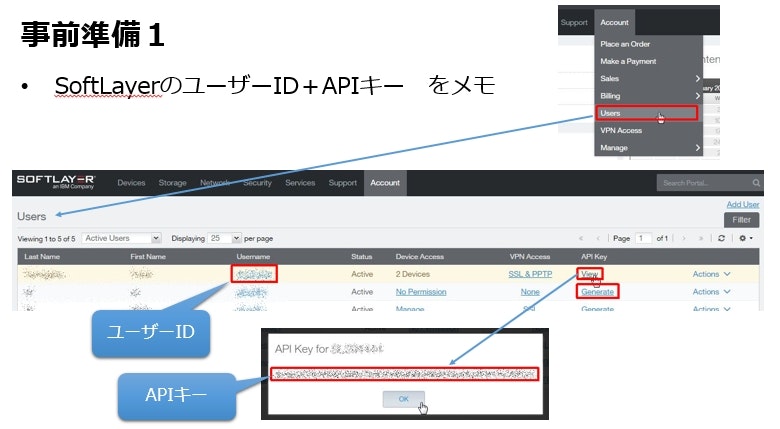
事前準備
上図で、事前準備の1と2と書いた部分の設定を行います。
まず1つ目は、SoftLayerのユーザーIDとAPIキーをメモしておき、後でVagrantfile内で設定します。これは、VagrantがSoftLayerのAPIを呼び出す際の認証用に必要となります。
この情報は、SoftLayerの管理ポータルで、Account > Users のメニューから、参照可能です。
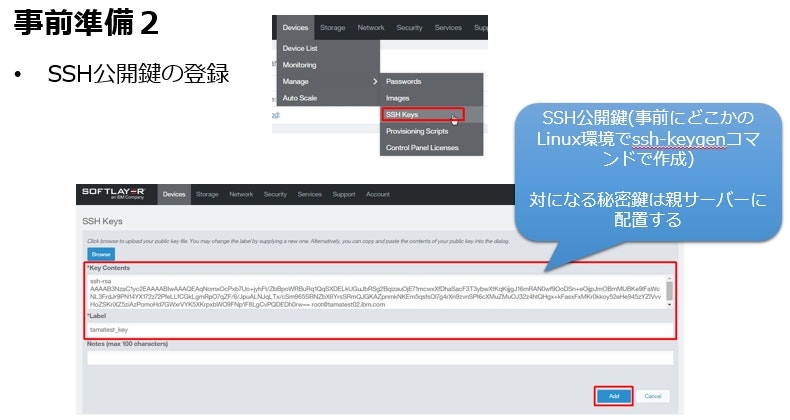
2つ目の準備は、SSH用の公開鍵をSoftLayerの管理ポータルから登録します。
これは、vagrant sshコマンドで、親サーバーから対象サーバーにsshログインする際に必要となります。
公開鍵と秘密鍵のペアは、事前にどこかのLinuxサーバー(もちろん親サーバーでも構いません)でssh-keygenコマンドで作成します。
公開鍵を、SoftLayerの管理ポータルで、Devices > Manage > SSH Keys のメニューから、登録します。
秘密鍵は親サーバー上に配置し、Vagrantfile内で場所を指定します。
VagrantとSoftLayer用プラグインのインストール
事前準備が終わったら、いよいよ親サーバーにVagrantと、SoftLayer用プラグインをインストールします。
Vagrant本体は、rpmをhashicorp社のサイトから取得します。
https://www.vagrantup.com/downloads.html
# rpm -ivh https://releases.hashicorp.com/vagrant/1.8.1/vagrant_1.8.1_x86_64.rpm
Retrieving https://releases.hashicorp.com/vagrant/1.8.1/vagrant_1.8.1_x86_64.rpm
Preparing...                ########################################### [100%]
   1:vagrant                ########################################### [100%]
# vagrant version
Installed Version: 1.8.1
Latest Version: 1.8.1

You're running an up-to-date version of Vagrant!
#
プラグインは、vagrant plugin installコマンドでインストールできます。
# vagrant plugin install vagrant-softlayer
Installing the 'vagrant-softlayer' plugin. This can take a few minutes...
Installed the plugin 'vagrant-softlayer (0.4.0)'!
# vagrant plugin list
vagrant-share (1.1.5, system)
vagrant-softlayer (0.4.0)
#
Vagrantfile編集
インストールが完了したら、ディレクトリを1つ作り、そこに移動してvagrant initコマンドで初期化します。
# mkdir vagrant
# cd vagrant
# vagrant init
A `Vagrantfile` has been placed in this directory. You are now
ready to `vagrant up` your first virtual environment! Please read
the comments in the Vagrantfile as well as documentation on
`vagrantup.com` for more information on using Vagrant.
# ls
Vagrantfile
#
これに、SoftLayer用の記述を追記します。項目の詳細な意味は、下記にREADMEがあります。
https://github.com/audiolize/vagrant-softlayer/blob/master/README.md
Vagrantfileは、一例としてはこのような内容になります。
# -*- mode: ruby -*-
# vi: set ft=ruby :

# Vagrantfile API/syntax version. Don't touch unless you know what you're doing!
VAGRANTFILE_API_VERSION = "2"

Vagrant.configure(VAGRANTFILE_API_VERSION) do |config|
    config.vm.box = "dummy"
    config.vm.box_url = "https://github.com/audiolize/vagrant-softlayer/raw/master/dummy.box"
    config.ssh.pty = true
    config.ssh.private_key_path = "/root/.ssh/id_rsa"
    config.vm.synced_folder ".", "/vagrant", type: "rsync", disabled: true
    config.ssh.username = "root"

    config.vm.provider :softlayer do | sl, override |
            sl.api_key = "xxxxxxxxxxxxxxxxxxxxxxxxxxxxxxxxxxxxxxxxxxxxxxxxxxxxxxxxxxxxxxxx"
            sl.username = "xxxxxxx"
            sl.datacenter   = "che01"
            sl.dedicated    = false
            sl.domain       = "softlayer.com"
            sl.disk_capacity = { 0 => 25 }
#            sl.private_only = true
            sl.force_private_ip = true
            sl.hostname     = "vagrant03"
            sl.hourly_billing = true
            sl.image_guid   = nil
            sl.local_disk   = false
            sl.max_memory   = 1024
            sl.network_speed = 100
            sl.operating_system = "CENTOS_LATEST"
            sl.ssh_key = [ "tamatest_key" ]
            sl.start_cpus   = 1

            override.ssh.username = "root"
    end
end
vagrant up実行
上記のようにセットして vagrant up コマンドを打つと、仮想サーバーが作成されます。
# vagrant up
Bringing machine 'default' up with 'softlayer' provider...
==> default: Box 'dummy' could not be found. Attempting to find and install...
    default: Box Provider: softlayer
    default: Box Version: >= 0
==> default: Box file was not detected as metadata. Adding it directly...
==> default: Adding box 'dummy' (v0) for provider: softlayer
    default: Downloading: https://github.com/audiolize/vagrant-softlayer/raw/master/dummy.box
==> default: Successfully added box 'dummy' (v0) for 'softlayer'!
==> default: Creating a new SoftLayer instance...
==> default: Waiting for instance provisioning. This may take a few minutes...
==> default: SoftLayer instance successfully provisioned!
==> default: Waiting for machine to boot. This may take a few minutes...
    default: SSH address: 10.xx.xx.xxx:22
    default: SSH username: root
    default: SSH auth method: private key
==> default: Machine booted and ready!
#
管理ポータル上でも、仮想サーバーが作成中であることが確認できます。

イメージテンプレートからのサーバー作成
上記の例では、SoftLayerが用意している新規サーバー用のイメージ(素のOSイメージ)を使ってサーバーを起動しました。それ以外に、Image Templateを使用して仮想サーバーを作成することもできます。必要となるミドルウェアやライブラリを導入したImage Templateをあらかじめ用意しておいて、それをゴールデンイメージとして使うことで効率的に開発環境を準備できます。
Image Templateにはguidという一意のIDが付与されていますので、それをVagrantfile内で指定します。
guidは、SLCLIの slcli image listコマンドで参照できます。
SLCLIについては下記の記事を参照ください。
ソフトレイヤー活用ガイド コマンドでサーバーをオーダーするには?
https://www.change-makers.jp/post/10352
# slcli image list
:......................................:....................................................:....................:............:.........:
:                 guid                 :                        name                        :        type        : visibility : account :
:......................................:....................................................:....................:............:.........:
: 719113ed-c060-43f3-8c5c-8889f8b4df01 : 25GB - Ubuntu / Ubuntu / 14.04-64 Minimal for VSI  :       System       :   Public   :  208938 :
: b14a49a2-648b-4cea-9194-17120e98138f : 25GB - Ubuntu / Ubuntu / 12.04-64 Minimal for VSI  :       System       :   Public   :  208938 :
: 2402ec54-6dd8-4391-846a-772406fa76cd :    25GB - Redhat / EL / 5.5-64 Minimal for VSI     :       System       :   Public   :  208938 :
: 56c35934-1caa-408f-9e38-b36e4368e3b7 : 100GB - Ubuntu / Ubuntu / 14.04-32 Minimal for VSI :       System       :   Public   :  208938 :
: 0e4b036f-8287-4ff9-ac9b-77883c245e49 :    100GB - Redhat / EL / 5.5-32 Minimal for VSI    :       System       :   Public   :  208938 :
: f5d6c60f-d6cf-4d0b-a424-5e661e2dea47 : 100GB - Debian / Debian / 8.0.0-64 Minimal for VSI :       System       :   Public   :  208938 :
: 76575ef6-7227-4e76-a85f-b16e0c8cad27 :  25GB - CentOS / CentOS / 5.6-32 Minimal for VSI   :       System       :   Public   :  208938 :
: a3ebe687-87cc-4651-a53c-5d10c47292c1 :    100GB - Redhat / EL / 6.0-32 Minimal for VSI    :       System       :   Public   :  208938 :
: 6d801d2c-2a16-44ac-8d32-7da1a752f4f1 :  25GB - CentOS / CentOS / 6.0-32 Minimal for VSI   :       System       :   Public   :  208938 :
Vagrantfileで、下記のように指定します。(前述のサンプルとの差分だけ書いています)
sl.image_guid   = "719113ed-c060-43f3-8c5c-8889f8b4df01"
sl.operating_system = nil
# sl.disk_capacity = { 0 => 25 }
guidを指定した時は、上記のようにsl.operating_systemを明示的にnilにし、sl.disk_capacityをコメントアウトしないと、vagrant up時に下記のようなエラーになります。
# vagrant up
There are errors in the configuration of this machine. Please fix
the following errors and try again:

SoftLayer:
* The image guid for a compute or flex image and the operating
system reference code cannot be used at the same time.
Please use only one of the following options in the provider
section:

config.vm.provider :softlayer do |sl|
  sl.image_guid = "AAAAAAAA-BBBB-CCCC-DDDD-EEEEEEEEEEEE"
end

config.vm.provider :softlayer do |sl|
  sl.operating_system = "UBUNTU_LATEST"
end

#
# vagrant up
There are errors in the configuration of this machine. Please fix
the following errors and try again:

SoftLayer:
* The disk capacity can only be specified when using an operating
system reference code and not when using a specific compute or
flex image guid. Please use one of the following options in the
provider section:

config.vm.provider :softlayer do |sl|
  sl.image_guid = "AAAAAAAA-BBBB-CCCC-DDDD-EEEEEEEEEEEE"
end

config.vm.provider :softlayer do |sl|
  sl.operating_system = "UBUNTU_LATEST"

  # Disk number 1 is reserved for SWAP space, see SoftLayer API
  # CLI tool command 'sl cci create-options' for more info.
  sl.disk_capacity = { 0 => 25, 2 => 100, 3 => 2000 }
end

#
シェルスクリプトとの連携
vagrant upの処理の中で、親サーバーに置いたスクリプトを、対象サーバー上で実行できます。
サーバー作成後の定型作業に便利で、用途としては、iptablesの設定、OSユーザー作成、ソフトウェアの導入 などが考えられます。
SoftLayerのProvisioning script( https://www.change-makers.jp/post/10294 )を使っても同様の事が実現できますが、スクリプトをHTTPSサーバーに配置しておく必要があります。両方使ってみた感想としては、Vagrantのほうが手軽のように感じました。
Vagrantfileには、下記のように記載します。
config.vm.provision :shell, :path => "./provisioning.sh",:privileged => true
provisioning.shは、下記のように、通常のシェルスクリプトとして記述します。例として、最新のOSパッチを適用し、ウェブサーバーを導入・起動するスクリプトです。
#!/bin/sh

# yum update all
yum -y update

# install apach webserver
yum install -y httpd
service httpd start
chkconfig httpd on
Chefとの連携
簡易なミドルウェアの導入であれば上記のようにシェルスクリプトでも十分と思いますが、少し複雑な構成や、既存のrecipeがある場合には、Chefと連携することも可能です。VagrantfileにChefと連携する記述をする事で、vagrant up のみで、Chefによるプロビジョニングまで行うことができます。なお、今回は、chef-zeroの機能を使い、Chefクライアントをローカルモードで動かします。
Chefを動かすために親サーバーに少々の追加準備が必要となりますので、それを記載します。
OSに Development Tools導入
VagrantにChef関連のプラグインを追加する際に必要となるため、Development Toolsを導入します。
# yum groupinstall -y "Development Tools"
Chef Development Kit 導入(chef, ruby, gem)
親サーバーで、Chef、Ruby、Gemが動く必要があります。
Chef Development Kit(Chef DK)を使うことで、これらを一度にインストールする事ができます。
下記からダウンロードできます。
https://downloads.chef.io/chef-dk/redhat/
# rpm -ivh https://opscode-omnibus-packages.s3.amazonaws.com/el/6/x86_64/chefdk-0.11.2-1.el6.x86_64.rpm
Retrieving https://opscode-omnibus-packages.s3.amazonaws.com/el/6/x86_64/chefdk-0.11.2-1.el6.x86_64.rpm
warning: /var/tmp/rpm-tmp.CMDJ51: Header V4 DSA/SHA1 Signature, key ID 83ef826a: NOKEY
Preparing...                ########################################### [100%]
   1:chefdk                 ########################################### [100%]
Thank you for installing Chef Development Kit!
#
上記のインストールが完了するとchefコマンドは使えるようになりますが、gemはまだパスが通っていないので、使えません。eval "$(chef shell-init bash)"コマンドで、必要な環境変数をセットすることでgemも使えるようになります。"bash"の部分は、echo $SHELLで自分のシェル環境を確認して指定します。
# which chef
/usr/bin/chef
# gem
-bash: gem: command not found
# echo $SHELL
/bin/bash
# eval "$(chef shell-init bash)"
# which gem
/opt/chefdk/embedded/bin/gem
#
ちなみに、chef shell-init bashの出力は下記のような感じです。
# chef shell-init bash
export PATH="/opt/chefdk/bin:/root/.chefdk/gem/ruby/2.1.0/bin:/opt/chefdk/embedded/bin:/opt/chefdk/bin:/root/.chefdk/gem/ruby/2.1.0/bin:/opt/chefdk/embedded/bin:/usr/local/sbin:/usr/local/bin:/sbin:/bin:/usr/sbin:/usr/bin:/root/bin"
export GEM_ROOT="/opt/chefdk/embedded/lib/ruby/gems/2.1.0"
export GEM_HOME="/root/.chefdk/gem/ruby/2.1.0"
export GEM_PATH="/root/.chefdk/gem/ruby/2.1.0:/opt/chefdk/embedded/lib/ruby/gems/2.1.0"
_chef_comp() {
    local COMMANDS="exec env gem generate shell-init install update push push-archive show-policy diff provision export clean-policy-revisions clean-policy-cookbooks delete-policy-group delete-policy undelete verify"
    COMPREPLY=($(compgen -W "$COMMANDS" -- ${COMP_WORDS[COMP_CWORD]} ))
}
complete -F _chef_comp chef

#
ログインしなおしても上記の環境変数が有効になるよう、profileにも書いておきます。
# echo 'eval "$(chef shell-init bash)"' >> ~/.bash_profile
Vagrantプラグイン(vagrant-omnibus、vagrant-chef-zero)導入
vagrant-omnibusは、操作対象のサーバーにChefをインストールするためのプラグインです。
# vagrant plugin install vagrant-omnibus
Installing the 'vagrant-omnibus' plugin. This can take a few minutes...
Installed the plugin 'vagrant-omnibus (1.4.1)'!
#
vagrant-chef-zeroは、VagrantからChef Zero Serverを起動するためのプラグインです。
# vagrant plugin install vagrant-chef-zero
Installing the 'vagrant-chef-zero' plugin. This can take a few minutes...
Installed the plugin 'vagrant-chef-zero (2.0.0)'!
#
プラグインの導入状況は下記のようになります。
# vagrant plugin list
vagrant-chef-zero (2.0.0)
vagrant-omnibus (1.4.1)
vagrant-share (1.1.5, system)
vagrant-softlayer (0.4.0)
#
なお、vagrant-chef-zeroのインストールする際、OSにDevelopment Toolsやgemが入っていないと、下記のようなエラーになります。事前に前項までの前提条件を導入しておいてください。
# vagrant plugin install vagrant-chef-zero
Installing the 'vagrant-chef-zero' plugin. This can take a few minutes...
Bundler, the underlying system Vagrant uses to install plugins,
reported an error. The error is shown below. These errors are usually
caused by misconfigured plugin installations or transient network
issues. The error from Bundler is:

An error occurred while installing hitimes (1.2.3), and Bundler cannot continue.
Make sure that `gem install hitimes -v '1.2.3'` succeeds before bundling.

Warning: this Gemfile contains multiple primary sources. Using `source` more than once without a block is a security risk, and may result in installing unexpected gems. To resolve this warning, use a block to indicate which gems should come from the secondary source. To upgrade this warning to an error, run `bundle config disable_multisource true`.Gem::Ext::BuildError: ERROR: Failed to build gem native extension.

    /opt/vagrant/embedded/bin/ruby -r ./siteconf20160306-18625-dthbk2.rb extconf.rb
checking for clock_gettime() in -lrt... *** extconf.rb failed ***
Could not create Makefile due to some reason, probably lack of necessary
libraries and/or headers.  Check the mkmf.log file for more details.  You may
need configuration options.

Provided configuration options:
        --with-opt-dir
        --with-opt-include
        --without-opt-include=${opt-dir}/include
        --with-opt-lib
        --without-opt-lib=${opt-dir}/lib
        --with-make-prog
        --without-make-prog
        --srcdir=.
        --curdir
        --ruby=/opt/vagrant/embedded/bin/$(RUBY_BASE_NAME)
        --with-rtlib
        --without-rtlib
/opt/vagrant/embedded/lib/ruby/2.2.0/mkmf.rb:456:in `try_do': The compiler failed to generate an executable file. (RuntimeError)
You have to install development tools first.
        from /opt/vagrant/embedded/lib/ruby/2.2.0/mkmf.rb:541:in `try_link0'
        from /opt/vagrant/embedded/lib/ruby/2.2.0/mkmf.rb:556:in `try_link'
        from /opt/vagrant/embedded/lib/ruby/2.2.0/mkmf.rb:735:in `try_func'
        from /opt/vagrant/embedded/lib/ruby/2.2.0/mkmf.rb:966:in `block in have_library'
        from /opt/vagrant/embedded/lib/ruby/2.2.0/mkmf.rb:911:in `block in checking_for'
        from /opt/vagrant/embedded/lib/ruby/2.2.0/mkmf.rb:351:in `block (2 levels) in postpone'
        from /opt/vagrant/embedded/lib/ruby/2.2.0/mkmf.rb:321:in `open'
        from /opt/vagrant/embedded/lib/ruby/2.2.0/mkmf.rb:351:in `block in postpone'
        from /opt/vagrant/embedded/lib/ruby/2.2.0/mkmf.rb:321:in `open'
        from /opt/vagrant/embedded/lib/ruby/2.2.0/mkmf.rb:347:in `postpone'
        from /opt/vagrant/embedded/lib/ruby/2.2.0/mkmf.rb:910:in `checking_for'
        from /opt/vagrant/embedded/lib/ruby/2.2.0/mkmf.rb:961:in `have_library'
        from extconf.rb:10:in `<main>'

extconf failed, exit code 1

Gem files will remain installed in /root/.vagrant.d/gems/gems/hitimes-1.2.3 for inspection.
Results logged to /root/.vagrant.d/gems/extensions/x86_64-linux/2.2.0/hitimes-1.2.3/gem_make.out

#
Chef初期化
Vagrantfileが配置されたフォルダで、chef generate repo chef-repoコマンドを実行し、policy repositoryの雛形を作成します。
# ls
Vagrantfile
# chef generate repo chef-repo
Compiling Cookbooks...
Recipe: code_generator::repo
  * directory[/root/vagrant/chef-repo] action create
(後略)

# ls
chef-repo  Vagrantfile
#
Berksfile作成
# cd chef-repo/
# ls
chefignore  cookbooks  data_bags  environments  LICENSE  README.md  roles
# vi Berksfile
# cat Berksfile
source "https://supermarket.chef.io"
cookbook 'apache2'
#
Cookbook作成(berks vendor cookbooks)
# berks vendor cookbooks
/opt/chefdk/embedded/lib/ruby/gems/2.1.0/gems/httpclient-2.6.0.1/lib/httpclient/webagent-cookie.rb:458: warning: already initialized constant HTTPClient::CookieManager
/opt/chefdk/embedded/lib/ruby/gems/2.1.0/gems/httpclient-2.6.0.1/lib/httpclient/cookie.rb:8: warning: previous definition of CookieManager was here
Resolving cookbook dependencies...
Fetching cookbook index from https://supermarket.chef.io...
Installing apache2 (3.1.0)
Vendoring apache2 (3.1.0) to cookbooks/apache2
#
Vagrantfileにchef用設定追記
# cat Vagrantfile
# -*- mode: ruby -*-
# vi: set ft=ruby :

# Vagrantfile API/syntax version. Don't touch unless you know what you're doing!
VAGRANTFILE_API_VERSION = "2"

Vagrant.configure(VAGRANTFILE_API_VERSION) do |config|
    config.vm.box = "dummy"
    config.vm.box_url = "https://github.com/audiolize/vagrant-softlayer/raw/master/dummy.box"
    config.ssh.pty = true
    config.ssh.private_key_path = "/root/.ssh/id_rsa"
    config.vm.synced_folder ".", "/vagrant", type: "rsync", disabled: true
    config.ssh.username = "root"
    config.omnibus.chef_version = :latest

    config.vm.provision "chef_zero" do |chef|
        # Specify the local paths where Chef data is stored
        chef.cookbooks_path = "./chef-repo/cookbooks"
        chef.roles_path = "./chef-repo/roles"
        chef.nodes_path = "./chef-repo/cookbooks"

        # Add a recipe
        chef.add_recipe "apache2"

    end

    config.vm.provider :softlayer do | sl, override |
            sl.api_key = "xxxxxxxxxxxxxxxxxxxxxxxxxxxxxxxxxxxxxxxxxxxxxxxxxxxxxxxxxxxxxxxx"
            sl.username = "xxxxxxx"
            sl.datacenter   = "sea01"
            sl.dedicated    = false
            sl.domain       = "softlayer.com"
            sl.disk_capacity = { 0 => 25 }
#            sl.private_only = true
            sl.force_private_ip = true
            sl.hostname     = "vagrant03"
            sl.hourly_billing = true
            sl.image_guid   = nil
            sl.local_disk   = false
            sl.max_memory   = 1024
            sl.network_speed = 100
            sl.operating_system = "UBUNTU_14_64"
            sl.ssh_key = [ "tamatest_key" ]
            sl.start_cpus   = 1

            override.ssh.username = "root"
    end
end
#
vagrant up
vagrant upコマンドの中で、操作対象サーバーにChefがインストールされ、ローカルホストモードでアクセスしに行っていることが分かります。
# vagrant up
Bringing machine 'default' up with 'softlayer' provider...
==> default: Auto-generating node name for Chef...
==> default: Creating a new SoftLayer instance...
==> default: Waiting for instance provisioning. This may take a few minutes...
==> default: SoftLayer instance successfully provisioned!
==> default: Waiting for machine to boot. This may take a few minutes...
    default: SSH address: 10.28.227.132:22
    default: SSH username: root
    default: SSH auth method: private key
==> default: Machine booted and ready!
==> default: Rsyncing folder: /root/vagrant/chef-repo/cookbooks/ => /tmp/vagrant-chef/a14caf21a1f1c0ee0745db508bbcabc2/cookbooks
==> default: Rsyncing folder: /root/vagrant/chef-repo/roles/ => /tmp/vagrant-chef/05d0b4f19a1e6bdc34b5b3c14dd2fb5c/roles
==> default: Rsyncing folder: /root/vagrant/chef-repo/cookbooks/ => /tmp/vagrant-chef/a14caf21a1f1c0ee0745db508bbcabc2/nodes
==> default: Installing Chef 12.7.2 Omnibus package...
==> default: Getting information for chef stable 12.7.2 for ubuntu...
==> default: downloading https://omnitruck-direct.chef.io/stable/chef/metadata?v=12.7.2&p=ubuntu&pv=14.04&m=x86_64
==> default:   to file /tmp/install.sh.2745/metadata.txt
==> default: trying wget...
==> default: url        https://opscode-omnibus-packages.s3.amazonaws.com/ubuntu/14.04/x86_64/chef_12.7.2-1_amd64.deb
==> default: md5        b7acab8f396f8bb12fe39f42b3277bed
==> default: sha256     0f543f51116fb498cf683e73b005cdd8ed0c8147ca5d10163377d9c1ab6a2cde
==> default: version    12.7.2downloaded metadata file looks valid...
==> default: downloading https://opscode-omnibus-packages.s3.amazonaws.com/ubuntu/14.04/x86_64/chef_12.7.2-1_amd64.deb
==> default:   to file /tmp/install.sh.2745/chef_12.7.2-1_amd64.deb
==> default: trying wget...
==> default: Comparing checksum with sha256sum...
==> default: Installing chef 12.7.2
==> default: installing with dpkg...
==> default: Selecting previously unselected package chef.
(Reading database ... 47139 files and directories currently installed.)
==> default: Preparing to unpack .../chef_12.7.2-1_amd64.deb ...
==> default: Unpacking chef (12.7.2-1) ...
==> default: Setting up chef (12.7.2-1) ...
==> default: Thank you for installing Chef!
==> default: Running provisioner: chef_zero...
==> default: Detected Chef (latest) is already installed
==> default: Generating chef JSON and uploading...
==> default: Running chef-client (local-mode)...
==> default: [2016-03-07T02:05:25-06:00] INFO: Started chef-zero at chefzero://localhost:8889 with repository at /tmp/vagrant-chef/a14caf21a1f1c0ee0745db508bbcabc2
==> default:   One version per cookbook
==> default:   roles at /tmp/vagrant-chef/05d0b4f19a1e6bdc34b5b3c14dd2fb5c/roles
==> default:
==> default: [2016-03-07T02:05:25-06:00] INFO: Forking chef instance to converge...
==> default: Starting Chef Client, version 12.7.2
==> default: [2016-03-07T02:05:25-06:00] INFO: *** Chef 12.7.2 ***
==> default: [2016-03-07T02:05:25-06:00] INFO: Chef-client pid: 3149
==> default: [2016-03-07T02:05:27-06:00] INFO: HTTP Request Returned 404 Not Found: Object not found: chefzero://localhost:8889/nodes/vagrant-38b5c5d2
==> default: [2016-03-07T02:05:27-06:00] INFO: Setting the run_list to ["recipe[apache2]"] from CLI options
==> default: [2016-03-07T02:05:27-06:00] INFO: Run List is [recipe[apache2]]
==> default: [2016-03-07T02:05:27-06:00] INFO: Run List expands to [apache2]
==> default: [2016-03-07T02:05:27-06:00] INFO: Starting Chef Run for vagrant-38b5c5d2
==> default: [2016-03-07T02:05:27-06:00] INFO: Running start handlers
==> default: [2016-03-07T02:05:27-06:00] INFO: Start handlers complete.
==> default: resolving cookbooks for run list: ["apache2"]
==> default: [2016-03-07T02:05:27-06:00] INFO: Loading cookbooks [apache2@3.1.0]
==> default: Synchronizing Cookbooks:
==> default: [2016-03-07T02:05:27-06:00] INFO: Storing updated cookbooks/apache2/recipes/mod_charset_lite.rb in the cache.
==> default: [2016-03-07T02:05:27-06:00] INFO: Storing updated cookbooks/apache2/recipes/mod_authn_dbd.rb in the cache.
==> default: [2016-03-07T02:05:27-06:00] INFO: Storing updated cookbooks/apache2/recipes/mod_authn_anon.rb in the cache.
==> default: [2016-03-07T02:05:27-06:00] INFO: Storing updated cookbooks/apache2/recipes/mod_fcgid.rb in the cache.
(後略)
上記処理の完了後、操作対象サーバー上でapacheが起動していました。
vagrant upコマンドのみで、Chefのレシピ実行まで行えた事が確認できました。
# ps -ef|grep apache
root      4103     1  0 02:05 ?        00:00:00 /usr/sbin/apache2 -k start
www-data  4296  4103  0 02:05 ?        00:00:00 /usr/sbin/apache2 -k start
www-data  4297  4103  0 02:05 ?        00:00:00 /usr/sbin/apache2 -k start
www-data  4431  4103  0 02:05 ?        00:00:00 /usr/sbin/apache2 -k start
root      4659  4582  0 02:07 pts/0    00:00:00 grep --color=auto apache
#
残課題
RedHatやCentOSだと、vagrant up中に下記のエラーとなりました。
ググると、Vagrantfileに override.ssh.pty = true を記述する事でうまくいく、という情報も見つかりましたが当環境の場合はそれでは解決しませんでした。
# vagrant up
Bringing machine 'default' up with 'softlayer' provider...
==> default: Auto-generating node name for Chef...
==> default: Creating a new SoftLayer instance...
==> default: Waiting for instance provisioning. This may take a few minutes...
==> default: SoftLayer instance successfully provisioned!
==> default: Waiting for machine to boot. This may take a few minutes...
    default: SSH address: 10.28.227.133:22
    default: SSH username: root
    default: SSH auth method: private key
==> default: Machine booted and ready!
==> default: Rsyncing folder: /root/vagrant/chef-repo/cookbooks/ => /tmp/vagrant-chef/a14caf21a1f1c0ee0745db508bbcabc2/cookbooks
There was an error when attempting to rsync a synced folder.
Please inspect the error message below for more info.

Host path: /root/vagrant/chef-repo/cookbooks/
Guest path: /tmp/vagrant-chef/a14caf21a1f1c0ee0745db508bbcabc2/cookbooks
Command: rsync --verbose --archive --delete -z --copy-links --no-owner --no-group --rsync-path sudo rsync -e ssh -p 22 -o ControlMaster=auto -o ControlPath=/tmp/ssh.116 -o ControlPersist=10m -o StrictHostKeyChecking=no -o IdentitiesOnly=true -o UserKnownHostsFile=/dev/null -i '/root/.ssh/id_rsa' --exclude .vagrant/ /root/vagrant/chef-repo/cookbooks/ root@10.28.227.133:/tmp/vagrant-chef/a14caf21a1f1c0ee0745db508bbcabc2/cookbooks
Error: Warning: Permanently added '10.28.227.133' (RSA) to the list of known hosts.
sudo: sorry, you must have a tty to run sudo
rsync: connection unexpectedly closed (0 bytes received so far) [sender]
rsync error: error in rsync protocol data stream (code 12) at io.c(600) [sender=3.0.6]

#
上記エラーが出ても、仮想サーバー自体は作成されています。
作成された仮想サーバーにsshログインし、visudoで/etc/sudoersのttyの設定を下記のように変更後、vagrant provisionを行えば、Chefによる設定まで行ってくれます。
変更前
Defaults requiretty
変更後
Defaults !requiretty
RedHatやCentOSの場合、/etc/sudoersに上記の変更を行った後でImage Templateを取得し、前述のように、Vagrantfileでイメージのguidを指定して、イメージから仮想サーバーを作成するのが良いかもしれません。
おわりに
Vagrantは仮想サーバーの作成・削除・再構築を容易に行えるツールですが、それだけに留まらず、Image Templateからのサーバー作成や、仮想サーバー作成の後工程として、シェルスクリプトやChefとの連携もできる事が確認できました。
vagrant upコマンドのみで、サーバーを立ち上げ、必要なミドルウェアが導入された状態にできますので、開発環境を準備する時などに有用なツールと思います。
参考リンク
今回の内容を試すにあたり、下記の情報を参考にさせていただきました。ありがとうございました。
VagrantでSoftLayerを操作する
http://niccloud.niandc.ne.jp/?p=749
VagrantでSoftLayerに仮想サーバーをProvisioningする
http://qiita.com/takech9203/items/27e38278e7f71ca4d9ab
Chefを使うのに必要な環境が一気に整う「ChefDK」レビュー
http://knowledge.sakura.ad.jp/tech/2825/
Vagrant と Chef による仮想環境構築の自動化(VirtualBox編)
https://www.ogis-ri.co.jp/otc/hiroba/technical/vagrant-chef/chap1.html
初めての Vagrant + Chef zero + Berkshelf
http://qiita.com/tsuyopooon/items/d90679d9f8b5ccfcfde5
SoftLayer Tips プロビジョニング・スクリプトとSSH鍵でのログイン
https://ibm.biz/BdH4Yu
Chef Zero Provisioner
https://www.vagrantup.com/docs/provisioning/chef_zero.html
Error: Missing required value for `chef.nodes_path'.
https://github.com/r8/vagrant-lamp/issues/134