python3を使って色々試してみたいと思いこのシリーズ全てを参考に簡単なウィンドウを作ってみようと思う。チュートリアルの動画が全部で15個分あるので少し長いですが。
目次
- きほんのき
- オブジェクトのレイアウトをいじる
- レイアウトにウィジェットを追加する
- より直感的にウィジェット整理
- 関数を使ってレイアウトをより便利に
- 複数のウィジェットをウィンドウに追加する
- クラスを使って簡易プログラムを作る
- ドロップダウンメニューを追加する
- ツールバーを追加する
- ステータスバーを追加する
- メッセージボックスを追加する
- シンプルな図式などを追加する
- 画像やアイコンの追加
きほんのき
GUIとは
GUIと言うとUIとかCUIとかっていう単語が出てくるかもしれない。そこら辺の違いも上手く理解していなかったのでお互いの違いも含めて調べてみた。まずGUIとはGraphical User Interfaceの略でwindowsやmacに関係なく普段自分たちがいわゆるホームスクリーンを通じて直感的に行っている操作のほとんどがGUIのおかげと言っても過言ではない。それまではCUI(Character User Interface)と呼ばれるいわゆるTerminalを通じてだけでパソコンとのコミュニケーションを図っていた。具体的には直感的な操作を得意としたGUIとは反対に位置しているのがより複雑な処理を得意としたCUIといったところでしょうか。技術的なものはぐぐってみるとよりいいと思います。
一般的な流れ
- フレームとなるウィンドウを作る
-
label()を使ってメッセージをディスプレイに送るための材料を用意 -
pack()で実際にrootウィンドウに表示するよう指示している -
mainloopでウィンドウを継続的に開いている。閉じることでloopをbreakする
*ちなみにtkinterでプログラムを作る場合はx = Tk()とx.mainloop()の2つは必須。
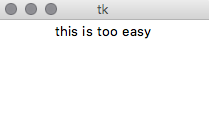
from tkinter import *

root = Tk() #create a blank window by initiating TK()
theLabel = Label(root, text="this is too easy") #Label(where, text="")
theLabel.pack() #just pack it in the first place you can fit it
root.mainloop()
\# you need to continuously run the screen with GUI
\# w/out mainloop, the window will eventually disappear
\# it keeps displaying the window until user manually closes it
アウトプット
オブジェクトのレイアウトをいじる
frameという概念
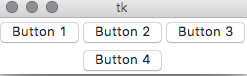
frameとは簡単にいえば透明の四角形型のレイアウトと考えてもらえればいい。tkinterにおいてプログラムのレイアウトを考えるとき、この考え方が役に立つとか。そこで実際にframeという概念を頭に入れながら#2ではtopbottomrightleftを使ってみる。基本的な操作は普段通りobejctを作ってpack()でディスプレイに表示させるという2セットになっている。
from tkinter import *

root = Tk()
topFrame = Frame(root)
# top is set by default therefore no parameter needed. you can explicitly say it too
# create a empty container in the main screen.
# !!!NOTE!!! its just in its program not displayed yet
topFrame.pack() # place it somewhere in the main program
bottomFrame = Frame(root)
bottomFrame.pack(side=BOTTOM)
# specify the given location by passing a parameter

button1 = Button(topFrame, text="Button 1", fg="red")
#Button(where, text="", fg="colour(optional)")
button2 = Button(topFrame, text="Button 2", fg="blue")
button3 = Button(topFrame, text="Button 3", fg="green")
button4 = Button(bottomFrame, text="Button 4", fg="purple")

button1.pack(side=LEFT)
button2.pack(side=LEFT)
button3.pack(side=LEFT)
# places bottum on the left of each other side by side
button4.pack(side=BOTTOM)

root.mainloop()
アウトプット
レイアウトにウィジェットを追加する
from tkinter import *
root = Tk()
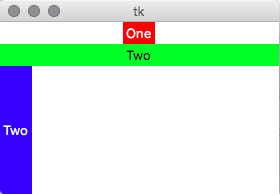
one = Label(root, text="One", bg="red", fg="white")
one.pack()
two = Label(root, text="Two", bg="green", fg="black")
two.pack(fill=X) # make widget responsive
three = Label(root, text="Two", bg="blue", fg="white")
three.pack(side=LEFT, fill=Y)
root.mainloop()
fill=Xで横の大きさに合わせてレスポンシブに。fill=Yで縦の大きさに合わせてレスポンシブになる。
アウトプット
より直感的にウィジェット整理
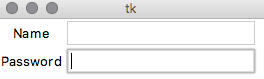
Grid Layoutというやり方を使えばエクセルの行と列を扱う感覚でウィジェットをいじることが出来る。読んだだけでオブジェクトがどこにあるか大体分かるので便利。
やり方は非常に簡単で表示させたいものをitem.pack()の代わりにitem.grid()とする。grid()の引数はrow = x, column = xだがcolumnはデフォルトで0になっているので0でいいならば入力する必要はない。
from tkinter import *

root = Tk()

label_1 = Label(root, text="Name")
label_2 = Label(root, text="Password")
entry_1 = Entry(root) # Entry = input field
entry_2 = Entry(root)

label_1.grid(row=0)
label_2.grid(row=1)

entry_1.grid(row=0, column=1)
entry_2.grid(row=1, column=1)

root.mainloop()
アウトプット
grid()を使って文字を揃える
もし「アウトプットで出したフォームのNameとPasswordの文字を右に揃えたい」なんて思った場合はgrid()の引数をrowとcolumnに加えてstickyという引数を加える。stickyに対応する値は全て英語の東西南北の頭文字を取っている。右ならE、左ならW、上はNで下はS。
アウトプット

ウィンドウにチェックボックスを追加
c = Checkbutton(root, text="Keep me logged in")で追加できる。c.grid(columnspan=2)で表示させると綺麗に映る。columnspanを使えばテキストを2つのセルをくっつけて中央表示させる。
関数を使ってレイアウトをより便利に
例えば「ウィンドウ上にボタンを作ってそれを押したら何かを起動させたい」みたいなことをしたい、とする。
from tkinter import *

root = Tk()

def printName():
    print("Chello my name is your mom!")

button_1 = Button(root, text="Print my name", command=printName)
# what command is bound to shoud be func to be called when the button is clicked
button_1.pack()

root.mainloop()
アウトプット
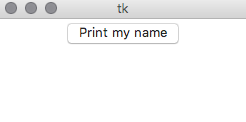
ボタンを押した回数分だけChello my name is your mom!がターミナル上に表示される。
別の方法
敢えて関数内で引数といてeventを作ってitem.bind("item_name", func_name)で呼んであげれば別のやり方でも追加できる。
from tkinter import *

root = Tk()

def printName(event):
    print("Chello my name is your mom!")

button_1 = Button(root, text="Print my name")
button_1.bind("<button-1>", printName)
# 1. what event, #2 what func to call when the event occurs
button_1.pack()

root.mainloop()
複数のウィジェットをウィンドウに追加する
from tkinter import *

root = Tk()

def leftClick(event):
    print("Left")

def middleClick(event):
    print("Middle")

def rightClick(event):
    print("Right")

frame = Frame(root, width=300, height=250)
frame.bind("<Button-1>", leftClick)
frame.bind("<Button-1>", middleClick)
frame.bind("<Button-1>", rightClick)

root.mainloop()
クラスを使って簡易プログラムを作る
ボタンを押すとターミナル上にメッセージが表示され、閉じることも可能な簡易ウィンドウを作る。大まかな流れはpython3xでクラスを作りそこにprintとquitの役割を持った関数を入れるだけ。クラスはこの辺でサクッと学習できる。
from tkinter import *


# rule: whenever you make a class, you need two blank lines above it
class Buttons:
    def __init__(self, master):
        frame = Frame(master) # create a frame in the main window
        frame.pack()

        self.printButton = Button(frame, text="Print Message", command=self.printMessage)
        # command + function to call when the button is clicked
        self.printButton.pack(side=LEFT)

        self.quitButton = Button(frame, text="Quit", command=frame.quit)
        # quit breaks the loop
        self.quitButton.pack(side=LEFT)

    def printMessage(self):
        print("Wow, this actually worked!")

root = Tk()
b = Buttons(root)
root.mainloop()
アウトプット
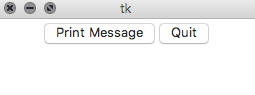
Print Messageを押すと押した回数分だけターミナル上にWow, this actually worked!と表示されるようになっている。Quitを押すとroot.mainloopをbreakするためウィンドウが閉じる。
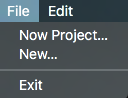
ドロップダウンメニューを追加する
ウィンドウを開いた時に上のウィンドウからドロップダウンメニューを出せるようにする。html、cssのような感覚でパーツを足していく。
from tkinter import *


def doNothing():
    print("ok ok I won't...")

# root window below
root = Tk()

menu = Menu(root)
root.config(menu=menu)
# to make sure tkinter recognizes it as menu
# parameter menu, and the name that you just defined

subMenu = Menu(menu)
menu.add_cascade(label="File", menu=subMenu)
# cascade=dropdown, label=option
subMenu.add_command(label="Now Project...", command=doNothing)
subMenu.add_command(label="New...", command=doNothing)
subMenu.add_separator()
# a line to separates an item from one group from another
subMenu.add_command(label="Exit", command=doNothing)

editMenu = Menu(menu)
menu.add_cascade(label="Edit", menu=editMenu)
editMenu.add_command(label="Redo", command=doNothing)

root.mainloop()
アウトプット

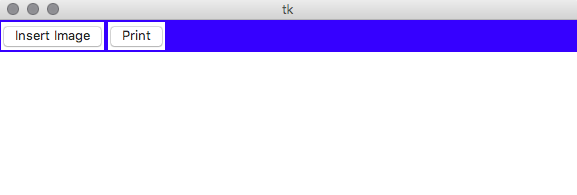
ツールバーを追加する
初めにtoolbarという名のframeを作ってその箱にどんどん必要な物を足していく感じ。
from tkinter import *


def doNothing():
    print("ok ok I won't...")

# root window below
root = Tk()

# ***** Main Menu *****

menu = Menu(root)
root.config(menu=menu)
# to make sure tkinter recognizes it as menu
# parameter menu, and the name that you just defined

subMenu = Menu(menu)
menu.add_cascade(label="File", menu=subMenu)
# cascade=dropdown, label=option
subMenu.add_command(label="Now Project...", command=doNothing)
subMenu.add_command(label="New...", command=doNothing)
subMenu.add_separator()
# a line to separates an item from one group from another
subMenu.add_command(label="Exit", command=doNothing)

editMenu = Menu(menu)
menu.add_cascade(label="Edit", menu=editMenu)
editMenu.add_command(label="Redo", command=doNothing)

# *****Toolbar *****

toolbar = Frame(root, bg="blue")

insertButt = Button(toolbar, text="Insert Image", command=doNothing)
insertButt.pack(side=LEFT, padx=2, pady=2)
printButt = Button(toolbar, text="Print", command=doNothing)
printButt.pack(side=LEFT, padx=2, pady=2)

toolbar.pack(side=TOP, fill=X)
# side=TOP allows it to place it right underneath it
# fill makes it resposive in x direction

root.mainloop()
アウトプット
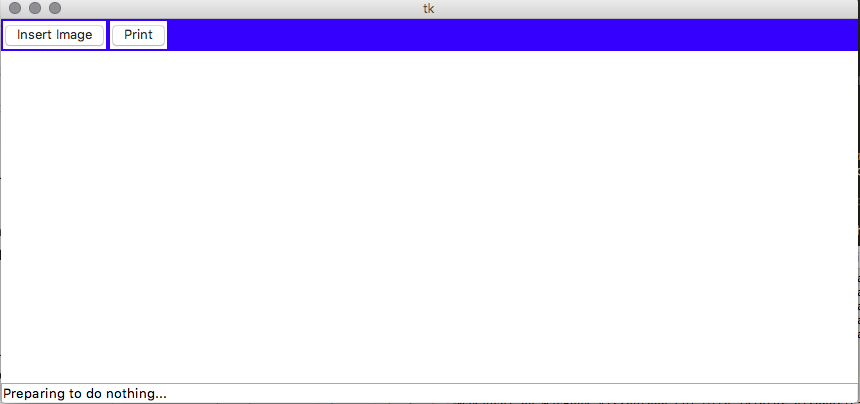
ステータスバーを追加する
あらゆるアプリケーションなどで良く見かける下の方にあるステータスバーを追加する。やり方はツールバーとそこまで変わらない。
# ***** Status Bar *****
status = Label(root, text="Preparing to do nothing...", bd=1, relief=SUNKEN, anchor=W)
# bd=border, relief to make it look like a status bar, want anchor to be left
status.pack(side=BOTTOM, fill=X)
アウトプット
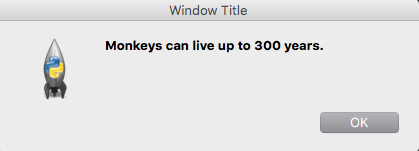
メッセージボックスを追加する
from tkinter import *
import tkinter.messagebox

root = Tk()

tkinter.messagebox.showinfo('Window Title', 'Monkeys can live up to 300 years.')
# Window Title be the top bar of the window

answer = tkinter.messagebox.askquestion('Question 1', 'Do you like silly faces?')
# yes or no question ONLY

if answer == 'yes':
    print(' 8=======D~ ')

root.mainloop()
アウトプット

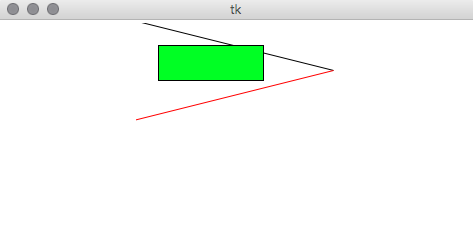
シンプルな図式などを追加する
線を追加する
まずは x = Canvas(where, size)キャンバスを用意する。そこにx.create_actionという形で材料をキャンパスの上に足していくイメージ。何を書くにしてもデフォルトは黒色ということを忘れずに。つまりblackline = canvas.create_line(0, 0, 200, 50)は黒になり、redline = canvas.create_line(0, 100, 200, 50, fill=red)は赤になるということ。線も黒以外にしたい場合は
fill=colourで指定してあげないといけない。
簡単な図式を追加する
greenBox = canvas.create_rectangle(top-left, height)で追加可能。詳しくはこの辺を参考に。
アウトプット
図式の表示、非表示
アプリケーションによっては最初から図式を表示させないでユーザーに表示させたり様々なパターンがある。そんなときも図式をx.delete(item_to_delete)を使うだけで非表示にさせることが可能。x.delete(ALL)で引数をまとめて渡すことも出来る。
画像やアイコンの追加
最初に画像を変数に入れておき、それをlabelの引数として渡してlabel.pack()で表示させるという何とも変わった表示のさせ方。