概要
前回はChainerの基本的な使い方である、MLP(多層パーセプトロン)の実装と、CNNの畳み込み層から全結合層のノード数を出すために必要な計算式を紹介しました。
今回は、実際のTwitterのデータを読込んで、CNNを構築することにします。
畳み込みニューラルネットワーク
畳み込みニューラルネットワークの説明はここが分かりやすかったです。
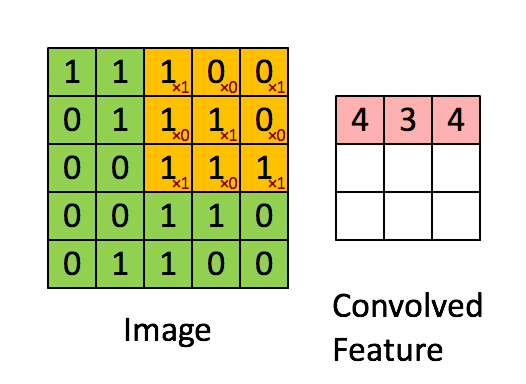
2次元の画像データに対して、フィルターを適用し、特徴量を圧縮します。その後、プーリングを行って、さらに特徴量を抽出します。
たぶん、フィルターは1種類ではなくて、出力したい枚数分異なるフィルターを適用する形になるんだと思います。
目標
処理の概要
処理の概要は以下の通りです。
- Tweetデータの読込
- Word Embed(今回はWord2Vecを使用)
- 学習・テストデータ分割
- CNNの定義
- CNNでの学習
- CNNでの予測
なお、CNNの定義と学習は論文に記載の以下の方法をとります。

この図は、1枚のセンテンスに対する畳み込みとプーリング処理を描いていて、一番左の大きなマトリックスは$d$がWordベクトルの次元、$s$がセンテンス中の単語の数になります。そして、フィルタサイズは対称行列ではなく、$d×m$次元の非対称マトリックスになります。
ただ、論文を読んでもわからなかったのですが、$s$ってセンテンスごとに違うので、そのへんどうやってるのかなぁと思っていたら、こちらの記事では、全Tweetに現れる各センテンスの最大単語数をとっていましたので、これをまねます。
データ取得
Tweetデータを取得します。
データは、1列目が[0,1]のフラグになっており、2列目が英語でのTweetになります。
Word Embed
2次元の画像形式でセンテンスを保持したいため、分散表現に直します。
今回はChainer付属のEmbedIDがうまく動かなかったので、gensimパッケージにあるWord2Vecを使用します。
まず、テキストデータからWordにIDを振ります。
# ! -*- coding:utf-8 -*-

def read(inp_file,num_sent=None):
        f_in = open(inp_file, 'r')
        lines = f_in.readlines()

        words_map = {}
        word_cnt = 0

        k_wrd = 5 #単語コンテクストウィンドウ

        y = []
        x_wrd = []

        if num_sent is None:
            num_sent = len(lines)
            max_sen_len = 0
        else:
            max_sen_len, num_sent = 0, num_sent


        words_vocab_mat = []

        token_list = []

        for line in lines[:num_sent]:
            words = line[:-1].split()
            tokens = words[1:]
            y.append(int(float(words[0])))
            max_sen_len = max(max_sen_len,len(tokens))
            for token in tokens:
                if token not in words_map:
                    words_map[token] = word_cnt
                    token_list.append(token)
                    word_cnt += 1
            words_vocab_mat.append(tokens)

        cnt = 0
        for line in lines[:num_sent]:
            words = line[:-1].split()
            cnt += 1
            tokens = words[1:]
            word_mat = [-1] * (max_sen_len+k_wrd-1)

            for i in xrange(len(tokens)):
                word_mat[(k_wrd/2)+i] = words_map[tokens[i]]
            x_wrd.append(word_mat)
        max_sen_len += k_wrd-1

        # num_sent: 文書の数
        # word_cnt: 単語の種類数
        # max_sen_len: 文書の最大の長さ
        # x_wrd: 入力となる単語のid列 行数 : センテンス数(num_sent) 列数 : 文書の最大の長さ(max_sen_len)
        # k_wrd: window size
        # words_map : key = word,value = id
        # y: 1 or 0 (i.e., positive or negative)
        # words_vocab_mat : sentenceを分解したもの、行数はセンテンス数、列数は可変で単語数
        # token_list : tokenのリスト、indexがidに対応
        data = (num_sent, word_cnt, max_sen_len, k_wrd, x_wrd, y,words_map,words_vocab_mat,token_list)
        return data

(num_sent, word_cnt, max_sen_len, k_wrd, x_wrd, y,words_map,sentences,token_list) = load.read("data/tweets_clean.txt",10000)
x_wrdはセンテンス数×最大文書長のマトリックスで、各要素は現れた単語のIDになります。
あとで必要なので、words_mapとtoken_listとwords_vocab_matも用意しておきます。
次にWord2Vecを使って各単語のベクトル表現を得たのち、「センテンス画像マトリックス」(勝手につけた)を作ります。
    """Word2Vecで単語のベクトル空間を作成する"""
    word_dimension = 200
    from gensim.models import Word2Vec
    model_w2v = Word2Vec(sentences,seed=123,size=word_dimension,min_count=0,window=5)
    sentence_image_matrix = np.zeros((len(sentences),1,word_dimension,max_sen_len)) #Convolutionするためのセンテンス画像マトリックスの初期化

    """x_wrdに対してベクトルを生成する"""
    for i in range(0,len(x_wrd)):
        tmp_id_list = x_wrd[i,:]
        for j in range(0,len(tmp_id_list)):
            """1行に対して回す"""
            id = tmp_id_list[j]
            if id == -1:
                """情報なし"""
                sentence_image_matrix[i,0,:,j] = [0.] * word_dimension #0ベクトルを入れる
            else:
                target_word = token_list[id]
                sentence_image_matrix[i,0,:,j] = model_w2v[target_word]
sentence_image_matrixは(センテンス数,1,ベクトル次元=200,最大文章長)の大きさの4次元テンソルとして定義します。
学習・テストデータ分割
初めて知ったのですが、4次元テンソルに対してもsklearnのtrain_test_splitが使えます。
たぶん、第1次元しか見ていないからだと思います。
    """学習データとテストデータに分ける"""
    sentence_image_matrix = np.array(sentence_image_matrix,dtype=np.float32)
    N = len(sentence_image_matrix)
    t_n = 0.33
    x_train,x_test,y_train,y_test = train_test_split(sentence_image_matrix,y,test_size=t_n,random_state=123)
CNNの定義
問題はCNNの定義です。
今回論文では、非対称フィルターを使っており、さらにプーリングも非対称ですので、その辺を考慮しないといけません。
するとこんな感じになります。
class CNNFiltRow(ChainerClassifier):
    """
    CNNの行方向を全部フィルターとして、列方向に動かすパターン
    """

    def _setup_network(self, **params):
        self.input_dim = params["input_dim"] #1枚の画像の列方向の次元
        self.in_channels = params["in_channels"] #input channels : default = 1
        self.out_channels = params["out_channels"] #out_channels : 任意
        self.row_dim = params["row_dim"] #1枚の画像の行方向の次元 = Filterの行数になる
        self.filt_clm = params["filt_clm"] #Filterの列数
        self.pooling_row = params["pooling_row"] if params.has_key("pooling_row") else 1 #poolingの行数 : default = 1
        self.pooling_clm = params["pooling_clm"] if params.has_key("pooling_clm") else int(self.input_dim - 2 * math.floor(self.filt_clm/2.)) #Poolingの列数 : default = math.floor((self.input_dim - 2 * math.floor(self.filt_clm/2.))
        self.batch_size = params["batch_size"] if params.has_key("batch_size") else 100
        self.hidden_dim = params["hidden_dim"]
        self.n_classes = params["n_classes"]

        self.conv1_out_dim = math.floor((self.input_dim - 2 * math.floor(self.filt_clm/2.))/self.pooling_clm)
        network = FunctionSet(
            conv1 = F.Convolution2D(self.in_channels,self.out_channels,(self.row_dim,self.filt_clm)), #Filterを非対称にした
            l1=F.Linear(self.conv1_out_dim*self.out_channels, self.hidden_dim),
            l2=F.Linear(self.hidden_dim, self.hidden_dim),
            l3=F.Linear(self.hidden_dim, self.n_classes),
        )
        return network

    def forward(self, x, train=True):
        h = F.max_pooling_2d(F.relu(self.network.conv1(x)), (self.pooling_row,self.pooling_clm))
        h1 = F.dropout(F.relu(self.network.l1(h)),train=train)
        h2 = F.dropout(F.relu(self.network.l2(h1)),train=train)
        y = self.network.l3(h2)
        return y

    def output_func(self, h):
        return F.softmax(h)

    def loss_func(self, y, t):
        return F.softmax_cross_entropy(y, t)

    def fit(self, x_data, y_data):
        batchsize = self.batch_size
        N = len(y_data)
        for loop in range(self.n_iter):
            perm = np.random.permutation(N)
            sum_accuracy = 0
            sum_loss = 0
            for i in six.moves.range(0, N, batchsize):
                x_batch = x_data[perm[i:i + batchsize]]
                y_batch = y_data[perm[i:i + batchsize]]
                x = Variable(x_batch)
                y = Variable(y_batch)
                self.optimizer.zero_grads()
                yp = self.forward(x)
                loss = self.loss_func(yp,y)
                loss.backward()
                self.optimizer.update()
                sum_loss += loss.data * len(y_batch)
                sum_accuracy += F.accuracy(yp,y).data * len(y_batch)
            if self.report > 0 and loop % self.report == 0:
                print('loop={}, train mean loss={} , train mean accuracy={}'.format(loop, sum_loss / N,sum_accuracy / N))

        return self

    def fit_test(self, x_data, y_data,x_test,y_test):
        batchsize = self.batch_size
        N = len(y_data)
        Nt = len(y_test)
        train_ac = []
        test_ac = []
        for loop in range(self.n_iter):
            perm = np.random.permutation(N)
            permt = np.random.permutation(Nt)
            sum_accuracy = 0
            sum_loss = 0

            sum_accuracy_t = 0

            """学習フェーズ"""
            for i in six.moves.range(0, N, batchsize):
                x_batch = x_data[perm[i:i + batchsize]]
                y_batch = y_data[perm[i:i + batchsize]]
                x = Variable(x_batch)
                y = Variable(y_batch)
                self.optimizer.zero_grads()
                yp = self.forward(x)
                loss = self.loss_func(yp,y)
                loss.backward()
                self.optimizer.update()
                sum_loss += loss.data * len(y_batch)
                sum_accuracy += F.accuracy(yp,y).data * len(y_batch)

            """テストフェーズ"""
            for i in six.moves.range(0,Nt,batchsize):
                x_batch = x_test[permt[i:i + batchsize]]
                y_batch = y_test[permt[i:i + batchsize]]
                x = Variable(x_batch)
                y = Variable(y_batch)
                yp = self.forward(x,False)
                sum_accuracy_t += F.accuracy(yp,y).data * len(y_batch)

            if self.report > 0 and loop % self.report == 0:
                print('loop={}, train mean loss={} , train mean accuracy={} , test mean accuracy={}'.format(loop, sum_loss / N,sum_accuracy / N,sum_accuracy_t / Nt))

            train_ac.append(sum_accuracy / N)
            test_ac.append(sum_accuracy_t / Nt)

        return self,train_ac,test_ac
ChainerClassifierについては前回の記事を参照ください。
CNNの学習
テストデータの精度も見たかったのでfit_testメソッドを追加しました。
    """CNN Filter Rowの学習"""
    n_iter = 200
    report = 5
    params = {"input_dim":max_sen_len,"in_channels":1,"out_channels":20,"row_dim":word_dimension,"filt_clm":3,"batch_size":100,"hidden_dim":300,"n_classes":2}
    cnn = CNNFiltRow(n_iter=n_iter,report=report,**params)
    cnn,train_ac,test_ac = cnn.fit_test(x_train,y_train,x_test,y_test)
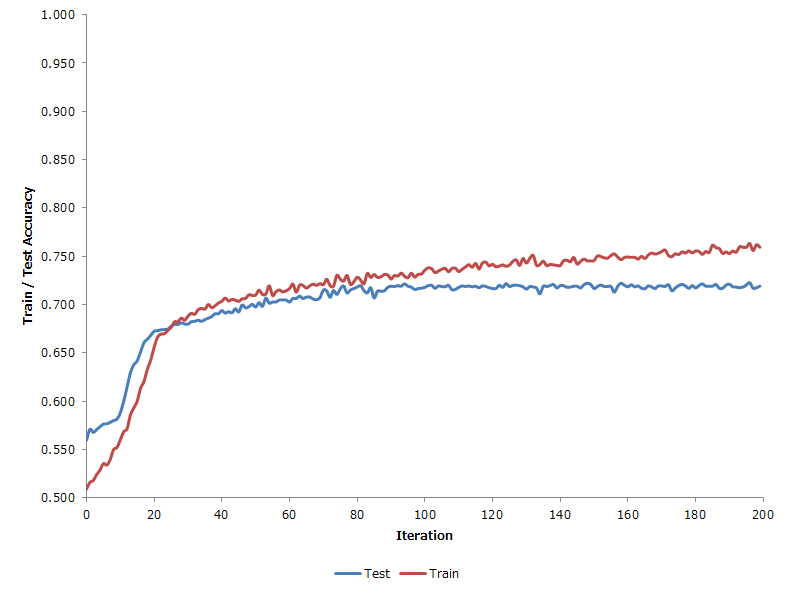
学習の際の精度とテストデータでの精度のプロットは以下。
Iter = 100くらいから過学習が始まる感じのようである。
それでも汎化性能が高い印象。
CNNの予測
最終的に出来上がったモデルに、テストデータを入れてみて各指標を出してみると以下のようになる。
[CNN]P AUC: 0.80 Pres: 0.66 Recl: 0.89 Fscr: 0.76
Fscoreで0.76でAUCで0.8と結構良い感じになった。
他のモデルと比較
ベンチマークとしてRandom ForestとMLP(多層パーセプトロン)でも同じことをやってみる。
入力データはこの場合2次元ではないので、MNISTのように1次元に直している。
その結果、同様のテストデータに対する各種指標で以下のようになった。
[RF ]P AUC: 0.71 Pres: 0.65 Recl: 0.60 Fscr: 0.62
[MLP]P AUC: 0.71 Pres: 0.64 Recl: 0.69 Fscr: 0.67
[CNN]P AUC: 0.80 Pres: 0.66 Recl: 0.89 Fscr: 0.76
CNNのこの圧倒的性能差…
まとめ
- おおむねCNNの挙動は理解できた。
- BoWでやったのものもあるが、精度はここまで出なかった。
- 適切な分散表現は必要かと思う。
- パラメータは今回置きでやったが、クロスバリデーションできるならやりたい(計算機パワーが足りない)
- あとは日本語への拡張か。
- LSTMを使ったRNNも試してみたい。