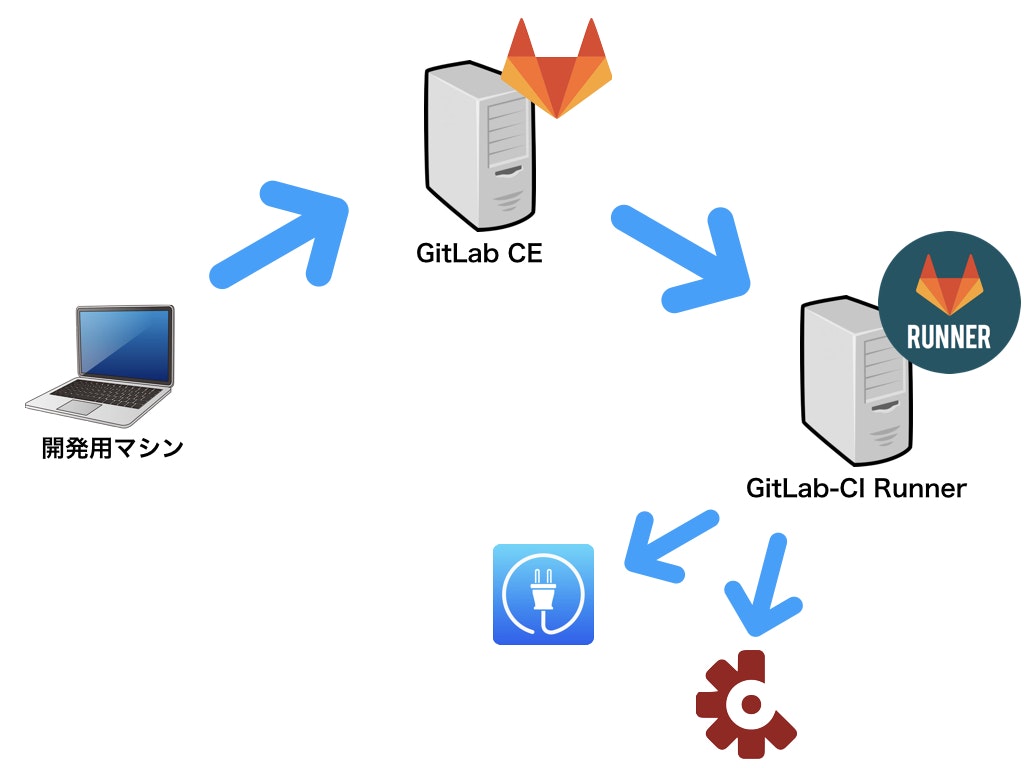
すでに稼働しているGitLabへGitLab-CI Runnerを登録。
iOSプロジェクトの
・ユニットテスト
・Beta配信
・iTunesConnectへアップロード
をCI環境上で実現しました。
実行環境
- GitLab CE 9.3.9
- GitLab-CI 9.3.9
- Xcode 8.3.3
- CocoaPods 1.2.0
この投稿で語らないこと
- GitLabの環境構築手順
- UnitTestの書き方
Runnerマシンの構築
利用したMacは10.12.6
CI Runnerのインストール
GitLab本家のドキュメント通りに実行しました。
https://docs.gitlab.com/runner/install/osx.html
RunnerをGitLabに登録
こちらも本家GitLabのドキュメント通りに実行し問題ありませんでした。
https://docs.gitlab.com/runner/register/index.html#macos
- 補足
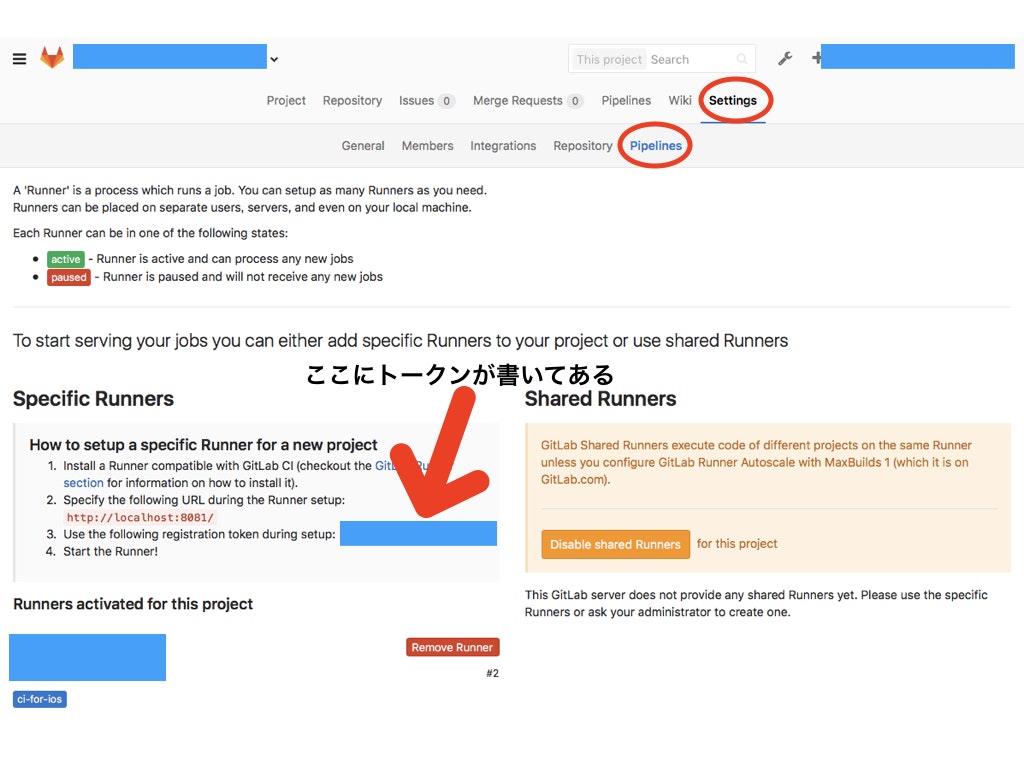
GitLab-CI Tokenの調べ方
- GitLabのコーンソール上でRunnerを登録したいプロジェクトを選択
- [Settings] -> [Pipelines] を選択
- 下の図の位置にTokenが表示されます。
Runner executorは何を選ぶ?
Please enter the executor: ssh, docker+machine, docker-ssh+machine, kubernetes, docker, parallels, virtualbox, docker-ssh, shell:
docker
Runner executorはShellを選択しました。
Xcodeのインストール
RunnerマシンにもXcodeをインストールする必要があります。
証明書の取り込み
Runnerマシンにコードサイン証明書を取り込みます。
Apple Developerサイトから新たにダウンロードしてもビルドできません。
開発マシンからエスクポートする必要があります。
詳細はこちら
http://qiita.com/moc-yuto/items/bcecf6a1050115093c5a
Cocoapodsのインストール
プロジェクトの依存関係を解決するためにCocoapodsを導入している場合は、RunnerマシンにもCocoapodsをインストールする必要があります。
今回はRunnerを複数プロジェクトで共有する予定があったため、Bundlerを用いてインストールしました
$ sudo gem install bundler
Xcodeプロジェクトの設定
本家GitLabのドキュメントが非常に役立ちました。
https://about.gitlab.com/2016/03/10/setting-up-gitlab-ci-for-ios-projects
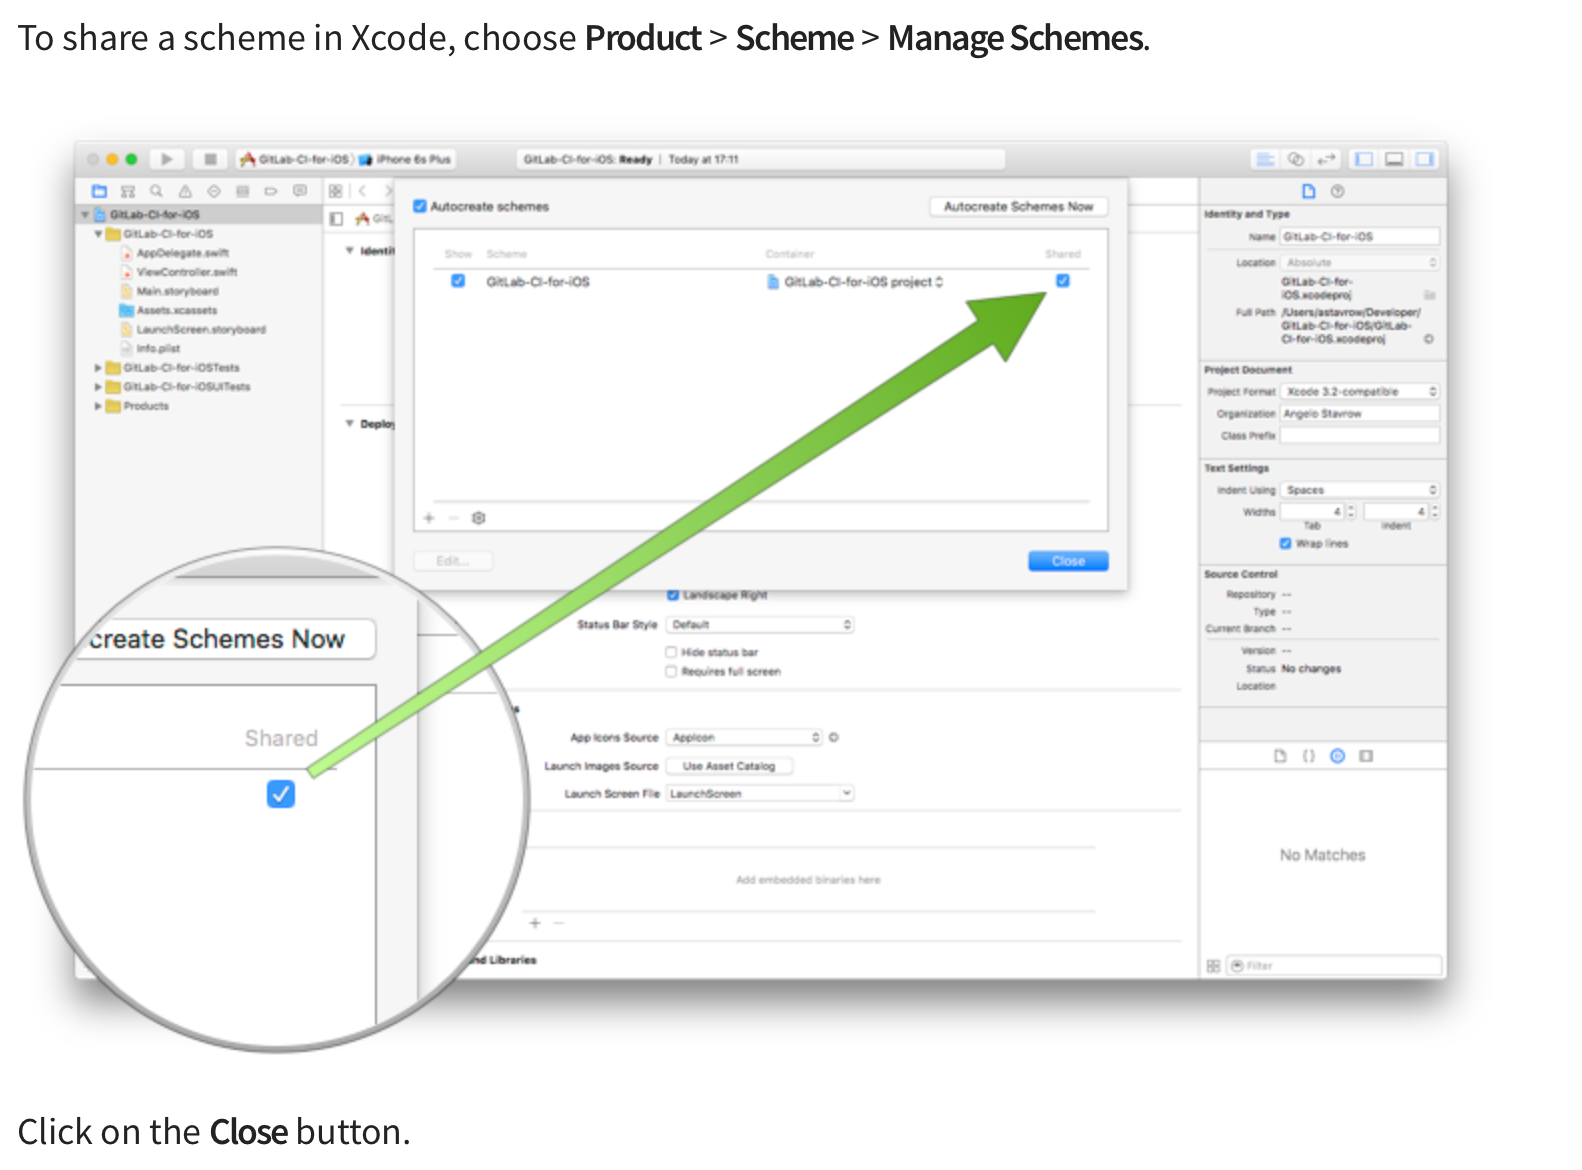
重要なポイントはスキームにShareのチェックを入れること
Bundlerの設定とCocoaPodsの入れ直し
既存のXocdeプロジェクトにもBundlerを導入し、CocoaPodsを入れ直しました。
Gemfileという名前のファイルをxcodeprojと同じ階層に作成します。
内容は以下、
# frozen_string_literal: true
source "https://rubygems.org"

git_source(:github) {|repo_name| "https://github.com/#{repo_name}" }

gem 'cocoapods', '1.2.0'
Bundler経由でCocoapodsをインストールします。
$ bundle install --path vendor/bundle
以下の2つのファイルをバージョン管理に含めます。
- Gemfile
- Gemfile.lock
ジョブの記述
.gitlab-ci.ymlという名前のファイルにRunnerに実行させたい処理(job)を記述します。
このファイルはxcodeprojと同じ階層に配置する必要があります。
本家のドキュメントを参考に、以下のようなjobを記述しました。
stages:
  - build

before_script:
  - bundle install
  - bundle exec pod install

build_project:
  stage: build
  script:
    - xcodebuild clean -project ProjectName.xcodeproj -scheme SchemeName | xcpretty
    - xcodebuild test -project ProjectName.xcodeproj -scheme SchemeName -destination 'platform=iOS Simulator,name=iPhone 7,OS=latest' | xcpretty -s
  tags:
    - ci-for-ios
tags に記載するタグはRunner登録時に入力したタグと同一のものにします。
また、GitLabのコンソールからタグを編集することも可能です。
※ [Settings] -> [Pipelines] を選択
ここで、xcprettyというモジュールが必要になりましたので
新たにxcprettyをBundler経由でインストールします。
# frozen_string_literal: true
source "https://rubygems.org"

git_source(:github) {|repo_name| "https://github.com/#{repo_name}" }

gem 'cocoapods', '1.2.0'
gem 'xcpretty', '0.2.8'
Bundler経由でCocoapodsをインストールします。
$ bundle install
ジョブの実行
.gitlab-ci.ymlファイルがあり、
かつ.gitlab-ci.yml内のtagsがRunnerに設定したタグに含まれていたら
ジョブが実行されます。
.gitlab-ci.ymlファイルを追加したコミットをpushすると、おそらくジョブが実行されるでしょう。
xcprettyの文字エンコード
私の環境では、上記の.gitlab-ci.ymlではすぐにジョブがエラーになってしまいました。理由はxcprettyの文字エンコードを指定していなかったことが原因のようでした。
深追いせず、文字コードを設定したところ動作しました。
stages:
  - build

before_script:
  - export LANG=en_US.UTF-8
  - export LANGUAGE=en_US.UTF-8
  - export LC_ALL=en_US.UTF-8
  - bundle install
  - bundle exec pod install

build_project:
  stage: build
  script:
    - xcodebuild clean -project ProjectName.xcodeproj -scheme SchemeName | xcpretty
    - xcodebuild test -project ProjectName.xcodeproj -scheme SchemeName -destination 'platform=iOS Simulator,name=iPhone 7,OS=latest' | xcpretty -s
  tags:
    - ci-for-ios
シミュレーターの権限問題
Runnerマシン上でユニットテストを実行する際、iOSシミュレータを起動します。
シミュレーターの起動時はMacの管理ユーザーで認証を求められます。
対策法は現在調査中...
fastlaneでの実行
続いて、ユニットテストの実行に加えてBeta配信とiTunesStoreへのアップロードを目指します。
これらの操作を.gitlab-ci.ymlからfastlaneを呼び出して実現することにします。
まず、Gemfileを編集して
# frozen_string_literal: true
source "https://rubygems.org"

git_source(:github) {|repo_name| "https://github.com/#{repo_name}" }

gem 'cocoapods', '1.2.0'
gem 'fastlane', '2.50.1'
Bundle経由でfastlaneをインストールします。
$ bundle install
続いて、fastlaneの初期設定を行います。
以下のコマンドを実行します。
$ bundle exec fastlane init
詳細はfastlaneの設定について親切な記事を参照してください。
http://qiita.com/econa77/items/d81a392d6b195cfb7316
laneは次のようにしました。
- ユニットテストの実行
  desc "Runs all the tests"
  lane :test do
    scan(
      scheme: "{アプリのスキーム}",
      clean: true,
      devices: ["iPhone 7"]
    )
  end
- CrashlyticsによるBeta配信
  lane :fabric do
    sigh(
      adhoc: true,
      force: true,
      app_identifier: "{アプリのバンドルID}"
    )
    gym(
      scheme: "{Xcodeプロジェクトのスキーム}",
      workspace: "{xcworkspaceファイル名}",
      configuration: "Release",
      clean: true,
      output_name: "AdHoc.ipa",
      export_method: "ad-hoc"
    )
    crashlytics(
      crashlytics_path: "./Pods/Crashlytics/",
      api_token: "{fabricのapi token}",
      build_secret: "{fabricのbuild secret}",
      ipa_path: "./AdHoc.ipa"
    )
  end
- iTunesConnectへアップロード
    gym(
      scheme: "{Xcodeプロジェクトのスキーム}",
      workspace: "{xcworkspaceファイル名}",
      configuration: "Release",
      clean: true,
      output_name: "AppStore.ipa",
      export_method: "app-store",
      include_symbols: true,
      include_bitcode: true
    )
    deliver(force: true)
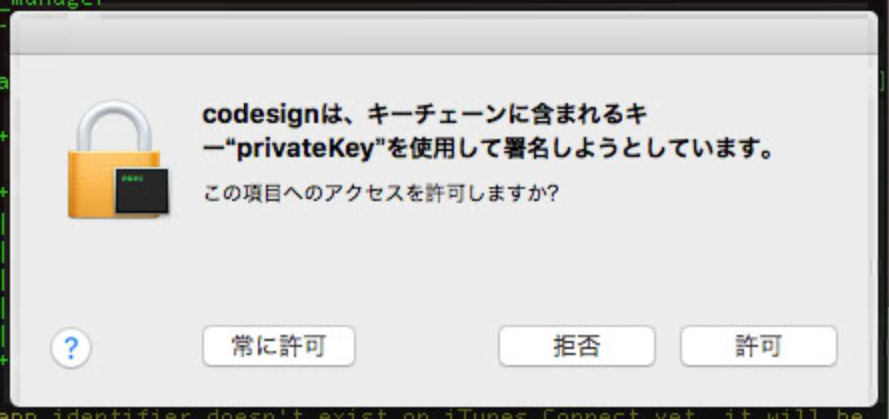
上記のlaneにてRelease用のipaを作成する場合、コード署名が発生します。
コード署名は最初の一回のみ、管理者権限を求められます。
GUIで「常に許可」を選択することで、処理がストップせずに進みます。
deliverでエラー
さらに、iTunesConnectへipaをアップロードするdeliverでエラーが発生しました。
Mac組み込みのOpensslのバージョンが古いために起こるエラーです。
[14:23:36]: fastlane finished with errors
[14:23:36]: -----------------------------------------------------------------------
[14:23:36]: Connection reset by peer - SSL_connect
[14:23:36]:
[14:23:36]: SSL errors can be caused by various components on your local machine.
[14:23:36]: Apple has recently changed their servers to require TLS 1.2, which may
[14:23:36]: not be available to your system installed Ruby (2.0.0)
[14:23:36]:
[14:23:36]: The best solution is to use the self-contained fastlane version.
[14:23:36]: Which ships with a bundled OpenSSL,ruby and all gems - so you don't depend on system libraries
[14:23:36]: - Use Homebrew
[14:23:36]: - update brew withbrew update
[14:23:36]: - install fastlane using:
[14:23:36]: -brew cask install fastlane
[14:23:36]: - Use One-Click-Installer:
[14:23:36]: - download fastlane at https://download.fastlane.tools
[14:23:36]: - extract the archive and double click theinstall
[14:23:36]: -----------------------------------------------------------
[14:23:36]: for more details on ways to install fastlane please refer the documentation:
[14:23:36]: -----------------------------------------------------------
[14:23:36]: 🚀 https://docs.fastlane.tools 🚀
[14:23:36]: -----------------------------------------------------------
[14:23:36]:
[14:23:36]: You can also install a new version of Ruby
[14:23:36]:
[14:23:36]: - Make sure OpenSSL is installed with Homebrew:brew update && brew upgrade openssl
[14:23:36]: - If you use system Ruby:
[14:23:36]: - Runbrew update && brew install ruby
[14:23:36]: - If you use rbenv with ruby-build:
[14:23:36]: - Runbrew update && brew upgrade ruby-build && rbenv install 2.3.1
[14:23:36]: - Runrbenv global 2.3.1to make it the new global default Ruby version
[14:23:36]: - If you use rvm:
[14:23:36]: - First runrvm osx-ssl-certs update all
[14:23:36]: - Then runrvm reinstall ruby-2.3.1 --with-openssl-dir=/usr/local
[14:23:36]:
[14:23:36]: If that doesn't fix your issue, please google for the following error message:
[14:23:36]: 'Connection reset by peer - SSL_connect'
[14:23:36]: -----------------------------------------------------------------------
今回はHome brew経由でOpensslとRubyのバージョンをアップデートすることで対処しました。
Home brewのインストール
/usr/bin/ruby -e "$(curl -fsSL https://raw.githubusercontent.com/Homebrew/install/master/install)"
opensslとrubyの更新
$ brew install ruby
$ brew install openssl
そのままではopensslの参照先が古いバージョンのままです。
.bash_profileを編集してパスを通します。
# bash_profile
export PATH=/usr/local/Cellar/openssl/1.0.2l/bin:$PATH
これで、deliverで発生していたエラーがなくなります。
さらにdeliverでエラー
さらにdeliverでエラーが発生しました。
Unexpected Error
deliverはデフォルトでスクリーンショットやメタデータのアップロードをする仕様になっているようです。
今回はipaのアップロードのみを予定していたため、画像ファイル等を用意していませんでした。
    gym(
      scheme: "{Xcodeプロジェクトのスキーム}",
      workspace: "{xcworkspaceファイル名}",
      configuration: "Release",
      clean: true,
      output_name: "AppStore.ipa",
      export_method: "app-store",
      include_symbols: true,
      include_bitcode: true
    )
    deliver(
      app_identifier: "{アプリのバンドルID}",
      skip_metadata: true,
      skip_screenshots: true,
      force: true
    )
以上のようにすることで、アップロードに成功しました。