ラべリング処理について
OpenCV3.0からやっと入ったラべリング処理についてです.
ラべリング処理とは,画素の連結成分を見つけて,連結成分ごとに一意の番号を付与する処理です.
ラベリングのわかりやすい説明はラベリング処理アルゴリズム 画像処理ソリューションを参照してください。
OpenCVのラべリング関数
今回実装されたラべリング処理は2種類あります.
//ラベリング(簡易版)
int cv::connectedComponents(InputArray image, OutputArray labels, int connectivity = 8, int ltype = CV_32S)

//ラベリング(詳細版)
int cv::connectedComponentsWithStats(InputArray image, OutputArray labels, OutputArray stats, OutputArray centroids,
                                     int connectivity = 8, int ltype = CV_32S)
1つ目のラべリング関数は,ラべリング画像のみを出力する簡易版です.
2つ目のラべリング関数は,重心や面積,バウンディングボックスの値(x,y,width,height)まで返してくれる詳細版です.
詳しくはOpenCVのドキュメントを参照してください。
1つ目のラベリング関数に関しては、いろいろなブログに詳しく書かれていますので、省きます。
この記事では2つ目の詳細版の面積値やバウンディングボックスの取り出し方をまとめておきます.
詳細版のラべリング関数
詳細情報が取得できるラベリング関数は、以下の仕様になっています。
int connectedComponentsWithStats(InputArray image,      //入力画像(CV_8UC1)
                                 OutputArray labels,    //ラベル画像(CV_32SC1 or CV_16UC1)
                                 OutputArray stats,     //バウンディングボックスを形成する値と面積値
                                 OutputArray centroids, //重心(x,y)(CV_64FC1)
                                 int connectivity=8,    //4連結 or 8連結
                                 int ltype=CV_32S);     //ラベリング画像のタイプ
statsの値は、列挙型のcv :: ConnectedComponentsTypesにより参照できます。
cv :: ConnectedComponentsTypesに設定されている列挙子は、以下のパラメータです。
| 列挙子 | |
|---|---|
| CC_STAT_LEFT | バウンディングボックスの一番左上のx座標 |
| CC_STAT_TOP | バウンディングボックスの一番左上のy座標 |
| CC_STAT_WIDTH | バウンディングボックスの水平方向のサイズ |
| CC_STAT_HEIGHT | バウンディングボックスの垂直方向のサイズ |
| CC_STAT_AREA | 連結成分の総面積(ピクセル単位) |
| CC_STAT_MAX | ???(何に使うか不明) |
実際にソースコードを見てみましょう。
重心とバウンディングボックスと面積を出力するプログラムを書くと以下のようになります。
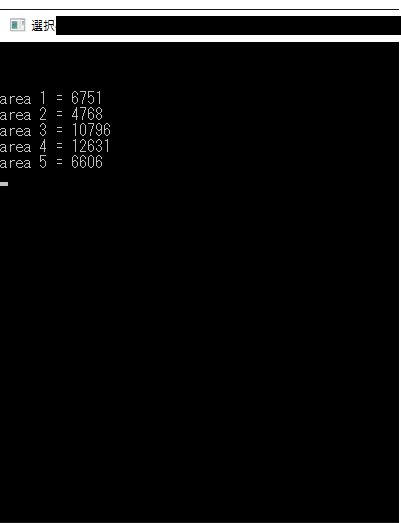
面積値との対応を取りやすいように、面積値を求める際にラベル番号も出力しています。
#include<iostream>
#include<vector>
#include<random>
#include<string>
#include<strstream>
#include"OpenCV3.h"

int main(void)
{
	//グレースケール入力
	cv::Mat src = cv::imread("/*任意の2値画像*/", cv::IMREAD_GRAYSCALE);

	//ラべリング処理
	cv::Mat LabelImg;
	cv::Mat stats;
	cv::Mat centroids;
	int nLab = cv::connectedComponentsWithStats(src, LabelImg, stats, centroids);

	// ラベリング結果の描画色を決定
	std::vector<cv::Vec3b> colors(nLab);
	colors[0] = cv::Vec3b(0, 0, 0);
	for (int i = 1; i < nLab; ++i) {
		colors[i] = cv::Vec3b((rand() & 255), (rand() & 255), (rand() & 255));
	}

	// ラベリング結果の描画
	cv::Mat Dst(src.size(), CV_8UC3);
	for (int i = 0; i < Dst.rows; ++i) {
		int *lb = LabelImg.ptr<int>(i);
		cv::Vec3b *pix = Dst.ptr<cv::Vec3b>(i);
		for (int j = 0; j < Dst.cols; ++j) {
			pix[j] = colors[lb[j]];
		}
	}

	//ROIの設定
	for (int i = 1; i < nLab; ++i) {
		int *param = stats.ptr<int>(i);

		int x = param[cv::ConnectedComponentsTypes::CC_STAT_LEFT];
		int y = param[cv::ConnectedComponentsTypes::CC_STAT_TOP];
		int height = param[cv::ConnectedComponentsTypes::CC_STAT_HEIGHT];
		int width = param[cv::ConnectedComponentsTypes::CC_STAT_WIDTH];

		cv::rectangle(Dst, cv::Rect(x, y, width, height), cv::Scalar(0, 255, 0), 2);
	}

	//重心の出力
	for (int i = 1; i < nLab; ++i) {
		double *param = centroids.ptr<double>(i);
		int x = static_cast<int>(param[0]);
		int y = static_cast<int>(param[1]);

		cv::circle(Dst,cv::Point(x, y), 3, cv::Scalar(0, 0, 255), -1);
	}

	//面積値の出力
	for (int i = 1; i < nLab; ++i) {
		int *param = stats.ptr<int>(i);
		std::cout << "area "<< i <<" = " << param[cv::ConnectedComponentsTypes::CC_STAT_AREA] << std::endl;

		//ROIの左上に番号を書き込む
		int x = param[cv::ConnectedComponentsTypes::CC_STAT_LEFT];
		int y = param[cv::ConnectedComponentsTypes::CC_STAT_TOP];
		std::stringstream num;
		num << i;
		cv::putText(Dst, num.str(), cv::Point(x+5, y+20), cv::FONT_HERSHEY_COMPLEX, 0.7, cv::Scalar(0, 255, 255), 2);
	}

	cv::imshow("Src", src);
	cv::imshow("Labels", Dst);
	cv::waitKey();

	return 0;
}
結果
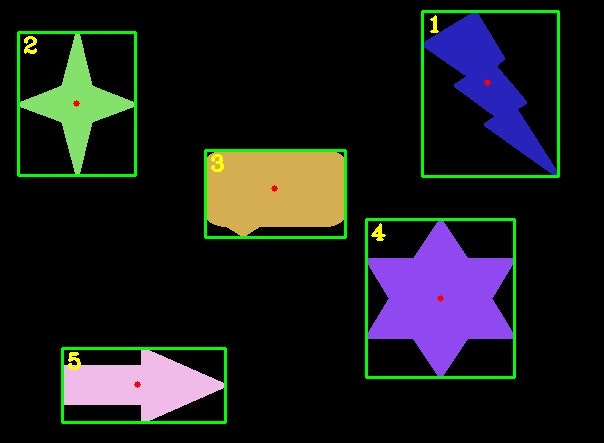
上記のプログラムを動かすと、ラベリング処理結果のラベルごとにランダムに色を付けて出力します。
さらに、バウンディングボックスを緑の矩形で、重心を赤まるで描画します。
最後に、ラベルごとの面積とラベル番号を描画して、画像を出力します。
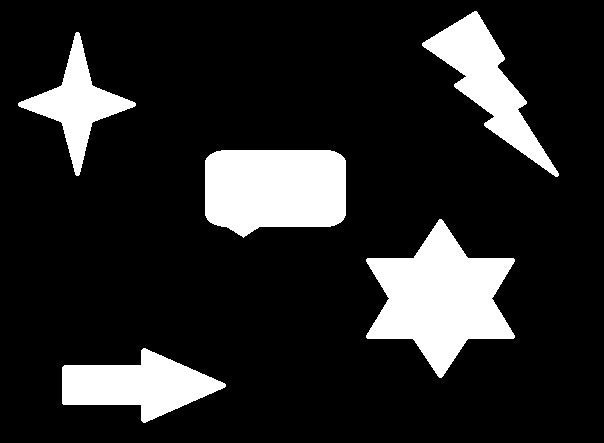
入力画像
※Qiitaにアップする際にjpg変換がかかっています。実際の入力は24ビットビットマップで作成した白黒画像です。

出力結果
※こちらもQiitaにアップする際に、jpg変換がかかっています。実際の出力は24ビットビットマップのカラー画像です。

面積値
こんな感じで使えます。
でも、今どきラベリング処理を使ってる人いるのかな?物体領域検出とかの正解画像作るときは便利かも?
