はじめに
- 提案で必要になりそうなので以下2つの方式を試してみました。
- 二要素認証を使ってより認証をセキュアにしたい。という要望に答えるためのTOTP(Time-based One-time Password)認証
- Twitter/Facebookに認可を委譲することで簡単にログインさせたい。という要望に答えるためのTwitter/Facebookログイン。
- Twitter/Facebookログインを利用する前の事前準備については詳しく触れていません。
- 実装ではSpringBootを使っています。おそらくSpringBootを知らなくても大丈夫だと思いますが、SpringBootに関するまとめとサンプルアプリケーションがありますので参考にしてください。
- SpringBootチートシート
- SpringBootサンプルアプリケーション
TOTP認証
- Pythonで二段階認証 - SlideShareのスライドが解りやすくて勉強になりました。何もご存知無い方はまずこちらを読んだ方が良さそうです。
- TOTPによるMFAに対応しているサービスは色々ありますが、AWSもそうですね。AWSではIAMの管理画面でMFAを有効にし、16文字のシークレットキーを仮想・物理MFAデバイスに登録させるようなフローになります。
- こちらにも記載がありますが、物理MFAデバイスは12.99 USD~19.99 USDです。物理MFAデバイスのユースケースとしてはAWSのルートアカウントなどに設定しておき金庫にしまっておく。仮想MFAデバイスは個人のアカウントにつけておくという運用になるのではないでしょうか。
- 仮想MFAデバイスはandroid/iphoneのアプリケーションとして提供され、基本的にはどこのを利用しても良いです。有名どころではGoogleAuthenticatorですね。今回IIJのSmartKeyも試してみましたがもちろん問題なく利用できました。
TOTP認証の画面フロー
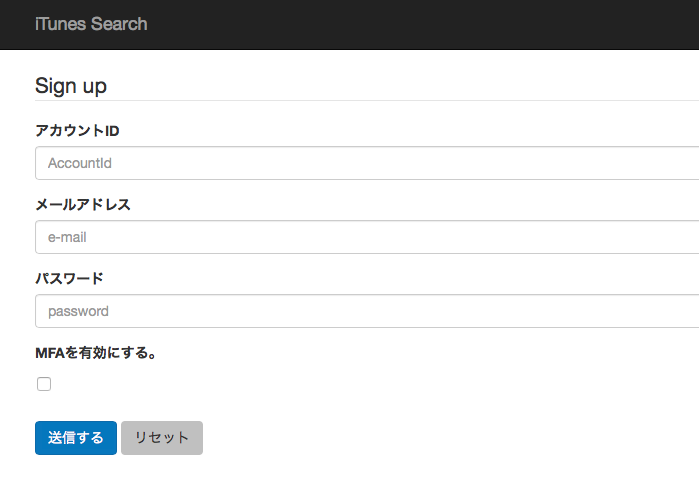
- 会員登録時にTOTPによるMFA(Multi-Factor Authentication)を利用するか否かを選択させます。
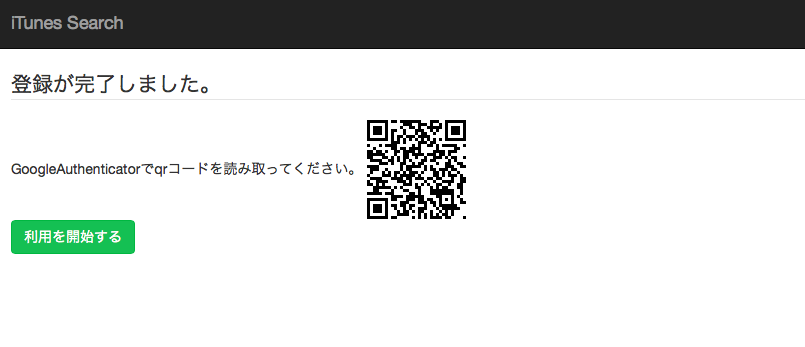
- 選択したユーザには、会員登録後にシークレットキーが含まれたQRコードを出力してあげます。
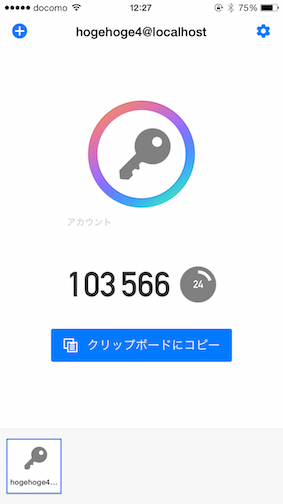
- QRコードを仮想MFAデバイスを使って読み取ります。
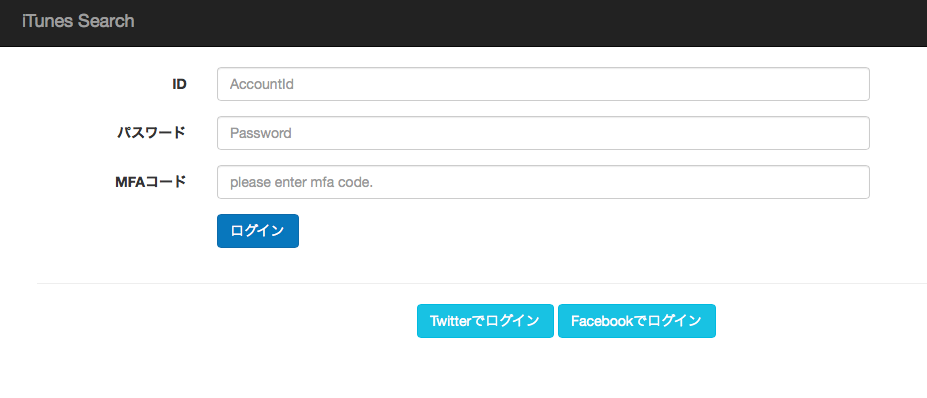
- 仮想MFAデバイスに表示されたワンタイムパスワードをログイン画面で入力させることによって認証させます。(今回仮想MFAは試しにIIJのものを使ってみました)
twitter/facebookログイン
- oauth2.0のフローについては、OAuth 2.0の概要とセキュリティ - SlideShareを参考にさせていただきました。
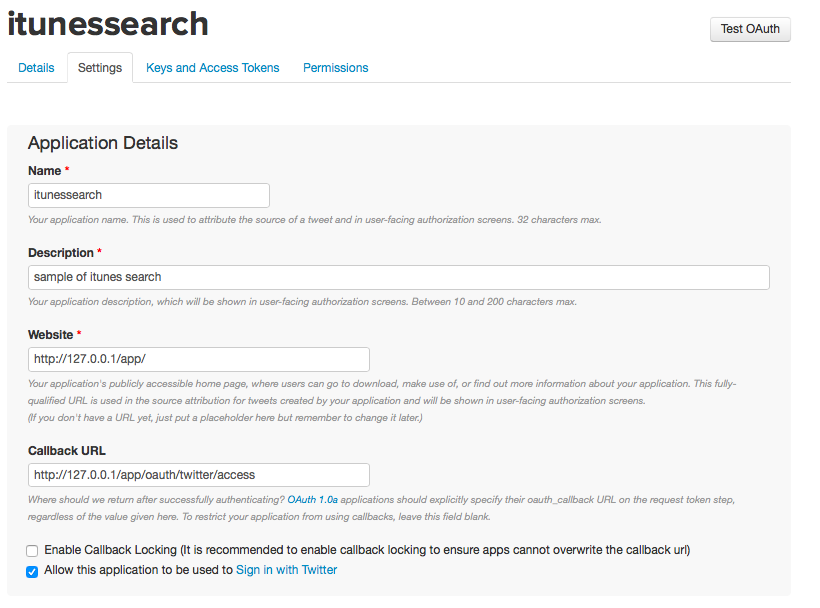
- 事前準備としてhttps://apps.twitter.comで事前設定が必要です。他のサイトで設定方法を確認してみてください。
- 登録時の注意点として何点か
- ローカル環境での利用時にTwitterではlocalhostが使えませんので127.0.0.1で登録しておく必要があります。
- TwitterのWebsiteのURLは何をいれても大丈夫です。一応合わせておきましたが間違っていても動きました。また、CallBackのURLでは一応入力する欄がありますが、ソースコード上のCallBackURLが利用されますので入力する必要はありません。
- Facebookの場合はWebsiteのURLは厳格にチェックされます。存在しないURLだと認可時にエラーになります。
- このフローをJavaで実現するにはTwitter4j、Facebook4jというライブラリを使うと非常に簡単に実現できます。
- 今回用意した流れはログインページからTwitterでログインボタンを押すと、Twitterの認可画面が表示され、認可後トップページを表示します。
実現方法
ソース
ソース見たほうがはやいぜ。という人はこちらからどうぞ。
https://github.com/uzresk/springboot-example.git
TOTP認証の実現方法
シークレットキーの生成~QRコード生成
- シークレットキーはSecureRandomを使って生成します。
- QRコードは自前で作るのめんどくさいのでGoogleのAPIを利用させてもらいました。
- QRコードに埋め込む文字列は「otpauth://totp/%s@%s&secret=%s」とドキュメントには記載されていますが、「otpauth://totp/%s@%s?secret=%s」(&を?)にしないと仮想MFAで読み込むときにエラーになりますので注意が必要です。
AccountCreateController.java
	@RequestMapping(value = "create", method = RequestMethod.POST)
	String create(@Validated AccountCreateForm accountCreateForm, BindingResult result, Model model,
			RedirectAttributes attributes) {

		// 入力チェック
		if (result.hasErrors()) {
			return "account/create";
		}

		// Accountの登録
		Account account = new Account();
		account.setAccountId(accountCreateForm.getAccountId());
		account.setPassword(new BCryptPasswordEncoder().encode(accountCreateForm.getPassword()));
		account.setMail(accountCreateForm.getMail());

		// MFA利用時にはsecret_keyを生成する。
		String secret = null;
		if ("1".equals(accountCreateForm.getUseMfa())) {
			secret = createSecret();
			account.setSecretKey(secret);
		}
		accountService.create(account);

		if (StringUtils.isNotBlank(secret)) {
			attributes.addFlashAttribute("qr", getQRBarcodeURL(account.getAccountId(), "localhost", secret));
		}

		return "redirect:complete";
	}

	@RequestMapping(value = "complete", method = RequestMethod.GET)
	String complete() {

		return "account/complete";
	}

	private String createSecret() {
		byte[] buffer = new byte[10];
		new SecureRandom().nextBytes(buffer);
		String secret = new String(new Base32().encode(buffer));
		return secret;
	}

	public static String getQRBarcodeURL(String user, String host, String secret) {
		return "http://chart.googleapis.com/chart?" + getQRBarcodeURLQuery(user, host, secret);
	}

	public static String getQRBarcodeURLQuery(String user, String host, String secret) {
		try {
			return "chs=100x100&chld=M%7C0&cht=qr&chl="
					+ URLEncoder.encode(getQRBarcodeOtpAuthURL(user, host, secret), "UTF8");
		} catch (UnsupportedEncodingException e) {
			throw new IllegalStateException(e);
		}
	}

	public static String getQRBarcodeOtpAuthURL(String user, String host, String secret) {
		return String.format("otpauth://totp/%s@%s?secret=%s", user, host, secret);
	}
認証処理
- ID/PW+ワンタイムトークンを使った認証を行いますのでSecurityConfigで認証プロバイダを追加します。
SecurityConfig.java
		@Autowired
		public void configureGlobal(UserDetailsService userDetailsService,
				AuthenticationManagerBuilder auth) throws Exception {

			// MFAコードで認証するためのプロバイダをAuthenticationManagerBuilderに追加
			MFAAuthenticationConfigurer configurer = new MFAAuthenticationConfigurer(
					userDetailsService).passwordEncoder(passwordEncoder());
			auth.apply(configurer);
		}
- MFAAuthenticationConfigureでMFAAuthenticationProviderを登録し認証処理を行います。
- 実際にコードを確認する処理はこんな感じです。ここはSpringBootを使おうが否か関係なく同じコードになるはずです。
verify.java
	public static boolean verifyCode(String secret, int code, int variance)
			throws InvalidKeyException, NoSuchAlgorithmException {
		long timeIndex = System.currentTimeMillis() / 1000 / 30;
		byte[] secretBytes = new Base32().decode(secret);
		for (int i = -variance; i <= variance; i++) {
			long c = getCode(secretBytes, timeIndex + i);
			logger.debug(new Long(c).toString());
			if (c == code) {
				return true;
			}
		}
		return false;
	}

	public static long getCode(byte[] secret, long timeIndex)
			throws NoSuchAlgorithmException, InvalidKeyException {
		SecretKeySpec signKey = new SecretKeySpec(secret, "HmacSHA1");
		ByteBuffer buffer = ByteBuffer.allocate(8);
		buffer.putLong(timeIndex);
		byte[] timeBytes = buffer.array();
		Mac mac = Mac.getInstance("HmacSHA1");
		mac.init(signKey);
		byte[] hash = mac.doFinal(timeBytes);
		int offset = hash[19] & 0xf;
		long truncatedHash = hash[offset] & 0x7f;
		for (int i = 1; i < 4; i++) {
			truncatedHash <<= 8;
			truncatedHash |= hash[offset + i] & 0xff;
		}
		return truncatedHash %= 1000000;
	}
twitter4jを使ったOAuth2.0ログインの実現方法
- twitter4jを使った認可処理は以下の通りです。
- /oauth/twitter/authというURLが叩かれるとtwitterのAPIをコールします。コール時にはcallbackのURLを指定しておきます。この時指定したリクエストトークンはセッションに入れておきます。
- twitter側で認証が終わるとoauth_verifierというリクエストパラメータとともにcallback URLにリダイレクトされてきます。
- callbackされた側では、セッション情報からリクエストトークンを取得しリクエストトークンとoauth_verifierからアクセストークンを取得します。
- twitter側での認可が完了したらSpring側でユーザとパスワード、ロールが設定されたAuthenticationTokenを作成し、Contextに格納することでSpring側の認証を行うことができます。
- facebook4jはtwitter4jとインタフェースをほとんど合わせてくれているので同じように実装できます。
TwitterLoginController.java
package jp.gr.java_conf.uzresk.sbex.web.common;

@Controller
public class TwitterLoginController {

	@Autowired
	private HttpSession session;

	@Autowired
	private HttpServletRequest request;

	@RequestMapping("/oauth/twitter/auth")
	String loginTwitter() {

		Twitter twitter = new TwitterFactory().getInstance();

		RequestToken requestToken = null;
		try {
			requestToken = twitter.getOAuthRequestToken("http://127.0.0.1/app/oauth/twitter/access");

			session.setAttribute("requestToken", requestToken);
		} catch (TwitterException e) {
			throw new RuntimeException(e);
		}
		return "redirect:" + requestToken.getAuthenticationURL();
	}

	@RequestMapping("/oauth/twitter/access")
	String loginTwitterAccess() {

		Configuration conf = ConfigurationContext.getInstance();
		RequestToken requestToken = (RequestToken) session.getAttribute("requestToken");

		// token secretが無い場合はエラーとする。
		if (requestToken == null || StringUtils.isBlank(requestToken.getTokenSecret())) {
			throw new RuntimeException("token secret is null.");
		}

		AccessToken accessToken = new AccessToken(requestToken.getToken(), requestToken.getTokenSecret());
		OAuthAuthorization oath = new OAuthAuthorization(conf);

		oath.setOAuthAccessToken(accessToken);
		String verifier = request.getParameter("oauth_verifier");
		try {
			accessToken = oath.getOAuthAccessToken(verifier);
		} catch (TwitterException e) {
			e.printStackTrace();
		}

		Account account = new Account(accessToken.getScreenName(), new Long(accessToken.getUserId()).toString());
		LoginAccountDetails loginAccountDetails = new LoginAccountDetails(account);

		UsernamePasswordAuthenticationToken token = new UsernamePasswordAuthenticationToken(loginAccountDetails, null,
				AuthorityUtils.createAuthorityList("ROLE_USER"));
		SecurityContextHolder.getContext().setAuthentication(token);

		session.setAttribute("accessToken", accessToken);

		return "redirect:/top";
	}
}
最後に
- ライブラリを利用することで結構簡単に実現できることがわかりました。
- 今回twitterログイン側は強引にUsernamePasswordAuthenticationTokenを使った結果パスワードに強引に値を埋めましたが、本当はAuthenticationTokenを別に作った方がいいんでしょうね。(すいません。サボりました)
- 次はxAuthもやっておこうかなと思います。
