はじめに
アラート見逃し防止のためにZabbixの障害イベントにコメントが入力されるまで再通知する仕組み(参考:ZabbixとSlackでChatOpsのススメ)を導入しています。しかし毎回ブラウザを開いてZabbixのWebGUIへアクセスしコメント入力操作をしなければならず、煩わしさを感じていました。
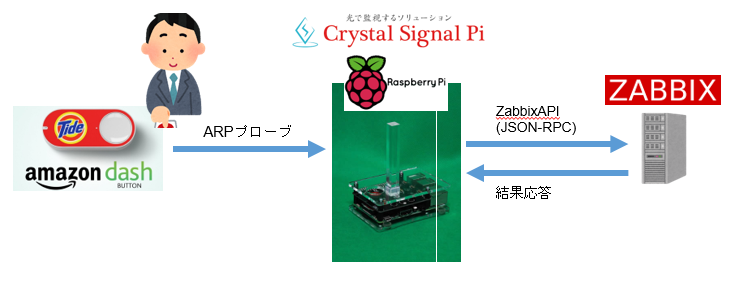
そこで今回は日本で発売されたばかりのAmazon Dash Buttonを使ってボタンを押すだけで障害イベントの受諾ができるようにしました。またAmazon Dash Buttonだけでは正常に受諾できたか確認できず、何らかのフィードバックがないと不安に感じます。そのため**ネットワーク対応の小型LED警告灯「Crystal Signal Pi」**を使って、受諾が正常に行えたことを通知します。
作ったもの
Amazon Dash ButtonからZabbixの障害イベントを受諾してみたhttps://t.co/iPo6aCrN0Q
— usiusi360 (@usiusi360) 2016年12月18日
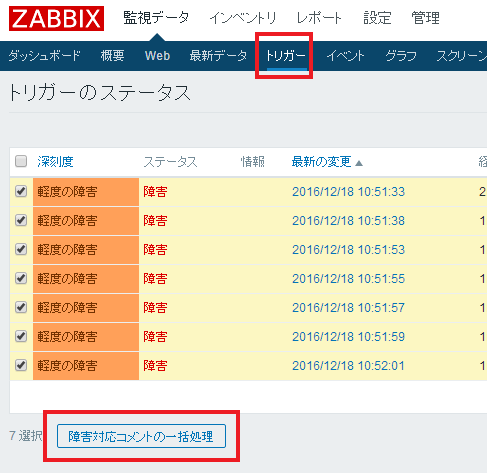
※1回目の「Dush Button」押下時に「障害イベント」が全て受諾され、2回目は受諾すべきイベントが見つからないためエラーになっています。
構成
下図のようにAmazon Dash Buttonを押下すると出力されるARPプローブパケットをRaspberry Piで受信し、それをトリガーにZabbixへAPI連携しイベントにコメントを入力します。
-
Amazon Dash Button
-
Raspberry Pi 3 Model B
- OS: RASPBIAN JESSIE WITH PIXEL
- Version: November 2016
- Release date: 2016-11-25
- Kernel version: 4.4
- node.js v7.2.1
- OS: RASPBIAN JESSIE WITH PIXEL
-
Zabbix 3.0.6
-
Crystal Signal Pi
- Crystal Signal Piは小型コンピュータRaspberry PiにLED警告灯機能を追加する拡張モジュールです。
- 詳しくは「ネットワーク対応小型LED警告灯「Crystal Signal PI」を動かしてみた」に纏めています。
コード
今回作成したコードはgithubにあるので参照してください
https://github.com/usiusi360/zabbix-dash-eventAcknowledge
zabbix-dash-eventAcknowledge/
├── conf.js   // 設定情報
├── index.js  // メイン
├── LICENSE
├── package.json
└── README.md
① ステータス=障害、コメント未入力のトリガーを抽出
    .then(function() {
      return zabbix.request('trigger.get', {
        "output": "triggerid",
        "active": true,                        //Return only enabled triggers that belong to monitored hosts.
        "monitored": true,                     //Return only enabled triggers that belong to monitored hosts and contain only enabled items.
        "withLastEventUnacknowledged": true,   //Return only triggers that have unacknowledged events.
        "maintenance": false,                  //If set to true return only enabled triggers that belong to hosts in maintenance.
        "skipDependent": true                  //Skip triggers in a problem state that are dependent on other triggers. Note that the other triggers are ignored if disabled, have disabled items or disabled item hosts.
      });
    })
②抽出したトリガーを配列化し、トリガーに紐づくイベントを抽出
    .then(function(value) {
      let trigger_array = [];
      value.forEach(function(val, j) {
        trigger_array.push(val.triggerid);
      });

      return zabbix.request('event.get', {
        "output": "eventid",
        "acknowledged": 0, //Whether the event has been acknowledged.
        "object": 0,       //Possible values for trigger events: 0 - trigger
        "source": 0,       //Type of the event. Possible values: 0 - event created by a trigger
        "value": 1,        //State of the related object. Possible values for trigger events: 1 - problem
        "objectids": trigger_array
      });
    })
③抽出したイベントを配列化し、該当イベントにコメントを入力する
    .then(function(value) {
      let event_array = [];
      value.forEach(function(val, j) {
        event_array.push(val.eventid);
      });

      return zabbix.request('event.acknowledge', {
        "message": "Accepted by Dash button",
        "eventids": event_array
      });
    })

実行
- rasbianにデフォルトでインストールされているnode.jsは古いため公式サイトにある最新版をインストールします。
$ curl -sL https://deb.nodesource.com/setup_7.x | sudo -E bash -
$ sudo apt-get install -y nodejs
- dash-buttonに書いてあるとおり、libpcap-devをインストールします。
$ sudo apt-get install libpcap-dev
- 今回作ったコードを「git clone」し、依存ライブラリをインストールします
$ git clone https://github.com/usiusi360/zabbix-dash-eventAcknowledge.git
$ cd zabbix-dash-eventAcknowledge
$ npm install
-
Dash Buttonをセットアップします
「Amazon Dash ButtonをただのIoTボタンとして使う」の「ボタンセットアップ」の項目を参考にし、登録を行いました。 -
Dash buttonのMACアドレスを調べます
$ sudo npm run scan

> zabbix-dash-accept@0.1.0 scan /home/pi/zabbix-dash-eventAcknowledge
> dash-button scan
Scanning for DHCP requests and ARP probes on wlan0...

//上記のとおりscanを始めたら、 Dash buttonのボタンをを押します。
//そうするとDash buttonからのARP probeのパケットを検知し、macアドレスが表示されるのでメモします。

Detected a DHCP request or ARP probe from xx:xx:xx:xx:xx:xx
- conf.js内の設定変更
- 先ほど調べたmacアドレスに変更します。
- zabbixサーバの情報も環境に合わせて変更します。
// amazon dash botton のmacアドレスを指定
exports.PHY_ADDR = "XX:XX:XX:XX:XX:XX";

// zabbixの設定
exports.zabbix_url = "http://localhost/zabbix/api_jsonrpc.php";
exports.zabbix_user = "Admin";
exports.zabbix_password = "password";

//crystal signal piの設定
exports.cs_url = "http://localhost";
exports.cs_color_ok = "0,255,255";
exports.cs_color_err = "255,0,127";
exports.cs_mode = "1";
exports.cs_repeat = "10";
exports.cs_period = "500";
- index.jsを実行します
- 1回目は正常に障害イベントにコメントを登録できましたが、2回目はコメントを入力すべき対象が見つからないためエラーになっています。
$ sudo node index.js
listening start

=== !! accept !! ===

{"info": "", "ack": 0, "json": 1, "repeat": 5, "mode": 1, "remote_addr": "127.0.0.1", "color": [0, 255, 255], "remote_host": 0, "period": 500}


=== !! exception !! ===
no triggers that are not accepted

{"info": "", "ack": 0, "json": 1, "repeat": 5, "mode": 1, "remote_addr": "127.0.0.1", "color": [255, 0, 127], "remote_host": 0, "period": 500}
さいごに
参考URL先でも指摘されていますが、Amazon Dash Buttonはボタンを押してからのタイムラグがあるので使いどころを考える必要がありますが、今回の用途であれば許容範囲かなと思います。
参考
Amazon Dash ButtonをただのIoTボタンとして使う
Amazon Dash Buttonを(正しくない方向で)使ってみた