なにがしたいか
msys2のパッケージマネージャ"pacman"のバックアップの方法をご紹介します。
"bacpac"というスクリプトでバックアップの自動化ができるとのことですが、windows版msys2では動きませんでした。
環境
- OS: windows10 / 64bit
- shell: msys2
原因
bacpacを実行すると"sudoを入れてください"というエラーが出ました。
windows版msys2にはsudoコマンドが含まれていませんし、pacmanでインストールすることもできません。
sudoコマンドの概念自体、windowsにはないのかもしれませんね。
adminとかいうcmdで使うやつに似てる?
一応powershell使ってsudoっぽいことを実現できるといっている人はいるのですが…..
bacpac使い方
- あらかじめgit, diff, grepコマンドを用意します。
grepコマンドはデフォルトで入っているかもしれません。
pacman -S git diffutils grep
- githubアカウントを用意します。
-
bacpacを
git cloneします。 - bacpacのディレクトリに移動します。
cd bacpac - bacpacのスクリプトを修正します。修正内容は以下。
- bacpacを初期化します。
./bacpac init - backupを取ります。
./bacpac backup - msys2を再インストールした時など、
./bacpac restoreで明示的にインストールしたパッケージを自動的に再インストールします。
pacman -Qqeで表示されるpackageをgistに記録して、restore時にそのpackageを再インストールするのがbacpacの動きのようです。
-
./bacpac updateはbacpac自体のアップデートを行うようですが、まだ実装されていません。開発が止まっているようです。
bacpacの修正
shellファイルの修正をします。
- sudoコマンドがないので、sudo使われているところは消します。
-
echo 'sudoとなっているところは$()で囲って実行させます。
@@ -46,8 +46,8 @@
   if [[ ! -f '/usr/bin/diff' ]]; then
     echo 'diffutils' >> 'tmp/notinstalled.list'
   fi
-  if [[ ! -f '/usr/bin/sudo' ]]; then
-    echo 'sudo' >> 'tmp/notinstalled.list'
+  if [[ ! -f '/usr/bin/bash' ]]; then
+    $(tmp/notinstalled.list)
   fi
   if [[ ! -f '/usr/bin/grep' ]]; then
     echo 'grep' >> 'tmp/notinstalled.list'
@@ -97,7 +97,7 @@
   else
     read -p "Restore $1 to $2? [Y/n] " response
     if [[ "$response" =~ ^[Yy]$ || "$response" == '' ]]; then
-    sudo cp "$1" "$2" &&
+    cp "$1" "$2" &&
     echo "Successfully restored $1 to $2" ||
     echo "Error restoring $1 to $2"
     else
@@ -129,7 +129,7 @@
     cat 'tmp/caninstall.list'
     read -p 'Install the above packages? [Y/n] ' response
     if [[ "$response" =~ ^[Yy]$ || "$response" == '' ]]; then
-      cat 'tmp/caninstall.list' | sudo pacman -Sy - &&
+      cat 'tmp/caninstall.list' | pacman -Sy - &&
       echo 'Successfully installed the above packages' ||
       echo 'Error installing the above packages'
     else
@@ -147,7 +147,7 @@
     cat 'tmp/remove.list'
     read -p 'Remove the above packages? [Y/n] ' response
     if [[ "$response" =~ ^[Yy]$ || "$response" == '' ]]; then
-      cat 'tmp/remove.list' | sudo pacman -Rsn - &&
+      cat 'tmp/remove.list' | pacman -Rsn - &&
       echo 'Successfully removed the above packages' ||
       echo 'Error removing the above packages'
     else
エラー
初めてinitしたときにsudoのためのエラーで処理が止まってしまい、設定がおかしくなったようです。
ここでは、そのエラーと対策を記述します。
初めてbacpacをする人は上記の修正を行うだけでここは見なくてよいと思います。
一度bacpac試してみて私のように失敗している人は役に立つかもしれません。
fatal: The current branch master has no upstream branch.
$ bacpac backup

[master 3f454fc] Update pacman.conf with bacpac
 1 file changed, 8 insertions(+), 22 deletions(-)
fatal: The current branch master has no upstream branch.
To push the current branch and set the remote as upstream, use

    git push --set-upstream origin master

Error backing up pacman.conf
pushができないようです。
対処
pushがうまくいっていないので、手動でpushしてみます。
bacpac_init関数にもそう書いてあります。
  git remote add origin $url
  if git push -f --set-upstream origin master; then
    echo 'Successfully initialized the repository'
    echo
  else
    echo 'Error initializing the repository'  # ここのエラーメッセージがでた
    echo "Please run 'bacpac init' again until successful, or bacpac will not work"
    echo 'properly.'
    echo
    exit 1
初めてbacpac initしたときに、エラー無視して先に行っちゃったからいけないようですね。
add, commitして、pushできるようにしてから、git remote add origin <URL>を実行してみます。
のところは作成したgistのURLに置き換えます。
fatal: remote origin already exists.
$ git remote add origin https://gist.github.com/hogehogehogehogehoge.git

fatal: remote origin already exists.
remoteは既にあるとのこと。
つまり、このコマンドはinitの段階で成功しているようです。
fatal: Unable to find remote helper for 'https'
次に git push -f --set-upstream origin masterを実行してみます。
$ git push -f --set-upstream origin master

fatal: Unable to find remote helper for 'https'
間違ってURLをhttpsで入れたのがいけないようですね。
gitに変えます。
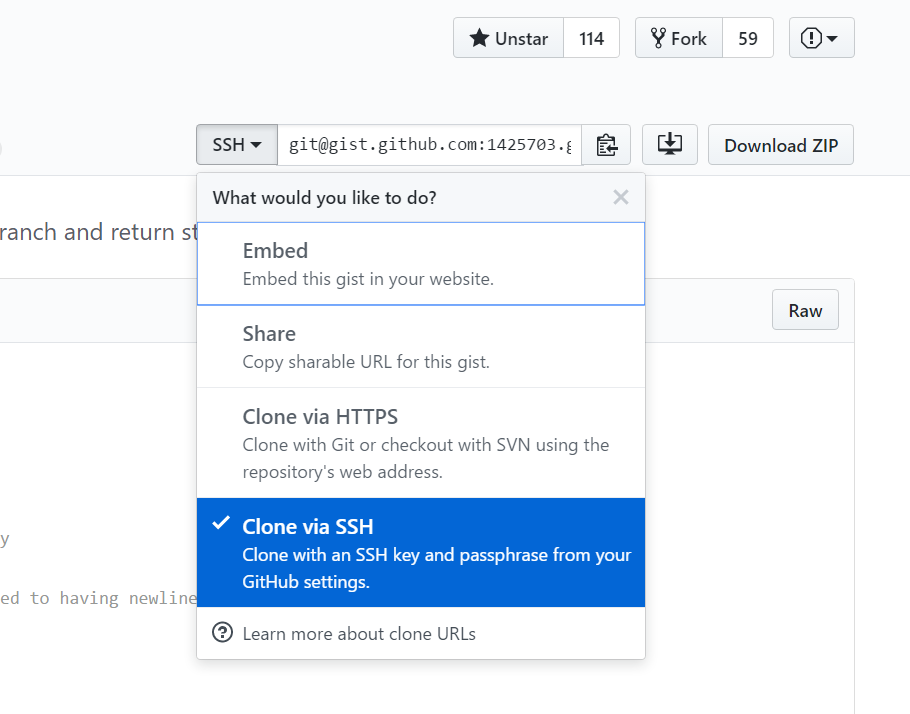
作成したgistへ行ってドロップダウンから選んでコピーします。
作業は以下のようになります。
- 誤って登録したリモートリポジトリを削除します。
- 正しいリモートリポジトリを登録します。
@U1and0 ~/bacpac (master)  # リモートリポジトリ削除
$ git remote remove origin

@U1and0 ~/bacpac (master)  # 正しいリモートリポジトリを登録
$ git remote add origin git@gist.github.com:hogehogehogehoge.git

@U1and0 ~/bacpac (master)  # 改めてpush
$ git push -f --set-upstream origin master
The authenticity of host 'gist.github.com (192.30.000.000)' can't be established.
RSA key fingerprint is SHA256:ThbgkXUpnJWGl67E1IGCspROoTxdCARmLviKw6E5SY8.
Are you sure you want to continue connecting (yes/no)? yes
Warning: Permanently added 'gist.github.com,192.30.000.000' (RSA) to the list of known hosts.
Counting objects: 10, done.
Delta compression using up to 4 threads.
Compressing objects: 100% (10/10), done.
Writing objects: 100% (10/10), 3.49 KiB | 0 bytes/s, done.
Total 10 (delta 4), reused 0 (delta 0)
remote: Resolving deltas: 100% (4/4), completed with 2 local objects.
To gist.github.com:hogehogehogehoge.git
   8f7f03b..9fad523  master -> master
Branch master set up to track remote branch master from origin.
うまくpushできました。
以上です。