参考にしたページ
お手軽にいろんなことが試せそうだなと思って買ってみました。
すでにネット上で得られる情報で十分なのですが、いろいろ試してみたら意外とうまくいったので書いてみました。
何かのお役にたてば。
こんなプログラムにしたい
このシールドはスイッチがA0に結線されていて、電圧を読んでどのスイッチか判別する必要があります。
多分使う時は、
- A0を読んで -> 平滑化して -> どのキーか判別して -> キーに応じて何かする
- ちょっと待つ
- 最初に戻る
という流れになるかと思います。
なのでとりあえずloopをこんな風にしてみました。
void loop() {
 // キーに応じて何かする <- どのキーか判別して <- 平滑化して <- A0を読んで
	actionByKey( 		 aKeyFromData( 	    smoothData( analogRead( A0 ) ) ) );
	delay( 1 );
}
まだ何にも決めていませんが、それっぽい名前をつけた関数を並べてみました。
これに合うように関数を作っていきたいと思います。
関数をどうするか
smoothData,aKeyFromData,actionByKeyと三つの関数を作ります。
- 引数は整数がひとつだけ。
- 返り値は整数。
ということにすればうまくいきそうです。
関数を作るときには他にも引数が必要になることもあるので、そこは部分適用で対応することにします。
※ 補足記事:部分適用っておいしいの? on Arduino
まず、平滑化する関数。
auto smoothF (
  []( const long RATE = 20 ){
    long previousValue ( 0 );
    return [=]( const long CURRENT_VALUE ) mutable -> long {
      return previousValue = (RATE * CURRENT_VALUE + (100 - RATE) * previousValue  ) / 100;
    };
  }
);
auto smoothData ( smoothF( 50 ) );
直前値と現在値の加重平均を返します。
ほかのスケッチで使用したものの使い回しです。
ただし、反応がのろい感じがしたので加重平均の比率を上げてみました。
キーを判別する関数。
auto aKeyFromDataF (
  [](const int NO_KEY, const int NEITHER ){
      int previousValue ( NO_KEY );
      int confirmedValue ( NO_KEY );
      return [=]( const int DATA ) mutable -> int {
        const int CURRENT_VALUE ( whichKey( DATA ) );
        if( previousValue == NEITHER || CURRENT_VALUE == NEITHER ) {
          previousValue = CURRENT_VALUE;
          return confirmedValue;
        }
        if(  CURRENT_VALUE == previousValue ) return confirmedValue = CURRENT_VALUE;
        previousValue = CURRENT_VALUE;
        return confirmedValue;
      };
    }
 );
 auto aKeyFromData ( aKeyFromDataF( NO_KEY, NEITHER ) );
まだキーの値をどうするかとか決めてないのですが、とりあえず、なにか整数値で、
- NO_KEYは何も押してない時の値
- NEITHERはどのキーにもあてはまらない時の値
です。
whichKeyという関数を作って、データがどのキーにあたるか判別しています。
ただし、変動の途中でたまたまそのキーの値になってしまったということもあるので、
- 直前値と現在値がともにNEITHER以外でかつ等しい場合、現在値を確定値に代入して返す
- そうでなければ、現在値を直前値に代入し、確定値を返す
二つ同じキー値が続いたら新しいキー値として確定する、というようにしました。
whichKeyはこんな感じです。
auto whichKeyF (
  []( const int NO_KEY, const int SELECT_KEY, const int LEFT_KEY
    , const int DOWN_KEY, const int UP_KEY, const int RIGHT_KEY, const int NEITHER
  ){

    return [=] ( const int DATA ) mutable -> int {
      if( isInRange(     NO_KEY, DATA ) )  return  NO_KEY;
      if( isInRange( SELECT_KEY, DATA ) )  return  SELECT_KEY;
      if( isInRange(   LEFT_KEY, DATA ) )  return  LEFT_KEY;
      if( isInRange(   DOWN_KEY, DATA ) )  return  DOWN_KEY;
      if( isInRange(     UP_KEY, DATA ) )  return  UP_KEY;
      if( isInRange(  RIGHT_KEY, DATA ) )  return  RIGHT_KEY;
      return NEITHER;
    };
  }
);
auto whichKey ( whichKeyF( NO_KEY, SELECT_KEY, LEFT_KEY
                         , DOWN_KEY, UP_KEY, RIGHT_KEY, NEITHER ) );
データがどのキーか判別します。どれでもなかったらNEITHERを返します。
isInRangeという関数を作って、キーの範囲にデータがあるか判別しています。
キーの値をどうするか決めてませんが、後述のactionByKeyと同じものを使っていれば大丈夫だろう、という作戦です。
isInRangeはこんな感じです。
auto isInRangeF (
  [](const int KEY_RANGE ){
    return [=](const int KEY, const int DATA ) mutable -> bool {
      return DATA > KEY - KEY_RANGE && DATA < KEY + KEY_RANGE;
    };
  }
);
auto isInRange ( isInRangeF( KEY_RANGE ) );
( KEY - KEY_RANGE, KEY + KEY_RANGE ) の範囲内に DATA が入っているかを返します。
キーに応じて何かする関数。
auto actionByKeyF (
  []( const int NO_KEY, const int SELECT_KEY, const int LEFT_KEY
    , const int DOWN_KEY, const int UP_KEY, const int RIGHT_KEY
  ){
    return [=]( const int KEY ) mutable -> int {
       //Serial.println( KEY );
      if( KEY == NO_KEY ) return KEY;
      if( KEY == SELECT_KEY ){
        lcd.setCursor( 0,1 );
        lcd.print( "SELECT_KEY" );
        return KEY;
      }
      if( KEY == LEFT_KEY ){
        lcd.setCursor( 0,1 );
        lcd.print( "LEFT_KEY  " );
        return KEY;
      }
      if( KEY == DOWN_KEY ){
        lcd.setCursor( 0,1 );
        lcd.print( "DOWN_KEY  " );
        return KEY;
      }
      if( KEY == UP_KEY ){
        lcd.setCursor( 0,1 );
        lcd.print( "UP_KEY    " );
        return KEY;
      }
      if( KEY == RIGHT_KEY ){
        lcd.setCursor( 0,1 );
        lcd.print( "RIGHT_KEY " );
        return KEY;
      }
      return KEY;
    };
  }
);
auto actionByKey ( actionByKeyF( NO_KEY, SELECT_KEY, LEFT_KEY
                               , DOWN_KEY, UP_KEY, RIGHT_KEY ) );
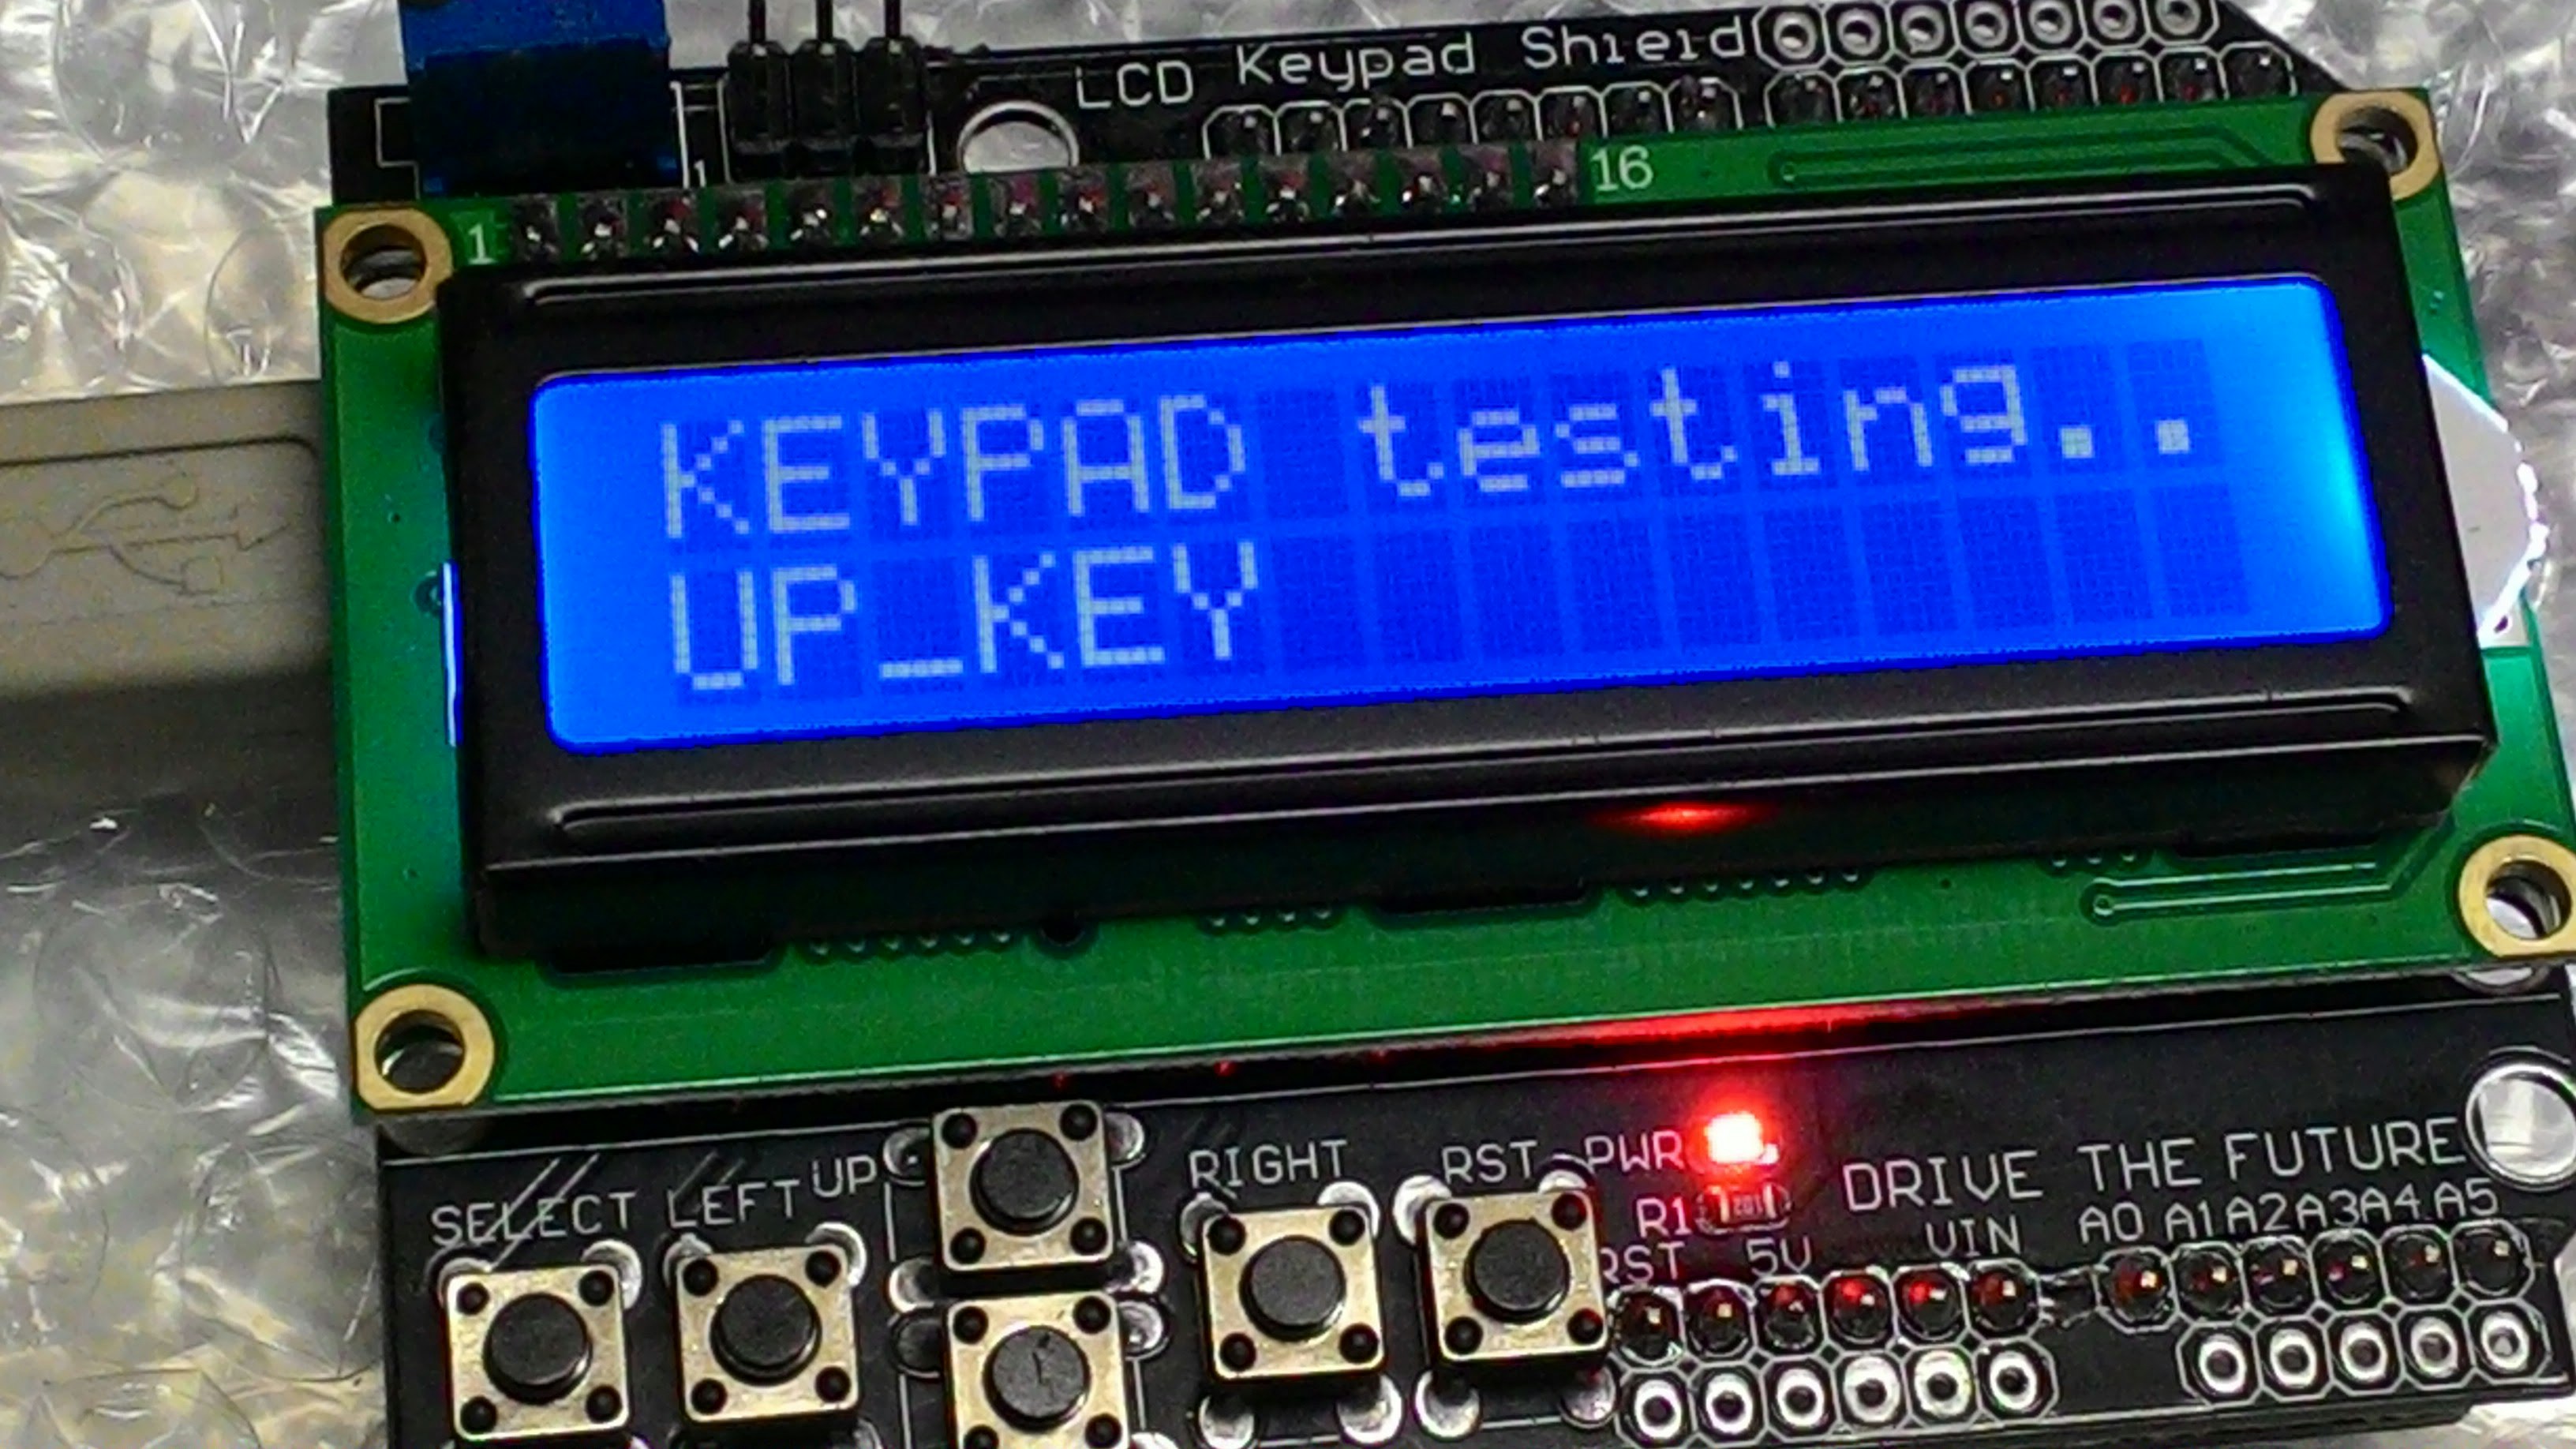
参考ページと同様に、とりあえずキーの名前を表示してみました。何か他のことをさせたいときはここを書き換えればOK。
用途によってはまだ使うかも知れないので、一応、引数をそのまま返り値にしています。
デバッグ用の関数。
auto sPrint( const int DATA ) -> int {
  Serial.print( DATA );
  Serial.print(",");
  return DATA;
};
auto sPrintln( const int DATA ) -> int {
  Serial.println(",");
  return DATA;
};
データの流れがどうなっているか見たかったので作ってみました。
引数をそのまま返しつつ、シリアルに出力します。
こんな風に見たいところに挟みこんで使います。便利。
  sPrintln( actionByKey( sPrint( aKeyFromData(
  	sPrint( smoothData( sPrint( analogRead( A0 )
  	) ) ) ) ) ) );
A0を読む -> シリアルに出力 -> 平滑化する -> シリアルに出力 -> キー値に変換 -> シリアルに出力 -> キーによって何かする -> シリアルを改行
という意味です。
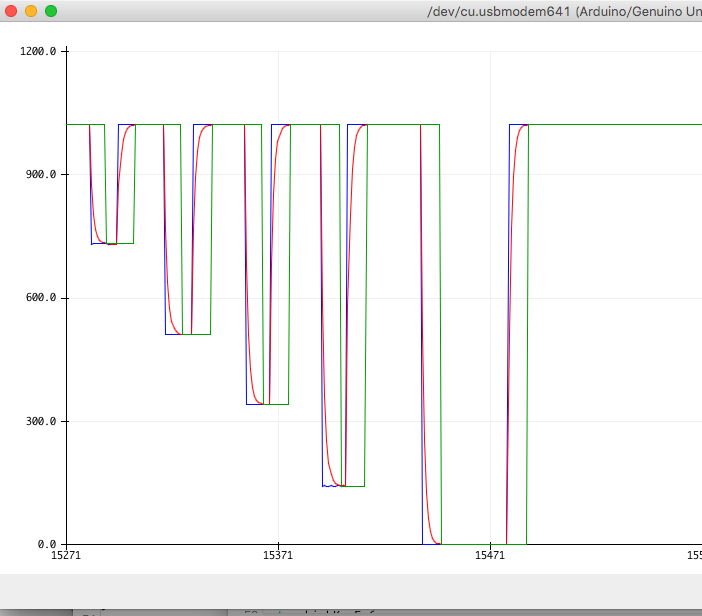
プロッタに出してみたところ。

青が生データ、赤が平滑化したもの、緑がキー値です。
キーの値は、0,1,2など別途IDを振ってもいいのですが、もろもろ簡単になるので 平滑化した値を実測したものにしました。IDイコール判断基準値ということです。
この流れでいくと、NEITHERは0から1023以外ならいいということになり、とりあえず-1ということにしました。
ここまで書いてきて、actionByKeyじゃないじゃん! actionByNewKeyじゃん!と気がつきました。
大概の場合、新しいキーが押された時だけ何かする、という方が使いでがあるようです。
使うこともあるかも知れないのでactionByKeyの方は処理の部分だけコメントアウトして残し、あらたにactionByNewKeyというのを加えました。といってもほとんど同じで、直前値と現在値が同じなら引数を返すだけで何もしない、というのが加わっただけです。
auto actionByKeyF (
  []( const int NO_KEY, const int SELECT_KEY, const int LEFT_KEY
    , const int DOWN_KEY, const int UP_KEY, const int RIGHT_KEY
  ){
    return [=]( const int KEY ) mutable -> int {
      if( KEY == NO_KEY ) return KEY;
      if( KEY == SELECT_KEY ){
//        lcd.setCursor( 0,1 );
//        lcd.print( "SELECT_KEY" );
        return KEY;
      }
      if( KEY == LEFT_KEY ){
//        lcd.setCursor( 0,1 );
//        lcd.print( "LEFT_KEY  " );
        return KEY;
      }
      if( KEY == DOWN_KEY ){
//        lcd.setCursor( 0,1 );
//        lcd.print( "DOWN_KEY  " );
        return KEY;
      }
      if( KEY == UP_KEY ){
//        lcd.setCursor( 0,1 );
//        lcd.print( "UP_KEY    " );
        return KEY;
      }
      if( KEY == RIGHT_KEY ){
//        lcd.setCursor( 0,1 );
//        lcd.print( "RIGHT_KEY " );
        return KEY;
      }
      return KEY;
    };
  }
);
auto actionByKey ( actionByKeyF( NO_KEY, SELECT_KEY, LEFT_KEY
                               , DOWN_KEY, UP_KEY, RIGHT_KEY ) );

auto actionByNewKeyF (
  []( const int NO_KEY, const int SELECT_KEY, const int LEFT_KEY
    , const int DOWN_KEY, const int UP_KEY, const int RIGHT_KEY
  ){
    int previousKey ( NO_KEY );
    return [=]( const int KEY ) mutable -> int {
      if( KEY == previousKey ) return KEY;
      if( KEY == NO_KEY ) return previousKey = KEY;
      if( KEY == SELECT_KEY ){
        lcd.setCursor( 0,1 );
        lcd.print( "SELECT_KEY" );
        return previousKey = KEY;
      }
      if( KEY == LEFT_KEY ){
        lcd.setCursor( 0,1 );
        lcd.print( "LEFT_KEY  " );
        return previousKey = KEY;
      }
      if( KEY == DOWN_KEY ){
        lcd.setCursor( 0,1 );
        lcd.print( "DOWN_KEY  " );
        return previousKey = KEY;
      }
      if( KEY == UP_KEY ){
        lcd.setCursor( 0,1 );
        lcd.print( "UP_KEY    " );
        return previousKey = KEY;
      }
      if( KEY == RIGHT_KEY ){
        lcd.setCursor( 0,1 );
        lcd.print( "RIGHT_KEY " );
        return previousKey = KEY;
      }
      return previousKey = KEY;
    };
  }
);
auto actionByNewKey ( actionByNewKeyF( NO_KEY, SELECT_KEY, LEFT_KEY
                               , DOWN_KEY, UP_KEY, RIGHT_KEY ) );
loopはこんな感じになりました。
void loop() {
  sPrintln( actionByNewKey( actionByKey( sPrint( aKeyFromData(
  	sPrint( smoothData( sPrint( analogRead( A0 )
  	) ) ) ) ) ) ) );
  delay( 1 );
}
最初のように言葉で書けば
- A0を読む -> シリアルに出力 -> 平滑化する -> シリアルに出力 -> キー値に変換 -> シリアルに出力 -> キーによって何かする -> 新しいキーによって何かする -> シリアルを改行
- ちょっと待つ
- 最初に戻る
という流れです。
スケッチの全体はこちらからどうぞ。
