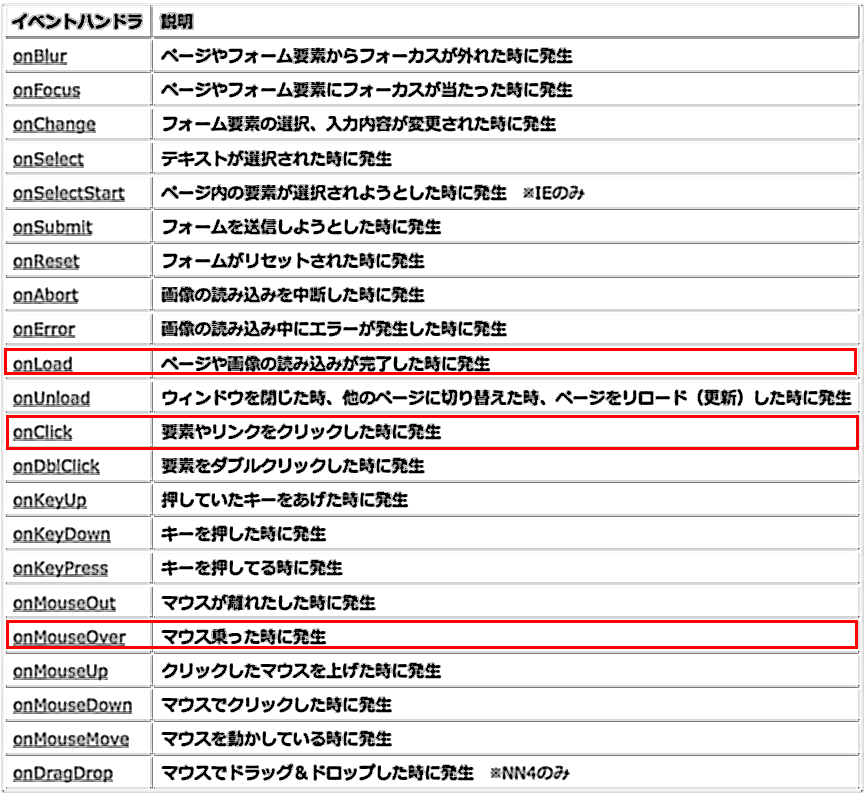
イベントとは、「ページ上で発生する様々な出来事です」
(例)
・ページが読み込まれた
・ボタンがクリックされた。
・マウスのカーソルが要素の上に乗ったとき
等いろいろあって、主なイベントをまとめただけでもこれだけ有ります。全部と向き合ってると気持ちが折れそうなので赤わくで囲った3つを中心に進めて行きたいと思います。
イベント処理の方法(書き方)
基本的に「どの要素で発生した」「どのイベントを」「どの処理に関連づけるのか」を定義するのがまず基本です。
それでは以下書き方をまとめてみます。
①タグの属性として宣言する
イベント処理を関連づけたい要素(タグ)に対して、「onイベント名」属性を設定する方法。つまり以下↓
<要素 onイベント名="関数">
実際に書くと↓
<!DOCTYPE html>
<html>
<head>
<meta charset="UTF-8" />
<title>イベント処理1</title>
<script>
function show() { window.alert(' はい!出来ました。 ');
}
</script>
</head>
<body>
<button id="btn">ダイアログを表示</button>
</body>
</html>
結果 : http://m-uehara.com/js_002/js_ivent_001.html
これでも良いのですが、一般的にはタグの中にJavaScriptのコードを記述するのは、コードの可読性という点ではあまり好ましい事ではありません。
そこで②の様な書き方があります。
②オブジェトのプロパティに割り当てる
オブジェクトの「onイベント名」プロパティを利用する事で、関連付けとイベントハンドラそのものの宣言をまとめてJavaScriptで記述する方法です。
実際書いてみると以下の様になります。↓
<!DOCTYPE html>
<html>
<head>
<meta charset="UTF-8" />
<title>イベント処理2</title>
<script>
window.onload = function() {
    document.getElementById('btn').onclick = function() {
        window.alert('はい!出来ました。');
    }
};
</script>
</head>
<body>
<button id="btn">ダイアログを表示</button>
</body>
</html>
結果 : http://m-uehara.com/js_002/js_ivent_002.html
ページロード時にid="btn"である要素に対してclickイベントハンドラを登録します。また、clickイベントハンドラでは、「クリック時にダイヤログボッスを表示する」ように命令しています。
③addEventListenerを利用する。
②の書き方には1つ問題があります。対プロパティに対する処理の割当なので、要素/イベントの単位で1つのイベントハンドラしか登録出来ない点です。
つまり「addEventListenerという関数を使うと、1つのイベントで2つの処理を同時に行える様になります。」という事です。
では「クリック」というイベントで2つのメソッドを実行してみます。
addEventListenerの書き方。
基本、以下の様に書きます。
実際に、「ボタンををクリック」すると「ダイヤログを表示」と「boxの背景を赤にする」という2つのメソッドを同時に行う事をやってみます。
<html xmlns="http://www.w3.org/1999/xhtml" xml:lang="ja" lang="ja" dir="ltr">
<head>
<meta http-equiv="Content-Type" content="text/html; charset=utf-8" />
<title>イベント処理3−1</title>
</head>
<script>
window.addEventListener('load', function() {
     document.getElementById('btn').addEventListener('click', function() {
        box.style.backgroundColor = 'red';
    });
     document.getElementById('btn').addEventListener('click', function() {
     window.alert('はい!出来ました。');
    });

}, false);
</script>


</head>
<body>

<div id='box'>This is box</div>
<button id='btn'>ダイヤログを表示</button>

</body>
</html>
結果 : http://m-uehara.com/js_002/js_ivent_003_3.html↑
短縮系で以下の様に買いてもエラーが出なかったので大丈夫かもしれません。↓
<html xmlns="http://www.w3.org/1999/xhtml" xml:lang="ja" lang="ja" dir="ltr">
<head>
<meta http-equiv="Content-Type" content="text/html; charset=utf-8" />
<title>イベント処理3−2</title>
</head>
<script>
window.addEventListener('load', function() {
     document.getElementById('btn').addEventListener('click', function() {
     box.style.backgroundColor = 'red';
     window.alert('はい!出来ました。');
    });

}, false);
</script>

</head>
<body>

<div id='box'>This is box</div>
<button id='btn'>ダイヤログを表示</button>

</body>
</html>
結果 : http://m-uehara.com/js_002/js_ivent_003_4.html↑
また、いっぺんにすべての処理を書くと混乱する場合は、最初は以下の様に分けて書くのも良いかもしれません。
<html xmlns="http://www.w3.org/1999/xhtml" xml:lang="ja" lang="ja" dir="ltr">
<head>
<meta http-equiv="Content-Type" content="text/html; charset=utf-8" />
<title>イベント処理3−3</title>
</head>
<body>

<div id='box'>This is box</div>
<button id='btn'>box</button>


<script type="text/javascript">
window.onload = function() {

    //要素を取得
    var btn = document.getElementById('btn');
    var box = document.getElementById('box');


    // 背景色を赤くするイベント
    btn.addEventListener('click', function() {
        box.style.backgroundColor = 'red';
    }, false);

    // アラートを出すイベント
    btn.addEventListener('click', function() {
        alert('clicked');
    }, false);
};

</script>

</html>
これでも結果は
結果 : http://m-uehara.com/js_002/js_ivent_003_2.html↑
それぞれソースコードをあけてみるとスクリプトの内容は違いますが、実行結果は同じ物になります。
又、「JavaScriptのイベント処理」については以前こちらでも書いていましたので合わせて読んでも良いかと思います。
http://qiita.com/tsukishimaao/items/5100d8734bc6e1abe7a3

