0. はじめに
WWDC2017始まりましたね。
Keynoteで発表され、なによりも話題になったのがARKit。早速試していきたいのですがもちろんまだまだ日本語の情報は少ないです(QiitaではなぜかUnityで使う方法が先にあがっていますね...)
というわけで公式のドキュメントを参考に、早速ARKitを動かしてみようというのが今回の趣旨です。
環境はもちろんのことXcode9 betaです。
有料デベロッパーアカウントでないとインストールできない(?)ようなので気になる人はアプリをリリースしている人に頼み込んでみましょう。
今回のコードはこちらです。(ARKitSCNSampleがSceneKitの、ARKitSKSampleがSpriteKitの、ARKitMetalSampleがMetalのサンプルになっています。)
1. ARことはじめ〜SceneKit編〜
まず最初に必要なのはARSessionです。これはその名からも分かる通りARKitがカメラやモーションセンサを管理をするためのshared objectになります。
これを直接叩いてやれば、自分で用意したCameraView上にARを実現することができるというようなことがUnderstanding Augmented Realityに書いてありますが、今回は簡単のためBuilding a Basic AR Experienceにかかれているように用意されているテンプレートとSceneKitやSpriteKitを組み合わせて作っていきましょう。
Xcode9 betaで新規プロジェクトを作成するとAugumented Reality Appという項目が追加されているのでこれを選択します。
使うライブラリとしてはSceneKit,SpriteKit,Metalの三種類が選択できます。今回はせっかくのARですので3Dも扱えるSceneKitを選択しました。
プロジェクトを作成するとSceneKitおなじみの船のモデルが入ったテンプレートプロジェクトができます。
ViewControllerはこんな感じ。
import UIKit
import SceneKit
import ARKit

class ViewController: UIViewController, ARSCNViewDelegate {

    @IBOutlet var sceneView: ARSCNView!

    override func viewDidLoad() {
        super.viewDidLoad()

        // Set the view's delegate
        sceneView.delegate = self

        // Show statistics such as fps and timing information
        sceneView.showsStatistics = true

        // Create a new scene
        let scene = SCNScene(named: "art.scnassets/ship.scn")!

        // Set the scene to the view
        sceneView.scene = scene
    }

    override func viewWillAppear(_ animated: Bool) {
        super.viewWillAppear(animated)

        // Create a session configuration
        let configuration = ARWorldTrackingSessionConfiguration()

        // Run the view's session
        sceneView.session.run(configuration)
    }

    override func viewWillDisappear(_ animated: Bool) {
        super.viewWillDisappear(animated)

        // Pause the view's session
        sceneView.session.pause()
    }

    override func didReceiveMemoryWarning() {
        super.didReceiveMemoryWarning()
        // Release any cached data, images, etc that aren't in use.
    }

    // MARK: - ARSCNViewDelegate

/*
    // Override to create and configure nodes for anchors added to the view's session.
    func renderer(_ renderer: SCNSceneRenderer, nodeFor anchor: ARAnchor) -> SCNNode? {
        let node = SCNNode()

        return node
    }
*/

    func session(_ session: ARSession, didFailWithError error: Error) {
        // Present an error message to the user

    }

    func sessionWasInterrupted(_ session: ARSession) {
        // Inform the user that the session has been interrupted, for example, by presenting an overlay

    }

    func sessionInterruptionEnded(_ session: ARSession) {
        // Reset tracking and/or remove existing anchors if consistent tracking is required

    }
}
まず最初に目がとまるのはARSCNViewですね。既存の接頭辞にさらにARがつくかたちでARKitのサポートするライブラリ群は実装されているようです。
delegateとしてARSCNViewDelegateがあり、これにはアンカーポイントが置かれたところにSCNNodeを置く(?)rendererと、セッションが失敗した時のエラー表示用のためのsession、セッションが中断されたときのためのsessionWasInterruptedやsessionInterruptionEndedが用意されているようです。エラー処理多いな...
ARSessionの設定はviewWillAppear内で行われているようですが、ここでさっそく記事のとおりに設定を変えてみましょう。
override func viewWillAppear(_ animated: Bool) {
    super.viewWillAppear(animated)

    // Create a session configuration
    let configuration = ARWorldTrackingSessionConfiguration()
    configuration.planeDetection = .horizontal

    // Run the view's session
    sceneView.session.run(configuration)
}
まずARWorldTrackingSessionConfigurationがARの設定クラスになるようです。ARSCNViewがARSessionのインスタンスを持っているのでそこでこの設定クラスのインスタンスをrunしてあげます。
追加したplaneDetectionは自動で検知する平面の方向を設定します(現状horizontalしかなさげ?)
これで自動で水平面を検知することができるようになります。
2. ARしてみる
もっとも手軽なARとして平面の認識があげられます。ARKitでは先程のconfiguration設定によって水平面を自動で認識しそこにARAnchorを設置してくれるようになっています。delegateメソッドであるrendererにこのアンカーポイントは渡されるため、このdelegateメソッドの中で平面に置いておきたいNodeを記述してあげます。
公式の例としてはこちら(テンプレートにあらかじめ用意されているdelegateメソッドとは若干ことなるので注意しましょう。)
    func renderer(_ renderer: SCNSceneRenderer, didAdd node: SCNNode, for anchor: ARAnchor) {
        guard let planeAnchor = anchor as? ARPlaneAnchor else { return }

        let plane = SCNPlane(width: CGFloat(planeAnchor.extent.x), height: CGFloat(planeAnchor.extent.z))
        let planeNode = SCNNode(geometry: plane)
        planeNode.position = SCNVector3Make(planeAnchor.center.x, 0, planeAnchor.center.z)
        planeNode.transform = SCNMatrix4MakeRotation(-Float.pi / 2, 1, 0, 0)

        node.addChildNode(planeNode)
    }
このサンプルでは平面ノードをアンカーポイントをもとに設置しています。アンカーの座標系での広がりがplaneAnchor.extentなのでそれにあわせた平面ノードをつくっています。これによって水平面に平面のノードが設置されることになります。
3. 実行してみよう
実行はもちろんiOS11の入った実機ということになります。(シュミレーターでも落ちずに動きはします。)
僕自身はbeta版の人柱になっているiPadで試そうとしたのですがまさかのiOS11対象外になってしまっていたらしく、入れられなかったため断念しました。。。
是非動く方は試してみてください。
本日実機を持っている人に協力していただくことになったので後ほど更新します。
SceneKitサンプルが何故か動いてくれなかったのでその他のものです。
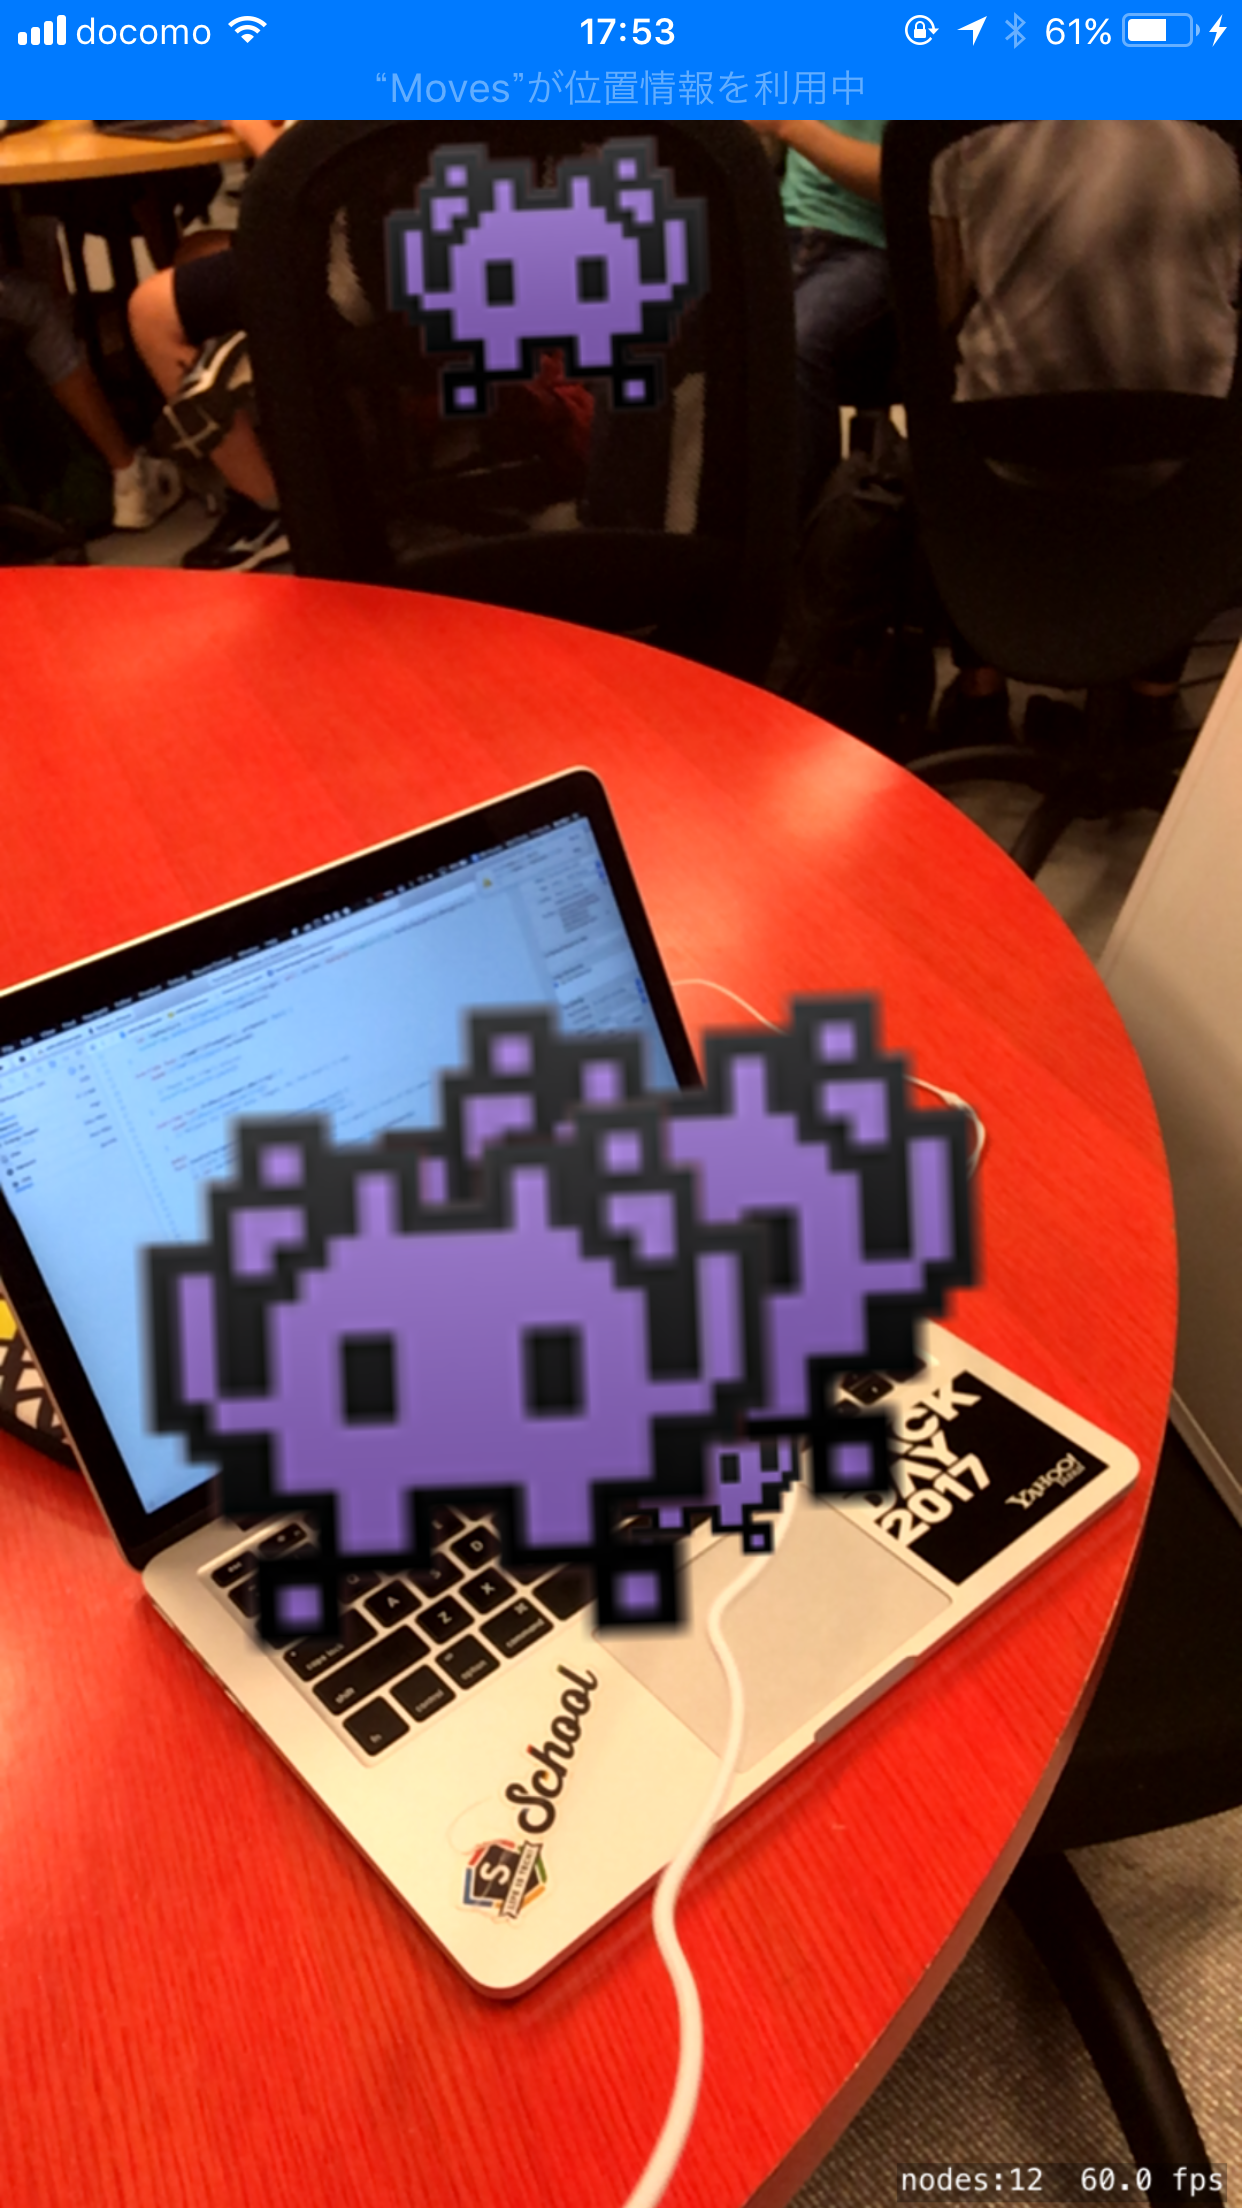
4. 他にもためしてみよう
4-2. 2Dを現実空間へ
SceneKitが3D担当ならば、SpriteKitは2D担当です。
テンプレートではあらかじめアンカーポイントに👾を表示するように以下のデリゲートメソッドが実装されています。
    func view(_ view: ARSKView, nodeFor anchor: ARAnchor) -> SKNode? {
        // Create and configure a node for the anchor added to the view's session.
        let labelNode = SKLabelNode(text: "👾")
        labelNode.horizontalAlignmentMode = .center
        labelNode.verticalAlignmentMode = .center
        return labelNode;
    }
ドキュメントにある通り、このアンカーポイントを自作するにはたとえばこのように書きます(Metalのサンプルにあったコードを真似してタップされたら出現するようにしました。)
    @objc
    func handleTap(gestureRecognize: UITapGestureRecognizer) {
        // Create anchor using the camera's current position
        if let currentFrame = sceneView.session.currentFrame {

            // Create a transform with a translation of 0.2 meters in front of the camera
            var translation = matrix_identity_float4x4
            translation.columns.3.z = -0.2
            let transform = simd_mul(currentFrame.camera.transform, translation)

            // Add a new anchor to the session
            let anchor = ARAnchor(transform: transform)
            sceneView.session.add(anchor: anchor)
        }
    }
これによって前方0.2メートルにARAnchorが置かれます。translationで座標を0.2メートル分平行移動させたということですね。
4-3. Metalで自作してみよう
今までSceneKitやSpriteKitとなっていたところをMetalにしてつくると、Rendererクラスが実装されたかなり重めのテンプレートができます。他との違いは自分でARSessionを管理しなければいけないというところです。ですが逆に言えばそれだけSceneKitやSpriteKitに左右されずに実装できるということになります。
Displaying an AR Experience with Metalはこの実装の解説になっています。
(後ほど追記します。)