CloudWatchLogsを使ったことがなく、何かやってみようと思い、nginxで400系エラーの場合にSNSを使ってメールを送信することをやってみたのでメモ
前提
- Amazon Linux AMI release 2015.03
参考
- CloudWatch LogsでAmazonLinux上のApacheエラーログを監視する
- AWS マイスターシリーズ Black belt
AWS CloudTrail & CloudWatch Logs - CloudWatch Logs エージェントのリファレンス
CloudWatchLogsへアクセスできるIAMロールの作成
EC2起動前にCloudWatchLogsへのアクセス権限を持ったIAMロールを作成します。
- IAM->Roles->Create New Role
- 「Role Name」の画面では任意の名前を入力
- 「Select Role Type」の画面ではAmazon EC2を選択
- 「Attach Policy」の画面ではCloudWatchLogsFullAccessを選択
EC2の起動
AmazonLinuxを起動します。
先ほど作成したCloudWatchLogsへのアクセス権限を持ったIAMロールの付与を忘れないようにします。
EC2のタイムゾーンをJSTに変更する
起動されたEC2のタイムゾーンがUTCになっているのでJSTに変更します。
$sudo cp /usr/share/zoneinfo/Japan /etc/localtime

$date
2015年  6月 28日 日曜日 15:56:25 JST
nginxのインストール、
yumでインストールし、サービス起動を実施します
$sudo yum install -y nginx
$sudo service nginx start
CloudWatchLogsエージェントのインストール
yumでインストールします。
$sudo yum install -y awslogs
CloudWatchLogsエージェントの設定
デフォルト設定ではリージョンがUSになっているので東京(ap-northeast-1)に変更します。
[plugins]
cwlogs = cwlogs
[default]
region = ap-northeast-1
次にCloudWatchLogsで送信するログのデフォルト情報を確認してみます。
#
# ------------------------------------------
# CLOUDWATCH LOGS AGENT CONFIGURATION FILE
# ------------------------------------------
#
# --- DESCRIPTION ---
# This file is used by the CloudWatch Logs Agent to specify what log data to send to the service and how.
# You can modify this file at any time to add, remove or change configuration.
#
# NOTE: A running agent must be stopped and restarted for configuration changes to take effect.
#
# --- CLOUDWATCH LOGS DOCUMENTATION ---
# https://aws.amazon.com/documentation/cloudwatch/
#
# --- CLOUDWATCH LOGS CONSOLE ---
# https://console.aws.amazon.com/cloudwatch/home?region=us-east-1#logs:
#
# --- AGENT COMMANDS ---
# To check or change the running status of the CloudWatch Logs Agent, use the following:
#
# To check running status: service awslogs status
# To stop the agent: service awslogs stop
# To start the agent: service awslogs start
# To start the agent on server startup: chkconfig awslogs on
#
# --- AGENT LOG OUTPUT ---
# You can find logs for the agent in /var/log/awslogs.log
#

# ------------------------------------------
# CONFIGURATION DETAILS
# ------------------------------------------

[general]
# Path to the CloudWatch Logs agent's state file. The agent uses this file to maintain
# client side state across its executions.
state_file = /var/lib/awslogs/agent-state

## Each log file is defined in its own section. The section name doesn't
## matter as long as its unique within this file.
# [kern.log]
#
## Path of log file for the agent to monitor and upload.
# file = /var/log/kern.log
#
## Name of the destination log group.
# log_group_name = kern.log
#
## Name of the destination log stream. You may use {hostname} to use target machine's hostname.
# log_stream_name = {instance_id} # Defaults to ec2 instance id
#
## Format specifier for timestamp parsing. Here are some sample formats:
## Use '%b %d %H:%M:%S' for syslog (Apr 24 08:38:42)
## Use '%d/%b/%Y:%H:%M:%S' for apache log (10/Oct/2000:13:55:36)
## Use '%Y-%m-%d %H:%M:%S' for rails log (2008-09-08 11:52:54)
# datetime_format = %b %d %H:%M:%S # Specification details in the table below.
#
## A batch is buffered for buffer-duration amount of time or 32KB of log events.
## Defaults to 5000 ms and its minimum value is 5000 ms.
# buffer_duration = 5000
#
# Use 'end_of_file' to start reading from the end of the file.
# Use 'start_of_file' to start reading from the beginning of the file.
# initial_position = start_of_file
#
## Encoding of file
# encoding = utf-8 # Other supported encodings include: ascii, latin-1
#
#
#
# Following table documents the detailed datetime format specification:
# ----------------------------------------------------------------------------------------------------------------------
# Directive     Meaning                                                                                 Example
# ----------------------------------------------------------------------------------------------------------------------
# %a            Weekday as locale's abbreviated name.                                                   Sun, Mon, ..., Sat (en_US)
# ----------------------------------------------------------------------------------------------------------------------
#  %A           Weekday as locale's full name.                                                          Sunday, Monday, ..., Saturday (en_US)
# ----------------------------------------------------------------------------------------------------------------------
#  %w           Weekday as a decimal number, where 0 is Sunday and 6 is Saturday.                       0, 1, ..., 6
# ----------------------------------------------------------------------------------------------------------------------
#  %d           Day of the month as a zero-padded decimal numbers.                                      01, 02, ..., 31
# ----------------------------------------------------------------------------------------------------------------------
#  %b           Month as locale's abbreviated name.                                                     Jan, Feb, ..., Dec (en_US)
# ----------------------------------------------------------------------------------------------------------------------
#  %B           Month as locale's full name.                                                            January, February, ..., December (en_US)
# ----------------------------------------------------------------------------------------------------------------------
#  %m           Month as a zero-padded decimal number.                                                  01, 02, ..., 12
# ----------------------------------------------------------------------------------------------------------------------
#  %y           Year without century as a zero-padded decimal number.                                   00, 01, ..., 99
# ----------------------------------------------------------------------------------------------------------------------
#  %Y           Year with century as a decimal number.                                                  1970, 1988, 2001, 2013
# ----------------------------------------------------------------------------------------------------------------------
#  %H           Hour (24-hour clock) as a zero-padded decimal number.                                   00, 01, ..., 23
# ----------------------------------------------------------------------------------------------------------------------
#  %I           Hour (12-hour clock) as a zero-padded decimal numbers.                                  01, 02, ..., 12
# ----------------------------------------------------------------------------------------------------------------------
#  %p           Locale's equivalent of either AM or PM.                                                 AM, PM (en_US)
# ----------------------------------------------------------------------------------------------------------------------
#  %M           Minute as a zero-padded decimal number.                                                 00, 01, ..., 59
# ----------------------------------------------------------------------------------------------------------------------
#  %S           Second as a zero-padded decimal numbers.                                                00, 01, ..., 59
# ----------------------------------------------------------------------------------------------------------------------
#  %f           Microsecond as a decimal number, zero-padded on the left.                               000000, 000001, ..., 999999
# ----------------------------------------------------------------------------------------------------------------------
#  %z           UTC offset in the form +HHMM or -HHMM (empty string if the the object is naive).        (empty), +0000, -0400, +1030
# ----------------------------------------------------------------------------------------------------------------------
#  %j           Day of the year as a zero-padded decimal number.                                        001, 002, ..., 365
# ----------------------------------------------------------------------------------------------------------------------
#  %U           Week number of the year (Sunday as the first day of the week) as a zero padded          00, 01, ..., 53
#               decimal number. All days in a new year preceding the first Sunday are considered
#               to be in week 0.
# ----------------------------------------------------------------------------------------------------------------------
#  %W           Week number of the year (Monday as the first day of the week) as a decimal number.      00, 01, ..., 53
#               All days in a new year preceding the first Monday are considered to be in week 0.
# ----------------------------------------------------------------------------------------------------------------------
#  %c           Locale's appropriate date and time representation.                                      Tue Aug 16 21:30:00 1988 (en_US)
# ----------------------------------------------------------------------------------------------------------------------

[/var/log/messages]
datetime_format = %b %d %H:%M:%S
file = /var/log/messages
buffer_duration = 5000
log_stream_name = {instance_id}
initial_position = start_of_file
log_group_name = /var/log/messages
**[general]セクションでは共有の設定を記載し、以降の[/var/log/messages]**などの個別のセクションがCloudWatchLogsで送信する各ログファイルの設定をします。
設定を確認するとデフォルト設定でも**/var/log/messages**を送信する設定になっているのが分かります。
指定されている各パラーメーターの詳細は以下を参照ください。
/var/log/messages送信の確認
デフォルトで指定されている/var/log/messagesの内容が正しく送信されるかサービスを起動して確認します。
$sudo service awslogs start
上記実施後、マネージメントコンソールで確認します。
- CloudWatch->Logs
LogGroupsに**/var/log/messages**が存在することが確認できます。

また、Never Expireということでこのログがずっと残ることが分かります。保存期間を変更する場合にはNever Expireのリンクを選択することで変更が可能です。
LogGroupsを選択するとLog Streamsが選択できます。デフォルト設定ではEC2のインスタンスIDとなっています。Log StreamsにインスタンスIDを利用することで具体的にどのインスタンスからのログ情報なのかが確認できます。

任意のLog Streamsを選択すると実際のログ情報が見ることが出来る画面となります。また、本画面では任意の文字列と日付時間(日付時間はFromのみでToの指定はできない)によるフィルタリングも可能です。

細かいフィルタリングなどは後述するメトリックフィルタを使うことで可能です。
nginxのアクセスログをCloudWatchLogsに対応させる
nginxのアクセスログをCloudWatchLogsに対応させるために**/etc/awslogs/awslogs.conf**に追記を行います。
と、その前にnginxのアクセスログの形式を確認してみます。
127.0.0.1 - - [28/Jun/2015:09:13:41 +0900] "GET /hogefuga HTTP/1.1" 404 3696 "-" "Wget/1.16.1 (linux-gnu)" "-"
CloudWatchLogsでは日付時刻フォーマットを記載する必要があるので、予めフォーマットを確認しておきます。
どのように日付時刻フォーマットを指定すればよいかについてはdateコマンドを利用して確認します。
28/Jun/2015:09:13:41 +0900という形式であればdateコマンドのmanを見つつ、以下のようフォーマット指定できることが分かります。
$date +"%d/%b/%Y:%H:%M:%S %z"
28/ 6月/2015:09:19:58 +0900
上記で設定ファイルを記載する準備ができたので、末尾に追記を行います。
[/var/log/nginx/access.log]
datetime_format = %d/%b/%Y:%H:%M:%S %z
file = /var/log/nginx/access.log
buffer_duration = 5000
log_stream_name = {instance_id}
initial_position = start_of_file
log_group_name = /var/log/nginx/access.log
datetime_formatには先ほど調べたフォーマットの内容を記載しています。
設定ファイルを反映するためにサービスの再起動を行います。
$sudo service awslogs restart
サービス起動後、Webサーバーにアクセスし、アクセスログを追記します。
$wget http://localhost
上記実施後、同じようにマネージメントコンソールを確認し、ロググループに**/var/log/nginx/access.log**が追加され、先ほどアクセスしたログを表示できれば成功です。
うまくいかない場合、CloudWatchLogsのログ(/var/log/awslogs.log)などを確認します。
nginxのエラーログもCloudWatchLogsに対応させる
nginxのエラーログは以下のような形式となっております。
2015/06/28 09:00:45 [error] 2279#0: *3 open() "/usr/share/nginx/html/hogefuga" failed (2: No such file or directory), client: 127.0.0.1, server: localhost, request: "GET /hogefuga HTTP/1.1", host: "localhost"
先ほどと同じようにdateコマンドでフォーマットを確認します。
$date +"%Y/%m/%d %H:%M:%S"
2015/06/28 09:18:58
準備ができたので設定ファイルに追記します。
[/var/log/nginx/error.log]
datetime_format = %Y/%m/%d %H:%M:%S
file = /var/log/nginx/error.log
buffer_duration = 5000
log_stream_name = {instance_id}
initial_position = start_of_file
log_group_name = /var/log/nginx/error.log
先ほどと同じようにCloudWatchLogsのサービス再起動、nginxのエラーログ出力を行います。
$wget http://localhost/hogefuga
マネージメントコンソールを確認し、表示されれば成功です。
SNSの設定
本項以降ではCloudWatchLogsに登録した内容を利用してSNSと連携して4xxエラーの際にメールが送信されるように設定します。
メールを送信する箇所ではSNSを利用するのでその設定を以下のように行います。
- SNSでトピックを作成
- 作成したトピックを選択し、Create Subscriptionを行う。今回の例ではプロトコルはEmailとする
- 自分のメールアドレスを入力する
- 登録したメールアドレスのリンクをクリックし、Subscriptionの許可を行う
メトリックフィルタの作成
LogGroupsからnginxのエラーログを示す/var/log/nginx/error.logにチェックを行い、Create Metric Filterを選択します。
すると以下のような画面が表示され、フィルタをするパターンを指定できます。
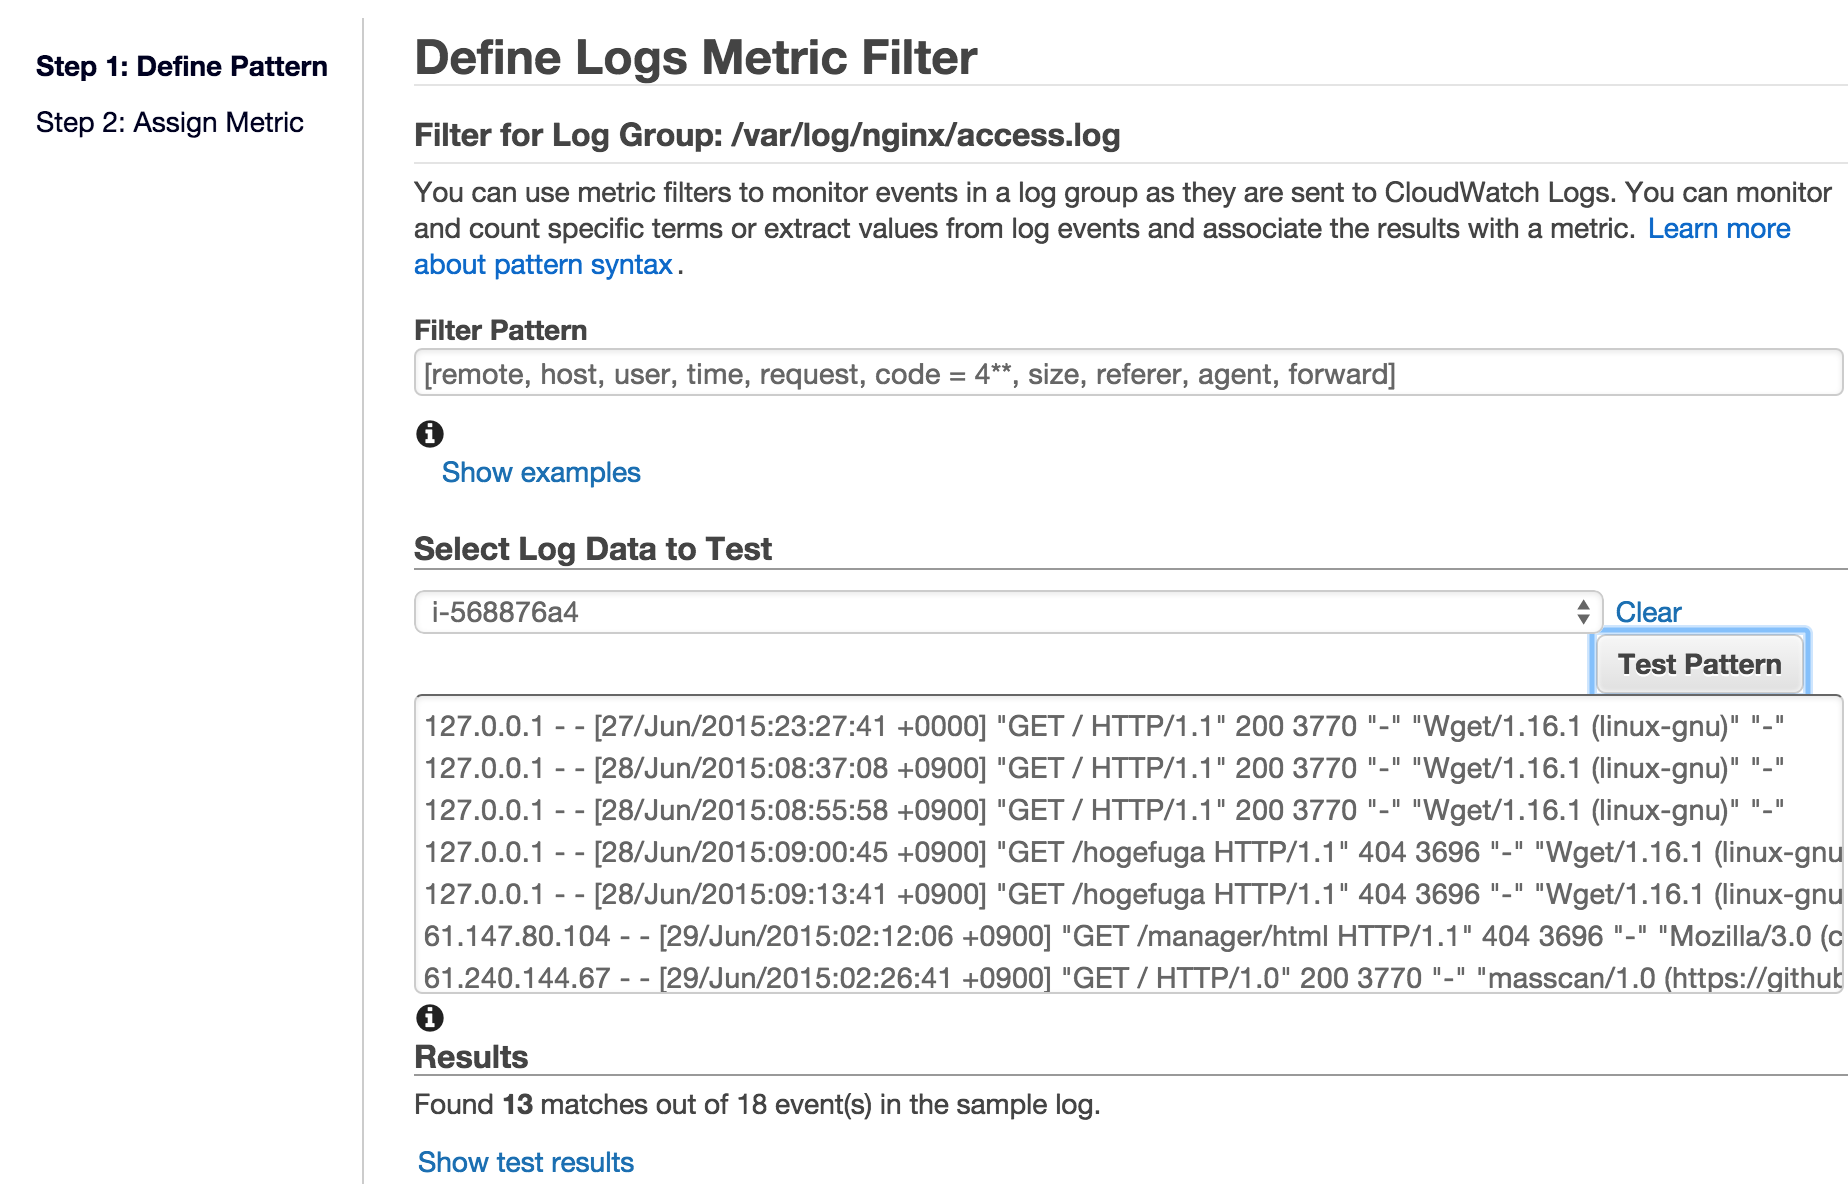
上記では [remote, host, user, time, request, code = 4**, size, referer, agent, forward] と記載することでnginxでステータスコードが4xx系の場合のログをフィルタリングするようにしています。
フィルタの書き方の詳細については以下を参照ください。
フィルタパターンを作成後、Test Patternボタンを選択することで指定したファイルパターンが実際のログにどれだけマッチするかも確認できます。
アラームの作成
アラームを作成して4xx系のエラーが5分で5回を超えた時にメールが送信されるようにします。
LogGroupsのグラフの/var/log/nginx/access行のMetric Filters列の1filterとなっている部分を選択します。先ほど登録したメトリックフィルタの内容が確認できる画面に遷移します。このフィルタに対してアラームを作成するのでCreate Alarmリンクを選択します。
アラーム画面では以下のように設定しました。
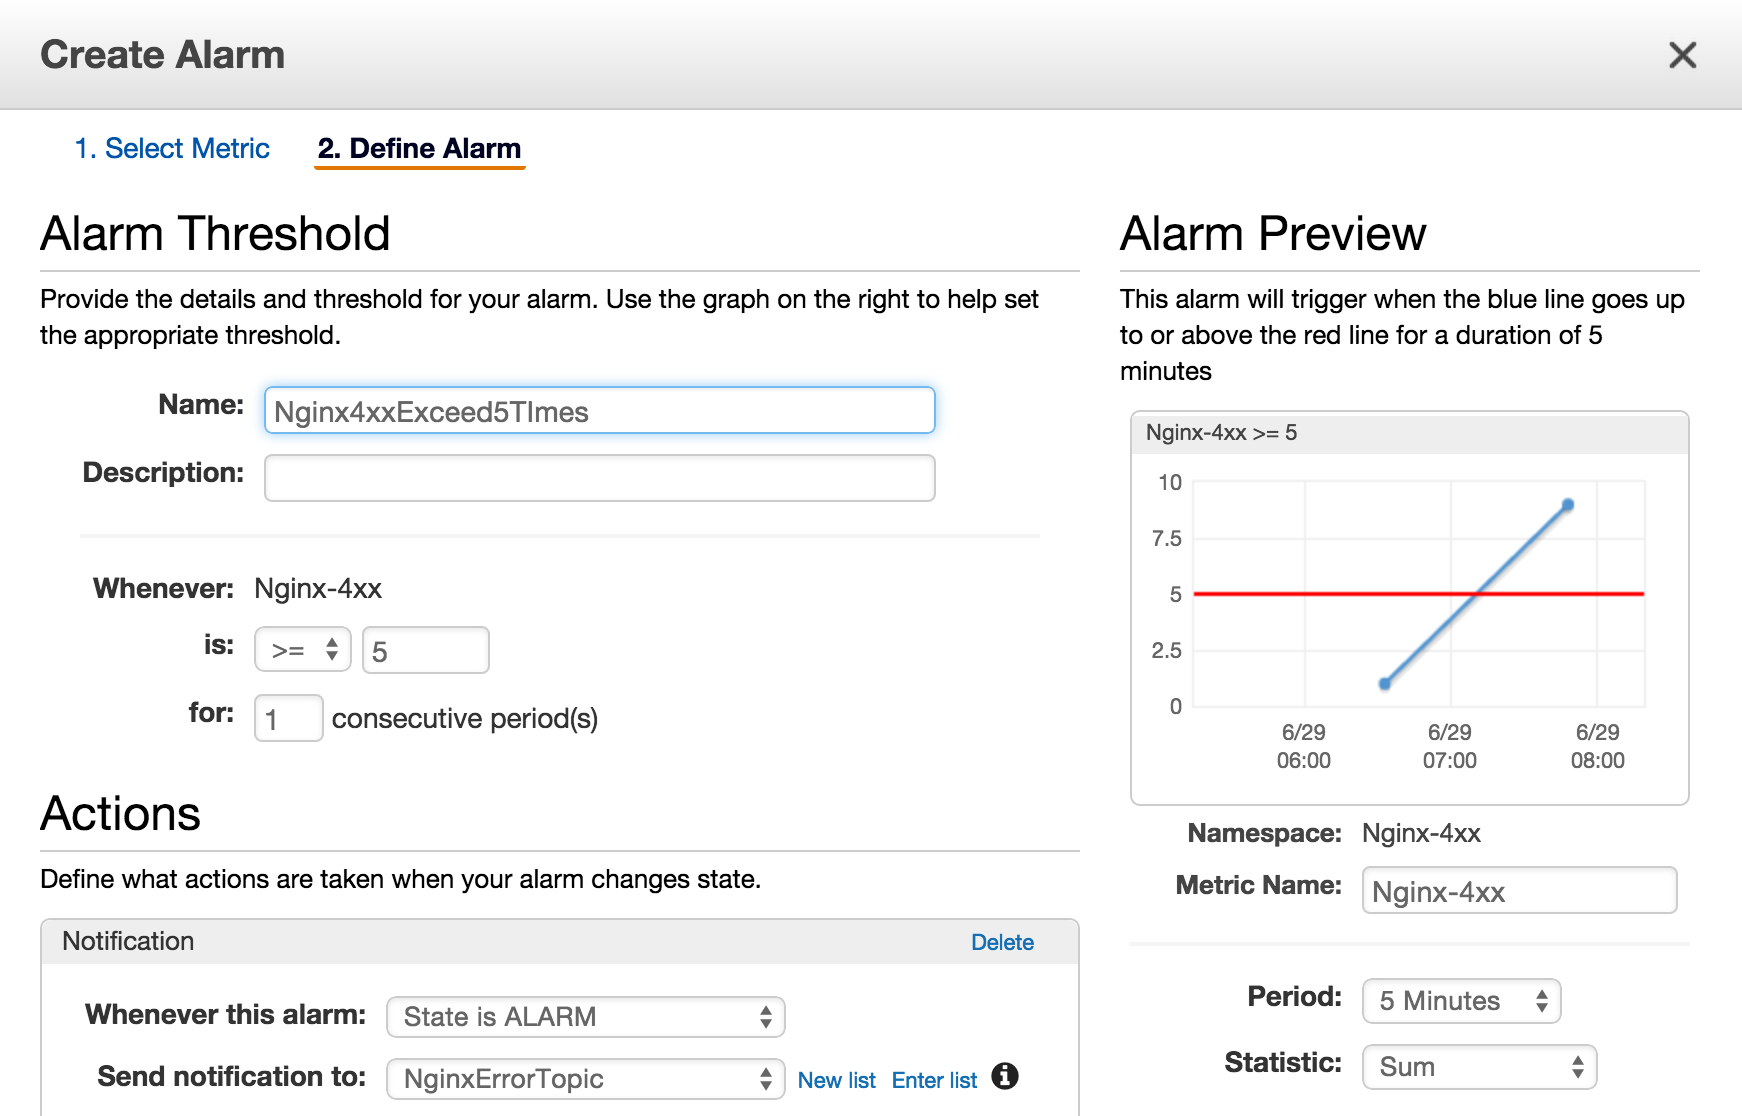
Send notification toの項で先ほど作成したSNSのトピックを選択することでアラーム発生時にメールを送信することができます。
アラームを発生させる
設定が正しくできているか確認するために対象のサーバーで404(Not Found)を複数回発生させます。対象のサーバーで以下を5回以上実施します。
$wget http://localhost/hoge
設定が正しくできていればSNSのトピックで指定したメールアドレスに対してアラームが発生したことを示すメールが届くかと思います。