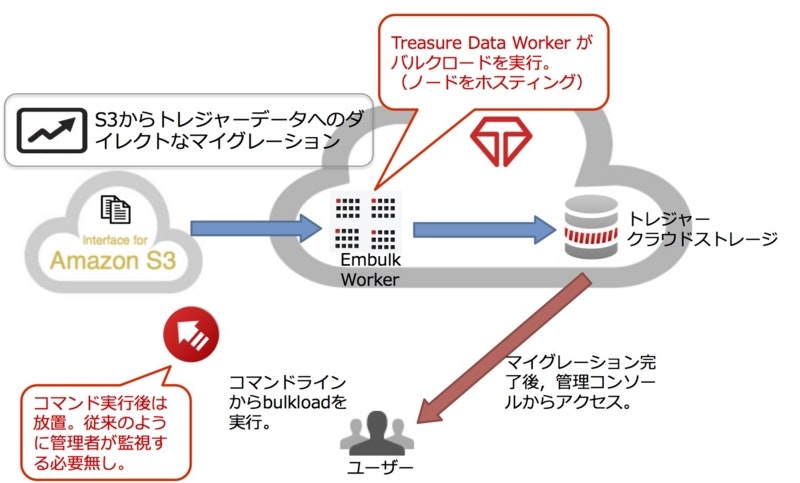
先日、TreasureDataからDataConnectorの発表があり、S3からのデータの取り込みがクライアントレスで定期的に実行できるようになりました。
これにより、ユーザはインポート用サーバを持たずに、いろいろなデータソースからデータを取り込むことができるようになりました。
(新機能)「Data Connector for Amazon S3」によるデータロード革命

その一方で、自前のバッチ処理がある場合には、自分たちの環境下でコントロールしたい場合もあります。
そうしたケースにも対応するために、embulk-output-tdも合わせてリリースが行われました。
今回は、embulk-output-tdをつかって、S3からTreasureDataにデータを取り込むまでを実施します。
実行環境
- Mac version 10.10.3
- Embulk v0.6.13
- embulk-output-td v0.1.0
- embulk-input-s3 v0.2.0
インストール
参考: Embulk on Github
$ curl --create-dirs -o ~/.embulk/bin/embulk -L "http://dl.embulk.org/embulk-latest.jar" -k
$ chmod +x ~/.embulk/bin/embulk
$ echo 'export PATH="$HOME/.embulk/bin:$PATH"' >> ~/.bashrc
$ source ~/.bashrc
$ embulk gem install embulk-output-td
$ embulk gem install embulk-input-s3
インポート対象のファイル
ELBのログの仕様は下記に記載されています。
Elastic Load Balancing アクセスログ
ログの有効化については、こちら
| フィールド名 | フィールド値の例 |
|---|---|
| timestamp | 2014-02-15T23:39:43.945958Z |
| elb | my-test-loadbalancer |
| client:port | 192.168.131.39:2817 |
| backend:port | 10.0.0.1:80 |
| request_processing_time | 0.000073 |
| backend_processing_time | 0.001048 |
| response_processing_time | 0.000057 |
| elb_status_code | 200 |
| backend_status_code | 200 |
| received_bytes | 0 |
| sent_bytes | 29 |
| "request" | "GET http://www.example.com: 80/HTTP/1.1" |
ファイル生成のルール: "{Bucket}/{Prefix}/AWSLogs/{AWS AccountID}/elasticloadbalancing/{Region}/{Year}/{Month}/{Day}/{AWS Account ID}elasticloadbalancing{Region}{Load Balancer Name}{End Time}{Load Balancer IP}{Random String}.log"
上記のデータをトレジャーデータでアップロードする際の注意点としては、
カラム名の対応がTreasuredataでは、英数字小文字または'_'のみとなっています。
また、TreasureDataのパーティショニングのキーであるtimeカラムはunixtimeのため、timestampのフィールドを使う際にも丸め込みが必要となります。
この点に注意して、次のGuessコマンドをしていきましょう。
embulk-input-s3の設定
それでは、ELBのログをまずはGuessしてみます。
そのためにはまずは必要な設定ファイルを
embulk-input-s3でチェックして、必要な項目を修正します。
in:
  type: s3
  bucket: my-s3-bucket
  path_prefix: AWSLogs/9192993993/elasticloadbalancing/
  access_key_id: ABCXYZ123ABCXYZ123
  secret_access_key: AbCxYz123aBcXyZ123
$ embulk guess elb.yml -o config.yml
2015-06-26 17:36:25.714 -0700: Embulk v0.6.13
2015-06-26 17:36:26.805 -0700 [INFO] (guess): Loaded plugin embulk-input-s3 (0.2.0)
2015-06-26 17:36:28.973 -0700 [INFO] (guess): Loaded plugin embulk-input-s3 (0.2.0)
in:
  type: s3
  bucket: my-s3-bucket
  path_prefix: AWSLogs/9192993993/elasticloadbalancing/
  access_key_id: ABCXYZ123ABCXYZ123
  secret_access_key: AbCxYz123aBcXyZ123
  parser:
    charset: UTF-8
    newline: CRLF
    type: csv
    delimiter: ','
    quote: ''
    escape: ''
    trim_if_not_quoted: false
    skip_header_lines: 1
    allow_extra_columns: false
    allow_optional_columns: false
    columns:
    - {name: '2015-06-10T23:50:48.421631Z production-event-collector 66.249.82.184:63668
        10.153.176.66:5140 0.000041 0.013111 0.000021 200 200 1289 16 "POST http://uredata.com:80/js/v3/event/
        HTTP/1.1" "Mozilla/5.0 (Linux; Android 4.4.4; 401SO Build/23.0.H.0.334) AppleWebKit/537.36
        (KHTML', type: string}
    - {name: ' like Gecko) Chrome/43.0.2357.92 Mobile Safari/537.36" - -', type: string}
exec: {}

Created 'config.yml' file.
columnsはあまりうまくguessれてないようです。もう一度ELBのドキュメントをみてみると、
ELBのログはヘッダーがないことや、ログエントリのすべてのフィールドはスペースで区切られているようです。
2014-02-15T23:39:43.945958Z my-test-loadbalancer 192.168.131.39:2817 10.0.0.1:80 0.000073 0.001048 0.000057 200 200 0 29 "GET http://www.example.com:80/HTTP/1.1"
それでは、新たに分かったことと、前節で分かったことを組み合わせて、生成されたconfig.ymlを編集してみます。
主な編集点としては、
- delimiterとtrim_if_not_quotedとskip_header_linesを編集しています。
- columnsもTreasureDataに入れやすい形に変更しています。
- requestがTCPリスナーの場合にはURLが入力されない代わりに、スペースで区切られ、末尾がスペースである 3 個のダッシュが引用符で囲まれて表示されます(例: "- - - ")。これを無視するためにallow_optional_columnsをtrueにし、カラムが足りない行をスキップする代わりにnullをセットさせています。
in:
  type: s3
  bucket: my-s3-bucket
  path_prefix: AWSLogs/9192993993/elasticloadbalancing/
  access_key_id: ABCXYZ123ABCXYZ123
  secret_access_key: AbCxYz123aBcXyZ123
  parser:
    charset: UTF-8
    newline: CRLF
    type: csv
    delimiter: ' '
    quote: ''
    escape: ''
    trim_if_not_quoted: false
    skip_header_lines: 0
    allow_extra_columns: true
    allow_optional_columns: false
    columns:
      - name: timestamp
        type: timestamp
        format: '%Y-%m-%dT%H:%M:%S.%NZ'
      - name: elb
        type: string
      - name: client_port
        type: string
      - name: backend_port
        type: string
      - name: request_processing_time
        type: double
      - name: backend_processing_time
        type: double
      - name: response_processing_time
        type: double
      - name: elb_status_code
        type: string
      - name: backend_status_code
        type: string
      - name: received_bytes
        type: double
      - name: sent_bytes
        type: double
      - name: request
        type: string
なんとなく設定ファイルができたような気がします。それではPreviewコマンドで見てみましょう。
なんとなーくよさそうですね。
$ embulk preview config.yml
2015-06-26 17:57:00.210 -0700: Embulk v0.6.13
2015-06-26 17:57:01.910 -0700 [INFO] (preview): Loaded plugin embulk-input-s3 (0.2.0)
+-------------+---------+----+--+-------------+-------------+--------------+-----+---------+----++------------------+
|  timestamp:timestamp |  elb:string |    client_port:string | backend_port:string | request_processing_time:double | backend_processing_time:double | response_processing_time:double | elb_status_code:string | backend_status_code:string | received_bytes:double | sent_bytes:double |    request:string |
+-------------+---------+----+--+-------------+-------------+--------------+-----+---------+----++------------------+
| 2015-06-10 23:50:48.421631 UTC | plector |   66.249.82.184:63668 |  10.153.176.66:5140 |4.1E-5 |   0.013111 | 2.1E-5 |200 |    200 | 1289.0 |    16.0 |  POST http://treasuredata.com/js/v3/event/ HTTP/1.1 |

+-------------+---------+----+--+-------------+-------------+--------------+-----+---------+----++------------------+
embulk-output-tdの設定
次にembulk-output-tdの設定方法を見てみます。
out:
  type: td
  apikey: <your apikey>
  endpoint: api.treasuredata.com
  database: my_db
  table: my_table
  time_column: created_at
それではこれを元に、config.ymlに追記をします。
in:
  type: s3
  bucket: event-collect-access
  path_prefix: AWSLogs/9192993993/elasticloadbalancing/
  access_key_id: ABCXYZ123ABCXYZ123
  secret_access_key: AbCxYz123aBcXyZ123
  parser:
    charset: UTF-8
    newline: CRLF
    type: csv
    delimiter: ' '
    quote: ''
    escape: ''
    trim_if_not_quoted: false
    skip_header_lines: 0
    allow_extra_columns: true
    allow_optional_columns: false
    columns:
      - name: timestamp
        type: timestamp
        format: '%Y-%m-%dT%H:%M:%S.%NZ'
      - name: elb
        type: string
      - name: client_port
        type: string
      - name: backend_port
        type: string
      - name: request_processing_time
        type: double
      - name: backend_processing_time
        type: double
      - name: response_processing_time
        type: double
      - name: elb_status_code
        type: string
      - name: backend_status_code
        type: string
      - name: received_bytes
        type: double
      - name: sent_bytes
        type: double
      - name: request
        type: string
out:
  type: td
  apikey: b0747190f~4b4dbbd43c32a
  database: support
  table: embulk
  time_column: timestamp
実行
$ embulk run config.yml
2015-06-26 18:04:17.628 -0700: Embulk v0.6.13
2015-06-26 18:04:19.673 -0700 [INFO] (transaction): Loaded plugin embulk-input-s3 (0.2.0)
2015-06-26 18:04:19.720 -0700 [INFO] (transaction): Loaded plugin embulk-input-s3 (0.2.0)
2015-06-26 18:04:19.721 -0700 [INFO] (transaction): Loaded plugin embulk-output-td (0.1.0)
2015-06-26 18:04:21.636 -0700 [INFO] (transaction): Logging initialized @7310ms
2015-06-26 18:04:22.843 -0700 [INFO] (transaction): Duplicating timestamp:timestamp column to 'time' column for the data partitioning
2015-06-26 18:04:22.848 -0700 [INFO] (transaction): Create bulk_import session embulk_20150627_010419_568000000
2015-06-26 18:04:23.201 -0700 [INFO] (transaction): {done:  0 / 4, running: 0}
2015-06-26 18:04:23.219 -0700 [INFO] (task-0001): Duplicating timestamp:timestamp column to 'time' column for the data partitioning
2015-06-26 18:04:23.219 -0700 [INFO] (task-0002): Duplicating timestamp:timestamp column to 'time' column for the data partitioning
2015-06-26 18:04:23.222 -0700 [INFO] (task-0000): Duplicating timestamp:timestamp column to 'time' column for the data partitioning
2015-06-26 18:04:23.228 -0700 [INFO] (task-0003): Duplicating timestamp:timestamp column to 'time' column for the data partitioning
2015-06-26 18:04:57.753 -0700 [INFO] (task-0000): {uploading: {rows: 100000, size: 12,314,336 bytes (compressed)}}
2015-06-26 18:04:58.084 -0700 [INFO] (task-0001): {uploading: {rows: 100000, size: 12,486,764 bytes (compressed)}}
2015-06-26 18:04:58.156 -0700 [INFO] (task-0003): {uploading: {rows: 100000, size: 12,446,634 bytes (compressed)}}
2015-06-26 18:04:58.202 -0700 [INFO] (task-0002): {uploading: {rows: 100000, size: 12,434,280 bytes (compressed)}}
2015-06-26 18:05:13.977 -0700 [INFO] (transaction): {done:  3 / 4, running: 1}
2015-06-26 18:05:13.977 -0700 [INFO] (transaction): {done:  3 / 4, running: 1}
2015-06-26 18:05:13.977 -0700 [INFO] (transaction): {done:  3 / 4, running: 1}
2015-06-26 18:05:18.304 -0700 [INFO] (transaction): {done:  4 / 4, running: 0}
2015-06-26 18:05:18.892 -0700 [INFO] (transaction): Performing bulk import session 'embulk_20150627_010419_568000000'
2015-06-26 18:05:53.696 -0700 [INFO] (transaction):     job id: 27749060
2015-06-26 18:05:53.697 -0700 [INFO] (transaction): Committing bulk import session 'embulk_20150627_010419_568000000'
2015-06-26 18:05:53.697 -0700 [INFO] (transaction):     valid records: 400000
2015-06-26 18:05:53.697 -0700 [INFO] (transaction):     error records: 0
2015-06-26 18:05:53.697 -0700 [INFO] (transaction):     valid parts: 4
2015-06-26 18:05:53.697 -0700 [INFO] (transaction):     error parts: 0
2015-06-26 18:06:03.733 -0700 [INFO] (transaction): Deleting bulk import session 'embulk_20150627_010419_568000000'
2015-06-26 18:06:04.447 -0700 [INFO] (main): Committed.
2015-06-26 18:06:04.447 -0700 [INFO] (main): Next config diff: {"in":{"last_path":"AWSLogs/9192993993/elasticloadbalancing/us-east-1/2015/06/10/52390_elasticloadbalancing_us-east-1_production-event-collector_2015064.10.178_xVZNKUd1.log"},"out":{"last_session":"embulk_20150627_010419_568000000"}}
ログの途中でembulkからbulkimportのジョブが実行され、

インポート完了後にテーブルにインポートができていることがわかります。

これにより様々なデータソースと組み合わせて、TreasureDataにもデータをインポートすることが可能になりますね!
おわりに
これでELBのログをEmbulkをつかって簡単にTreasureDataにインポートすることができましたね。
様々なデータソースからTreasureDataにデータを入れてみたいと思います。