TensorFlowの画像認識をモバイルで動かす&その仕組み
TensorFlowがモバイルで動くという話がちょっと前から気になっていて、Androidで動かしてみました。サンプルの動かし方と、どのような仕組みになっているかまとめました。
動かし方
主にTensorFlowのReadmeに書いてある内容です。Androidを知っている人なら特に問題無いと思いますが以下日本語で書いてます。
事前準備
Android SDK以外にも以下のツールが必要になります。
1.Bazelの導入
TensorFlowのBuildにGoogleの新しいBuild toolであるBazelが必須になります。
MacであればHomebrewでかんたんに導入できます。
Bazelの挙動についてやファイル構成についてはチュートリアルがあるので、そこも目を通しておくとよいです。
初めて触ったのですが、ワークスペースを作ってそこでビルドするところとかGoっぽいなと思いました。こちらの記事も参考になるかと思います。
$ brew info bazel
bazel: stable 0.3.0 (bottled), HEAD
Google's own build tool
http://www.bazel.io/
/usr/local/Cellar/bazel/0.3.0 (8 files, 92.4M) *
  Poured from bottle on 2016-08-30 at 17:14:10
From: https://github.com/Homebrew/homebrew-core/blob/master/Formula/bazel.rb
==> Caveats
2.Android NDKの導入
Android NDKの導入はこちらを参照しました。Android Studio 2.2からはAndroid StudioからC++/Cのコンパイルができると書いてあります。なんでこの際ASも2.2にあげておくべきでしょう。
Using Android Studio 2.2 and higher, you can use the NDK to compile C and C++ code into a native library and package it into your APK using Gradle, the IDE's integrated build system.
Build TensorFlow for Android
まずはディレクトリを作る所から始めます。
自分はとりあえずBazel用のディレクトリを作り、そこに git clone で TensorFlowのレポジトリをとってきました。
$ mkdir bazel  //Bazel用のディレクトリ作っておく
$ cd bazel
$ git clone git@github.com:tensorflow/tensorflow.git
次に、/tensorflow/WORKSPACE のファイルを自分のローカルのNDKやSDKに向くようにパス設定等を書きます。
 # Uncomment and update the paths in these entries to build the Android demo.
-#android_sdk_repository(
-#    name = "androidsdk",
-#    api_level = 23,
-#    build_tools_version = "23.0.1",
-#    # Replace with path to Android SDK on your system
-#    path = "<PATH_TO_SDK>",
-#)
-#
-#android_ndk_repository(
-#    name="androidndk",
-#    path="<PATH_TO_NDK>",
-#    api_level=21)

+android_sdk_repository(
+    name = "androidsdk",
+    api_level = 23,
+    build_tools_version = "23.0.3",
+    path = "/Applications/sdk/",
+)
+
+android_ndk_repository(
+    name="androidndk",
+    path="/Applications/sdk/ndk-bundle/",
+    api_level=21)
サンプルで使うモデルデータはサイズが大きく、別梱になっています。zipをDLしてきて tensorflow/examples/android/assets/ に配置します。
temp $ unzip inception5h.zip -d ../tensorflow/tensorflow/examples/android/assets/
temp $ ls -ltr ../tensorflow/tensorflow/examples/android/assets/
total 105296
-rw-r-----  1 tomoaki  staff  53884595 Nov 18  2015 tensorflow_inception_graph.pb
-r--r-----  1 tomoaki  staff     11416 Nov 18  2015 LICENSE
-r--r-----  1 tomoaki  staff     10492 Nov 18  2015 imagenet_comp_graph_label_strings.txt
temp $
ファイルサイズは50MBくらいでした。
あとはapkをbuildします。WORKSPACEがある /tensorflow配下で以下コマンド実行
$ bazel build //tensorflow/examples/android:tensorflow_demo
...
Target //tensorflow/examples/android:tensorflow_demo up-to-date:
  bazel-bin/tensorflow/examples/android/tensorflow_demo_deploy.jar
  bazel-bin/tensorflow/examples/android/tensorflow_demo_unsigned.apk
  bazel-bin/tensorflow/examples/android/tensorflow_demo.apk
INFO: Elapsed time: 786.287s, Critical Path: 676.97s
高速と言われるBazel使っても10分以上時間かかりました。TensorFlowのCoreファイルのコンパイルに時間がかかっていたもようです。2回目以降は13秒程度でビルドできました
INFO: Elapsed time: 12.936s, Critical Path: 11.17s
アプリをデバイスにインストールします。
adb install bazel-bin/tensorflow/examples/android/tensorflow_demo.apk
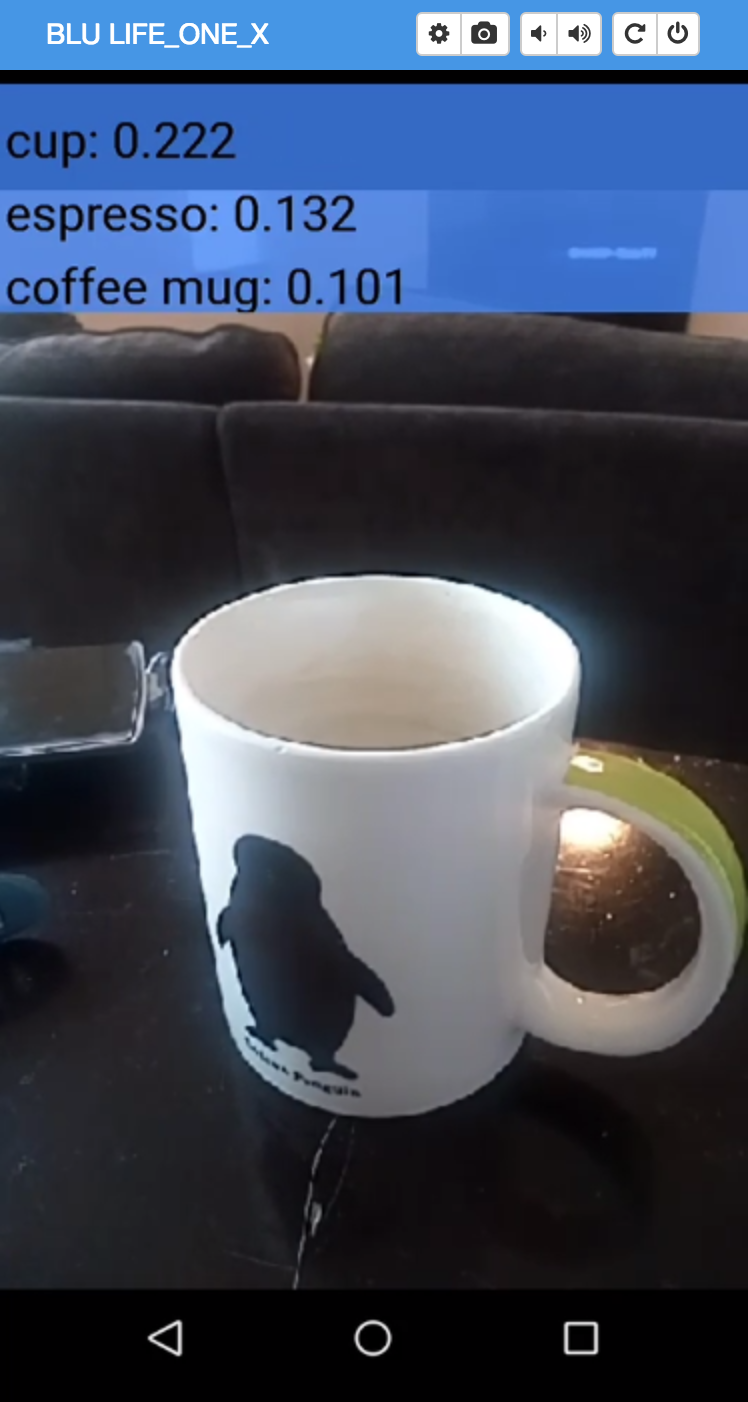
アプリを起動してみました。ちゃんとカップが認識されている!!予想以上に精度高いです。

仕組み
Androidサイド
どんな風に処理されているのか見てみました。Android側のファイル構成は以下のようになっています。
├── AutoFitTextureView.java
├── CameraActivity.java
├── CameraConnectionFragment.java
├── Classifier.java
├── RecognitionScoreView.java
├── TensorFlowClassifier.java
├── TensorFlowImageListener.java
└── env
    ├── ImageUtils.java
    └── Logger.java
キモになっているのは TensorFlowImageListener.java と TensorFlowClassifier.java になります。 TensorFlowImageListener.java が CameraのPreviewを取得し(1)、Previewを受け取った TensorFlowClassifier.java でbitmapの評価を行い(2)、その結果を RecognitionScoreView.java に返す(3)ような実装になっています。
private final TensorFlowImageListener tfPreviewListener = new TensorFlowImageListener();

/**
 * Creates a new {@link CameraCaptureSession} for camera preview.
 */
private void createCameraPreviewSession() {
  ...
  // Create the reader for the preview frames.
  previewReader =
        ImageReader.newInstance(
            previewSize.getWidth(), previewSize.getHeight(), ImageFormat.YUV_420_888, 2);

  previewReader.setOnImageAvailableListener(tfPreviewListener, backgroundHandler); // (1) Camera Previewからimageを取得する処理
  ...
  // Initialization
  tfPreviewListener.initialize(
      getActivity().getAssets(), scoreView, inferenceHandler, sensorOrientation);
}
private final TensorFlowClassifier tensorflow = new TensorFlowClassifier();

@Override
  public void onImageAvailable(final ImageReader reader) {
    image = reader.acquireLatestImage();
  ...
    rgbBytes = new int[previewWidth * previewHeight];
    rgbFrameBitmap = Bitmap.createBitmap(previewWidth, previewHeight, Config.ARGB_8888);
    croppedBitmap = Bitmap.createBitmap(INPUT_SIZE, INPUT_SIZE, Config.ARGB_8888);
  ...
    rgbFrameBitmap.setPixels(rgbBytes, 0, previewWidth, 0, 0, previewWidth, previewHeight);
    drawResizedBitmap(rgbFrameBitmap, croppedBitmap);
  ...
    handler.post(() ->{
            final List<Classifier.Recognition> results
               = tensorflow.recognizeImage(croppedBitmap); // (2)色調変換したbitmapをTensorFlowClassifierに渡す
            scoreView.setResults(results);(3) 結果をViewに渡す
            computing = false;
          }
        );
  }
private native String classifyImageBmp(Bitmap bitmap); //C++のネイティブメソッド

 @Override
 public List<Recognition> recognizeImage(final Bitmap bitmap) {
   final ArrayList<Recognition> recognitions = new ArrayList<Recognition>();
   // classifyImageBmp
   for (final String result : classifyImageBmp(bitmap).split("\n")) {
   ...
   }
 }
色調について
サンプルアプリでは YUV_420_888 で取得されたbitmapをrgbaに変換/リサイズして TensorFlowに渡しています。 AndroidのDocumentによると、ImageReaderから渡せるImageオブジェクトはこのデータを返すことが出来るものの、TensorFlow側は RGBAにしか現状対応してないために、このようになっているようです。高速化するならさらに軽量なRGB_565とかでもよいのかもしれないですね。
C++サイド
jni側のファイル構成は以下になっています。
ni $ tree
.
├── __init__.py
├── imageutils_jni.cc
├── jni_utils.cc
├── jni_utils.h
├── limiting_file_input_stream.h
├── rgb2yuv.cc
├── rgb2yuv.h
├── tensorflow_jni.cc
├── tensorflow_jni.h
├── yuv2rgb.cc
└── yuv2rgb.h
C++に関して学生時代のうすーい知識しかないため、ぼんやりとしか読めてないのですが、tensorflow_jni.cc がキモになっています。
TensorFlowの計算方法
TensorFlowがどのように動いているのかはこちらの記事に大変分かりやすくまとめられています。サンプルアプリも
(1)Tensor/Sessionの構築
(2)計算
の構成になっています。
(1)Tensor(多次元配列)/Session(分類器)の構築
initializeTensorFlow で行われています。
モデルデータ(tensorflow_inception_graph.pb)をProtocolBufferで読み取り、Graphを生成します。
Graphは計算処理に当たる部分です。そのGraphを元にSessionを作ります。
static std::unique_ptr<tensorflow::Session> session;

tensorflow::GraphDef tensorflow_graph;

AAssetManager* const asset_manager =
    AAssetManager_fromJava(env, java_asset_manager);

//モデルデータからTensorを処理するGraphを生成する
ReadFileToProto(asset_manager, model_cstr, &tensorflow_graph);

//Session生成
tensorflow::Status s = session->Create(tensorflow_graph);
なお、g_image_mean,g_image_stdといったグローバル変数には以下のような固定値が設定されています。
  private static final int NUM_CLASSES = 1001;
  private static final int INPUT_SIZE = 224;
  private static final int IMAGE_MEAN = 117;
  private static final float IMAGE_STD = 1;
これはなにかというと画像認識の計算モデルInception-v1と呼ばれる、Googleの論文を元に設定されたものが採用されています。 詳しくはTensorFlowのModelのコードにあります。
(2)計算
計算はClassifyImage内で実行されています。
画像のbitmapを行列配列(input_tensor)に変換したものをsessionに代入して行います。
//BitmapのRGB値を多項式行列に変換
auto input_tensor_mapped = input_tensor.tensor<float, 4>();
for (int i = 0; i < g_tensorflow_input_size; ++i) {
  const RGBA* src = bitmap_src + i * g_tensorflow_input_size;
  for (int j = 0; j < g_tensorflow_input_size; ++j) {
    // Copy 3 values
    input_tensor_mapped(0, i, j, 0) =
        (static_cast<float>(src->red) - g_image_mean) / g_image_std;
    input_tensor_mapped(0, i, j, 1) =
        (static_cast<float>(src->green) - g_image_mean) / g_image_std;
    input_tensor_mapped(0, i, j, 2) =
        (static_cast<float>(src->blue) - g_image_mean) / g_image_std;
    ++src;
  }
}

//Vectorに格納
std::vector<std::pair<std::string, tensorflow::Tensor> > input_tensors(
    {{*g_input_name, input_tensor}});

std::vector<tensorflow::Tensor> output_tensors;
std::vector<std::string> output_names({*g_output_name});

//計算
s = session->Run(input_tensors, output_names, {}, &output_tensors);
道中は若干複雑ですが最後のRunの部分ではTensorFlowがよしなに計算をCPUに振り分けて結果を返してくれるというわけです。
このプログラムではさらに受け取った結果のTop5をソートして返すようになっていました。
まとめ
ひととおりざっと動きを見てみましたが、C++に若干抵抗感はあるものの、本質的にやっていることは意外とシンプルな印象でした。アプリサイズは学習データがデカイこともあり50MB以上あったので、プロダクションでTensorFlowを入れることは現時点ではないとは思うのですが、気軽にTensorFlowの動きを理解できた気がします。