Android Studio2.2 でndkを使いcファイルを開きます。
テーマの通りですが、これがなかなか資料が少なくて大変だった
ndkのインストール方法
appを右クリックしてOpen Module Settingを開きます。
SDK Locationを選んで一番下のとこでインストールしてください。
すでにある人は…/ndk-bundleとでもかいてあるはずです。
ビルドツール
左のメニューからGradle Scripts -> build.gradleを二つ開きます。
最初はbuild.gradle(Project: TestNdk)の方です。
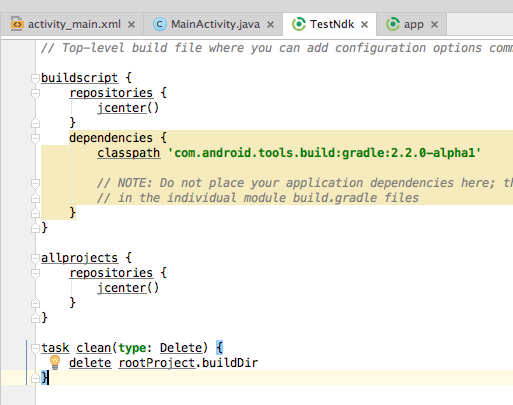
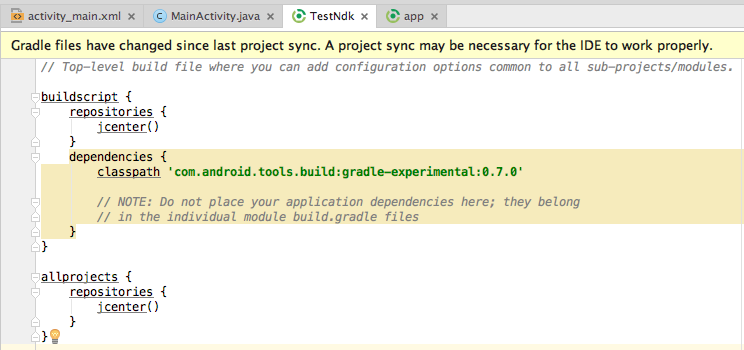
初期ではこうなってると思うので、これを以下のようにします。
次にbuild.gradle(Module: app)の方です。
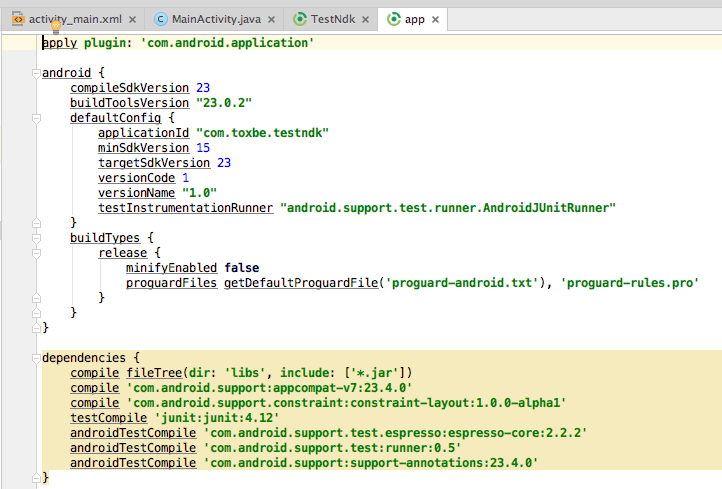
これを以下のようにします。
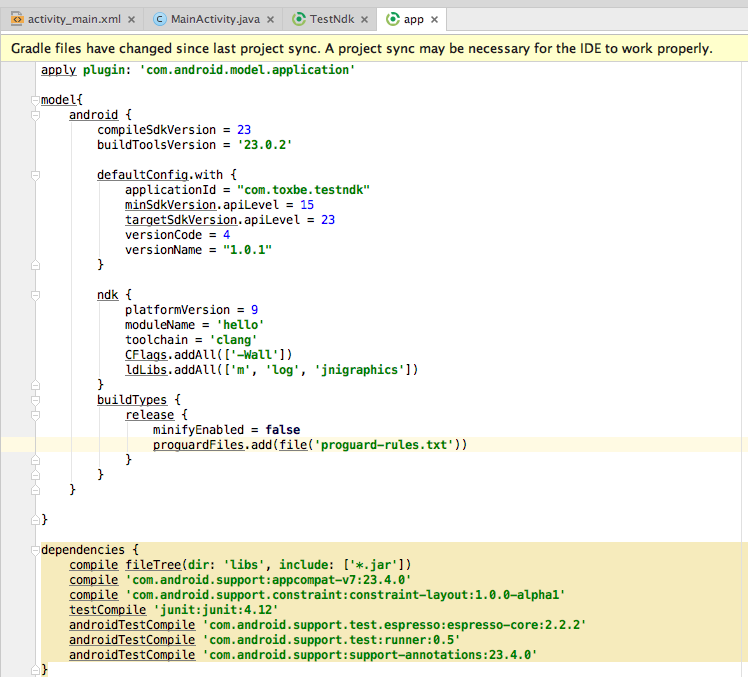
右上のSyncを押してビルドツールを更新します。
すると、左のapp以下の階層が少し変わります。cppが追加されますね。
これで、ndkにもう対応出来るようになりました。
使ってみる
まずは、c(cpp)ファイルを作りましょう。
ここではhello.cとします。
このhello.cをFinder(Explorer)からjavaフォルダと同じ階層にあるjniフォルダに入れます。
cファイルの準備はこれでOKです。
xmlファイル
<?xml version="1.0" encoding="utf-8"?>
<android.support.constraint.ConstraintLayout xmlns:android="http://schemas.android.com/apk/res/android"   xmlns:app="http://schemas.android.com/apk/res-auto"   xmlns:tools="http://schemas.android.com/tools"     android:id="@+id/activity_main"     android:layout_width="match_parent"      android:layout_height="match_parent"     tools:context="com.toxbe.testndk.MainActivity">

    <TextView android:layout_width="wrap_content"
       android:layout_height="wrap_content"
       android:text="Hello World!"
       android:id="@+id/textView"  <!--ここを追加しただけ-->
       app:layout_constraintBottom_toBottomOf="@+id/activity_main"
       app:layout_constraintLeft_toLeftOf="@+id/activity_main"
       app:layout_constraintRight_toRightOf="@+id/activity_main"
       app:layout_constraintTop_toTopOf="@+id/activity_main" />

</android.support.constraint.ConstraintLayout>
javaファイル
package com.toxbe.testndk;

import android.support.v7.app.AppCompatActivity;
import android.os.Bundle;
import android.widget.TextView;

public class MainActivity extends AppCompatActivity {

    static {
        System.loadLibrary("hello");
    }

    // helloライブラリにあるメソッドの定義
    public native String  stringFromJNI();

    @Override
    protected void onCreate(Bundle savedInstanceState) {
        super.onCreate(savedInstanceState);
        setContentView(R.layout.activity_main);

        TextView textView = (TextView)findViewById(R.id.textView);
        textView.setText(stringFromJNI());
    }
}
この時、public native String stringFromJni();
でエラーをはきますが、そのエラーの赤電球からcreateを押すと、hello.cに移動して勝手にちょいちょい書いてくれます。
しかし、これがちょいちょいずれてたりすることもあるので調整しましょう。
Cファイル
# include <string.h>
# include <jni.h>


JNIEXPORT jstring JNICALL Java_com_toxbe_testndk_MainActivity_stringFromJNI(JNIEnv *env, jobject instance)
{
    // TODO

    return (*env)->NewStringUTF(env, returnValue);
}
関数名ですが
Java_パッケージの”.”を”_”に変える_Activityクラス名_関数名となり、
引数は第3引数のあとから追加していけばいいと思います。
ではreturnValueを”hello world via ndk.”にして実行してみましょう。
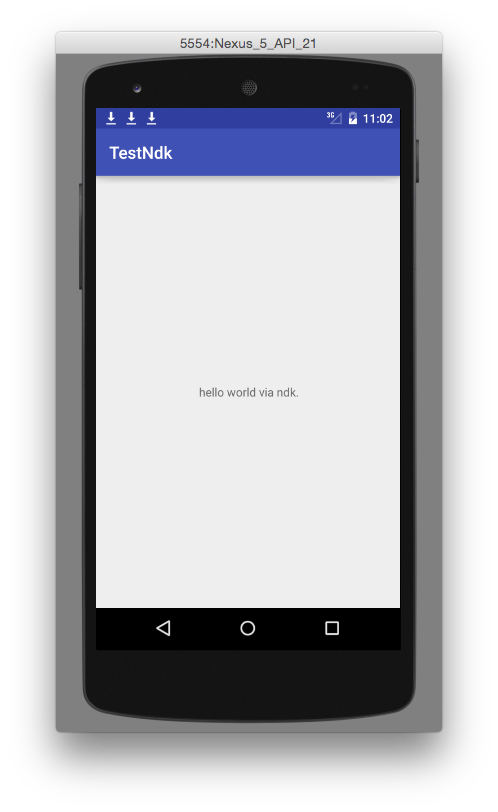
こんな感じです。
まとめてみるとそんなにややこしくなく簡単でしたけど、試行錯誤してる時はよくわかんないままぐちゃぐちゃになったりしてました。
とにかく動いてよかった。
Android Studio2.0からの資料がとにかく少なかったので参考になれば嬉しいです。
Android Studio1.3ごろではmkファイルをいじったり、先にいろいろコンパイルしなければいけなかったりしたそうなので、簡単になってよかったです。
参考にしたサイト
http://ph0b.com/new-android-studio-ndk-support/
http://qiita.com/m1takahashi/items/3a3c9d2845e9b57aeda3