「設定情報」とは
本記事で使う「設定情報」とは、ビルド時または起動時に設定値が決定し、アプリケーション中で動的に変更しないパラメータを指しています。
具体例
- ゲームのバージョン情報
- 通信先サーバのホストやポート設定
- 外部アプリケーション連携用のAccessTokenやKey
目標
1.staticクラス経由で簡単に設定値を参照できるようにする
//APIのBaseURLを取得する
var baseUrl = ConfigProvider.Api.BaseUrl;
2.InspectorViewから簡単に設定を切り替えられるようにする
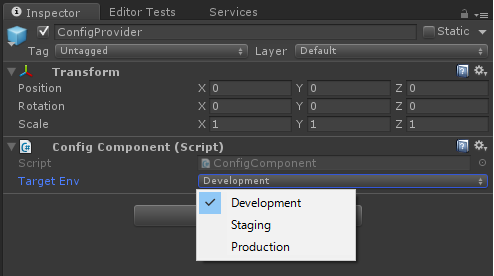
設定は環境ごとにまとめて管理して、それを選択するだけで済むようにしたい
3.設定は一度ロードしたらオンメモリでキャッシュさせる
毎回ロードするのは無駄なのでロードしたタイミングでキャッシュし、シーンをまたいでも揮発しないようにします。
実装
1.ScriptableObjectを継承した設定クラスを用意する
[Serializable]
public class ApplicationConfigs : ScriptableObject
{
    //例としてPhoto設定,サーバ設定、NCMBの設定を扱う
    public PhotonConfig PhotonConfig;
    public ApiConfig ApiConfig;
    public NcmbConfig NcmbConfig;
}

[Serializable]
public class ApiConfig
{
    public string BaseUrl = "";
}

[Serializable]
public class PhotonConfig
{
    public string gameVersion = "";
}

[Serializable]
public class NcmbConfig
{
    public string ApplicationKey = "";
    public string ClientKey = "";
}
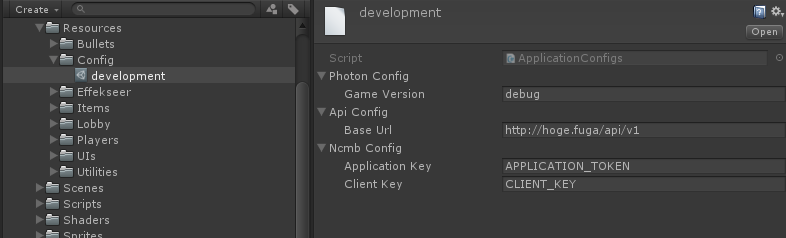
ScriptableObjectを使うと設定値をAssetsファイルとして利用できるため、これを使って設定ファイルを生成して保存しておきます。今回はResouces/Configに設定ファイルを配置することにします。
(Assets化はScriptableObjectToAsset を使うと簡単にできるのでおすすめです)
2.設定情報を管理するUnityComponentを作成する
/// <summary>
/// 環境一覧
/// </summary>
public enum ConfigEnvironment
{
    Development,
    Staging,
    Production
}
/// <summary>
/// 設定情報管理コンポーネント
/// </summary>
public class ConfigComponent : SingletonMonoBehaviour<ConfigComponent>
{
    private readonly string basePath = "Config/";

    [SerializeField] private ConfigEnvironment targetEnv = ConfigEnvironment.Development;
    private ApplicationConfigs config;

    void Awake()
    {
        //シーンをまたいでも消さない
        DontDestroyOnLoad(gameObject);
    }

    /// <summary>
    /// Conf値
    /// </summary>
    public ApplicationConfigs Config
    {
        //configがnullならロードしてキャッシュする
        get { return config ?? (config = LoadConfig()); }
    }

    /// <summary>
    /// 環境別設定値読み込み
    /// </summary>
    /// <returns></returns>
    private ApplicationConfigs LoadConfig()
    {
        // 愚直にswitchで
        // 他にもっといい方法あるかも
        switch (targetEnv)
        {
            case ConfigEnvironment.Development:
                Debug.Log("Load 'Development' conf");
                return Resources.Load<ApplicationConfigs>(basePath + "Development");
            case ConfigEnvironment.Staging:
                Debug.Log("Load 'Staging' conf");
                return Resources.Load<ApplicationConfigs>(basePath + "Staging");
            case ConfigEnvironment.Production:
                return Resources.Load<ApplicationConfigs>(basePath + "Production");
            default:
                throw new ArgumentOutOfRangeException();
        }
    }
}
Resouces/Configから設定値をロードし、メモリにキャシュするコンポーネントです。
設定値は遅延評価でロードするようにすることで、初期化の順序で設定値がnullになってしまうのを防いでいます。
使わせてもらったもの:SingletonMonoBehaviour
(ただしこのままSingletonMonoBehaviourを使うとログが毎回出ちゃうので13行目のDebug.LogWarningを削除しておくとよいかも。)
Componentの定義ができたら、これをGameObjectに貼り付けてPrefab化しておきます。
置き場所は今回はResouces/Utilitiesにします。

以降、PrefabのTargetEnvを切り替えることでゲーム中に読み込む設定値を切り替えることができるようになります。
3.staticなConfigProviderクラスを作る
直接ConfigComponentを触らず、staticクラスを仲介させることで初期化の処理を隠蔽してあげます。
/// <summary>
/// ゲーム中の設定情報を提供する
/// </summary>
public static class ConfigProvider
{
    private const string path = "Utilities/ConfigProvider";

    private static ConfigComponent _confgiComponent;

    private static ConfigComponent ConfigComponent
    {
        get
        {
            //ConfigComponentが存在しないなら新しく生成する
            if (_confgiComponent != null) return _confgiComponent;
            if (ConfigComponent.Instance == null)
            {
                var resource = Resources.Load(path);
                Object.Instantiate(resource);
            }
            _confgiComponent = ConfigComponent.Instance;
            return _confgiComponent;
        }
    }

    /// <summary>
    /// Photon設定
    /// </summary>
    public static PhotonConfig Photon
    {
        get { return ConfigComponent.Config.PhotonConfig; }
    }

    /// <summary>
    /// APIサーバ設定
    /// </summary>
    public static ApiConfig Api
    {
        get { return ConfigComponent.Config.ApiConfig; }
    }

    /// <summary>
    /// NCMB設定
    /// </summary>
    public static NcmbConfig Ncmb
    {
        get { return ConfigComponent.Config.NcmbConfig; }
    }
}
4.完成
ゲーム中の好きなタイミングでConfigProviderにアクセスすることで設定値が取得できるようになりました。
void Awake()
{
    //設定値をロードしてNCMBのApplication設定を行う
    var conf = ConfigProvider.Ncmb;
    NCMBSettings.ApplicationKey = conf.ApplicationKey;
    NCMBSettings.ClientKey = conf.ClientKey;
}
まとめ
Singleton + Staticクラスの組み合わせることで、Unityの機能を利用しつつ、それを隠蔽してstaticアクセスを可能にすることができます。
いろいろ応用が効く技なので覚えておくとよいと思います!
(おまけ) NCMBのユーザ情報を管理する
ConfigProviderと同じノリで、NCMBのユーザ情報をstaticクラス経由で取得できるようにした例です。
サーバとの通信処理やハンドリングはUserProfileComponentに隠蔽してあります。
/// <summary>
/// 全シーン共通で利用可能なユーザ情報を提供するProvider
/// </summary>
public static class UserProfileProvider
{
    private static UserProfileComponent _userProfileComponent;

    private static UserProfileComponent UserProfileComponent
    {
        get
        {
            if (_userProfileComponent != null) return _userProfileComponent;
            if (UserProfileComponent.Instance == null)
            {
                var resource = Resources.Load("Utilities/UserProfileProvider");
                Object.Instantiate(resource);
            }
            _userProfileComponent = UserProfileComponent.Instance;
            return _userProfileComponent;
        }
    }

    public static void Logined(NCMBUser user)
    {
        UserProfileComponent.SetNcmbUser(user);
    }

    /// <summary>
    /// NCMBUserを取得する
    /// </summary>
    public static NCMBUser User
    {
        get { return UserProfileComponent.User; }
    }

    /// <summary>
    /// ユーザの表示名
    /// 更新すると自動的にサーバに保存される
    /// </summary>
    public static string ScreenName
    {
        get
        {
            if (UserProfileComponent.IsLoggedIn)
            {
                //ログイン済み
                return UserProfileComponent.ScreenName;
            }

            //ログインしていない
# if UNITY_EDITOR
            "ログインしていません。仮のユーザネームを利用します。".Yellow();
            return "DEBUG_USER_NAME";
# else
                throw new RuntimeException("ログインせずにユーザ名の取得を実行しました");
# endif
        }
        set
        {
            if (UserProfileComponent.IsLoggedIn)
            {
                UserProfileComponent.ScreenName = value;
            }
        }
    }
}
また、値の参照時にログイン状態をチェックすることで挙動を変更させる処理を入れています。
未ログインで情報を取得しようとした場合、Editor上でデバッグしているときは仮の値を、スタンドアローン時は例外を投げるようにしてあります。(デバッグを簡単にするためにこうなってます)