FirebaseUI for Android — Auth を翻訳してみました。
お気づきの点があればコメント頂ければと思います。
FirebaseUI for Android — Auth
FirebaseUI is an open-source library that offers simple, customizable UI bindings on top of the core Firebase SDKs. It aims to eliminate boilerplate code and promote best practices (both user experience and security) for authentication.
A simple API is provided for drop-in user authentication which handles the flow of signing in users with Email/Password, Google Sign-In, and Facebook Login. It is built on top of the Firebase Auth.
The best practices embodied in FirebaseUI aim to maximize sign-in and sign-up conversion for your app. It integrates with Smart Lock for Passwords to store and retrieve credentials, enabling automatic and single-tap sign-in to your app for returning users. It also handles tricky use cases like account recovery and account linking that are security sensitive and difficult to implement correctly using the base APIs provided by Firebase Auth.
FirebaseUI auth can be easily customized to fit with the rest of your app's visual style. As it is open source, you are also free to modify it to exactly fit your preferred user experience.
Equivalent FirebaseUI auth libraries are also available for iOS and Web.
FirebaseUIはコアFirebase SDK上でシンプルでカスタマイズ可能なUIを提供するオープンソースライブラリです。 これは認証処理の定型コードの削減と、(ユーザーエクスペリエンスとセキュリティ両方の)ベストプラクティスの促進を目的としています。
訪問したユーザーの認証処理のために、メールとパスワードまたはGoogleサインインまたはFacebookログオンでサインインを行うフローを扱うシンプルなAPIが提供されます。 これはFirebase Auth上に構築されています。
FirebaseUIに組み込まれたベストプラクティスは、あなたのアプリへのサインインとサインアップのコンバージョンを最大化することを目的としています。 それは証明書を保存し、見つけ出すためにSmart Lock for Passwordsを統合し、戻ってきたユーザーがあなたのアプリで自動またはシングルタップサインイン出来るようにします。 それはまた、セキュリティに注意が必要で、Firebase AuthのベースAPIを使用して正しく実装するのが難しいアカウントの復旧やアカウントのリンクのような手間のかかるケースを処理します。
FirebaseUI authはあなたのアプリの残りの部分の見た目に合わせるために、簡単にカスタマイズできます。 これはオープンソースなので、あなたは好みのユーザーエクスペリエンスにぴったり合わせるために自由に編集することもできます。
iOSとWeb向けの同等のFirebaseUI authライブラリも利用できます。
Table of Content
Configuration
As a pre-requisite, ensure your application is configured for use with Firebase: see the Firebase documentation. Then, add the FirebaseUI auth library dependency. If your project uses Gradle, add:
dependencies {
  // ...
  compile 'com.firebaseui:firebase-ui-auth:0.5.1'
}
If instead your project uses Maven, add:
<dependency>
  <groupId>com.firebaseui</groupId>
  <artifactId>firebase-ui-auth</artifactId>
  <version>0.5.1</version>
</dependency>
前提条件として、あなたのアプリケーションがFirebaseと使用するよう設定されていることを確認します : Firebase documentationを参照してください。 そしてFirebaseUI authライブラリの依存関係を追加します。 あなたのプロジェクトがGradleを使用するなら、次を追加:
dependencies {
  // ...
  compile 'com.firebaseui:firebase-ui-auth:0.5.1'
}
代わりにあなたのプロジェクトがMavenを使用するなら、次を追加:
<dependency>
  <groupId>com.firebaseui</groupId>
  <artifactId>firebase-ui-auth</artifactId>
  <version>0.5.1</version>
</dependency>
Identity provider configuration
In order to use either Google or Facebook accounts with your app, ensure that these authentication methods are first configured in the Firebase console.
FirebaseUI client-side configuration for Google sign-in is then provided automatically by the google-services gradle plugin. If support for Facebook Sign-in is also required, define the resource string facebook_application_id to match the application ID in the Facebook developer dashboard:
<resources>
  <!-- ... -->
  <string name="facebook_application_id" translatable="false">APPID</string>
</resources>
あなたのアプリでGoogleまたはFacebookのアカウントを使用するため、まずこれらの認証方法がFirebase consoleで設定されていることを確認します。
Googleサインイン向けのFirebaseUIクライアントサイドの設定はgoogle-services gradle pluginにより自動で提供されます。 もしFacebookサインインのサポートも必要ならば、Facebookデベロッパーダッシュボードのapplication IDと合致するようにfacebook_application_idリソース文字列を定義します。
<resources>
  <!-- ... -->
  <string name="facebook_application_id" translatable="false">APPID</string>
</resources>
Using FirebaseUI for Authentication
Before invoking the FirebaseUI authentication flow, your app should check
whether a user is already signed in from a previous session:
FirebaseAuth auth = FirebaseAuth.getInstance();
if (auth.getCurrentUser() != null) {
  // already signed in
} else {
  // not signed in
}
The entry point to the authentication flow is the com.firebase.ui.auth.AuthUI class. If your application uses the default FirebaseApp instance, an AuthUI instance can be retrieved simply by calling AuthUI.getInstance(). If an alternative app instance is required, call AuthUI.getInstance(app) instead, passing the appropriate FirebaseApp instance.
FirebaseUI認証フローを実行する前に、あなたのアプリはユーザーが既に以前のセッションでサインインしているかどうかをチェックする必要があります:
FirebaseAuth auth = FirebaseAuth.getInstance();
if (auth.getCurrentUser() != null) {
  // already signed in
} else {
  // not signed in
}
認証フローのエントリーポイントは、com.firebase.ui.auth.AuthUIクラスです。 もしあなたのアプリケーションがデフォルトのFirebaseAppインスタンスを使用するなら、AuthUI.getInstance()を呼ぶだけでAuthUIインスタンスを取得できます。 もし代替のアプリインスタンスが必要なら、適切なFirebaseAppインスタンスを渡して、代わりにAuthUI.getInstance(app)を呼びます。
Sign in
If a user is not currently signed in, as can be determined by checking auth.getCurrentUser() != null, where auth is the FirebaseAuth instance associated with your FirebaseApp, then the sign-in process can be started by creating a sign-in intent using AuthUI.SignInIntentBuilder. A builder instance can be retrieved by calling createSignInIntentBuilder() on the retrieved AuthUI instance.
The builder provides the following customization options for the authentication flow:
- The set of authentication providers can be specified.
- The terms of service URL for your app can be specified, which is included as a link in the small-print of the account creation step for new users. If no terms of service URL is provided, the associated small-print is omitted.
- A custom theme can be specified for the flow, which is applied to all the activities in the flow for consistent customization of colors and typography.
もし現在ユーザーがサインインしていないなら(auth.getCurrentUser() != nullで判定できます(authはあなたのFirebaseAppに関連付けられているFirebaseAuthインスタンスです))、サインインのプロセスはAuthUI.SignInIntentBuilderを使用したサインインインテントの作成から始められます。 ビルダーのインスタンスはAuthUIインスタンスのcreateSignInIntentBuilder()を呼ぶことで取得できます。
ビルダーは認証フローに次のカスタマイズオプションを提供します:
- 認証プロバイダのセットを特定します。
- あなたのアプリのサービス利用規約を指定できます。 それは新しいユーザーのアカウント作成手順にリンクとして含まれます。 もしサービス利用規約が無いならば、関係する文面は省略されます。
- 処理フローのカスタムテーマを指定できます。 それは色やタイポグラフィの一貫性のあるカスタマイズのため、処理フロー内のすべてのactivityに適用されます。
Sign-in examples
If no customization is required, and only email authentication is required, the sign-in flow can be started as follows:
startActivityForResult(
    // Get an instance of AuthUI based on the default app
    AuthUI.getInstance().createSignInIntentBuilder().build(),
    RC_SIGN_IN);
You can enable sign-in providers like Google Sign-In or Facebook Log In by calling the setProviders method:
startActivityForResult(
    AuthUI.getInstance()
        .createSignInIntentBuilder()
        .setProviders(
            AuthUI.EMAIL_PROVIDER,
            AuthUI.GOOGLE_PROVIDER,
            AuthUI.FACEBOOK_PROVIDER)
        .build(),
    RC_SIGN_IN);
If a terms of service URL and a custom theme are required:
startActivityForResult(
    AuthUI.getInstance()
        .createSignInIntentBuilder()
        .setProviders(...)
        .setTosUrl("https://superapp.example.com/terms-of-service.html")
        .setTheme(R.style.SuperAppTheme)
        .build(),
    RC_SIGN_IN);
By default, FirebaseUI uses Smart Lock for Passwords to store the user's credentials and automatically sign users into your app on subsequent attempts. Using SmartLock is recommended to provide the best user experience, but in some cases you may want to disable SmartLock for testing or development. To disable SmartLock, you can use the setIsSmartLockEnabled method when building your sign-in Intent:
startActivityForResult(
    AuthUI.getInstance()
        .createSignInIntentBuilder()
        .setIsSmartLockEnabled(false)
        .build(),
    RC_SIGN_IN);
It is often desirable to disable SmartLock in development but enable it in production. To achieve this, you can use the BuildConfig.DEBUG flag to control SmartLock:
startActivityForResult(
    AuthUI.getInstance()
        .createSignInIntentBuilder()
        .setIsSmartLockEnabled(!BuildConfig.DEBUG)
        .build(),
    RC_SIGN_IN);
もしカスタマイズを行わず、メール認証のみを必要とするのなら、サインフローは次のように開始できます:
startActivityForResult(
    // Get an instance of AuthUI based on the default app
    AuthUI.getInstance().createSignInIntentBuilder().build(),
    RC_SIGN_IN);
あなたはsetProvidersメソッドを呼ぶことにより、GoogleサインインやFacebookログインのようなサインインプロバイダを有効にできます:
startActivityForResult(
    AuthUI.getInstance()
        .createSignInIntentBuilder()
        .setProviders(
            AuthUI.EMAIL_PROVIDER,
            AuthUI.GOOGLE_PROVIDER,
            AuthUI.FACEBOOK_PROVIDER)
        .build(),
    RC_SIGN_IN);
もしサービス利用規約とカスタムテーマが必要な場合:
startActivityForResult(
    AuthUI.getInstance()
        .createSignInIntentBuilder()
        .setProviders(...)
        .setTosUrl("https://superapp.example.com/terms-of-service.html")
        .setTheme(R.style.SuperAppTheme)
        .build(),
    RC_SIGN_IN);
デフォルトではFirebaseUIはユーザーの証明書を保存するためにSmart Lock for Passwordsを使用し、その後のサインイン試行時にあなたのアプリにユーザーを自動でサインインさせます。 SmartLockの使用は、ベストなユーザーエクスペリエンスを提供するために推奨されます。 しかし、あなたはテストや開発などいくつかのケースでSmartLockを無効にしたいと思うかもしれません。 SmartLockを無効にするため、あなたはサインインIntentを作成するときにsetIsSmartLockEnabledメソッドを使用できます:
startActivityForResult(
    AuthUI.getInstance()
        .createSignInIntentBuilder()
        .setIsSmartLockEnabled(false)
        .build(),
    RC_SIGN_IN);
開発中にSmartLockを無効にすることは、多くの場合望ましいです。 しかし、製品版では有効にします。 これを実現するため、SmartLockを制御するためにBuildConfig.DEBUGフラグを使用することが出来ます。
startActivityForResult(
    AuthUI.getInstance()
        .createSignInIntentBuilder()
        .setIsSmartLockEnabled(!BuildConfig.DEBUG)
        .build(),
    RC_SIGN_IN);
Handling the sign-in response
The authentication flow provides only two response codes: Activity.RESULT_OK if a user is signed in, and Activity.RESULT_CANCELLED if sign in failed. No further information on failure is provided as it is not typically useful; the only recourse for most apps if sign in fails is to ask the user to sign in again later, or proceed with an anonymous account if supported.
protected void onActivityResult(int requestCode, int resultCode, Intent data) {
   super.onActivityResult(requestCode, resultCode, data);
   if (requestCode == RC_SIGN_IN) {
     if (resultCode == RESULT_OK) {
       // user is signed in!
       startActivity(new Intent(this, WelcomeBackActivity.class));
       finish();
     } else {
       // user is not signed in. Maybe just wait for the user to press
       // "sign in" again, or show a message
     }
   }
 }
Alternatively, you can register a listener for authentication state changes; see the Firebase Auth documentation for more information.
認証フローは応答コードを2つだけの返します:ユーザーがサインインした場合はActivity.RESULT_OKで、失敗した場合はActivity.RESULT_CANCELLEDです。 一般的に有用ではないため、失敗時における追加の情報は提供されません:ほどんどのアプリにとってサインインに失敗した場合の唯一の解決方法は、ユーザーに再度サインインを依頼するか、またはもしサポートしているならば匿名アカウントで続行することです。
protected void onActivityResult(int requestCode, int resultCode, Intent data) {
   super.onActivityResult(requestCode, resultCode, data);
   if (requestCode == RC_SIGN_IN) {
     if (resultCode == RESULT_OK) {
       // user is signed in!
       startActivity(new Intent(this, WelcomeBackActivity.class));
       finish();
     } else {
       // user is not signed in. Maybe just wait for the user to press
       // "sign in" again, or show a message
     }
   }
 }
あるいは、あなたは認証ステータス変更のリスナーを登録できます。 くわしくはFirebase Auth documentationを参照してください。
Sign out
With the integrations provided by AuthUI, signing out a user is a multi-stage process:
- The user must be signed out of the FirebaseAuth instance.
- Smart Lock for Passwords must be instructed to disable automatic sign-in, in order to prevent an automatic sign-in loop that prevents the user from switching accounts.
- If the current user signed in using either Google or Facebook, the user must also be signed out using the associated API for that authentication method. This typically ensures that the user will not be automatically signed-in using the current account when using that authentication method again from the authentication method picker, which would also prevent the user from switching between accounts on the same provider.
In order to make this process easier, AuthUI provides a simple signOut method to encapsulate this behavior. The method returns a Task which is marked completed once all necessary sign-out operations are completed:
public void onClick(View v) {
  if (v.getId() == R.id.sign_out) {
      AuthUI.getInstance()
          .signOut(this)
          .addOnCompleteListener(new OnCompleteListener<Void>() {
            public void onComplete(@NonNull Task<Void> task) {
              // user is now signed out
              startActivity(new Intent(MyActivity.this, SignInActivity.class));
              finish();
            }
          });
  }
}
AuthUIが提供する統合化で、ユーザーのサインアウトは多段階のプロセスになります:
- ユーザーはFirebaseAuthインスタンスからサインアウトする必要があります。
- ユーザーのアカウント切替を妨げる自動サインインのループを防止するため、Smart Lock for Passwordsの自動ログインを無効にしなければなりません。
- 現在のユーザーがGoogleまたはFacebookを使用してサインした場合、ユーザーは認証で使用したメソッドに対応するAPIを使用してサインアウトする必要があります。 これは一般的に認証メソッド選択で再度その認証メソッドを使用した時、ユーザーが現在のアカウントに自動でサインインしないことを保障します。(これは同一のプロバイダー上の別アカウントへの切替を妨げることを防ぎます。)
このプロセスを簡単にするため、AuthUIはこの動作をカプセル化するシンプルなsignOutメソッドを提供します。 このメソッドはすべての必要なサインアウト操作の完了を表すTaskを返します。
public void onClick(View v) {
  if (v.getId() == R.id.sign_out) {
      AuthUI.getInstance()
          .signOut(this)
          .addOnCompleteListener(new OnCompleteListener<Void>() {
            public void onComplete(@NonNull Task<Void> task) {
              // user is now signed out
              startActivity(new Intent(MyActivity.this, SignInActivity.class));
              finish();
            }
          });
  }
}
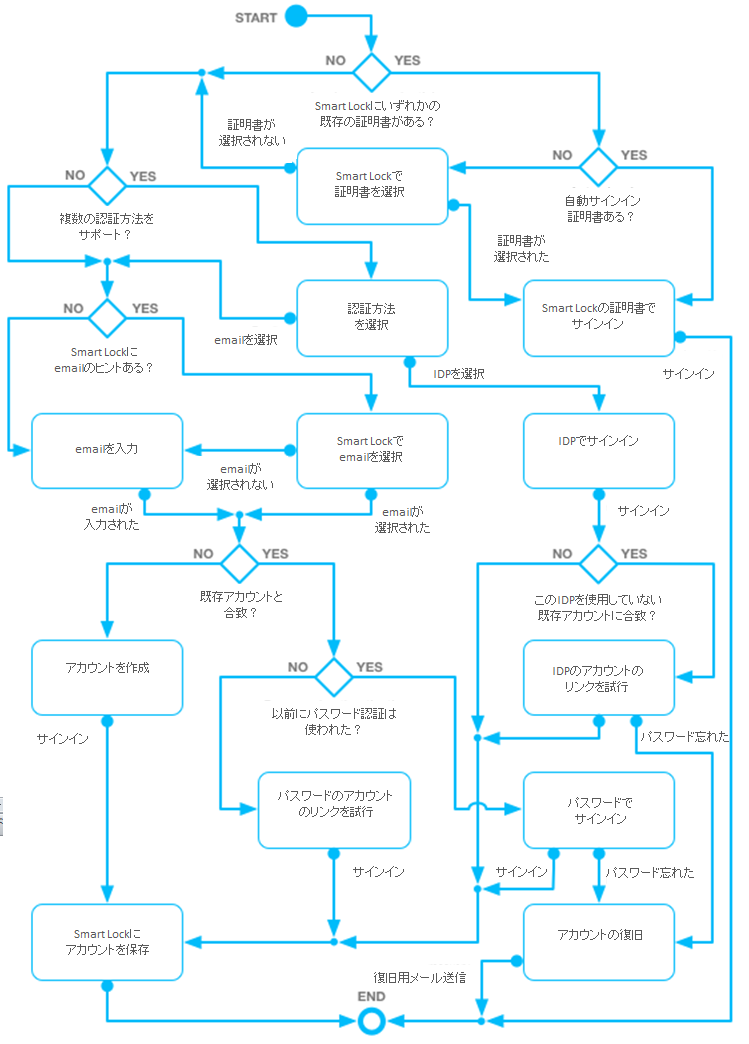
Authentication flow chart
The authentication flow implemented on Android is more complex than on other platforms, due to the availability of Smart Lock for Passwords. It is represented in the following diagram:
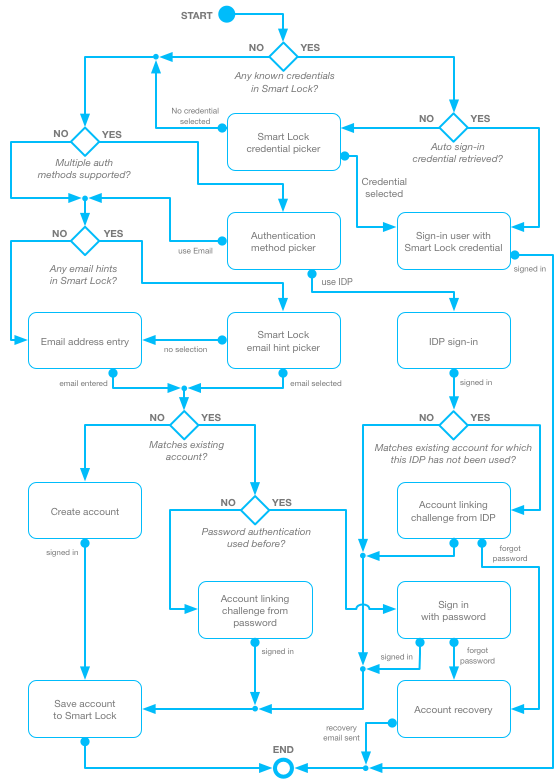
Smart Lock for Passwordsを使用できるため、Android上に実装された認証フローは他のプラットフォームよりも複雑です。 それは下記の図で表せます:
UI customization
To provide customization of the visual style of the activities that implement the flow, a new theme can be declared. Standard material design color and typography properties will take effect as expected. For example, to define a green theme:
<style name="GreenTheme" parent="FirebaseUI">
    <item name="colorPrimary">@color/material_green_500</item>
    <item name="colorPrimaryDark">@color/material_green_700</item>
    <item name="colorAccent">@color/material_purple_a700</item>
    <item name="colorControlNormal">@color/material_green_500</item>
    <item name="colorControlActivated">@color/material_lime_a700</item>
    <item name="colorControlHighlight">@color/material_green_a200</item>
    <item name="android:windowBackground">@color/material_green_50</item>
</style>
With associated colors:
<color name="material_green_50">#E8F5E9</color>
<color name="material_green_500">#4CAF50</color>
<color name="material_green_700">#388E3C</color>
<color name="material_green_a200">#69F0AE</color>
<color name="material_lime_a700">#AEEA00</color>
<color name="material_purple_a700">#AA00FF</color>
This would then be used in the construction of the sign-in intent:
startActivityForResult(
    AuthUI.getInstance(this).createSignInIntentBuilder()
        // ...
        .setTheme(R.style.GreenTheme)
        .build());
Your application theme could also simply be used, rather than defining a new one.
If you wish to change the string messages, the existing strings can be easily overridden by name in your application. See the built-in strings.xml and simply redefine a string to change it, for example:
<resources>
  <!-- was "Signing up..." -->
  <string name="progress_dialog_signing_up">Creating your shiny new account...</string>
</resources>
フローを実施するactivityのビジュアルスタイルの変更を規定するため、新しいテーマを宣言できます。 標準のマテリアルデザインのカラーとタイポグラフィのプロパティが期待通り有効になります。 例えば、緑のテーマを定義するには:
<style name="GreenTheme" parent="FirebaseUI">
    <item name="colorPrimary">@color/material_green_500</item>
    <item name="colorPrimaryDark">@color/material_green_700</item>
    <item name="colorAccent">@color/material_purple_a700</item>
    <item name="colorControlNormal">@color/material_green_500</item>
    <item name="colorControlActivated">@color/material_lime_a700</item>
    <item name="colorControlHighlight">@color/material_green_a200</item>
    <item name="android:windowBackground">@color/material_green_50</item>
</style>
関連するカラー:
<color name="material_green_50">#E8F5E9</color>
<color name="material_green_500">#4CAF50</color>
<color name="material_green_700">#388E3C</color>
<color name="material_green_a200">#69F0AE</color>
<color name="material_lime_a700">#AEEA00</color>
<color name="material_purple_a700">#AA00FF</color>
これはその後サインインintentの構築で使用されます:
startActivityForResult(
    AuthUI.getInstance(this).createSignInIntentBuilder()
        // ...
        .setTheme(R.style.GreenTheme)
        .build());
またあなたのアプリケーションテーマも、新しく定義するより簡単に使用できます。 もし文字列のメッセージを変更したい場合は、既存の文字列は簡単にあなたのアプリケーション内で上書きできます。 the built-in strings.xmlを参照し、単純にそれを変更するため文字列を再定義します。例:
<resources>
  <!-- was "Signing up..." -->
  <string name="progress_dialog_signing_up">Creating your shiny new account...</string>
</resources>
OAuth Scope Customization
By default, FirebaseUI requests the email and public_profile permissions when initiating Facebook Login. If you would like to override these scopes, add a string array resource to your application like this:
<!--
    See:
    https://developers.facebook.com/docs/facebook-login/android
    https://developers.facebook.com/docs/facebook-login/permissions
-->
<array name="facebook_permissions">
    <item>public_profile</item>
    <item>email</item>
    <!-- ... -->
</array>
Note that if you do not include at least the email and public_profile scopes, FirebaseUI will not work properly.
デフォルトでは、FirebaseUIはFacebookログインを開始するときにemailとpublic_profile権限を要求します。 もしこれらのスコープを上書きしたい場合、あなたのアプリケーションに次のような文字列配列のリソースを追加します:
<!--
    See:
    https://developers.facebook.com/docs/facebook-login/android
    https://developers.facebook.com/docs/facebook-login/permissions
-->
<array name="facebook_permissions">
    <item>public_profile</item>
    <item>email</item>
    <!-- ... -->
</array>
少なくともemailとpublic_profileスコープが含まれていないと、FirebaseUIが正常に動作しないことに注意してください。