JaredさんのカスタムカメラのチュートリアルをiOS10&Swift3に対応させてます。
https://www.youtube.com/watch?v=w0O3ZGUS3pk
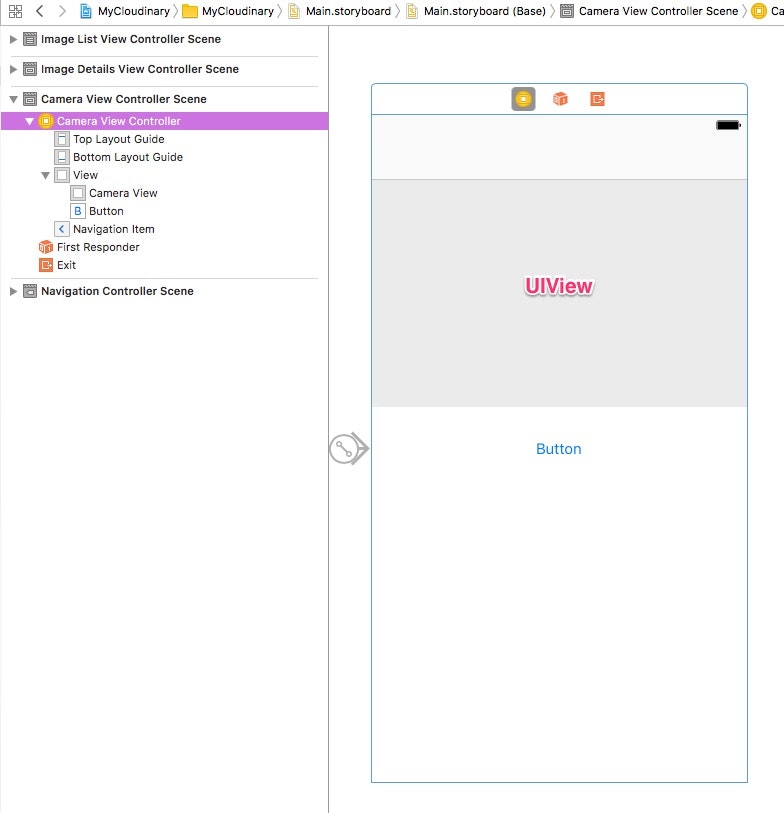
ストーリーボード
UIView と UIButton を適当に配置します。UIView にカメラの映像が表示されます。ボタンを押すとシャッターを切り、画像をフォトライブラリに保存します。
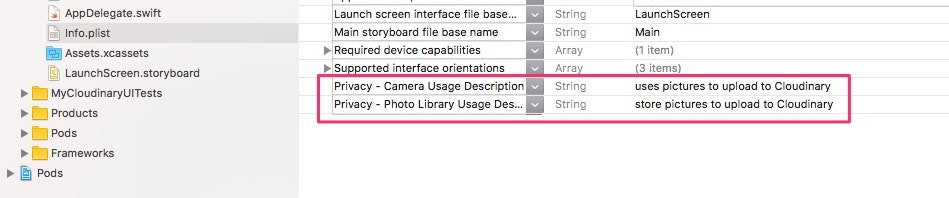
Info.plist
お約束の設定です。カメラとフォトライブラリにアクセスできるようにします。
ソース
ソースコード全体をざっと載せます。
import UIKit
import AVFoundation

class CameraViewController: UIViewController, AVCapturePhotoCaptureDelegate {
    // カメラの映像をここに表示
    @IBOutlet weak var cameraView: UIView!

    var captureSesssion: AVCaptureSession!
    var stillImageOutput: AVCapturePhotoOutput?
    var previewLayer: AVCaptureVideoPreviewLayer?

    // ボタンを押した時呼ばれる
    @IBAction func takeIt(_ sender: AnyObject) {
        // フラッシュとかカメラの細かな設定
        let settingsForMonitoring = AVCapturePhotoSettings()
        settingsForMonitoring.flashMode = .auto
        settingsForMonitoring.isAutoStillImageStabilizationEnabled = true
        settingsForMonitoring.isHighResolutionPhotoEnabled = false
        // シャッターを切る
        stillImageOutput?.capturePhoto(with: settingsForMonitoring, delegate: self)
    }

    override func viewWillAppear(_ animated: Bool) {

        captureSesssion = AVCaptureSession()
        stillImageOutput = AVCapturePhotoOutput()

        captureSesssion.sessionPreset = AVCaptureSessionPreset1920x1080 // 解像度の設定

        let device = AVCaptureDevice.defaultDevice(withMediaType: AVMediaTypeVideo)

        do {
            let input = try AVCaptureDeviceInput(device: device)

            // 入力
            if (captureSesssion.canAddInput(input)) {
                captureSesssion.addInput(input)

                // 出力
                if (captureSesssion.canAddOutput(stillImageOutput)) {
                    captureSesssion.addOutput(stillImageOutput)
                    captureSesssion.startRunning() // カメラ起動

                    previewLayer = AVCaptureVideoPreviewLayer(session: captureSesssion)
                    previewLayer?.videoGravity = AVLayerVideoGravityResizeAspect // アスペクトフィット
                    previewLayer?.connection.videoOrientation = AVCaptureVideoOrientation.portrait // カメラの向き

                    cameraView.layer.addSublayer(previewLayer!)

                    // ビューのサイズの調整
                    previewLayer?.position = CGPoint(x: self.cameraView.frame.width / 2, y: self.cameraView.frame.height / 2)
                    previewLayer?.bounds = cameraView.frame
                }
            }
        }
        catch {
            print(error)
        }
    }

    // デリゲート。カメラで撮影が完了した後呼ばれる。JPEG形式でフォトライブラリに保存。
    func capture(_ captureOutput: AVCapturePhotoOutput, didFinishProcessingPhotoSampleBuffer photoSampleBuffer: CMSampleBuffer?, previewPhotoSampleBuffer: CMSampleBuffer?, resolvedSettings: AVCaptureResolvedPhotoSettings, bracketSettings: AVCaptureBracketedStillImageSettings?, error: Error?) {

        if let photoSampleBuffer = photoSampleBuffer {
            // JPEG形式で画像データを取得
            let photoData = AVCapturePhotoOutput.jpegPhotoDataRepresentation(forJPEGSampleBuffer: photoSampleBuffer, previewPhotoSampleBuffer: previewPhotoSampleBuffer)
            let image = UIImage(data: photoData!)

            // フォトライブラリに保存
            UIImageWriteToSavedPhotosAlbum(image!, nil, nil, nil)
        }
    }
}
実行結果
こちらをご覧くださいw 基本同じです。
https://youtu.be/w0O3ZGUS3pk?t=1024