はじめに
Linux環境でSoftLayerのObject Storageにアクセスする方法として様々な手法が存在しますが、個人的には一番お気に入りのpython-swiftclientを使ったアクセスをご紹介します。
なぜpython-swiftclientを使うの?
python-swiftclientはOpenStack SwiftベースのObject Storageを扱うことができるソフトウェアです。SoftLayerのObject Storageを扱う際には、色々な制約が存在しますが、一番有名なのは20MBの壁と5GBの壁の問題です。詳細はこちらをご参照下さい。
http://qiita.com/testnin2/items/5511c493a1499112dfa3
例えば、cloudfuseはあたかもファイルシステムにアクセスしているかのようにOSからマウントできるのが特徴です。非常に便利なのですが、残念ながら自動分割の機能がないため、5GBを超えたファイルのバックアップの際には自力で分割しないといけません。このサイズ制限の問題を解決するためにはAPIを自分で書いたり、自分でファイルを分割したりマニフェストを記述すれば良いのですが、、、かなり面倒です(参考:https://gg-web.jp/document/ConfigGuide/05002/index.html )。
python-swiftclientを使えば、コマンドでファイル分割なども含めて自動的にやってくれます。同時並行処理数などもオプションで制御できます。これは非常に便利です!
python-swiftclientの導入
pytyon-swiftclientは以下のgithub上で公開されています。今回はrelease版を利用したいと思います。
https://github.com/openstack/python-swiftclient
既にSoftLayerのslコマンドなどに慣れてpython環境を構築済みであれば、pipでコマンド一発で導入可能です。
# pip install python-swiftclient
# swift --version
swift 2.3.1.post56
もし過去にpython-swiftclientを導入したことがある人で、最新のrelease版を入手したい場合は
# pip install --upgrade python-swiftclient
と実施して下さい。
python-swiftclientの設定
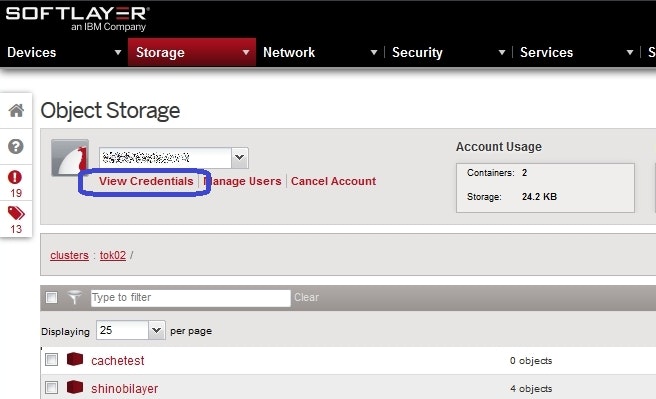
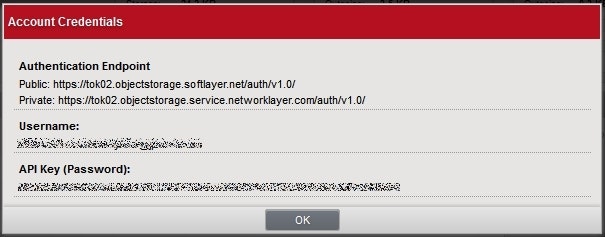
1. Object Storageへの接続情報(UsernameとAPI Key)をSoftLayerのCustomer Portalから確認しておきます。


2. 以下のように環境変数に、手順1で確認した値を設定します。
今回はTOK02にprivate NW経由でアクセスすることを想定しています。
# vi ~/.bash_profile
export ST_AUTH=https://tok02.objectstorage.service.networklayer.com/auth/v1.0/
export ST_USER=xxxxxxxxxxxx
export ST_KEY=xxxxxxxxxxxxxxxxxxxxxxxxxxxxxxxx
# . ~/.bash_profile
3. 動作確認を行う。
# which swift
/usr/bin/swift

# swift stat
      Account: AUTH_103de292-f5a7-4347-bd51-f7ec1a25fe33
   Containers: 2
      Objects: 108
        Bytes: 10737466824
  Meta Cdn-Id: 9224
  Meta Nas-Id: 3052764
 Content-Type: text/plain; charset=utf-8
   Connection: keep-alive
  X-Timestamp: 1418865840.53540
   X-Trans-Id: xxxxxxxxxxxxxxxxxxxxxx-xxxxxxxxx
Accept-Ranges: bytes
基本機能を試してみる
1. コンテナー一覧の表示
# swift list
cachetest
shinobilayer
2. コンテナー内のファイル一覧を表示
# swift list shinobilayer
index.html
menu.html
ninja.jpg
top.html
3. shinobilayerというコンテナーに100MB分割してSLO(Static Large Object)でアップロード
テストデータの作成
# dd if=/dev/zero of=test.data bs=1M count=10240
# ls -l test.data
-rw-r--r-- 1 root root 10737418240 Mar 20 00:44 test.data

shinobilayerというコンテナーに100MB(104857600 Byte)分割でSLO(Static Large Object)でuploadする。python-swiftclientのデフォルトはDLO(Dynamic Large Object)だが、upload速度はSLOでもあまり変わらないので、md5のチェックエラーがされている分、信頼性が高い。そのため、可能であればSLOを利用する方が望ましい。
# swift upload shinobilayer -S 104857600 test.data --use-slo

アップロード中はマルチスレッドでuploadしてくれる。同時uploadのためのスレッド数は別途パラメーターを指定することで調整可能。
# ps -eLf | grep -e swift -e PID | grep -v grep
UID        PID  PPID   LWP  C NLWP STIME TTY          TIME CMD
root     12216  9486 12216  0   15 01:07 pts/0    00:00:00 /usr/bin/python /usr/bin/swift upload shinobilayer -S 104857600 test.data --use-slo
root     12216  9486 12221  0   15 01:07 pts/0    00:00:00 /usr/bin/python /usr/bin/swift upload shinobilayer -S 104857600 test.data --use-slo
root     12216  9486 12224  0   15 01:07 pts/0    00:00:00 /usr/bin/python /usr/bin/swift upload shinobilayer -S 104857600 test.data --use-slo
root     12216  9486 12225  0   15 01:07 pts/0    00:00:00 /usr/bin/python /usr/bin/swift upload shinobilayer -S 104857600 test.data --use-slo
root     12216  9486 12226  0   15 01:07 pts/0    00:00:00 /usr/bin/python /usr/bin/swift upload shinobilayer -S 104857600 test.data --use-slo
root     12216  9486 12227  0   15 01:07 pts/0    00:00:00 /usr/bin/python /usr/bin/swift upload shinobilayer -S 104857600 test.data --use-slo
root     12216  9486 12228  0   15 01:07 pts/0    00:00:00 /usr/bin/python /usr/bin/swift upload shinobilayer -S 104857600 test.data --use-slo
root     12216  9486 12229  0   15 01:07 pts/0    00:00:00 /usr/bin/python /usr/bin/swift upload shinobilayer -S 104857600 test.data --use-slo
root     12216  9486 12230  0   15 01:07 pts/0    00:00:00 /usr/bin/python /usr/bin/swift upload shinobilayer -S 104857600 test.data --use-slo
root     12216  9486 12231  0   15 01:07 pts/0    00:00:00 /usr/bin/python /usr/bin/swift upload shinobilayer -S 104857600 test.data --use-slo
root     12216  9486 12232  0   15 01:07 pts/0    00:00:00 /usr/bin/python /usr/bin/swift upload shinobilayer -S 104857600 test.data --use-slo
root     12216  9486 12233  0   15 01:07 pts/0    00:00:00 /usr/bin/python /usr/bin/swift upload shinobilayer -S 104857600 test.data --use-slo
root     12216  9486 12234  0   15 01:07 pts/0    00:00:00 /usr/bin/python /usr/bin/swift upload shinobilayer -S 104857600 test.data --use-slo
root     12216  9486 12235  0   15 01:07 pts/0    00:00:00 /usr/bin/python /usr/bin/swift upload shinobilayer -S 104857600 test.data --use-slo
root     12216  9486 12236  0   15 01:07 pts/0    00:00:00 /usr/bin/python /usr/bin/swift upload shinobilayer -S 104857600 test.data --use-slo

アップロードの結果、"_segments"というコンテナーが別途作成され、分割されたファイルの実体はここに保管される。
# swift list
cachetest
shinobilayer
shinobilayer_segments

# swift list shinobilayer_segments
test.data/slo/1426780337.000000/10737418240/104857600/00000000
test.data/slo/1426780337.000000/10737418240/104857600/00000001
test.data/slo/1426780337.000000/10737418240/104857600/00000002
test.data/slo/1426780337.000000/10737418240/104857600/00000003
test.data/slo/1426780337.000000/10737418240/104857600/00000004
test.data/slo/1426780337.000000/10737418240/104857600/00000005
test.data/slo/1426780337.000000/10737418240/104857600/00000006
test.data/slo/1426780337.000000/10737418240/104857600/00000007
test.data/slo/1426780337.000000/10737418240/104857600/00000008
test.data/slo/1426780337.000000/10737418240/104857600/00000009
(以下略)
4. ファイルのダウンロード
ユーザー側で別途マージをする必要はありません!
# rm test.data
# swift download shinobilayer test.data
# ls -l test.data
-rw-r--r-- 1 root root 10737418240 Mar 20 01:50 test.data
終わりに
python-swiftclientは非常に便利ですね。5GBを越えるバックアップをする時に、自動的に分割してマルチスレッドでuploadしてくれるのは非常に有効です。しかも、SoftLayerのprivate NW経由であれば通信料金も無料!他にもpython-swiftclientには色々なオプションが存在します。Linux環境でSoftLayerのObject Storageを使う方には、是非とも覚えておいていただきたいツールです。