vRouter5400(Vyatta Gateway Appliance)からvRouter5600(Virtual Router Appliance)への移行注意点(1)の続きです。
以下では、vRouter 5400とvRouter 5600の違いについて説明していきます。
先述のとおり、残念ながら公式の移行ガイドみたいなものは存在しないため、網羅的に説明すること難しい状況です。よって、著者が気づいた点や指摘を受けた点を、ベストエフォートで適宜更新していく予定です。
5. インターフェース
vRouter 5600からはコントロールプレーンとデータプレーンが分離されDPDKを利用するため、
- eth0, eth1, eth2, eth3 -> dp0s0, dp0s1, dp0s2, dp0s3
- bond0, bond1 -> dp0bond0, dp0bond1
にそれぞれ変更されています。
また、vRouter 5400ではeth0/eth2がbond0を、eth1/eth3がbond1をそれぞれLACPで構成していたのと同様に、vRouter 5600ではdp0s0/dp0s2がdp0bond0を、dp0s1/dp0s3がdp0bond1をそれぞれLACPで構成しており、以下のようにオプションが変更されています。
- hash-policy -> vRouter 5600では廃止
- mode 802.3ad -> mode lacp
また、VRRPでは以下の変更があります。
- rfc3768-compatibility -> rfc-compatibility
- advertisementはVRRPの広告間隔です。vRouter 5400ではbond0/bond1に対して注文直後の初期構成では明示的に1秒に設定されていました。vRouter 5600ではdp0bond0/dp0bond1に対して注文直後の初期構成では設定されていませんが、デフォルト値は1秒なので挙動は同じです。明示的に設定することを推奨します。
# show interfaces bonding bond0
 address 10.132.50.92/26
 hash-policy layer3+4
 mode 802.3ad
 vif 1449 {
     address 192.168.0.1/24
     vrrp {
         vrrp-group 1 {
             advertise-interval 1
             preempt false
             priority 254
             sync-group vgroup1
             virtual-address 10.132.14.145/28
             virtual-address 10.133.101.113/28
             virtual-address 10.132.176.1/26
         }
     }
 }
 vrrp {
     vrrp-group 1 {
         advertise-interval 1
         preempt false
         priority 254
         rfc3768-compatibility
         sync-group vgroup1
         virtual-address 10.132.50.84/26
     }
 }
# show interfaces bonding dp0bond0
 bonding dp0bond0 {
        address 10.132.50.92/26
        mode lacp
        vif 1449 {
                address 192.168.0.1/24
                vrrp {
                        vrrp-group 1 {
                                advertise-interval 1
                                preempt false
                                priority 254
                                sync-group vgroup1
                                virtual-address 10.132.14.145/28
                                virtual-address 10.133.101.113/28
                                virtual-address 10.132.176.1/26
                        }
                }
        }
        vrrp {
                vrrp-group 1 {
                        advertise-interval 1
                        preempt false
                        priority 254
                        rfc-compatibility
                        sync-group vgroup1
                        virtual-address 10.132.50.84/26
                }
        }
 }
また、RFC準拠のVRRPインターフェースに沿うことで、bondXvXからdp0vrrpXに変更されています。これは、show vrrpコマンドを実行することでも確認することができます。
$ show vrrp
                                 RFC        Addr   Last        Sync
Interface         Group  State   Compliant  Owner  Transition  Group
---------         -----  -----   ---------  -----  ----------  -----
bond0             1      MASTER  yes        no     5s          vgroup1
bond0.1449        1      MASTER  no         no     5s          vgroup1
bond1             1      MASTER  yes        no     5s          vgroup1
bond1.1438        1      MASTER  no         no     7s          vgroup1

$ show vrrp detail | grep interface
  Virtual MAC interface:	bond0v1
  Virtual MAC interface:	bond1v1
$ show vrrp
                                 RFC        Addr   Last        Sync
Interface         Group  State   Compliant  Owner  Transition  Group
---------         -----  -----   ---------  -----  ----------  -----
dp0bond0          1      MASTER  dp0vrrp2   no     5h2m59s     vgroup1
dp0bond0.1449     1      MASTER  no         no     5h2m59s     vgroup1
dp0bond1          1      MASTER  dp0vrrp1   no     5h2m59s     vgroup1
dp0bond1.1438     1      MASTER  no         no     5h2m59s     vgroup1

$ show vrrp detail|grep interface
  Virtual MAC interface:	dp0vrrp2
  Virtual MAC interface:	dp0vrrp1
- VIFの設定方法は、vRouter5400の時と基本的に変わっていません。
- rfc-compatibilityはnative interfaceにのみ設定し、VIFでは設定しません。つまり、native interfaceにおけるVRRP用Virtual IPではRFC 3768に従う仮想MACアドレス(
00:00:5e:00:01:<vrrp-group番号>)を利用しますが、VIFにおけるVRRP用Virtual IPでは物理MACを利用します。 - VRRP Advertisementでも、送信元のMACアドレスはrfc-compatibilityを設定していると仮想MACアドレスを利用しますが、rfc-compatibilityを設定していないと物理MACアドレスを利用します。なお、VRRP Advertisementで利用する
Target Multicast IPは224.0.0.18、Target MAC Addressは01:00:5E:00:00:12です(参考)。よって、TCP dumpを取得すると以下のようになります。
- rfc-compatibilityはnative interfaceにのみ設定し、VIFでは設定しません。つまり、native interfaceにおけるVRRP用Virtual IPではRFC 3768に従う仮想MACアドレス(
root@vra01# show interfaces bonding dp0bond0
 bonding dp0bond0 {
        address 10.132.163.219/26
        lacp-options {
                activity active
        }
        mode lacp
        vif 1428 {
                address 10.129.120.186/29
                vrrp {
                        vrrp-group 1 {
                                preempt false
                                priority 254
                                sync-group vgroup1
                                virtual-address 10.132.94.65/26
                                virtual-address 10.133.238.129/26
                        }
                }
        }
        vrrp {
                vrrp-group 1 {
                        preempt false
                        priority 254
                        rfc-compatibility
                        sync-group vgroup1
                        virtual-address 10.132.163.215/26
                }
        }
 }

root@vra01:~# show vrrp

                                 RFC        Addr   Last        Sync
Interface         Group  State   Compliant  Owner  Transition  Group
---------         -----  -----   ---------  -----  ----------  -----
dp0bond0          1      MASTER  dp0vrrp1   no     12m48s      vgroup1
dp0bond1          1      MASTER  dp0vrrp2   no     12m48s      vgroup1
dp0bond0.1428     1      MASTER  no         no     12m45s      vgroup1

root@vra01:~# tcpdump -i dp0bond0 vrrp -enn
tcpdump: verbose output suppressed, use -v or -vv for full protocol decode
listening on dp0bond0, link-type EN10MB (Ethernet), capture size 262144 bytes
18:23:04.113211 ac:1f:6b:4d:8c:46 > 01:00:5e:00:00:12, ethertype 802.1Q (0x8100), length 62: vlan 1428, p 0, ethertype IPv4, 10.129.120.186 > 224.0.0.18: VRRPv2, Advertisement, vrid 1, prio 254, authtype none, intvl 1s, length 24
18:23:04.124669 00:00:5e:00:01:01 > 01:00:5e:00:00:12, ethertype IPv4 (0x0800), length 54: 10.132.163.219 > 224.0.0.18: VRRPv2, Advertisement, vrid 1, prio 254, authtype none, intvl 1s, length 20
18:23:05.113158 ac:1f:6b:4d:8c:46 > 01:00:5e:00:00:12, ethertype 802.1Q (0x8100), length 62: vlan 1428, p 0, ethertype IPv4, 10.129.120.186 > 224.0.0.18: VRRPv2, Advertisement, vrid 1, prio 254, authtype none, intvl 1s, length 24
18:23:05.124587 00:00:5e:00:01:01 > 01:00:5e:00:00:12, ethertype IPv4 (0x0800), length 54: 10.132.163.219 > 224.0.0.18: VRRPv2, Advertisement, vrid 1, prio 254, authtype none, intvl 1s, length 20
18:23:06.113073 ac:1f:6b:4d:8c:46 > 01:00:5e:00:00:12, ethertype 802.1Q (0x8100), length 62: vlan 1428, p 0, ethertype IPv4, 10.129.120.186 > 224.0.0.18: VRRPv2, Advertisement, vrid 1, prio 254, authtype none, intvl 1s, length 24
18:23:06.124552 00:00:5e:00:01:01 > 01:00:5e:00:00:12, ethertype IPv4 (0x0800), length 54: 10.132.163.219 > 224.0.0.18: VRRPv2, Advertisement, vrid 1, prio 254, authtype none, intvl 1s, length 20
-
こちらのdocsも参考にしてください。
rfc-compatibility enables or disables RFC 3768 MAC addresses for VRRP on an interface. This should be enabled on the native interfaces, but not enabled on any configured VIFs. Some virtual switches (mostly vmware) have problems with this being enabled, and cause traffic to be dropped and not sent to the gateway IP from the hypervisor host machine. Leave this setting alone, and do not configure the setting for any VIFs.
- こちらのリンクも参考になります。
RFC 3768 and RFC 5798 define a specific 48-bit MAC address that is to be associated with each VRRP virtual router. The ARP translation for the virtual router IPv4 or IPv6 address points to this MAC address.
The master router uses this well-defined MAC address as the source MAC address of VRRP packets that it sends, in this way teaching switches to send packets for that MAC address to itself. If one master fails and another router takes over as master, it acts in the same way.
Using the well-defined MAC address ensures quick failover of traffic for that MAC address. In addition, the ARP translations of the other hosts and routers on the network do not need to change when a new router takes over as master. This configuration is recommended.
In legacy versions of the vRouter , the VIP was directly linked with the real MAC address of the master router rather than the well-defined MAC address specified by the RFCs. In that implementation, if the master router failed and a new master was elected, the VIP assumed the MAC address of the physical interface of the new master router and the new master notified the network of its MAC address by issuing a gratuitous ARP. This behavior is still the default for VRRP.
Configure RFC-compliant MAC address behavior by setting the rfc-compatibility option for the VRRP group withinterfaces <interface> vrrp vrrp-group <group-id> rfc-compatibilitywhen you specify VRRP group information for the interface that you are adding to the VRRP group. Note that a vRouter in RFC-compliant mode does not interoperate with a vRouter in noncompliant mode. -
vRouter 5600のvrrp-group番号(=VRID=virtual_router_id)は、vRouter 5400の時と同様に、IBM Cloudから割り当てられていたものを利用しましょう。HAを構成しているvRouter間以外でvrrp-groupの重複が発生してはいけません。利用者側でvrrp-groupを変更した場合、 後から導入された別vRouterに割り当てられたvrrp-group番号が重複してしまう可能性があります。これにより、例えばvRouterのHA構成が2ペア(計4台)存在しても、そのうち1つだけがPrimaryとなり、残りの3台がBackupとなってしまうことや、VRRPのflappingが発生し通信不可に陥る可能性があります。推奨されませんが、もし独自に設定する場合は、重複が起こっていないことに注意する必要があります。
The VRRP group ID is assigned by IBM Cloud and should not be changed. When a new gateway group is provisioned behind a Frontend Customer Router (FCR)/Backend Customer Router (BCR) for the first time, it receives a VRRP group of 1. Subsequent gateway group provisions increment this value to prevent conflicts. For example, the next group has group 2, then group 3, and so on. It is then calculated and assigned by the provisioning process. Altering this value risks collision with other active groups, and then master/master contention, which likely causes an outage on both gateway groups.
If you migrate from a previous configuration, it is recommended that you double check your configuration code to make sure the VRRP group ID is not statically assigned.
The VRRP group ID is persisted in the database, so the same group ID value is used during an OS reload or upgrade. Any user modified VRRP group ID is overwritten with the system assigned value during an OS reload. -
vRouter 5600のsync-group番号も、vRouter 5400の時と同様に、IBM Cloudから割り当てられていたものを利用しましょう。すべてのInterfaceが同じsync-groupに属することが推奨されているため、変更する必要がありません。
Interfaces in a VRRP synchronization group (“sync group”) are synchronized such that, if one of the interfaces in the group fails over to backup, all interfaces in the group fail over to backup. For example, if one interface on a master router fails, the whole router fails over to a backup router.
This value is different than the VRRP group, as it defines what interfaces on a device fail over when an interface in that group registers a fault. It is recommended that all interfaces belong to the same sync-group; otherwise, some interfaces are master and have gateway IPs, and others are backup, and traffic does not forward properly anymore. Active/active configurations are not supported.
set interfaces bonding bond0 vif 1449 address 192.168.0.1/24
set interfaces bonding bond0 vif 1449 vrrp vrrp-group 1 advertise-interval 1
set interfaces bonding bond0 vif 1449 vrrp vrrp-group 1 preempt false
set interfaces bonding bond0 vif 1449 vrrp vrrp-group 1 priority 254
set interfaces bonding bond0 vif 1449 vrrp vrrp-group 1 sync-group vgroup1
set interfaces bonding bond0 vif 1449 vrrp vrrp-group 1 virtual-address 10.132.14.145/28
set interfaces bonding bond0 vif 1449 vrrp vrrp-group 1 virtual-address 10.133.101.113/28
set interfaces bonding bond0 vif 1449 vrrp vrrp-group 1 virtual-address 10.132.176.1/26
set interfaces bonding dp0bond0 vif 1449 address 192.168.0.1/24
set interfaces bonding dp0bond0 vif 1449 vrrp vrrp-group 1 advertise-interval 1
set interfaces bonding dp0bond0 vif 1449 vrrp vrrp-group 1 preempt false
set interfaces bonding dp0bond0 vif 1449 vrrp vrrp-group 1 priority 254
set interfaces bonding dp0bond0 vif 1449 vrrp vrrp-group 1 sync-group vgroup1
set interfaces bonding dp0bond0 vif 1449 vrrp vrrp-group 1 virtual-address 10.132.14.145/28
set interfaces bonding dp0bond0 vif 1449 vrrp vrrp-group 1 virtual-address 10.133.101.113/28
set interfaces bonding dp0bond0 vif 1449 vrrp vrrp-group 1 virtual-address 10.132.176.1/26
6. SSHサービス
vRouter 5400ではSSHのポートは1つしか設定できません。しかし、vRouter 5600では複数設定が可能です。もし1つしか設定しないのであれば、明示的に削除する必要があります。
# set service ssh port 22
# set service ssh port 20022
# commit
# show service ssh
 port 20022
# set service ssh port 22
# set service ssh port 20022
# commit
# show service ssh
 ssh {
        port 20022
        port 22
 }
7. Firewall
vRouter 5400ではiptablesベース(カーネルベース)でしたが、vRouter 5600ではユーザーランドで制御するように実装されています。そのため、ルールの設定方法や解釈がvRouter 5400とは大きく変更されています。
VyattaではFirewallは必ず利用する機能なので、ここが一番の難関だと思われます。
7.1 設定方法
vRouter 5400では、set firewallで設定していましたが、vRouter 5600ではset security firewallで設定します。
# set firewall
Possible completions:
   all-ping     Policy for handling of all IPv4 ICMP echo requests
   broadcast-ping
                Policy for handling broadcast IPv4 ICMP echo and timestamp requests
   config-trap  SNMP trap generation on firewall configuration changes
 > group        Firewall group
   ip-src-route Policy for handling IPv4 packets with source route option
+> ipv6-name    IPv6 firewall rule-set name
   ipv6-receive-redirects
                Policy for handling received ICMPv6 redirect messages
   ipv6-src-route
                Policy for handling IPv6 packets with routing extension header
   log-martians Policy for logging IPv4 packets with invalid addresses
+> name         IPv4 firewall rule-set name
   receive-redirects
                Policy for handling received IPv4 ICMP redirect messages
   send-redirects
                Policy for sending IPv4 ICMP redirect messages
   source-validation
                Policy for source validation by reversed path, as specified in RFC3704
 > state-policy Global firewall state-policy
   syn-cookies  Policy for using TCP SYN cookies with IPv4
vyatta@vga02# set security firewall
Possible Completions:
   all-ping            Policy for handling of all IPv4 ICMP echo requests
   broadcast-ping      Policy for handling broadcast IPv4 ICMP echo requests
   config-trap         SNMP trap generation on firewall configuration changes
 > global-state-policy Configure global state parameters for firewall
+> name                Firewall ruleset
 > session-log         Session logging
   syn-cookies         Policy for using TCP SYN cookies with IPv4
   tcp-strict          Enable tcp strict stateful firewall rule
また、vRouter 5400では1つのインターフェースに対して、in/out/localをそれぞれ1つのみfirewallを設定できましたが、vRouter 5600では以下のように複数指定できるようになりました。
# set interfaces bonding bond1 firewall in INTERNET-TO-LOCAL
# set interfaces bonding bond1 firewall in INTERNET
# set interfaces bonding bond1 firewall in SERVICE-ALLOW
# commit
# show interfaces bonding bond1 firewall
 local {
     name SERVICE-ALLOW
 }
# set interfaces bonding dp0bond1 firewall in INTERNET-TO-LOCAL
# set interfaces bonding dp0bond1 firewall in INTERNET
# set interfaces bonding dp0bond1 firewall in SERVICE-ALLOW
# commit
# show interfaces bonding dp0bond1 firewall
 firewall {
        in INTERNET-TO-LOCAL
        in INTERNET
        in SERVICE-ALLOW
 }
7.2 インターフェースベースのルール解釈の順番
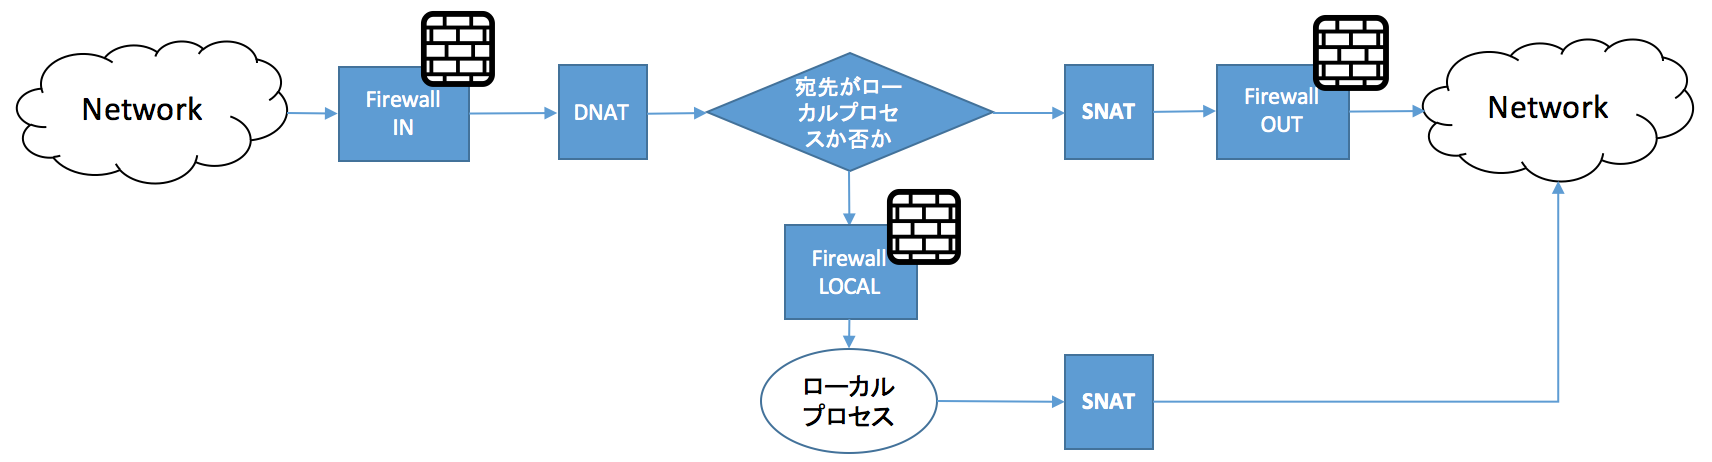
vRouterではインターフェースベースのFirewallとゾーンベースのFirewallがあります。インターフェースベースのFirewallは、vRouter 5400では下図のようにiptableのCHAINと同じく、DNAT -> Firewall(IN/OUT) -> SNATという順にパケットが処理されていました。

一方、vRouter 5600では、以下のようにDNATの前にFirewall(IN)が先に評価されます。Vyatta自身(ローカルプロセス)への宛先パケットが到達するために、INとLOCALの両方を経由しないといけないことに注意して下さい。よって、LOCALにアクセスするためには、vRouter 5400での既存のLOCALの設定をINにも反映させる必要があります。
※上述のとおり、1つのインターフェースに複数の設定を反映させることが可能なので、vRouter 5400でのLOCALで指定していたFirewallを、vRouter 5600ではINで指定し、LOCALは利用しないようにすれば事足りるかもしれません。
7.3 state policyのglobalオプション設定
vRouter 5400ではestablished/relatedというiptablesで利用されていたステータスに対する設定をglobalレベルで指定可能でした。
vRouter 5600では、TCP/UDP/ICMPごとにstatefulにするかどうかを指定します。。
# set firewall state-policy
Possible completions:
 > established  Global firewall policy for packets part of an established connection
 > invalid      Global firewall policy for packets part of an invalid connection
 > related      Global firewall policy for packets part of a related connection

# set firewall state-policy established action accept
# set firewall state-policy related action accept
# set firewall state-policy invalid action drop
# set security firewall global-state-policy
Possible Completions:
   icmp enable icmp state monitoring for firewall
   tcp  enable tcp state monitoring for firewall
   udp  enable udp state monitoring for firewall

# set security firewall global-state-policy tcp
# set security firewall global-state-policy udp
# set security firewall global-state-policy icmp
7.4 stateful firewall
vRouter 5400ではestablished/relatedというiptablesで利用されていたステータスに対する設定を指定可能でした。また、新規セッションの指定に対してはnewというステータスを利用していました。
vRouter 5600では、statefulにするためには単にstate enableを指定します。新規セッションの指定に関しては、TCPに関してはTCP Flagを利用します。
# set firewall name INTERNET-TO-LOCAL default-action drop
# set firewall name INTERNET-TO-LOCAL rule 10 action accept
# set firewall name INTERNET-TO-LOCAL rule 10 state established enable
# set firewall name INTERNET-TO-LOCAL rule 10 state related enable
# set firewall name INTERNET-TO-LOCAL rule 20 action accept
# set firewall name INTERNET-TO-LOCAL rule 20 protocol vrrp
# set firewall name INTERNET-TO-LOCAL rule 30 action accept
# set firewall name INTERNET-TO-LOCAL rule 30 destination port 20022
# set firewall name INTERNET-TO-LOCAL rule 30 protocol tcp
# set firewall name INTERNET-TO-LOCAL rule 30 state new enable
# set interfaces bonding bond1 firewall local name INTERNET-TO-LOCAL
# set security firewall name INTERNET-TO-LOCAL default-action drop
# set security firewall name INTERNET-TO-LOCAL rule 10 action accept
# set security firewall name INTERNET-TO-LOCAL rule 10 state enable
# set security firewall name INTERNET-TO-LOCAL rule 10 protocol tcp
# set security firewall name INTERNET-TO-LOCAL rule 20 action accept
# set security firewall name INTERNET-TO-LOCAL rule 20 protocol vrrp
# set security firewall name INTERNET-TO-LOCAL rule 30 action accept
# set security firewall name INTERNET-TO-LOCAL rule 30 destination port 20022
# set security firewall name INTERNET-TO-LOCAL rule 30 protocol tcp
# set security firewall name INTERNET-TO-LOCAL rule 30 tcp flags SYN,!ACK,!FIN,!RST
# set interfaces bonding dp0bond1 firewall in INTERNET-TO-LOCAL
7.5 portをまとめて書く方法
vRouter 5400ではdestination portをまとめて直接書くことができました(iptablesにおけるmultiportオプションに相当)。
vRouter 5600では、明示的にport-groupを作成する必要があります。
# set firewall name INTERNET-TO-LOCAL rule 30 destination port 80,443,10000-10010
# set resources group port-group HTTPGROUP port 80
# set resources group port-group HTTPGROUP port 443
# set resources group port-group HTTPGROUP port 10000-10010
# set security firewall name INTERNET-TO-LOCAL rule 30 destination port HTTPGROUP
7.6 QOS/Traffic policy
5400ではQOS/Traffic policyをset traffic-policyで設定していました。
5600では、set policy qosを使ったり、firewall rule内で設定できるようになったようです。
# set traffic-policy
Possible completions:
+> drop-tail    Drop tail queue (FIFO) policy
+> fair-queue   Fair queuing policy
+> limiter      Traffic input limiting policy
+> network-emulator
                Network emulator policy
+> priority-queue
                Priority queuing based policy
+> random-detect
                Weighted Random Early Detect policy
+> rate-control Rate limiting policy
+> round-robin  Deficit round robin based policy
+> shaper       Traffic shaping based policy
# set policy qos name xxx shaper
Possible Completions:
   bandwidth      Bandwidth limit
   burst          Burst size in bytes
+> class          Class number
   default        Qos profile for default traffic
   description    Description for this QoS policy
   frame-overhead Framing overhead
   period         Enforcement period (ms)
+> profile        QoS traffic profile
+> traffic-class  Traffic Class


# set security firewall name INTERNET-TO-LOCAL rule 40 police
Possible Completions:
   bandwidth Bandwidth limit
   burst     Burst size in bytes
   ratelimit Ratelimit in packets/second.
 > then      Result for packets over police limit
8. NAT
以前は、NATはset nat xxxで設定していましたが、今後はset service nat xxxで設定します。
# set nat
Possible completions:
 > destination  Destination NAT settings
 > source       Source NAT settings
# set service nat
Possible Completions:
   <Enter>      Execute the current command
 > destination  Destination NAT settings
 > ipv6-to-ipv4 IPv6 to IPv4 NAT settings
 > source       Source NAT settings
9. IPsec VPN
- vRouter 5400では
set vpnで設定していたものが、vRouter 5600ではset security vpnで設定するようになりました。 - IKEv2をサポートするようになりました。
set security vpn ipsec ike-group IKEGROUP1 ike-version 2 - IKEの実行モードとして、Main modeとAggressive modeの2つがありますが、vRouter 5600でもAggressive modeはサポートしないようです。よって、対抗機種ではvRouter 5400の時と同様にAggressive modeは無効にしておく必要があります。
- vRouter 5400ではipsec-interfacesの指定が必要でしたが、vRouter 5600では不要になりました。
- Site-to-Site VPNを利用する際には、prefix指定でトンネルを設定する方法と、VTIインターフェースを設定して別途ルーティングを設定する方法があります。
- **zone-based firewallを利用している際には、prefix指定のトンネルはうまく動かないことがあるようです。**もし、zone-based firewallを利用している際には、VTIを使いましょう。
- prefix指定のVPNトンネル上で流れるトラフィックは、送信元インターフェースが不明のために、zone-based firewallだとdropされる可能性があるとのことです。
# set vpn ipsec
Possible completions:
   auto-update  Set auto-update interval for IPsec daemon.
   disable-uniqreqids
                Option to disable requirement for unique IDs in the Security Database
+> esp-group    Name of Encapsulating Security Payload (ESP) group
+> ike-group    Name of Internet Key Exchange (IKE) group
 > ipsec-interfaces
                Interface to use for VPN [REQUIRED]
 > logging      IPsec logging
 > nat-networks Network Address Translation (NAT) networks
   nat-traversal
                Network Address Translation (NAT) traversal
+> profile      VPN IPSec Profile
 > site-to-site Site to site VPN
# set security vpn ipsec
Possible Completions:
   <Enter>            Execute the current command
   auto-update        Set auto-update interval for IPsec daemon. [Deprecated]
   disable-uniqreqids <No help text available> [Deprecated]
+> esp-group          Name of Encapsulating Security Payload (ESP) group
+> ike-group          Name of Internet Key Exchange (IKE) group
 > logging            IPsec logging
 > nat-networks       Network Address Translation (NAT) networks
   nat-traversal      Network Address Translation (NAT) traversal [Deprecated]
+> profile            VPN IPSec Profile
 > site-to-site       Site to site VPN
10. OpenVPN
OpenVPNについての設定方法は、基本的に変更はないように思われます。
# set interfaces openvpn vtun0
Possible completions:
 > auth         OpenVPN authentication method
 > bridge-group Interface to be added to a bridge group
 > client-bundle
                Generate SSL-VPN Client Bundles
   client-cert-not-required
                Client certificates not required
   description  Description for the interface
   device-type  OpenVPN interface device-type
   disable      Interface to be disabled
   encryption   Data encryption algorithm option
 > firewall     Firewall options
   hash         Hashing algorithm option
 > ip           IPv4 routing parameters
 > ipv6         IPv6 routing parameters
+> local-address
                Local IP address of tunnel
   local-host   Local IP address to accept connections (all if not set)
   local-port   Local port number to accept connections
   mode         OpenVPN mode of operation
+  openvpn-option
                Additional OpenVPN options
 > policy       Policy route options
   protocol     OpenVPN communication protocol
   redirect     Incoming packet redirection destination
   remote-address
                IP address of remote end of tunnel
 > remote-configuration
                Configure openvpn remote configuration
+  remote-host  Remote host to connect to (dynamic if not set)
   remote-port  Remote port number to connect to
 > replace-default-route
                OpenVPN tunnel to be used as the default route
 > server       Server-mode options
   shared-secret-key-file
                File containing the secret key shared with remote end of tunnel
 > tls          Transport Layer Security (TLS) options
 > traffic-policy
                Traffic-policy for interface
 set interfaces openvpn vtun0
Possible Completions:
   <Enter>                  Execute the current command
 > auth                     OpenVPN authentication method
 > client-bundle            Generate SSL-VPN Client Bundles
   client-cert-not-required Client certificates not required
   description              Description for the interface
   device-type              OpenVPN interface device-type
   disable                  Interface to be disabled
   encryption               Data encryption algorithm option
 > firewall                 Firewall options
   hash                     Hashing algorithm option
 > ip                       IPv4 parameters
 > ipv6                     IPv6 parameters
   local-address            Local IP address or network address
   local-host               Local IP address to accept connections (all if not set)
   local-port               Local port number to accept connections
   mode                     OpenVPN mode of operation
+  openvpn-option           Additional OpenVPN options
   protocol                 OpenVPN communication protocol
   remote-address           IP address of remote end of tunnel
 > remote-configuration     Configure openvpn remote configuration
+  remote-host              Remote host to connect to (dynamic if not set)
   remote-port              Remote port number to connect to
 > replace-default-route    OpenVPN tunnel to be used as the default route
 > server                   Server-mode options
   shared-secret-key-file   File containing the secret key shared with remote end of tunnel
 > tls                      Transport Layer Security (TLS) options
11. conntrack module
vRouter 5400では、以下のようにconntrakモジュールを使ってセッションkanr
# set system conntrack expect-table-size xxx
# set system conntrack hash-size xxxx
# set system conntrack table-size xxx
12. rootになる方法/sudoについて
vRouter 5400ではsudo -sでパスワードなしでrootユーザーになれていました。一方、vRouter 5600ではvRouter 5600ではvyattaユーザーでsudoを実行できません。これは、vRouetr5600ではadminの更に上の特権レベルとしてsuperuserというものが作られたからです。vRouter 5400の時と同様にvyattaユーザーでsudoを実行するためには、superuserに変更する必要があります。
# set system login user vyatta level
Possible completions:
   admin        Administrators
   operator     Operators
# set system login user vyatta level
Possible Completions:
   admin
   operator
   superuser
$ sudo ls -l
[sudo] password for vyatta:
Sorry, user vyatta is not allowed to execute '/bin/ls -l' as root on vga02.ibm.com.
# set system login user vyatta level superuser
# commit

(sshのログアウト・ログインを行なってセッションを張り直す)
$ show login
login     : vyatta
level     : Superuser
user      : vyatta
groups    :  users adm systemd-journal vyattacfg vyattaadm wireshark
$ sudo ls -l
[sudo] password for vyatta:
total 4
-rw-r----- 1 vyatta users 402 Jul 21 17:09 id_rsa.pub
ただし、sudo実行時にパスワード入力が求められてしまいます。パスワード入力なしでsudoを実行するためには、/etc/sudoersを編集する必要があります。システム設定を直接編集することはvRouterとしてはサポート範囲外ですが、どうしてもパスワード入力なしでsudoを実行したい場合は、以下の手順に従えばできました(繰り返しですが、vRouterとしてサポート対象外ですので、この変更作業によって如何なる不具合が発生しても当方は保証はできません!)。この場合、再起動では設定は消えないようですが、バージョンアップなどを行なった場合はこの情報は消失してしまうので再構成が必要になるようなので注意して下さい。
$ su -
Password:

# visudo
(下記を追記して保存)
vyatta  ALL=(ALL:ALL) NOPASSWD:ALL

# cat /etc/sudoers|grep vyatta
vyatta  ALL=(ALL:ALL) NOPASSWD:ALL
参考:バグ情報
- Version 5.2R5S3には、一度
# set system login user vyatta level superuserを設定した後に再度# set system login user vyatta level superuserでadminに戻しても、$ show loginコマンドによる出力結果がSuperuserのままになってしまうという表示上のバグがあるようです。これは、"Bug ID: VRVDR-37958"としてカウントされ、vRouter 5600 17.2以降 (Yountville)で修正予定だと聞いています。
13. SSL/TLSのバージョン
vRouter 5400ではTLS1.0のみをサポートしており、SSLv3, TLS1.1, TLS1.2は未サポートでした。
vRouter 5600ではTLS1.0, TLS1.1, TLS1.2をサポートしており、SSLv3はサポートしていません。