AWSサーバレスアーキテクチャで
不正なパラメータを含んでいるリクエスト(XSS、SQLインジェクションなど)のチェックをかけたいという要望があったので
WAF(Web Application Firewall)をかけて呼び出ししてみます。
WAFをかけるためには必然的にCloudFrontを利用することになります。
構図としては下記のような構図になります。
(この図では省略していますが、Cognito User Poolを導入することでさらにユーザ認証を導入することも可能です)
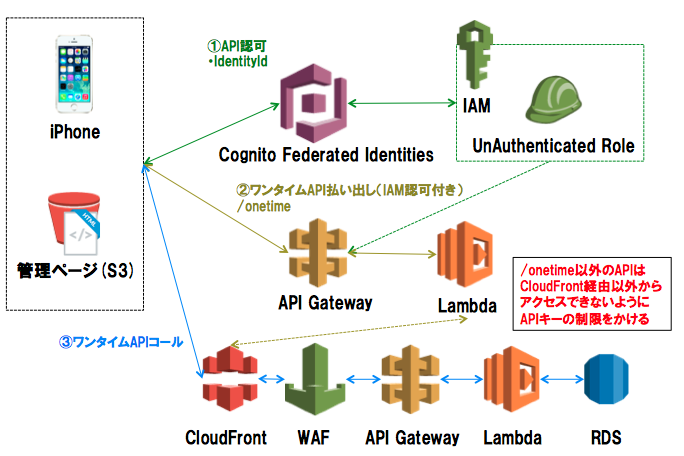
また、CloudFrontは署名付きURL(ワンタイムURL)を利用する以外に外部から直接アクセスを防ぐ方法がないため、
認可API経由でワンタイムURLを払い出しています。
さらにCloudFront経由でAPI Gateway呼び出しをするため、
かなり複雑な構成、設定になります。
ワンタイム払い出し
Cognito+IAMで/onetime APIにAPI認可をかけます。
CognitoでのAPI認可に関しては下記を参考にしてください。
世界に先駆けてAWSサーバレスアーキテクチャでユーザ認証とAPI認可の実装をしてみた
IAMロールに次のように/onetime APIの認可をかけます。
{
    "Version": "2012-10-17",
    "Statement": [
        {
            "Effect": "Allow",
            "Action": [
                "execute-api:Invoke",
                "cognito-sync:*",
                "cognito-identity:*"
            ],
            "Resource": [
                "arn:aws:execute-api:us-east-1:(アカウント情報)/*/POST/onetime"
            ]
        }
    ]
}
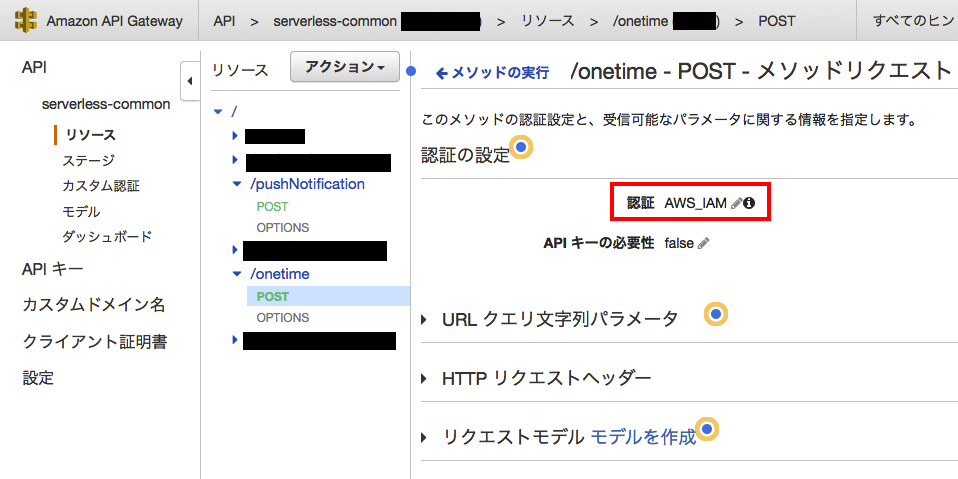
API Gatewayの設定
/onetime APIにはIAM認証をかけます。
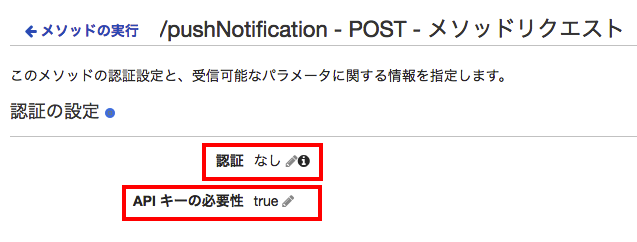
それ以外のAPIに関してはAPIキーでのアクセス制限をかけます。
CloudFront経由からの呼び出しだと署名情報が壊れてしまうのでIAMでの認証ができませんでした
(回避策ご存知の方いれば教えてください)
APIキーの払い出し
APIキー項目よりAPIキーを作成します。
作成後、APIのステージに紐付けをします。
APIキーはこの後、CloudFront側で設定します。
APIキーはAPI呼び出しに必要な認証情報なので外部に知られないようにしてください
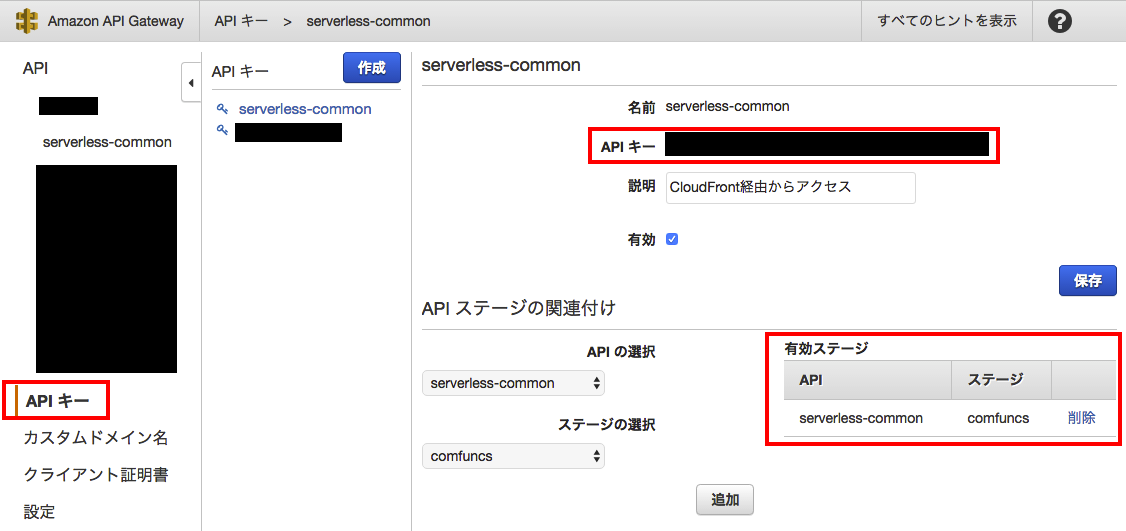
CloudFront側から呼び出すステージのアドレスを控えておきます。
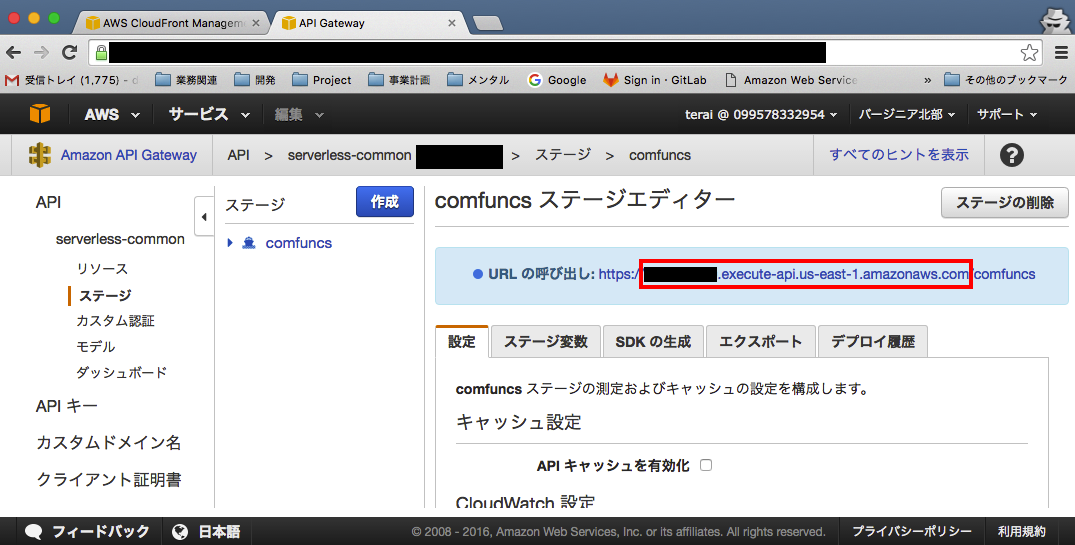
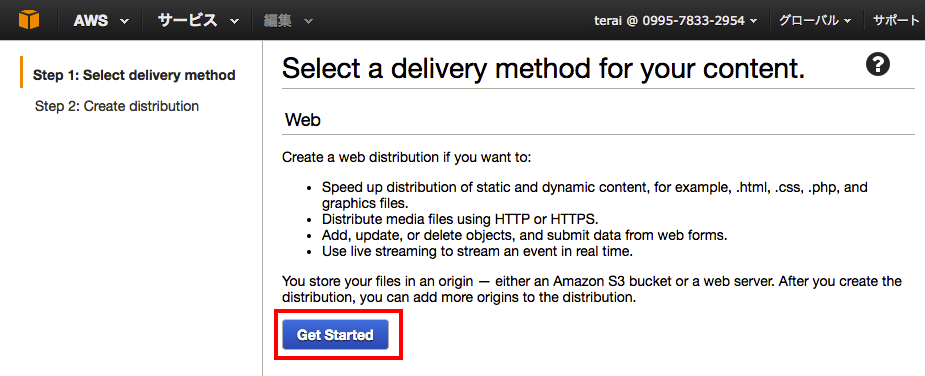
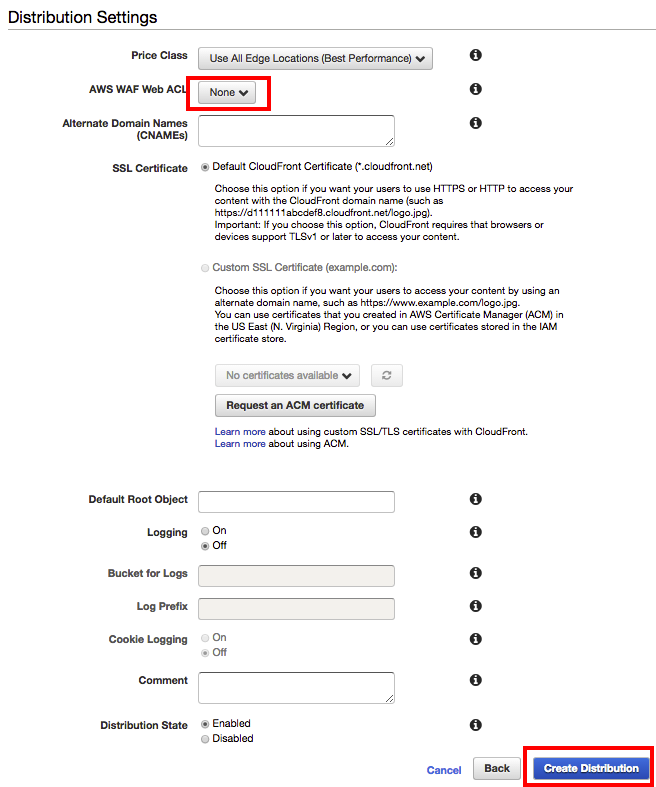
CloudFrontの設定
ここが一番苦労しました。(設定項目が多すぎる・・・)
WebのDistributionを作成します。
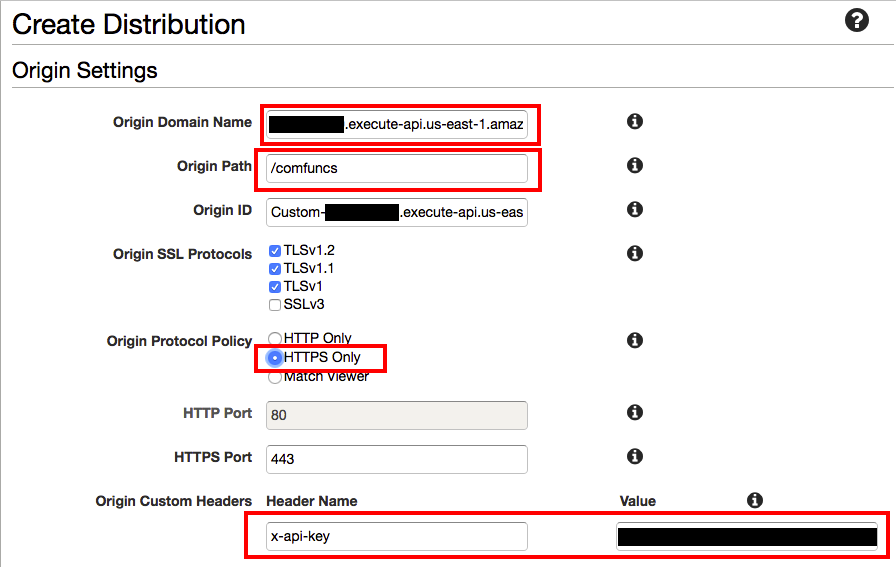
Origin Domain Nameには先ほど控えたAPI Gatewayのアドレスを指定します。(https除外、ステージ名の前まで)
Origin Pathにはステージのパスを設定します。
Origin Protocol PolicyはCloudFront→API Gatewayはhttps経由なのでhttps Onlyにします。
Origin Custom Headersはx-api-keyヘッダーを付与し、先ほど取得したAPIキーを設定します。
Viewer Protocol PolicyはCloudFrontへのアクセス時のプロトコルですHttps Onlyにします。
Allower HTTP Methodsは通信を許可するリクエストメソッドです。
Forward HeaderをWhitelistにし、Originを追加します。これはCloudFront経由のアクセスでもCORSを許可するためです。
(ブラウザからのリクエスト時はCloudFront経由でAPI GatewayのOPTIONSメソッドにアクセスします。)
Object CachingはCustomizeにし、
Minimum TTL、Maximum TTL、Default TTLを1にし、キャッシュを無効にします。
(キャッシュがあるとセッションなどの挙動がおかしくなるため)
Forward CookiesはAllにし、クッキー情報をロストしないようにします。
Forward Query StringsもYesにし、リクエストパラメータをロストしないようにします。
Restrict Viewer AccessをYesにし、署名付きのURL以外CloudFrontに直接アクセスできないようにします。
(署名URLは/onetime APIにて払い出しします。)
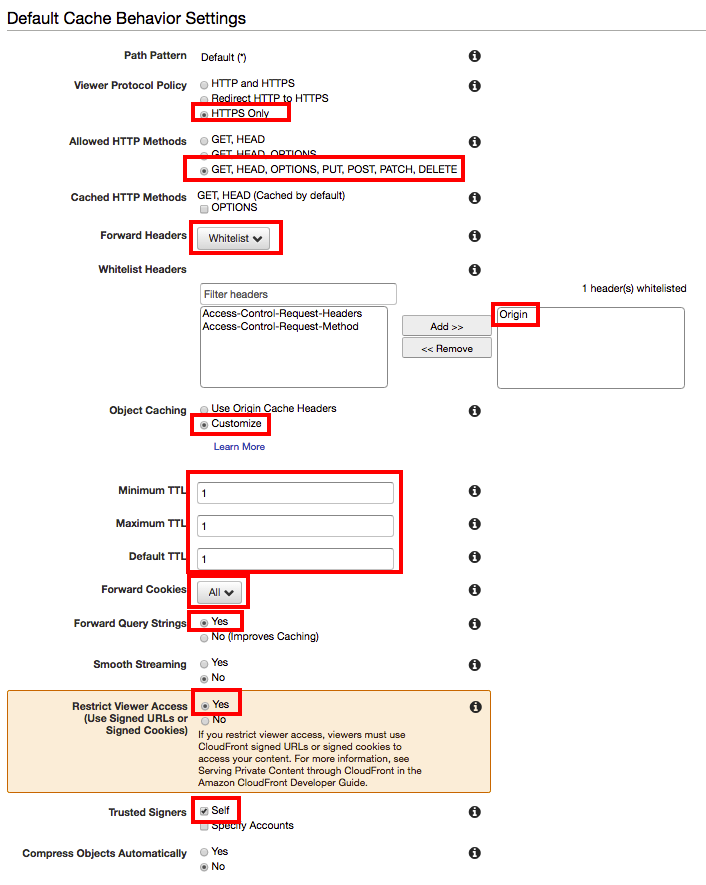
AWS WAF Domain Namesは後でWAF側から設定します。まずはNoneでCreate Distributionします。
WAFの設定
フィルターのかけ方は色々あるので下記参考にしてください
「AWS WAF」を導入してみた。- IP addresses編
「AWS WAF」を導入してみた。- SQL injection編
「AWS WAF」を導入してみた。- String matching編
署名付きURLの払い出しAPI実装
参考にさせてもらいました
CloudFront+S3で署名付きURLでプライベートコンテンツを配信する
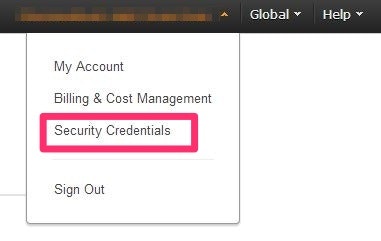
ルートアカウントの管理画面右上から「Security Credential」を選択します。
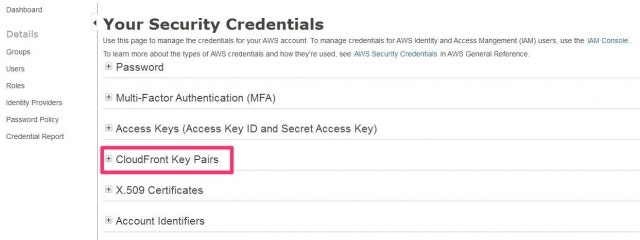
[Your Security Credentials]画面が表示されますので、[CloudFront Key Pairs]を選択します。
プライベートキーをダウンロードします。
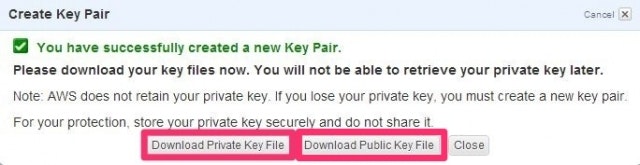
アクセスキーを控えます。

/onetime APIのLambdaは次のようにCloudFrontの署名付きURLを払い出しします。
aws-cloudfront-signモジュールを使っています。
'use strict';

var cf = require('aws-cloudfront-sign');
var options = {
    keypairId: (アクセスキー),
    privateKeyString: (プライベートキー)
};


module.exports.handler = function (event, context, cb) {


    if(event.param === void 0){
        // パラメータなしはクーロンで呼ばれた場合(常にスタンバイ状態にする)
        return cb(null, {
            "cron": "stanby call"
        });
    }

    var url = event.param.url;
    var signedUrl = cf.getSignedUrl(url, options);
    console.log('Signed URL: ' + signedUrl);

    return cb(null, {
        url: signedUrl
    });
};
クライアント側サンプルコード(Javascript、iOS、Android)
下記にアップロードしました。
https://github.com/teradonburi/CognitoCloudFrontWafAPIGateway
/onetime APIを経由しているだけで前回とあまりかわりません。
違う点だけピックアップしていきます。
Javascript
お使いの環境のIDを設定してください
 ///////////////// Config /////////////////////////
 var identityPoolId = 'us-east-1:<indentity-pool-id>';
 var userPoolId = 'us-east-1_<user-pool-id>';
 var clientId = '<user-pool-crient-id>';
 var apiGateway = 'https://<stage-id>.execute-api.us-east-1.amazonaws.com/<stage>';
 var cloudFront = 'https://<cloudfront-id>.cloudfront.net';
 var api = "<api-path>";
 //////////////////////////////////////////////////
まず/onetime APIでCloudfrontのワンタイムAPIを払い出します。
払い出したワンタイムAPIをパラメータをつけてリクエストします。
API Gateway SDKのapigClient.jsは呼び出しURLを変更できるように改良してあります。
 function callAPIGateway(api, token) {
            var apigClient = apigClientFactory.newClient({
                endpoint: apiGateway,
                accessKey: token.AccessKeyId,
                secretKey: token.SecretKey,
                sessionToken: token.SessionToken,
                region: 'us-east-1' // OPTIONAL: The region where the API is deployed, by default this parameter is set to us-east-1
            });

            var param = {};

            var body = {
                param: {
                    url: cloudFront + api
                }
            };

            apigClient.doPost('/onetime', param, body)
                .then(function (result) {
                    console.log("result:", result);


                    var cloudFrontClient = apigClientFactory.newClient({
                        endpoint: cloudFront,
                        region: 'us-east-1' // OPTIONAL: The region where the API is deployed, by default this parameter is set to us-east-1
                    });

                    var param = {};

                    // JSON送信データ
                    var body = {

                    };

                    return cloudFrontClient.doPost(api + '?' + result.data.url.split('?')[1], param, body);

                })
                .then(function (result) {
                    console.log("result:", result);
                })
                .catch(function (err) {
                    console.log("err:", err);
                });
        }
iOS
お使いの環境のIDを設定してください
/////////////////// Config ////////////////////////////////

// Cognito User Pool
let ClientId = "<user-pool-client-id>" // Cognito User Pool Client Id
let ClientSecret = "<user-pool-secret>" // Cognito User Pool Client Secret
let PoolId = "us-east-1_<user-pool-id>" // Cognito User Pool Id
// Congnito Identity Pool
let IdentityId = "us-east-1:<identity-pool-id>" // Cognito Identity Pool Id
// API Gateway
let EndPoint = "https://<apigateway-id>.execute-api.us-east-1.amazonaws.com/<stage>"
let CloudFront = "https://<cloudfront-id>.cloudfront.net"
let api = "<api path>"
///////////////////////////////////////////////////////////
認証付きで
API Gatewayでの/onetime API呼び出し
およびCloudFront用にクライアントをそれぞれ作成します。
// Cognito identityPoolIdによるAPI認可
let configuration = AWSServiceConfiguration(region: .USEast1, credentialsProvider: credentialsProvider)
ServerlessClient.registerClientWithConfiguration(configuration,forKey: "Auth",endpoint:self.EndPoint)
ServerlessClient.registerClientWithConfiguration(configuration,forKey: "CloudFront",endpoint:self.CloudFront)

self.callAPI(ServerlessClient(forKey: "CloudFront"),client: ServerlessClient(forKey: "Auth"))
/onetime APIを呼び出した後、
CloudfrontのURLにエンドポイントを設定したクライアントを呼び出します。
func callAPI(onetime:ServerlessClient,client:ServerlessClient){

        let path = CloudFront + self.api
        client.onetimeUrl(path).continueWithBlock { (task: AWSTask!) -> AnyObject! in

            var url:String
            ///////////////////////API認可されたAPIの呼び出し///////////////////////////
            if (task.error != nil) {
                print(task.error)
                return nil
            } else {
                print(task.result)
                url = (task.result as! NSDictionary)["url"] as! String
            }

            // JSON送信データ
            let param = [
                "": ""
            ]

            let queryParam = ServerlessClient.dictionaryFromQueryString(url)


            onetime.Post(self.api,param: param,queryParam:queryParam).continueWithBlock { (task: AWSTask!) -> AnyObject! in

                if (task.error != nil) {
                    print(task.error)

                } else {
                    print(task.result)

                }
                return nil
            }

            return nil
        }

}
Android
認証付きで
API Gatewayでの/onetime API呼び出し
およびCloudFront用にクライアントをそれぞれ作成します。
Cloudfront経由での呼び出しはAPI Gateway SDKが対応していないため、okhttpを利用して直接リクエストしてます。
 //////////////////////
 // Config Param
 //////////////////////
    private static final String userPoolId = "us-east-1_<userpool-id>";
    private static final String clientId = "<userpool-client-id>";
    private static final String clientSecret = "<userpool-client-secret>";
    private static final String identityPoolId = "us-east-1:<identity-pool-id>";
    private static final String EndPoint = "https://<apigateway-id>.execute-api.us-east-1.amazonaws.com/<stage>";
    private static final String CloudFront = "https://<cloudfront-id>.cloudfront.net";
    private static final String api = "<api path>";
build.gradleにて
AWS SDKおよびokhttpをインストールします。
dependencies {
    compile fileTree(dir: 'libs', include: ['*.jar'])
    testCompile 'junit:junit:4.12'
    compile 'com.android.support:appcompat-v7:23.3.0'
    compile 'com.amazonaws:aws-android-sdk-core:2.2.17+'
    compile 'com.amazonaws:aws-android-sdk-cognito:2.2.17+'
    compile 'com.amazonaws:aws-android-sdk-cognitoidentityprovider:2.2.17+'
    compile 'com.amazonaws:aws-android-sdk-apigateway-core:2.2.17+'
    compile 'com.squareup.okhttp3:okhttp:3.3.1'
}
リクエストのパラメータを入れ子にするためには
インナークラスにしてgsonにてjson化します。
 ////////////////////////////////////////////

 class RequestData {

    public class Param {
            public class Data{
                String name;
                String type;
            }

            Data data = new Data();
    }

    Param param = new Param();
}

class ResponseData {
        class Data{
            String app_name;
            String app_type;
        }

        Data data;
        Integer status_cd;
}


private void callAPI(final CognitoCredentialsProvider credentialsProvider){

        new AsyncTask<Void, Void, Void>() {
            @Override
            protected Void doInBackground(Void... params) {
                ApiClientFactory factory = new ApiClientFactory();

                if(credentialsProvider != null){
                    factory.credentialsProvider(credentialsProvider);
                }

                // Build
                final OneTimeClient client = factory.build(OneTimeClient.class);


                OneTimeRequestData onetimeRequest = new OneTimeRequestData();
                onetimeRequest.param.url = CloudFront + api;
                OneTimeResponseData onetimeUrl = client.Post(onetimeRequest);


                Gson gson = new Gson();
                RequestData apiRequest = new RequestData();
                apiRequest.param.data.name = "user";
                apiRequest.param.data.type = "primium";


                String url = onetimeUrl.url;
                String requestJSON = gson.toJson(apiRequest);
                try {
                    Request request =  new Request.Builder()
                            .url(url)
                            .post(RequestBody.create(MediaType.parse("application/json; charset=utf-8"), requestJSON))
                            .build();

                    Response response = new OkHttpClient().newCall(request).execute();
                    if (response.isSuccessful()){
                        ResponseData res = gson.fromJson(response.body().string(),ResponseData.class);
                        Log.i("200", res.toString());
                    }
                }catch(IOException e){
                    Log.e("500", "error:" + e.getMessage(), e);
                }

                return null;
            }


        }.execute();

}