概要
Terraform で Ruboty-Gacha アプリケーション を Heroku に構築します
前提
Ruboty-Gacha については、下記記事を参照
Terraform について
Terraform については下記記事を参照
インストール
Terraform は Golang 製の CLI ツールが提供されており、
バイナリをダウンロードしてパスを通すだけで利用できます。
今回は Windows (64 bit )版を利用します。
下記ページから自分の環境にあったバイナリの圧縮ファイルを取得します
ダウンロードした圧縮ファイルを解凍
ファイルを解凍すると、多数の exe ファイルを確認できます
% ls
terraform.exe                        terraform-provider-google.exe
terraform_0.5.1_windows_amd64.zip    terraform-provider-heroku.exe
terraform-provider-atlas.exe         terraform-provider-mailgun.exe
terraform-provider-aws.exe           terraform-provider-null.exe
terraform-provider-cloudflare.exe    terraform-provider-openstack.exe
terraform-provider-cloudstack.exe    terraform-provider-template.exe
terraform-provider-consul.exe        terraform-provider-terraform.exe
terraform-provider-digitalocean.exe  terraform-provisioner-chef.exe
terraform-provider-dme.exe           terraform-provisioner-file.exe
terraform-provider-dnsimple.exe      terraform-provisioner-local-exec.exe
terraform-provider-docker.exe        terraform-provisioner-remote-exec.exe
各 exe をパスが通った場所に移動
よしなに移動してください
疎通確認をします
% terraform help
usage: terraform [--version] [--help] <command> [<args>]

Available commands are:
    apply      Builds or changes infrastructure
    destroy    Destroy Terraform-managed infrastructure
    get        Download and install modules for the configuration
    graph      Create a visual graph of Terraform resources
    init       Initializes Terraform configuration from a module
    output     Read an output from a state file
    plan       Generate and show an execution plan
    push       Upload this Terraform module to Atlas to run
    refresh    Update local state file against real resources
    remote     Configure remote state storage
    show       Inspect Terraform state or plan
    taint      Manually mark a resource for recreation
    version    Prints the Terraform version

% terraform version
Terraform v0.5.2
サンプル
heroku.tf ファイルを作成
*.tf ファイルに設定を記述します。
*.tf の 細かな設定方法については、 Configuration - Docs - Terraform を参照。
variable "heroku_email" {}
variable "heroku_api_key" {}

provider "heroku" {
  email = "${var.heroku_email}"
  api_key = "${var.heroku_api_key}"
}

resource "heroku_app" "web" {
  name = "ruboty-gacha"
  region = "us"
  stack = "cedar-14"
  config_vars {
    BUILDPACK_URL="https://github.com/tbpgr/ruboty-gacha.git"
  }
}
DRY Run
terraform plan で DRY Run を行います。
% terraform plan \
    -var heroku_email=$HEROKU_EMAIL \
    -var heroku_api_key=$HEROKU_API_KEY
Refreshing Terraform state prior to plan...


The Terraform execution plan has been generated and is shown below.
Resources are shown in alphabetical order for quick scanning. Green resources
will be created (or destroyed and then created if an existing resource
exists), yellow resources are being changed in-place, and red resources
will be destroyed.

Note: You didn't specify an "-out" parameter to save this plan, so when
"apply" is called, Terraform can't guarantee this is what will execute.

+ heroku_app.web
    all_config_vars.#:           "" => "<computed>"
    config_vars.#:               "" => "1"
    config_vars.0.#:             "" => "1"
    config_vars.0.BUILDPACK_URL: "" => "https://github.com/tbpgr/ruboty-gacha.git"
    git_url:                     "" => "<computed>"
    heroku_hostname:             "" => "<computed>"
    name:                        "" => "ruboty-gacha"
    region:                      "" => "us"
    stack:                       "" => "cedar-14"
    web_url:                     "" => "<computed>"
セットアップ
terraform apply でセットアップを実行します。
% terraform apply \
    -var heroku_email=$HEROKU_EMAIL \
    -var heroku_api_key=$HEROKU_API_KEY
heroku_app.web
    all_config_vars.#: "" => "<computed>"
    git_url:           "" => "<computed>"
    heroku_hostname:   "" => "<computed>"
    name:              "" => "ruboty-gacha"
    region:            "" => "us"
    stack:             "" => "cedar-14"
    web_url:           "" => "<computed>"

heroku_app.web: Creation complete

Apply complete! Resources: 1 added, 0 changed, 0 destroyed.

The state of your infrastructure has been saved to the path
below. This state is required to modify and destroy your
infrastructure, so keep it safe. To inspect the complete state
use the `terraform show` command.

State path: terraform.tfstate
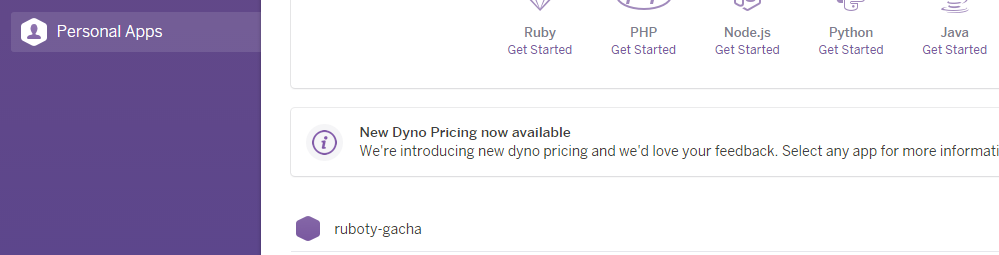
Heroku の Dashboard からアプリケーションが追加されたことを確認
Git の remote に heroku を追加
% git remote -v
origin  https://github.com/tbpgr/ruboty-gacha (fetch)
origin  https://github.com/tbpgr/ruboty-gacha (push)
% git remote add heroku git@heroku.com:ruboty-gacha.git
% git remote -v
heroku  git@heroku.com:ruboty-gacha.git (fetch)
heroku  git@heroku.com:ruboty-gacha.git (push)
origin  https://github.com/tbpgr/ruboty-gacha (fetch)
origin  https://github.com/tbpgr/ruboty-gacha (push)
Heroku に Push
$ git push heroku master
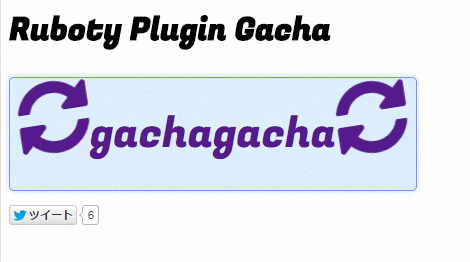
デプロイ結果
Web で確認
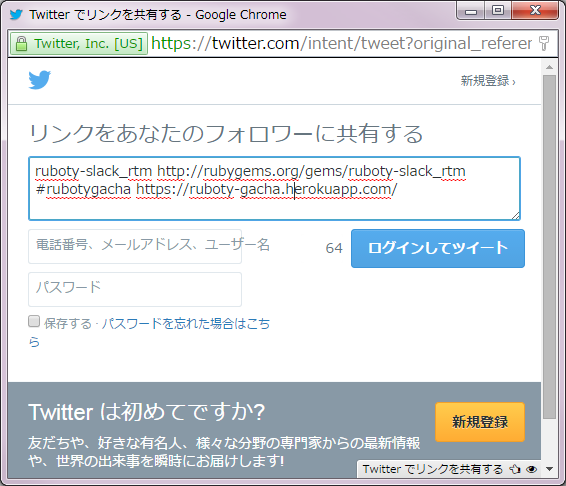
動的に生成されたツイート内容を確認
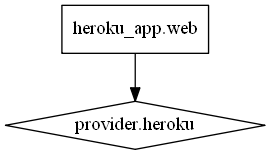
グラフ出力
terraform graph コマンドで dot ファイルを生成
% terraform graph > graph.dot
% cat graph.dot
digraph {
        compound = "true"
        newrank = "true"
        subgraph "root" {
                "[root] heroku_app.web" [label = "heroku_app.web", shape = "box"]
                "[root] provider.heroku" [label = "provider.heroku", shape = "diamond"]
                "[root] heroku_app.web" -> "[root] provider.heroku"
        }
}
dot コマンドで png ファイルを生成
graphviz の dot コマンドで dot ファイルから画像を生成します。
% dot -Tpng -o ruboty-gacha_graph.png graph.dot
出力画像を確認