OSSでmBaaSを構築できるParse Serverをいつも使っているさくらのVPSに構築し、
Android端末にプッシュ通知をしてみたいと思います。
※今回は動かすことを目的としているので、必要最低限の設定操作のみ行います。
Parse Serverとmongodbの構築
今回は、さくらのVPSにParse Serverとmongodbを構築します。
Parse Server
# yum install epel-release -y
# yum install gcc gcc-c++ git -y
# yum install nodejs npm --enablerepo=epel -y
# git clone git://github.com/creationix/nvm.git ~/.nvm
~/.bash_profileに、以下3行を追加します。
# vi ~/.bash_profile
if [[ -s ~/.nvm/nvm.sh ]];
 then source ~/.nvm/nvm.sh
fi
# source ~/.nvm/nvm.sh
# nvm install v4.3.0
# nvm alias default v4.3.0
※次のコマンドを実行すると、Parse Serverのセットアップが始まりますが
# sh <(curl -fsSL https://raw.githubusercontent.com/parseplatform/parse-server/master/bootstrap.sh)
このような、エラーが途中発生するため
../node_modules/nan/nan.h:43:3: error: #error This version of node/NAN/v8 requires a C++11 compiler
gcc、g++のバージョンアップをします。(バージョンアップをしなくとも、Parse Serverは動作しますが念のため)
※バージョンアップ前
# gcc -v
Using built-in specs.
Target: x86_64-redhat-linux
コンフィグオプション: ../configure --prefix=/usr --mandir=/usr/share/man --infodir=/usr/share/info --with-bugurl=http://bugzilla.redhat.com/bugzilla --enable-bootstrap --enable-shared --enable-threads=posix --enable-checking=release --with-system-zlib --enable-__cxa_atexit --disable-libunwind-exceptions --enable-gnu-unique-object --enable-languages=c,c++,objc,obj-c++,java,fortran,ada --enable-java-awt=gtk --disable-dssi --with-java-home=/usr/lib/jvm/java-1.5.0-gcj-1.5.0.0/jre --enable-libgcj-multifile --enable-java-maintainer-mode --with-ecj-jar=/usr/share/java/eclipse-ecj.jar --disable-libjava-multilib --with-ppl --with-cloog --with-tune=generic --with-arch_32=i686 --build=x86_64-redhat-linux
スレッドモデル: posix
gcc version 4.4.7 20120313 (Red Hat 4.4.7-17) (GCC)

# g++ -v
Using built-in specs.
Target: x86_64-redhat-linux
コンフィグオプション: ../configure --prefix=/usr --mandir=/usr/share/man --infodir=/usr/share/info --with-bugurl=http://bugzilla.redhat.com/bugzilla --enable-bootstrap --enable-shared --enable-threads=posix --enable-checking=release --with-system-zlib --enable-__cxa_atexit --disable-libunwind-exceptions --enable-gnu-unique-object --enable-languages=c,c++,objc,obj-c++,java,fortran,ada --enable-java-awt=gtk --disable-dssi --with-java-home=/usr/lib/jvm/java-1.5.0-gcj-1.5.0.0/jre --enable-libgcj-multifile --enable-java-maintainer-mode --with-ecj-jar=/usr/share/java/eclipse-ecj.jar --disable-libjava-multilib --with-ppl --with-cloog --with-tune=generic --with-arch_32=i686 --build=x86_64-redhat-linux
スレッドモデル: posix
gcc version 4.4.7 20120313 (Red Hat 4.4.7-17) (GCC)
※バージョンアップ後
# gcc -v
Using built-in specs.
COLLECT_GCC=gcc
COLLECT_LTO_WRAPPER=/opt/rh/devtoolset-2/root/usr/libexec/gcc/x86_64-redhat-linux/4.8.2/lto-wrapper
Target: x86_64-redhat-linux
Configured with: ../configure --prefix=/opt/rh/devtoolset-2/root/usr --mandir=/opt/rh/devtoolset-2/root/usr/share/man --infodir=/opt/rh/devtoolset-2/root/usr/share/info --with-bugurl=http://bugzilla.redhat.com/bugzilla --enable-bootstrap --enable-shared --enable-threads=posix --enable-checking=release --with-system-zlib --enable-__cxa_atexit --disable-libunwind-exceptions --enable-gnu-unique-object --enable-linker-build-id --enable-languages=c,c++,fortran,lto --enable-plugin --with-linker-hash-style=gnu --enable-initfini-array --disable-libgcj --with-isl=/dev/shm/home/centos/rpm/BUILD/gcc-4.8.2-20140120/obj-x86_64-redhat-linux/isl-install --with-cloog=/dev/shm/home/centos/rpm/BUILD/gcc-4.8.2-20140120/obj-x86_64-redhat-linux/cloog-install --with-mpc=/dev/shm/home/centos/rpm/BUILD/gcc-4.8.2-20140120/obj-x86_64-redhat-linux/mpc-install --with-tune=generic --with-arch_32=i686 --build=x86_64-redhat-linux
Thread model: posix
gcc version 4.8.2 20140120 (Red Hat 4.8.2-15) (GCC)

# g++ -v
Using built-in specs.
COLLECT_GCC=g++
COLLECT_LTO_WRAPPER=/opt/rh/devtoolset-2/root/usr/libexec/gcc/x86_64-redhat-linux/4.8.2/lto-wrapper
Target: x86_64-redhat-linux
Configured with: ../configure --prefix=/opt/rh/devtoolset-2/root/usr --mandir=/opt/rh/devtoolset-2/root/usr/share/man --infodir=/opt/rh/devtoolset-2/root/usr/share/info --with-bugurl=http://bugzilla.redhat.com/bugzilla --enable-bootstrap --enable-shared --enable-threads=posix --enable-checking=release --with-system-zlib --enable-__cxa_atexit --disable-libunwind-exceptions --enable-gnu-unique-object --enable-linker-build-id --enable-languages=c,c++,fortran,lto --enable-plugin --with-linker-hash-style=gnu --enable-initfini-array --disable-libgcj --with-isl=/dev/shm/home/centos/rpm/BUILD/gcc-4.8.2-20140120/obj-x86_64-redhat-linux/isl-install --with-cloog=/dev/shm/home/centos/rpm/BUILD/gcc-4.8.2-20140120/obj-x86_64-redhat-linux/cloog-install --with-mpc=/dev/shm/home/centos/rpm/BUILD/gcc-4.8.2-20140120/obj-x86_64-redhat-linux/mpc-install --with-tune=generic --with-arch_32=i686 --build=x86_64-redhat-linux
Thread model: posix
gcc version 4.8.2 20140120 (Red Hat 4.8.2-15) (GCC)
giwaさんとzoepontaさんの記事を参考にさせていただきました。
http://qiita.com/giwa/items/28c754d8fc2936c0f6d2
http://qiita.com/zoeponta/items/a2e109304729ffa23d81
# sh <(curl -fsSL https://raw.githubusercontent.com/parseplatform/parse-server/master/bootstrap.sh)

             `.-://////:-..`
         `:/oooooooooooooooo+:.`
      `:+oooooooooooooooooooooo+/`
     :+ooooooooooooooooooooooooooo/.
   .+oooooooooooooo/:.....-:+ooooooo-
  .+ooooooooooooo/` .:///:-` -+oooooo:
 `+ooooooooooooo: `/ooooooo+- `ooooooo-
 :oooooooooooooo  :ooooooooo+` /oooooo+
 +ooooooooooooo/  +ooooooooo+  /ooooooo.
 oooooooooooooo+  ooooooooo`  .oooooooo.
 +ooooooooooo+/: `ooooooo`  .:ooooooooo.
 :ooooooo+.`````````````  /+oooooooooo+
 `+oooooo- `ooo+ /oooooooooooooooooooo-
  .+ooooo/  :/:` -ooooooooooooooooooo:
   .+ooooo+:-..-/ooooooooooooooooooo-
     :+ooooooooooooooooooooooooooo/.
      `:+oooooooooooooooooooooo+/`
         `:/oooooooooooooooo+:.`
             `.-://////:-..`
              parse-server

Enter an installation directory
(/root): <エンターを押下>
This will setup parse-server in /root
Do you want to continue? (Y/n): <Yを入力>
\033[0;32m\xE2\x9C\x93\033[0m node: v4.3.0
\033[0;32m\xE2\x9C\x93\033[0m npm: 2.14.12
Setting up parse-server in /root\n{CHECK} /root exists
Enter your Application Name: <SampleApplicationと入力>
Enter your Application Id (leave empty to generate): <エンターを押下>
****************************************
Enter your Master Key (leave empty to generate): <エンターを押下>
****************************************
Enter your mongodbURI (mongodb://127.0.0.1:27017/parse): <エンターを押下>

...インストールのログが流れます。

Test your setup with:\n\ncurl -X POST -H 'X-Parse-Application-Id: ****************************************' \ -H 'Content-Type: application/json' \ -d '{"foo":"bar"}' http://localhost:1337/parse/classes/TestObject\n
生成される、 Application Id と Master Key は使用するのでメモしてください。
mongodb
# npm install -g mongodb-runner
# mongodb-runner start
ParseServerを起動
# npm start
動作確認
# curl -X POST -H 'X-Parse-Application-Id: <Application Id>' \
             -H 'Content-Type: application/json' \
             -d '{"foo":"bar"}' http://localhost:1337/parse/classes/TestObject
 {"objectId":"yarJrnz15B","createdAt":"2016-12-07T02:21:52.563Z"}
{"objectId":"ランダム値","createdAt":"作成日時"} のレスポンスがあれば正常に起動しています。
FCMの設定
FireBaseConsole上から、Notificationsの設定を行い必要な情報を取得します。(詳しい手順は省略します)
パッケージ名が必要になるので、事前に実装するアプリケーションをCreate New Projectしておいてください。
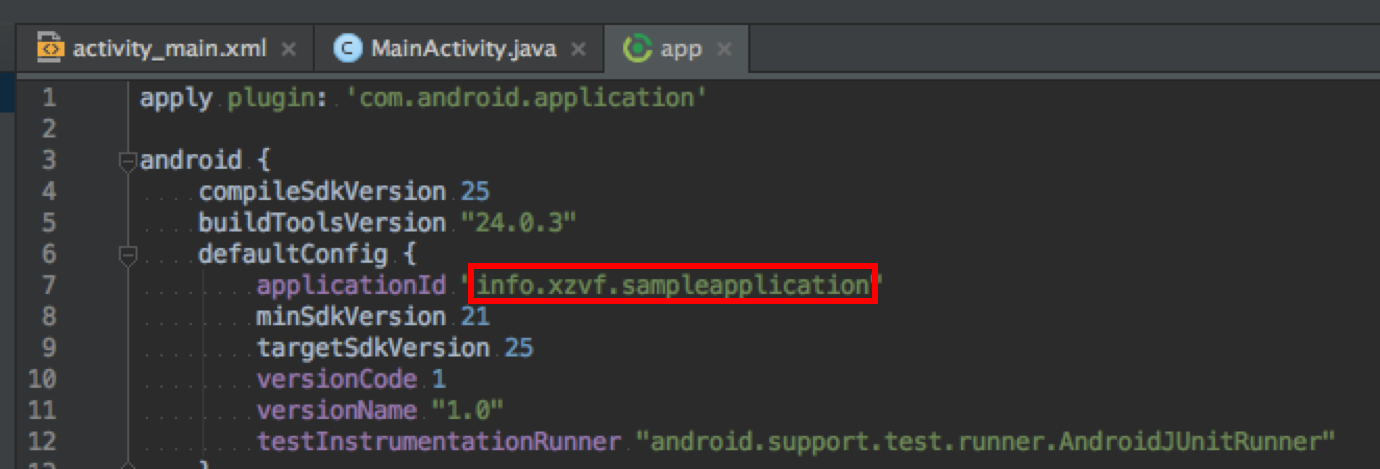
※アプリレベルのbuild.grableのapplicationIdを入力してください。
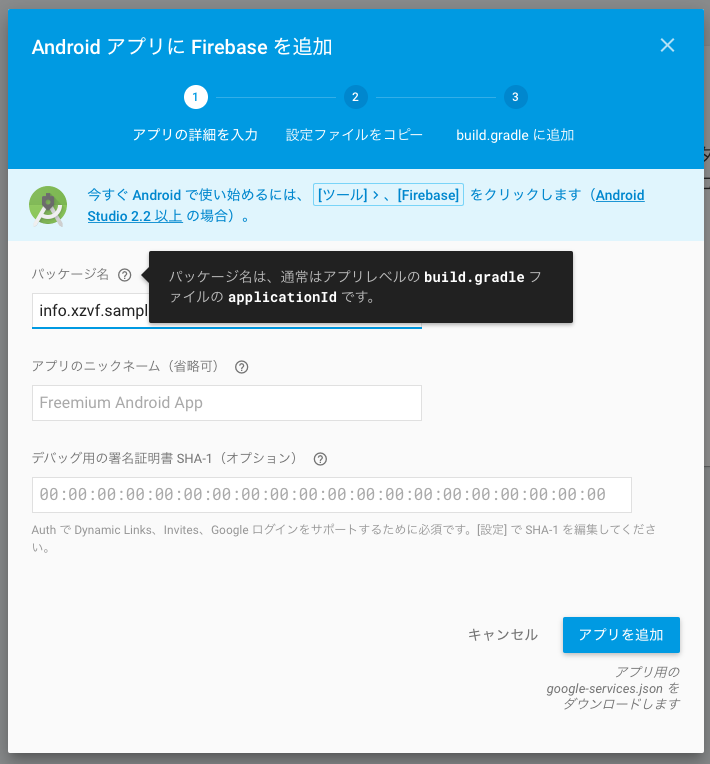
※この場所にある値を入力。
コンソールにスキップをクリック。
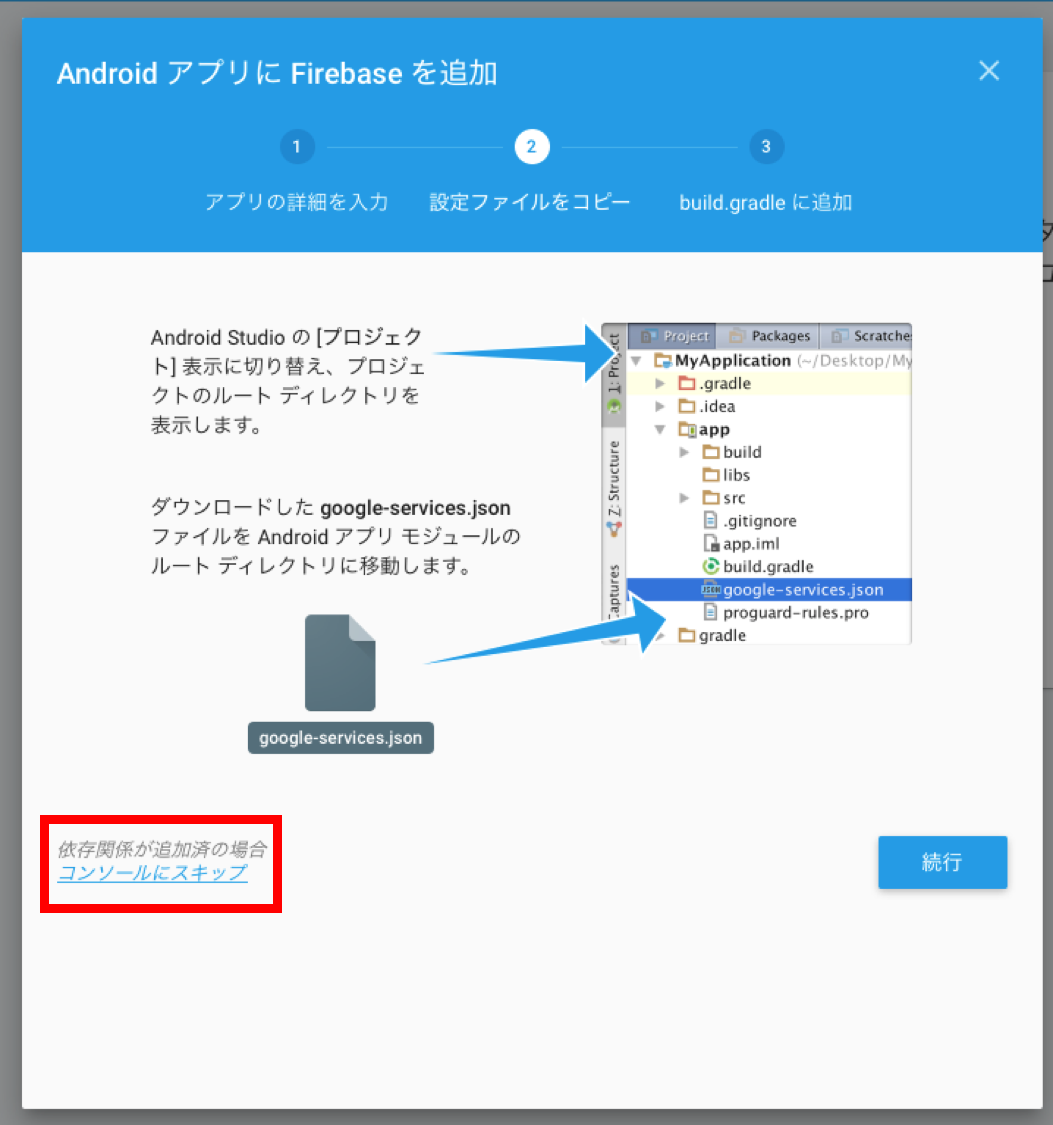
プロジェクトの設定 → クラウド メッセージングに
GCM sender ID または 送信者ID
Server key (legacy token) または サーバーキー
が表示されます、取得できたらメモしてください。
ParseServer設定ファイルの編集
FCMで取得した情報をParse Serverの設定ファイルに追加します。
先ほど起動したParse Serverを一旦停止します。
# <Control + cでParseServerを停止>
※編集前
# cat config.json
{
  "appId": "****************************************",
  "masterKey": "****************************************",
  "appName": "SampleApplication",
  "cloud": "./cloud/main",
  "databaseURI": "mongodb://127.0.0.1:27017/parse"
}
※編集後
# vi config.json

{
    "appId": "<そのまま>",
    "masterKey": "<そのまま>",
    "appName": "<そのまま>",
    "cloud": "<そのまま>",
    "databaseURI": "<そのまま>", ←カンマを追加!
    "push": {
        "android": {
            "senderId": "<GCM sender ID または 送信者ID>",
            "apiKey": "<Server key (legacy token) または サーバーキー>"
        }
    }
}
Parse Serverを再び起動します。
# npm start
アプリの実装
Parse SDK for Android
以下をbuild.gradle (Module:app)に追加
compile 'com.parse:parse-android:1.13.1'
CustomReceiver.java (新規作成)
そのままコピー&ペーストしてください。
import android.app.Notification;
import android.app.NotificationManager;
import android.content.Context;
import android.content.Intent;

import com.parse.ParsePushBroadcastReceiver;

import org.json.JSONException;
import org.json.JSONObject;

import static android.content.Context.NOTIFICATION_SERVICE;

public class CustomReceiver extends ParsePushBroadcastReceiver {

    @Override
    public void onReceive(Context context, Intent intent) {
        JSONObject json = null;

        try {
            json = new JSONObject(intent.getStringExtra("com.parse.Data"));
        } catch (JSONException e) {
            e.printStackTrace();
        }

        Notification.Builder builder = new Notification.Builder(context);

        if (json != null) {
            try {
                builder.setContentTitle(json.getString("title"));
                builder.setContentText(json.getString("body"));
            } catch (JSONException e) {
                e.printStackTrace();
            }
        } else {
            return;
        }

        builder.setDefaults(Notification.DEFAULT_ALL);
        builder.setSmallIcon(R.mipmap.ic_launcher);

        Notification notification = builder.build();

        NotificationManager notificationManager;
        notificationManager = (NotificationManager) context.getSystemService(NOTIFICATION_SERVICE);

        notification.flags = Notification.FLAG_AUTO_CANCEL;
        notificationManager.notify(1, notification);
    }
}
ParseApplication.java (新規作成)
以下の2つの部分を書き換えます。
"<Application Id>"
"http://<IPアドレス>:1337/parse"
import android.app.Application;

import com.parse.Parse;
import com.parse.ParseInstallation;

public class ParseApplication extends Application{

    @Override
    public void onCreate() {
        super.onCreate();
        Parse.initialize(new Parse.Configuration.Builder(getApplicationContext())
                .clientKey(null)
                .applicationId("<Application Id>")
                .server("http://<IPアドレス>:1337/parse")
                .build()
        );
        ParseInstallation.getCurrentInstallation().saveInBackground();
    }
}
AndroidManifest.xml
YOUR_PACKAGE_NAME の部分にパッケージ名。
YOUR_SENDER_ID の部分に取得した Server key (legacy token) または サーバーキー を入力。
<?xml version="1.0" encoding="utf-8"?>
<manifest xmlns:android="http://schemas.android.com/apk/res/android"
    package="YOUR_PACKAGE_NAME">

    <!--    追加行 START -->
    <uses-permission android:name="android.permission.INTERNET" />
    <uses-permission android:name="android.permission.WAKE_LOCK" />
    <uses-permission android:name="android.permission.ACCESS_NETWORK_STATE" />
    <uses-permission android:name="com.google.android.c2dm.permission.RECEIVE" />
    <!--    パッケージ名をする必要があります  -->
    <uses-permission android:name="YOUR_PACKAGE_NAME.permission.C2D_MESSAGE" />
    <!--    パッケージ名を変更する必要があります  -->
    <permission android:protectionLevel="signature"
        android:name="YOUR_PACKAGE_NAME.permission.C2D_MESSAGE" />
    <!--    追加行 END -->

    <!--    applicationタグの属性にandroid:name=".ParseApplication"を追加しています    -->
    <application
        android:name=".ParseApplication"
        android:allowBackup="true"
        android:icon="@mipmap/ic_launcher"
        android:label="@string/app_name"
        android:supportsRtl="true"
        android:theme="@style/AppTheme">
        <activity android:name=".MainActivity">
            <intent-filter>
                <action android:name="android.intent.action.MAIN" />

                <category android:name="android.intent.category.LAUNCHER" />
            </intent-filter>
        </activity>
        <!--    追加行 START-->
        <service android:name="com.parse.PushService" />
        <!--
        <receiver android:name="com.parse.ParsePushBroadcastReceiver"
            android:exported="false">  -->
        <receiver android:name=".CustomReceiver"
            android:exported="false">
            <intent-filter>
                <action android:name="com.parse.push.intent.RECEIVE" />
                <action android:name="com.parse.push.intent.DELETE" />
                <action android:name="com.parse.push.intent.OPEN" />
            </intent-filter>
        </receiver>

        <receiver android:name="com.parse.GcmBroadcastReceiver"
            android:permission="com.google.android.c2dm.permission.SEND">
            <intent-filter>
                <action android:name="com.google.android.c2dm.intent.RECEIVE" />
                <action android:name="com.google.android.c2dm.intent.REGISTRATION" />
                <!--    パッケージ名を変更する必要があります  -->
                <category android:name="YOUR_PACKAGE_NAME" />
            </intent-filter>
        </receiver>
        <!--    送信者IDを変更する必要があります  -->
        <meta-data android:name="com.parse.push.gcm_sender_id"
            android:value="id:YOUR_SENDER_ID" />;
        <!--    追加行 END -->

    </application>

</manifest>
動作確認
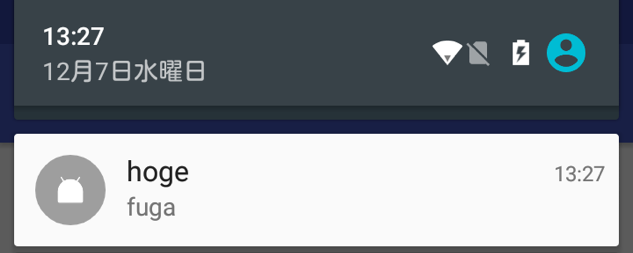
プッシュ通知を送信
# curl -s -X POST \
  -H "X-Parse-Application-Id: <Application Id>" \
  -H "X-Parse-Master-Key: <Master Key>" \
  -H "Content-Type: application/json" \
  -d '{
        "where": {
          "deviceType": {
            "$in": [
              "android"
            ]
          }
        },
        "data": {
          "title": "hoge",
          "body": "fuga"
        }
      }'\   http://localhost:1337/parse/push
感想
今回は、OSSのmBaaSというものを初めて知って使ってみたいということがきっかけで
この記事ではParse Serverの内容で書かせていただきました。
個人的には2年前にGCM+Amazon SNSでプッシュ通知を初めて実装してから、久々のプッシュ通知の実装でした。
GCMがFCMになっていたり、FCMでiOSに対してプッシュ通知ができたりと
特に、FCMを使った場合 Registration ID の更新をSDK側が自動で処理するなど、大きな変化を感じました。
Parser ServerはDocker Hubにコンテナイメージがあるので、
今度できたらhttp://arukas.io で動かせたらな~と思います。