やりたいこと
- アプリケーションからS3にデータをアップロードする
- 特定の bucket への参照権限だけ,アプリケーションに付与したい
気づいたら S3 の画面UIがガラッと変わっていたので,その辺もまとめなおした.
今回は,Rails X carrierwave で動作確認したが,SDKが使えるアプリケーションなら何にでも適用可能.
S3 の設定
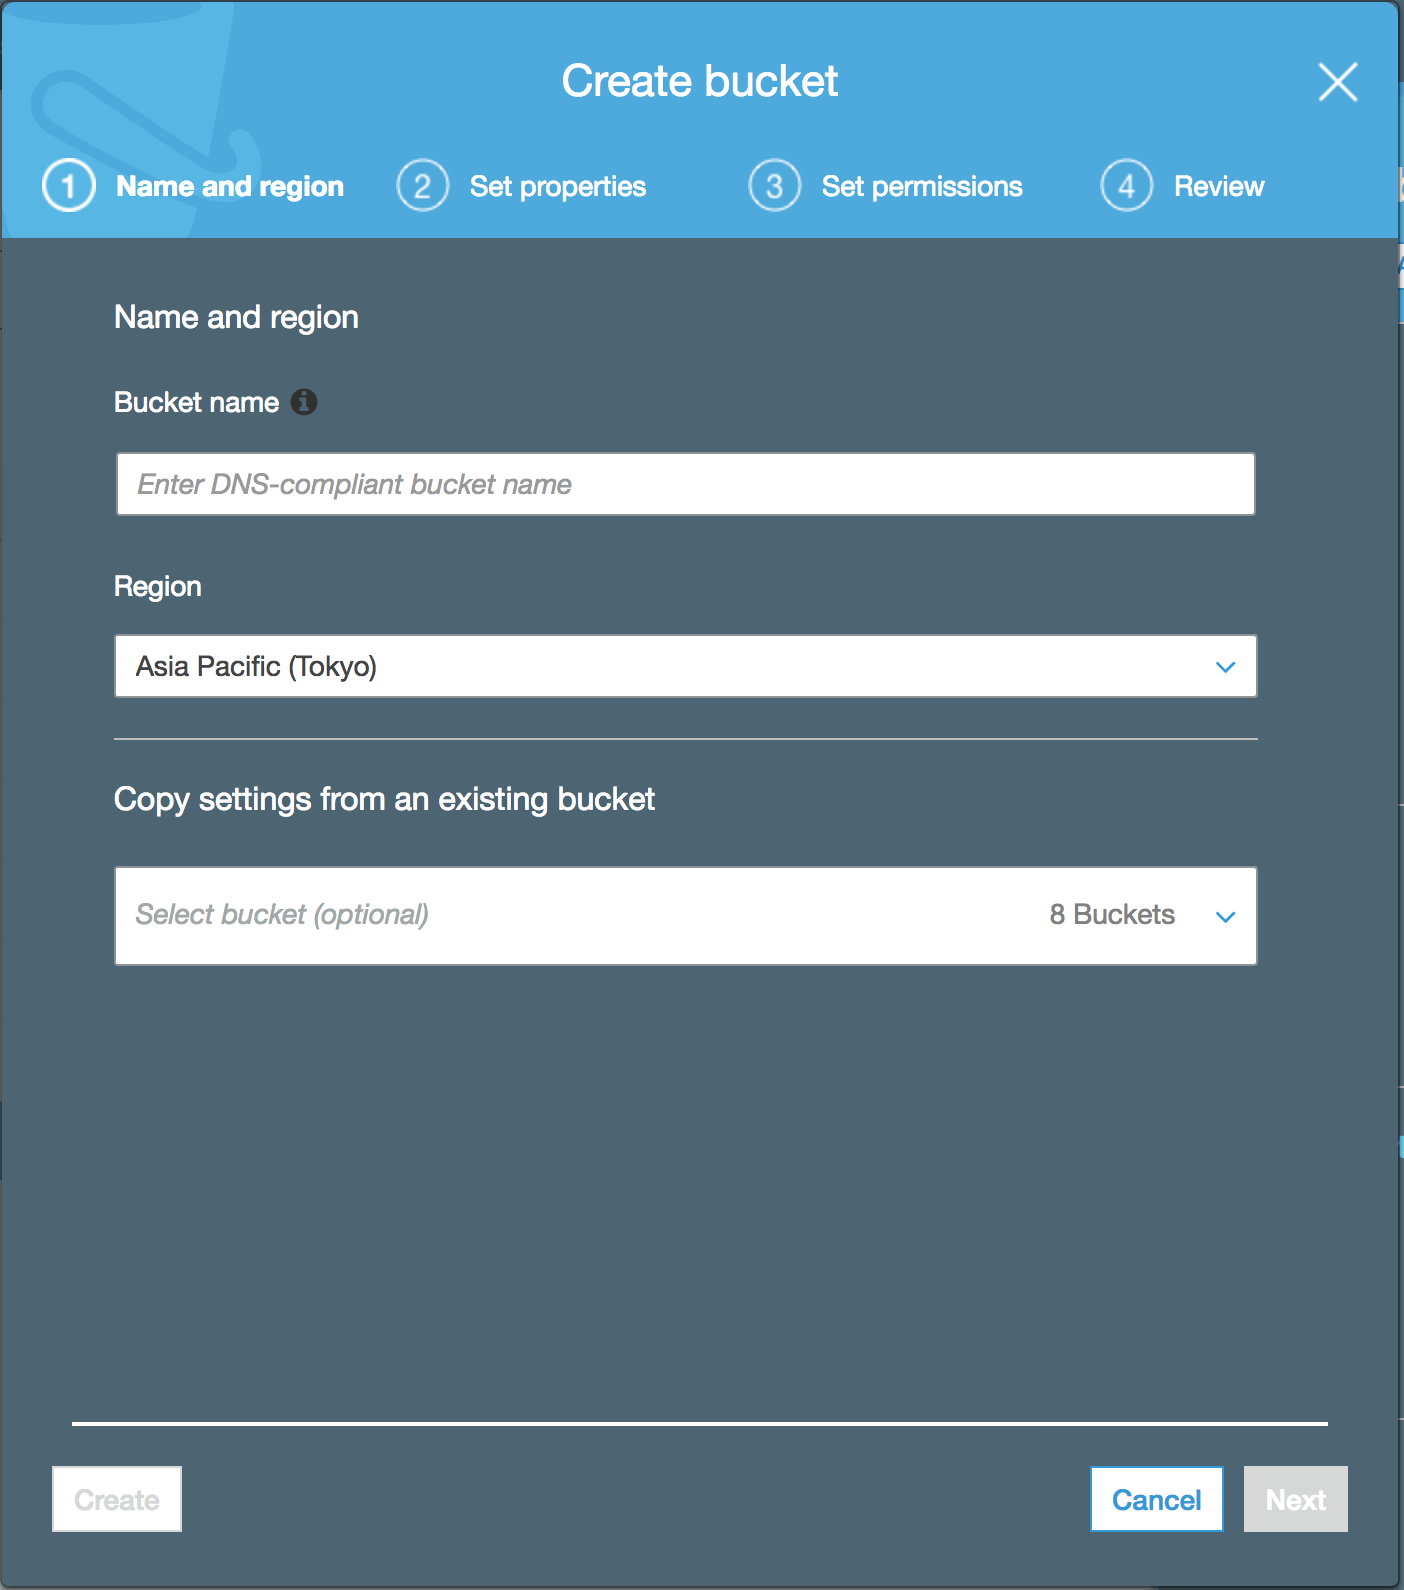
bucket作成
誰も取得していない固有バケット名を指定する.
2. Set properties と 3. Set permissions は後で設定するので,一旦 Create をクリックして bucket を作成する.
CORS configuration
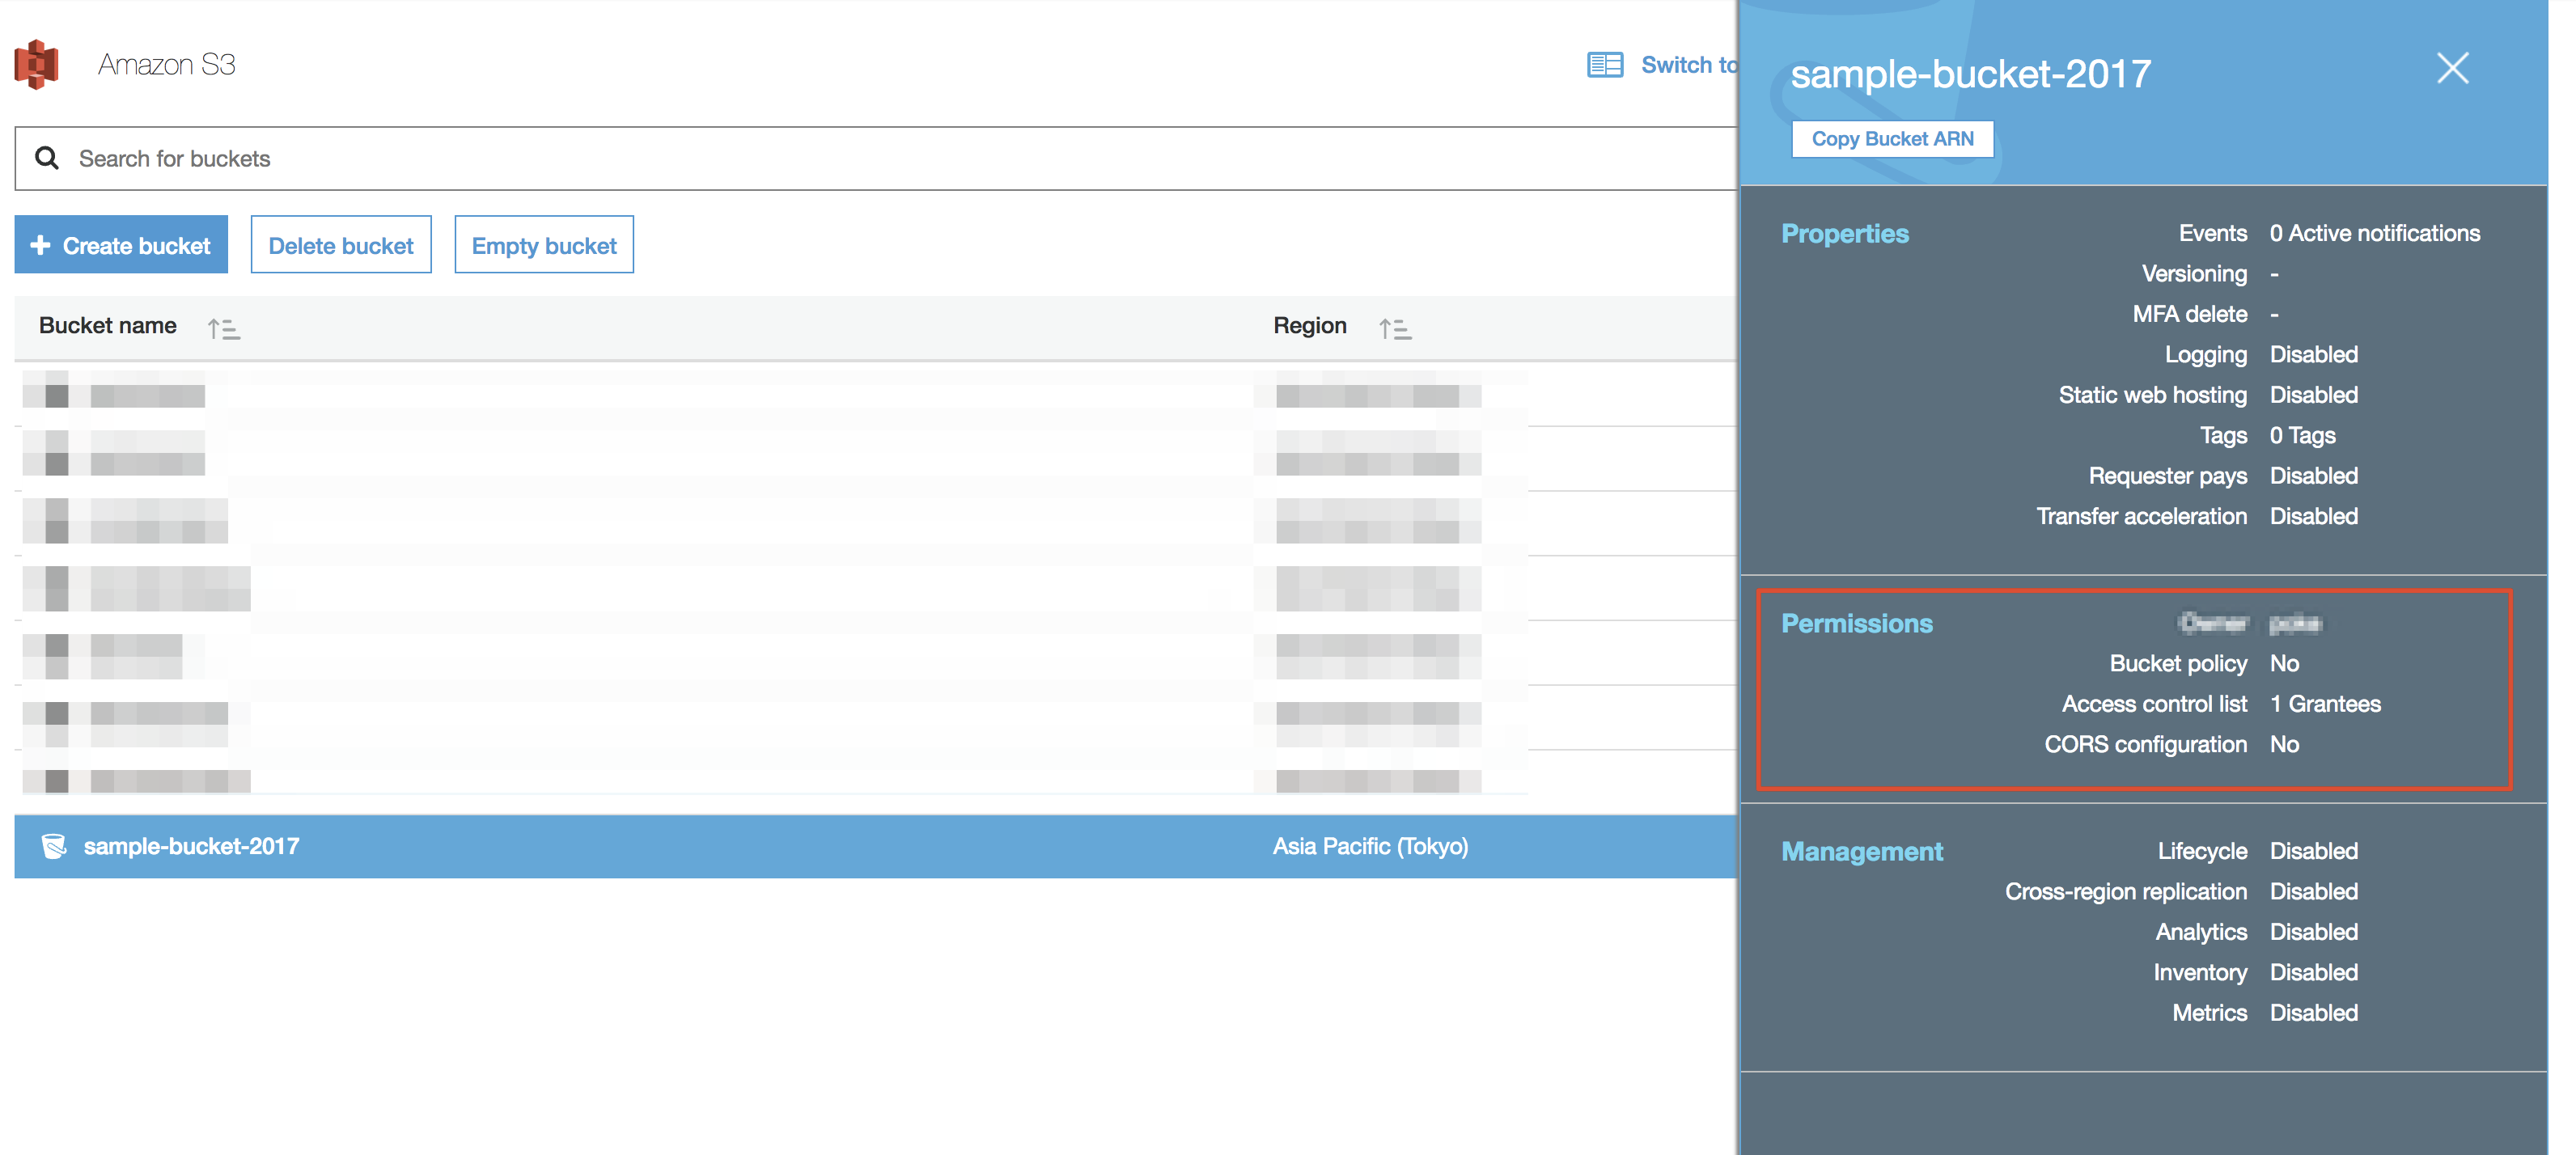
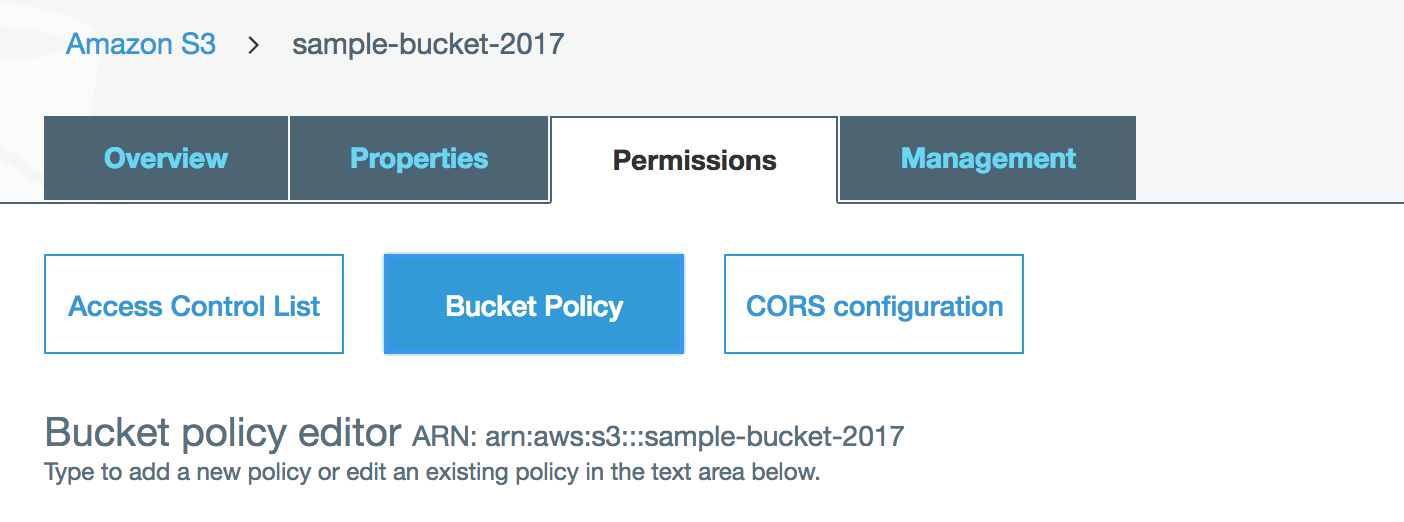
一覧から作成した bucket を選択し,右側メニューの Permissions を選択
サンプルの policy が設定されているので,下記の通り書き換え,保存する.
保存後 <CORSConfiguration> タグには xmlns="http://s3.amazonaws.com/doc/2006-03-01/" が自動で追加される.
<!-- Sample policy -->
<CORSConfiguration>
    <CORSRule>
        <AllowedOrigin>*</AllowedOrigin>
        <AllowedMethod>GET</AllowedMethod>
        <MaxAgeSeconds>3000</MaxAgeSeconds>
        <AllowedHeader>Authorization</AllowedHeader>
    </CORSRule>
</CORSConfiguration>

<!-- 変更後 -->
<CORSConfiguration>
    <CORSRule>
    <AllowedOrigin>*</AllowedOrigin>
        <AllowedMethod>GET</AllowedMethod>
        <AllowedMethod>PUT</AllowedMethod>
        <AllowedMethod>POST</AllowedMethod>
        <AllowedMethod>DELETE</AllowedMethod>
        <MaxAgeSeconds>3000</MaxAgeSeconds>
        <AllowedHeader>*</AllowedHeader>
    </CORSRule>
</CORSConfiguration>
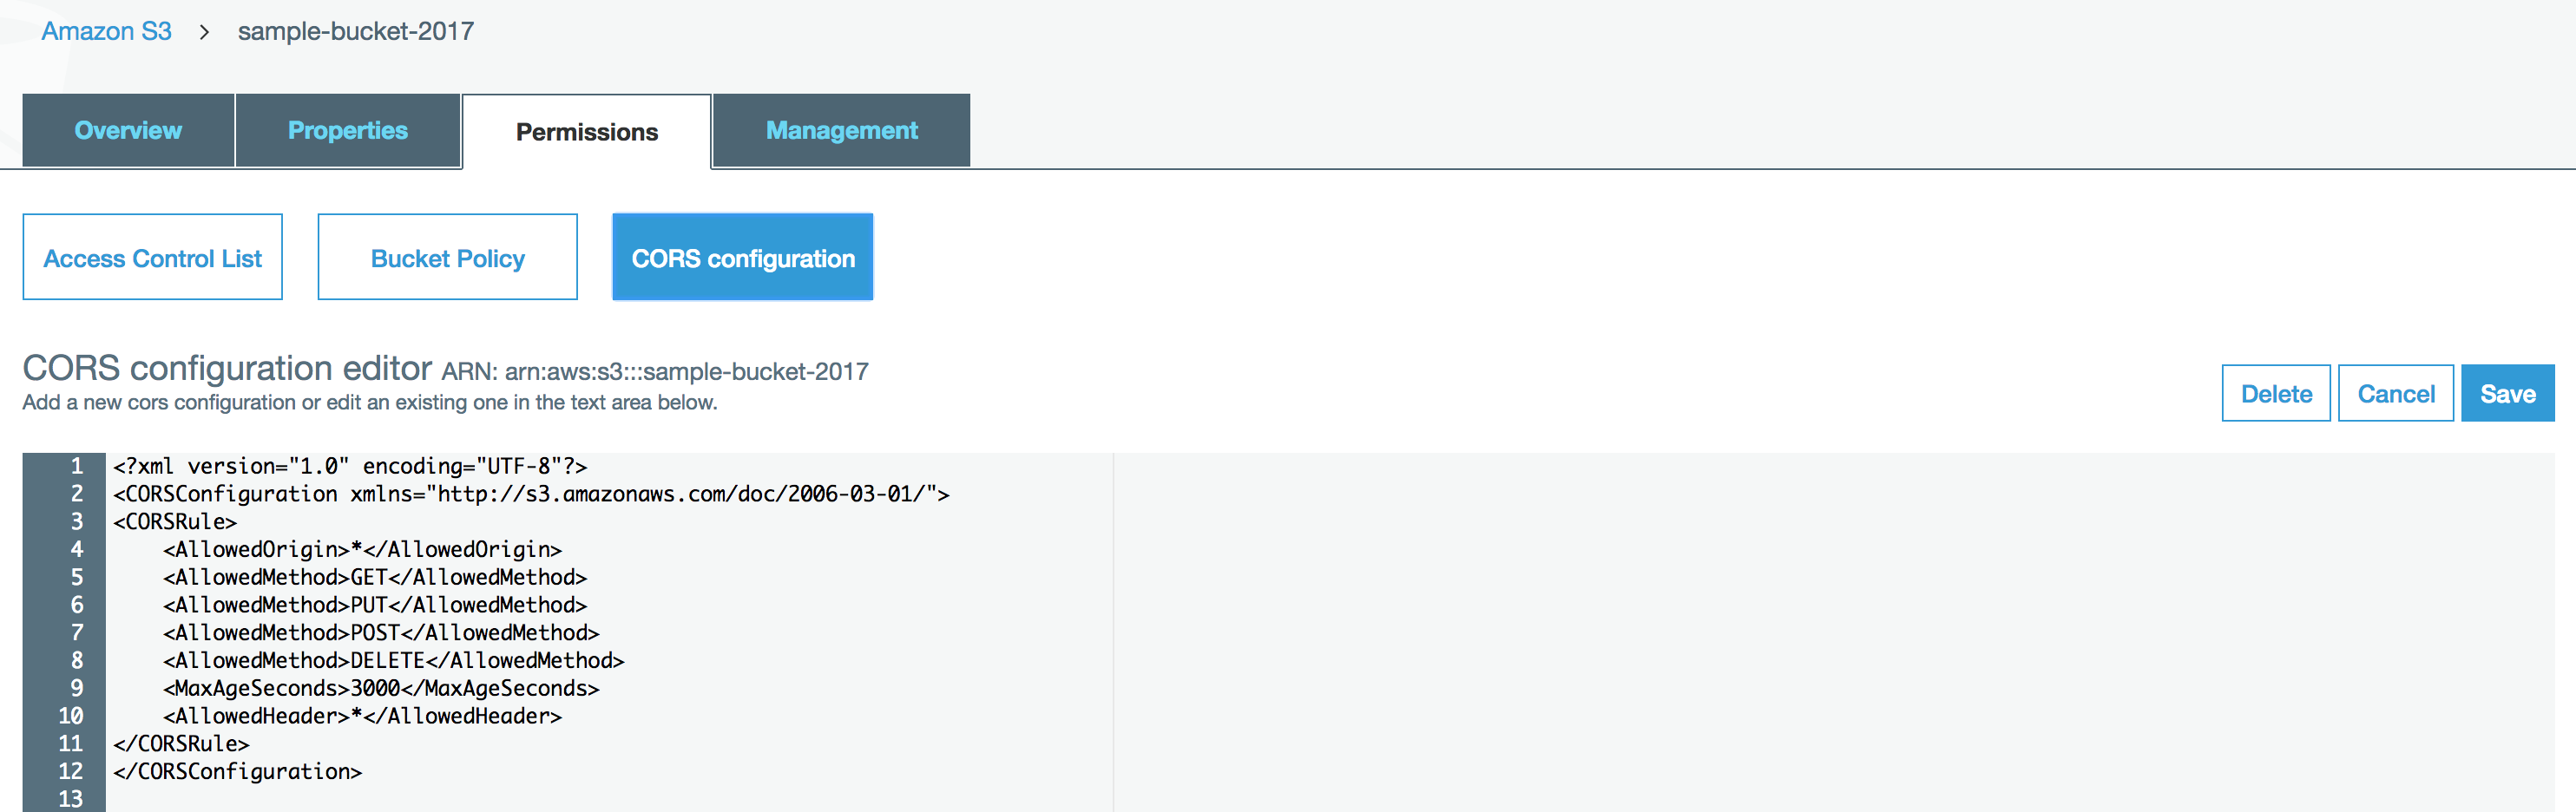
CORS configuration が No から Yes になっていることを確認する.

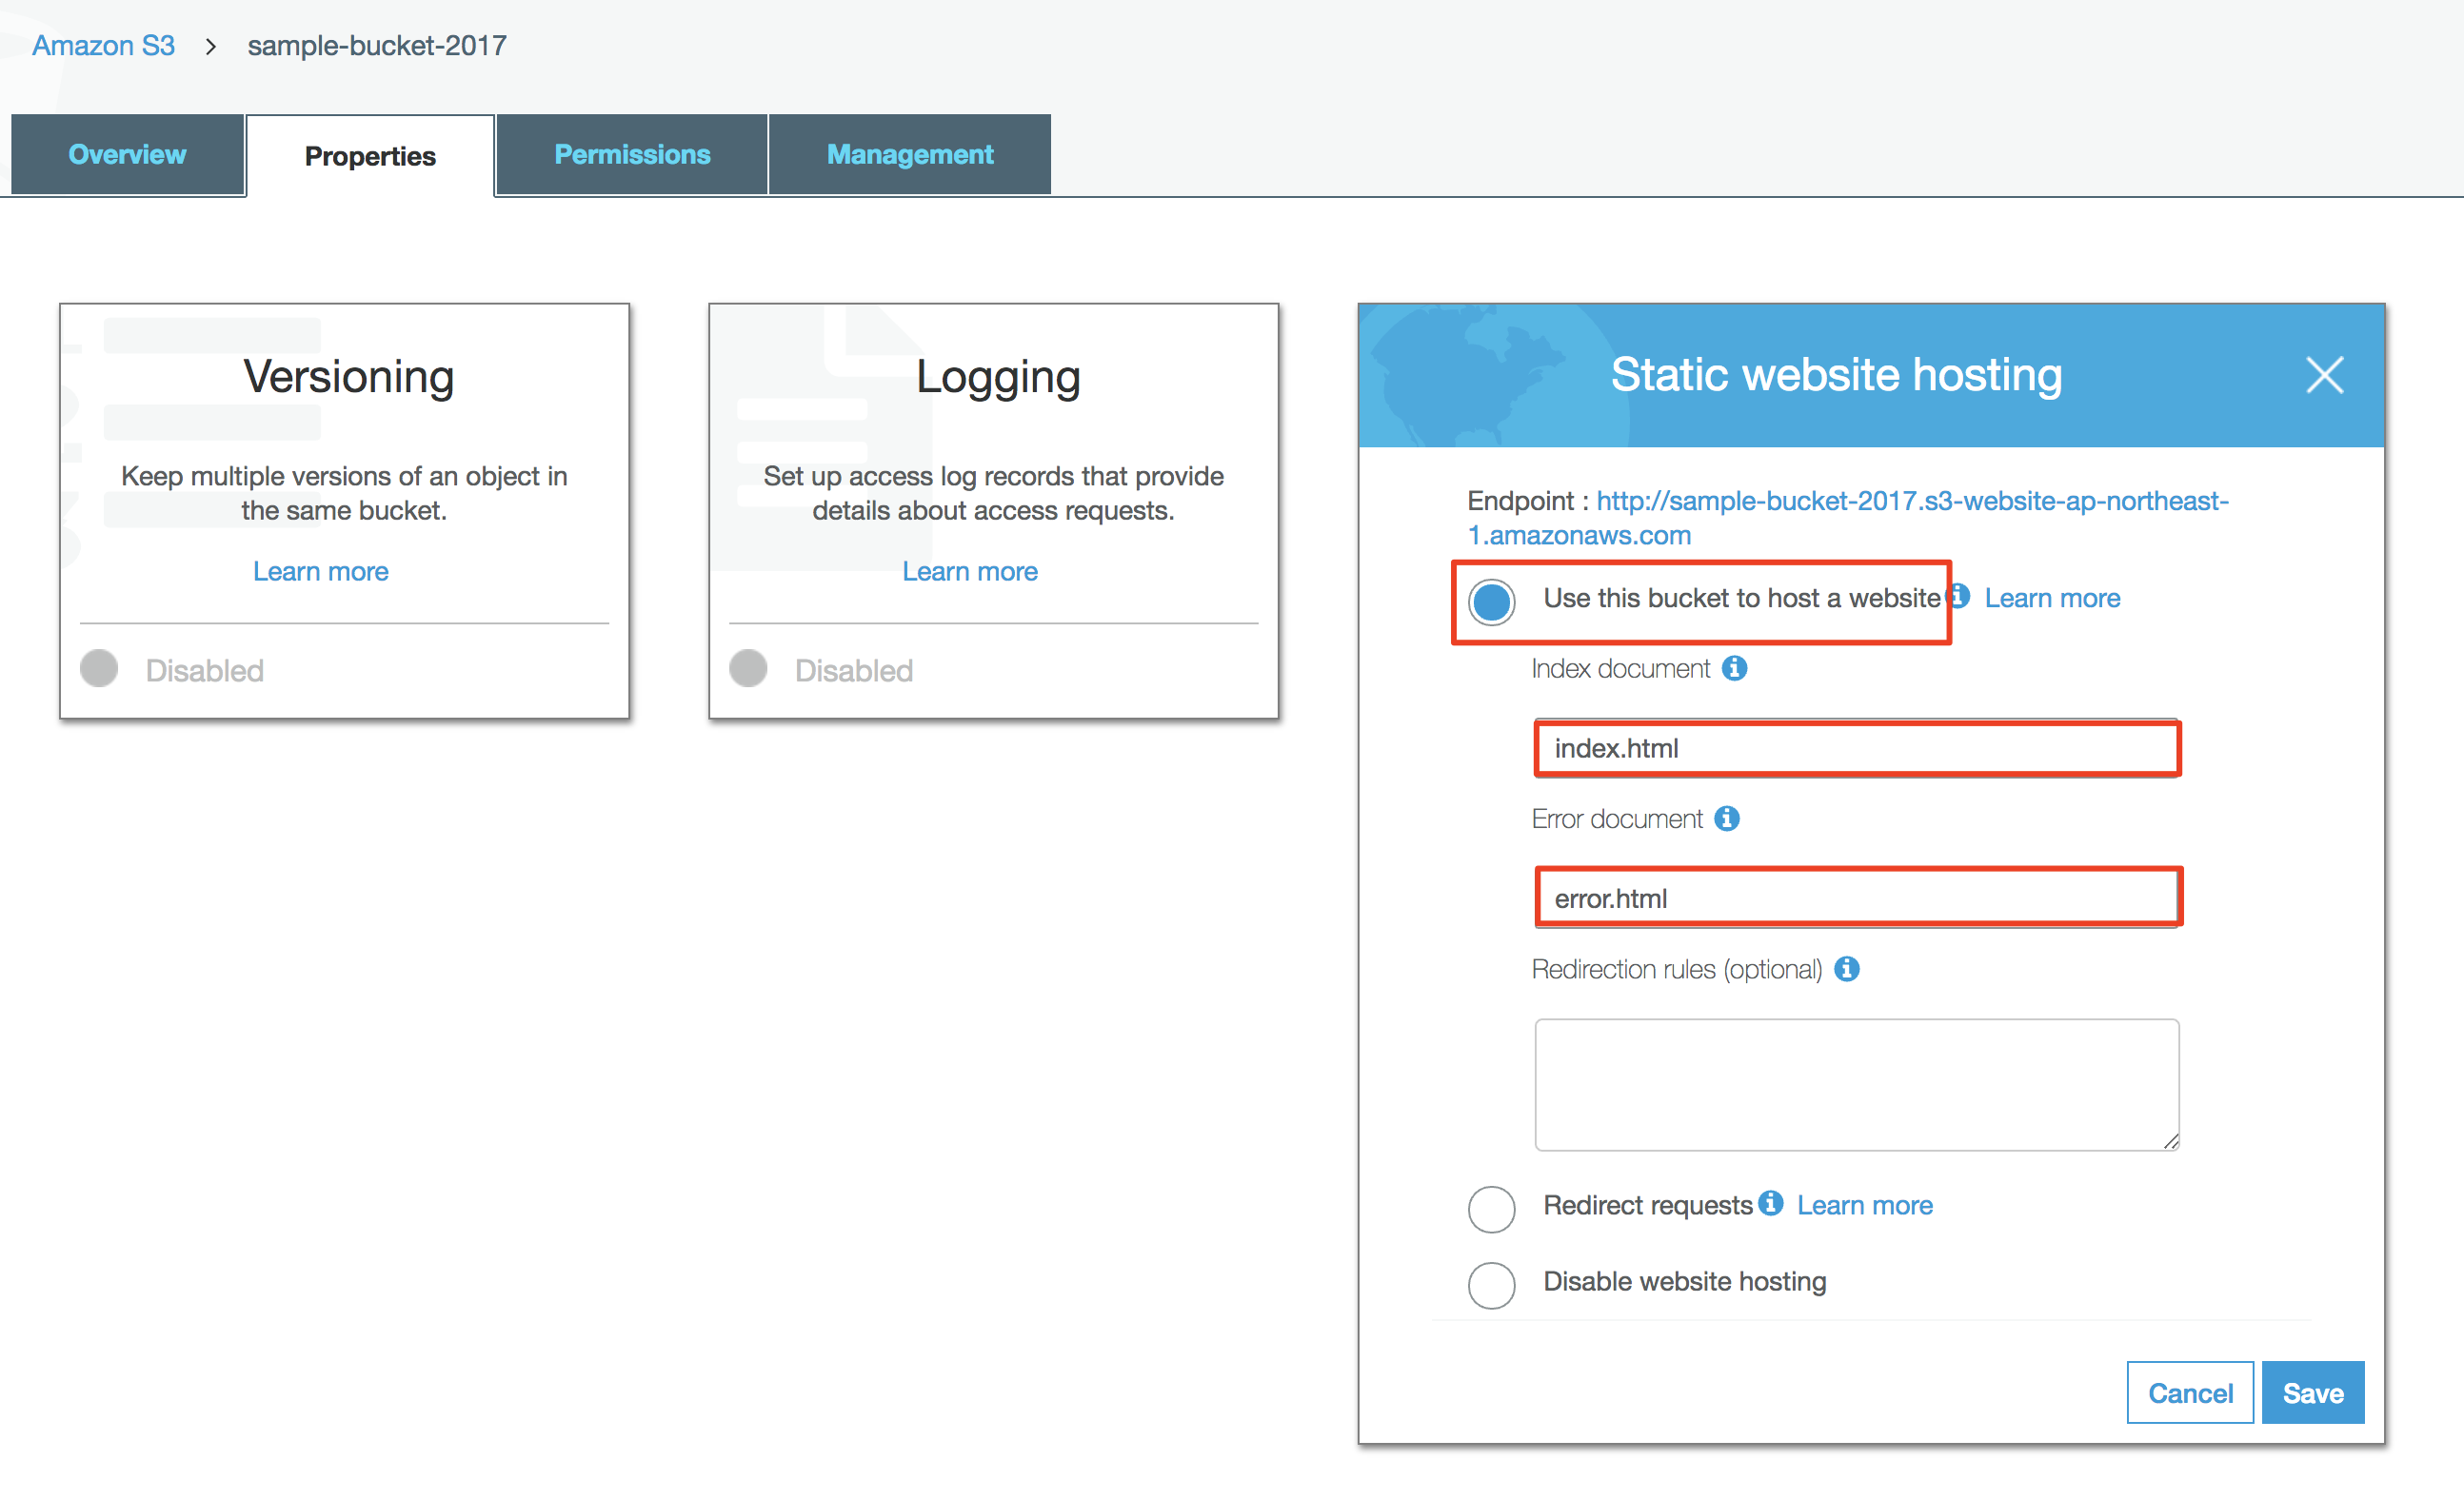
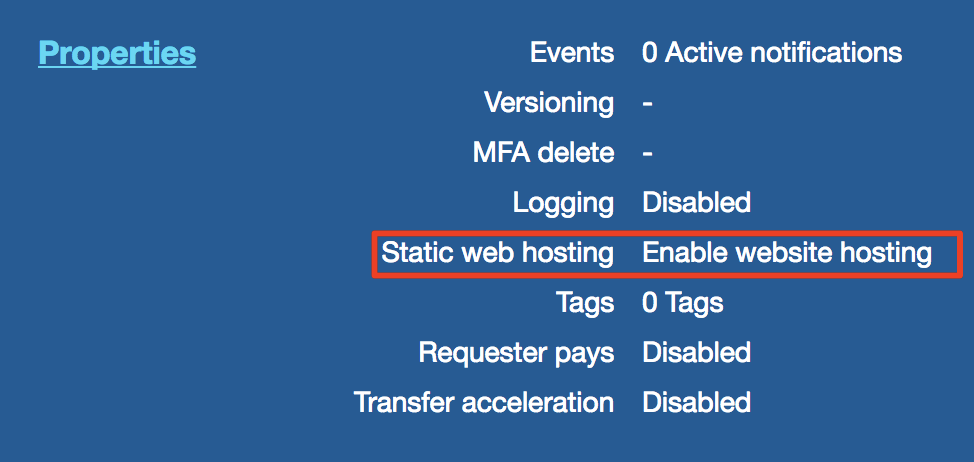
Static web hosting の設定
アップロードしたデータを https://<バケット名>.s3-ap-northeast-1.amazonaws.com の形式でアクセスできるようにする.
Use this bucket to host a website を有効化
bucket を選択 > Properties を表示.
Use this bucket to host a website を選択し, Index document と Error document 名を指定する.
index.html, error.html を配置
bucket ルートに, index.html, error.html を追加する.
<!DOCTYPE html>
<html>
  <body>
    <p>Hello Sample bucket!</p>
  </body>
</html>
<!DOCTYPE html>
<html>
  <body>
    <p>Error...</p>
  </body>
</html>
Static website hosting が Disabled から Enable website hosting になっていることを確認する.
Bucket Policy の設定 (※不要だった)
bucket にも policy が設定できるが,今回やりたいことは後述の IAM 設定だけで実現できたため未設定.
IAM の設定
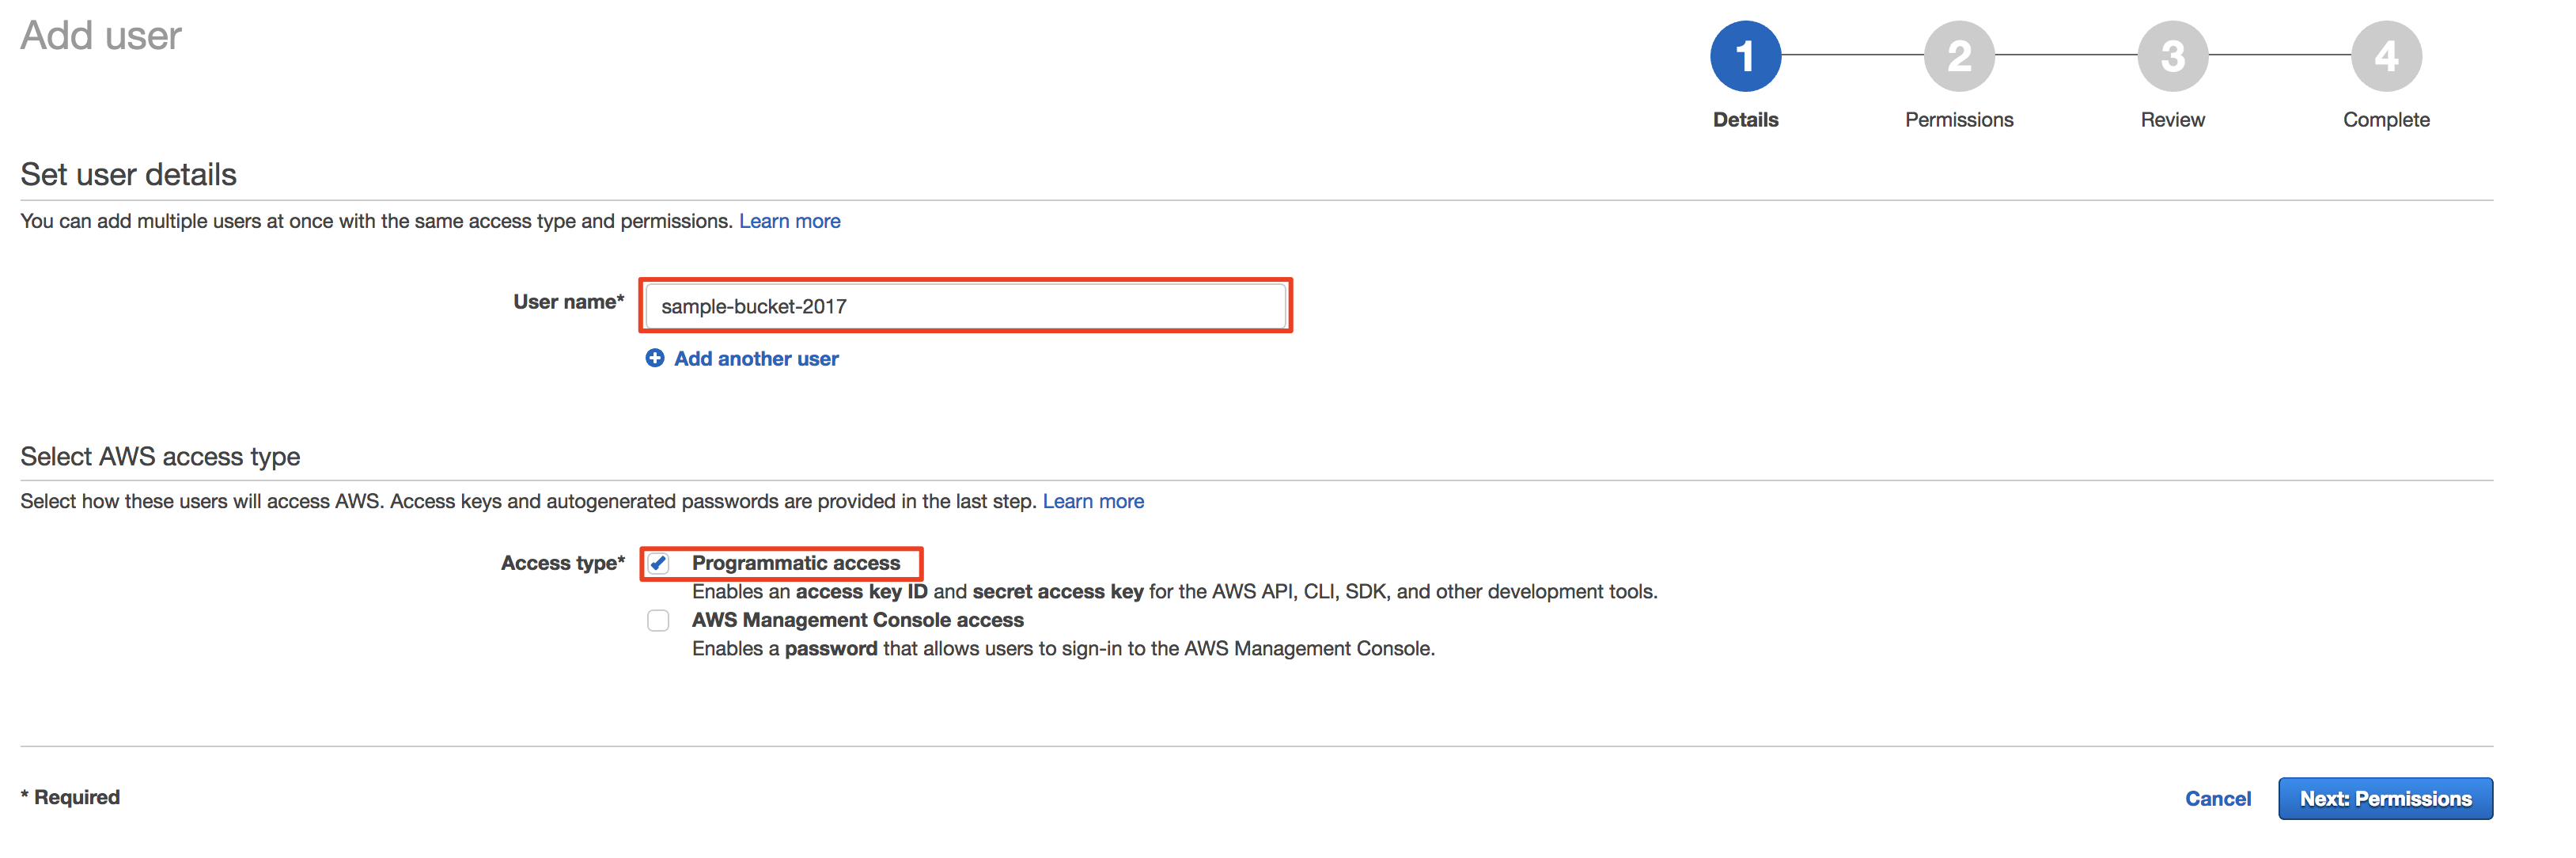
IAM でアプリケーション用のユーザーを作成する.
ユーザー追加
Access Type は Programmatic access を選択する.
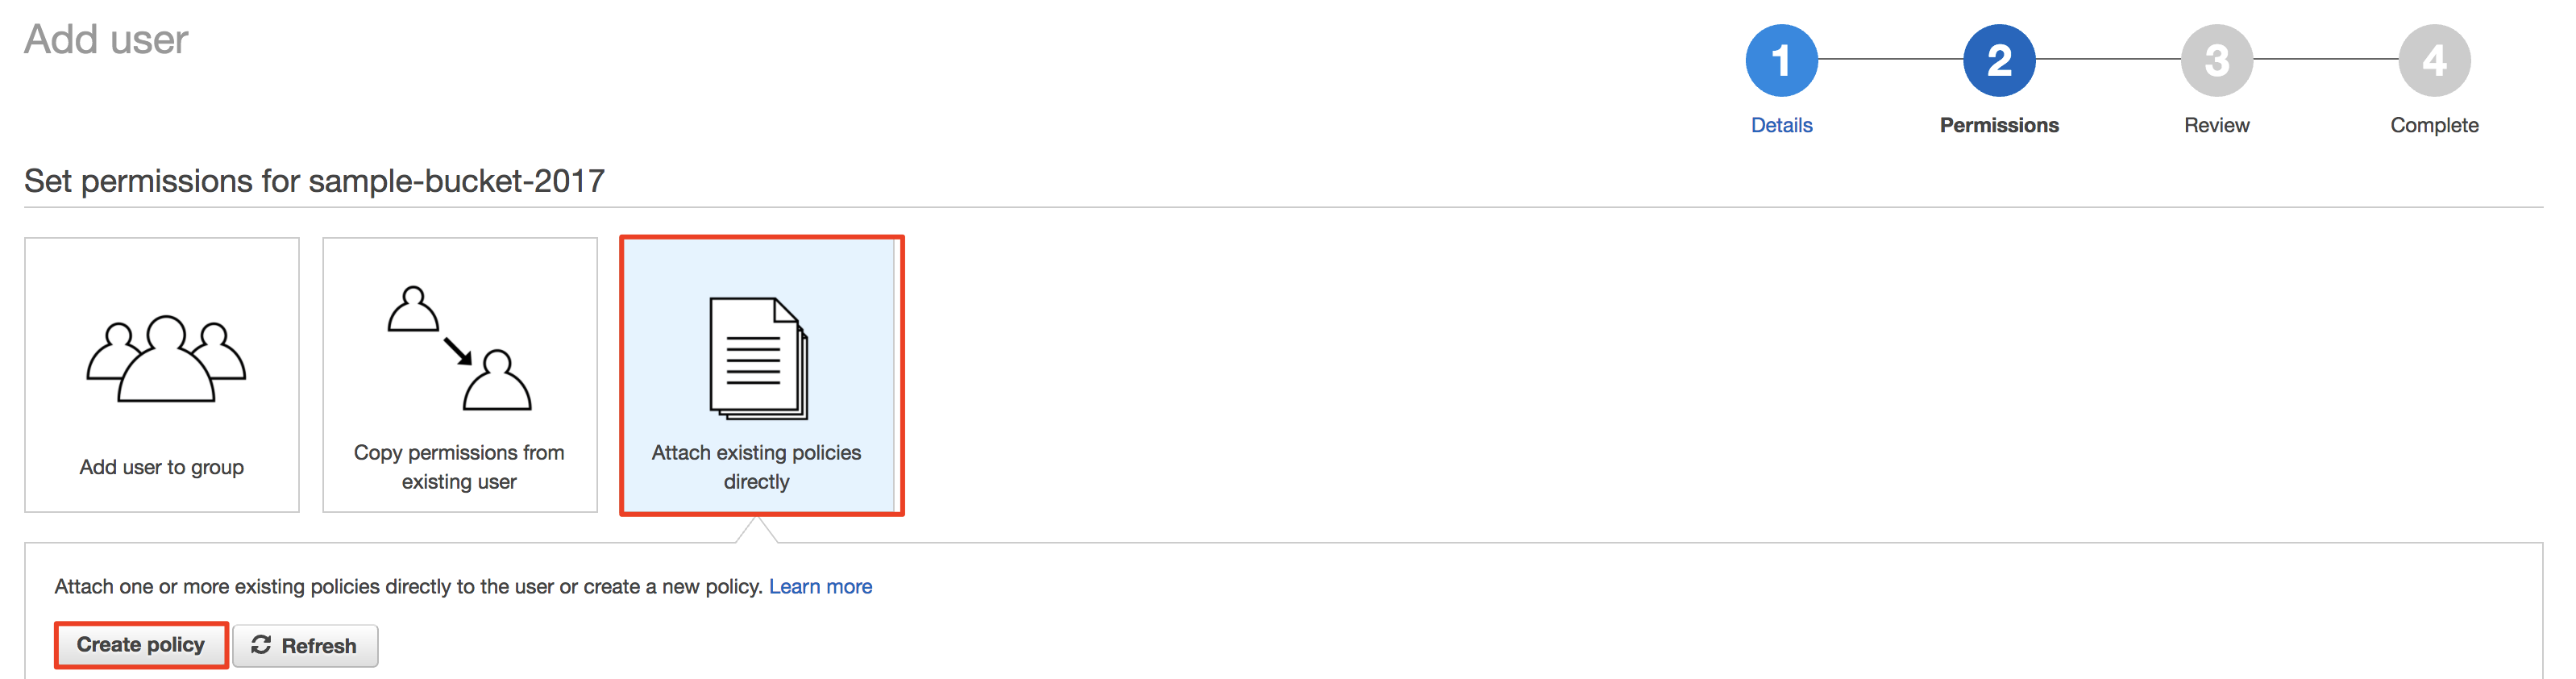
Policy の設定
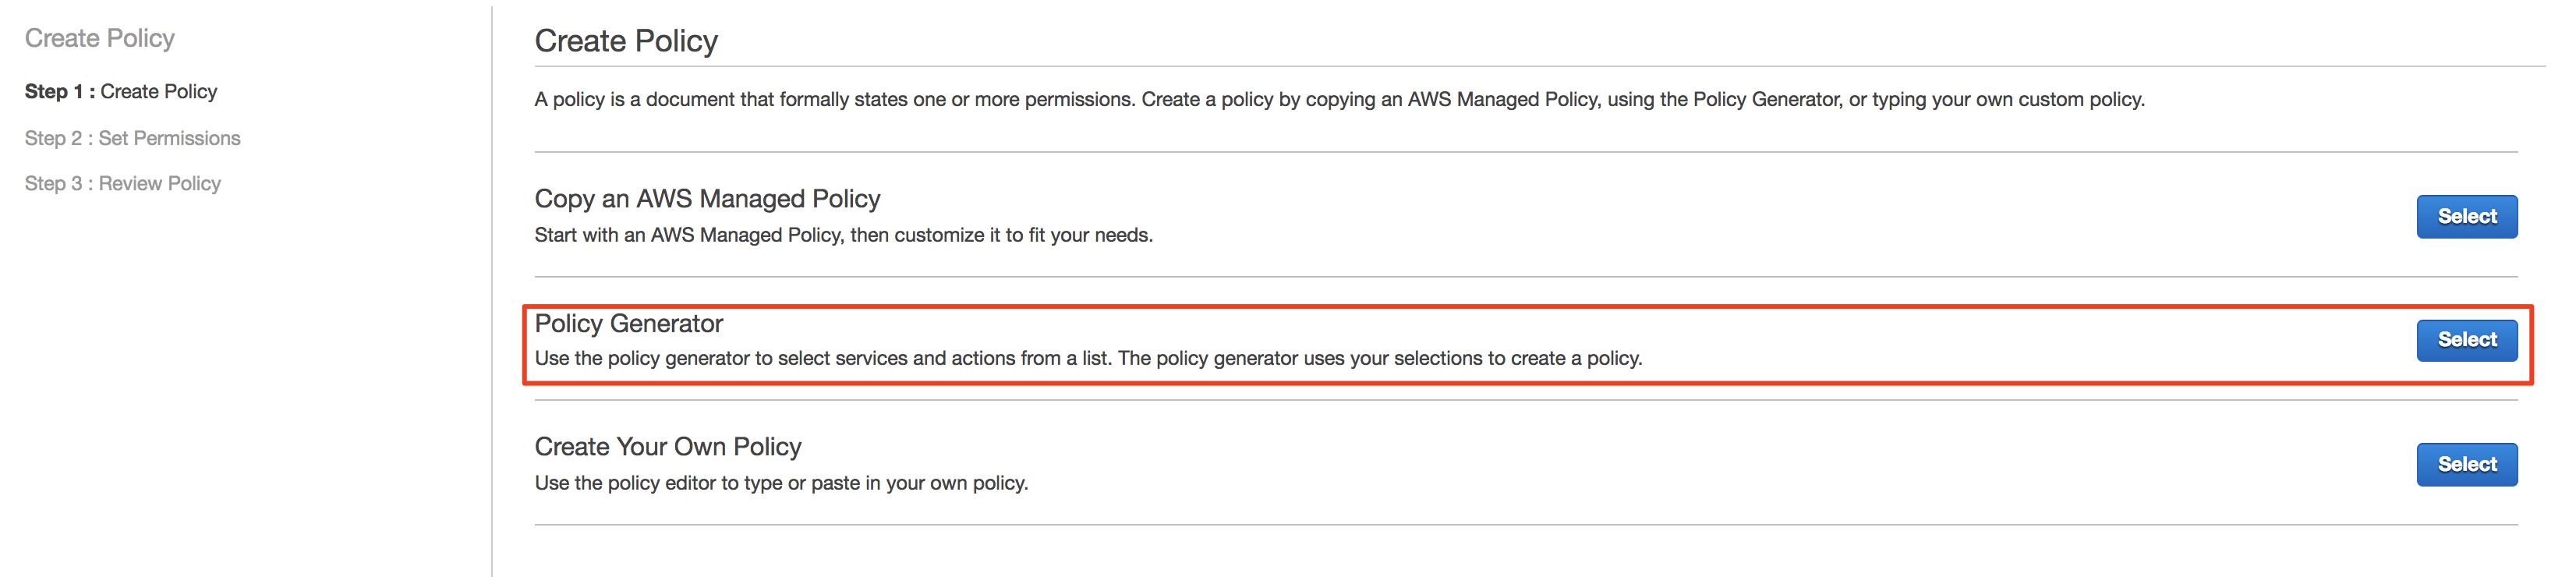
Attach existing policy > Create policy > Policy generator
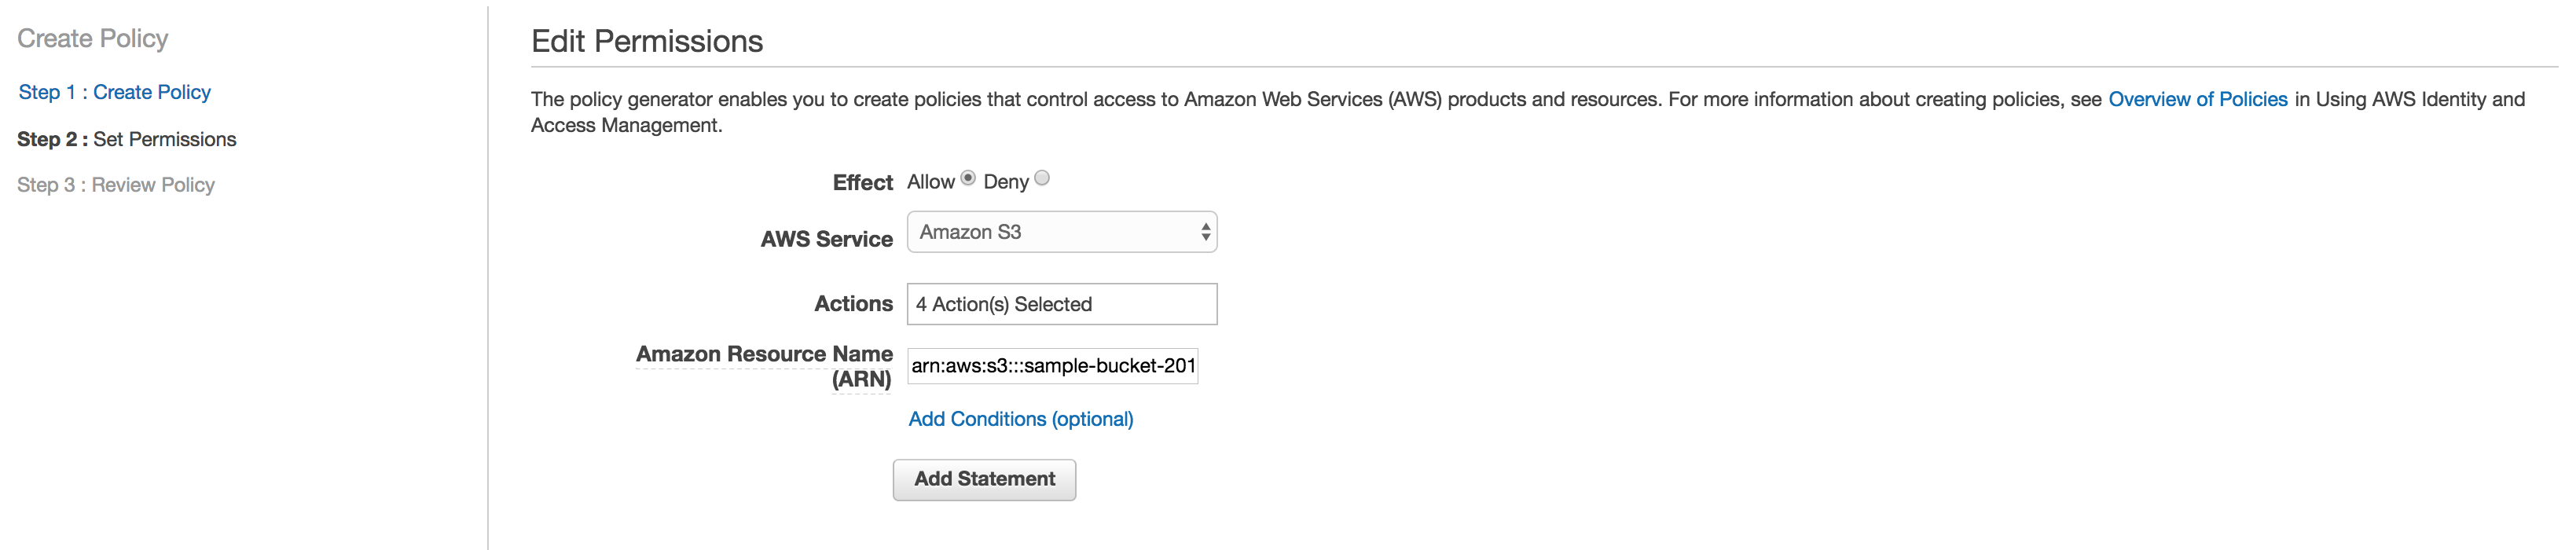
次の項目を設定する.
- Effect:
Allow - AWS Service:
S3 - Actions:
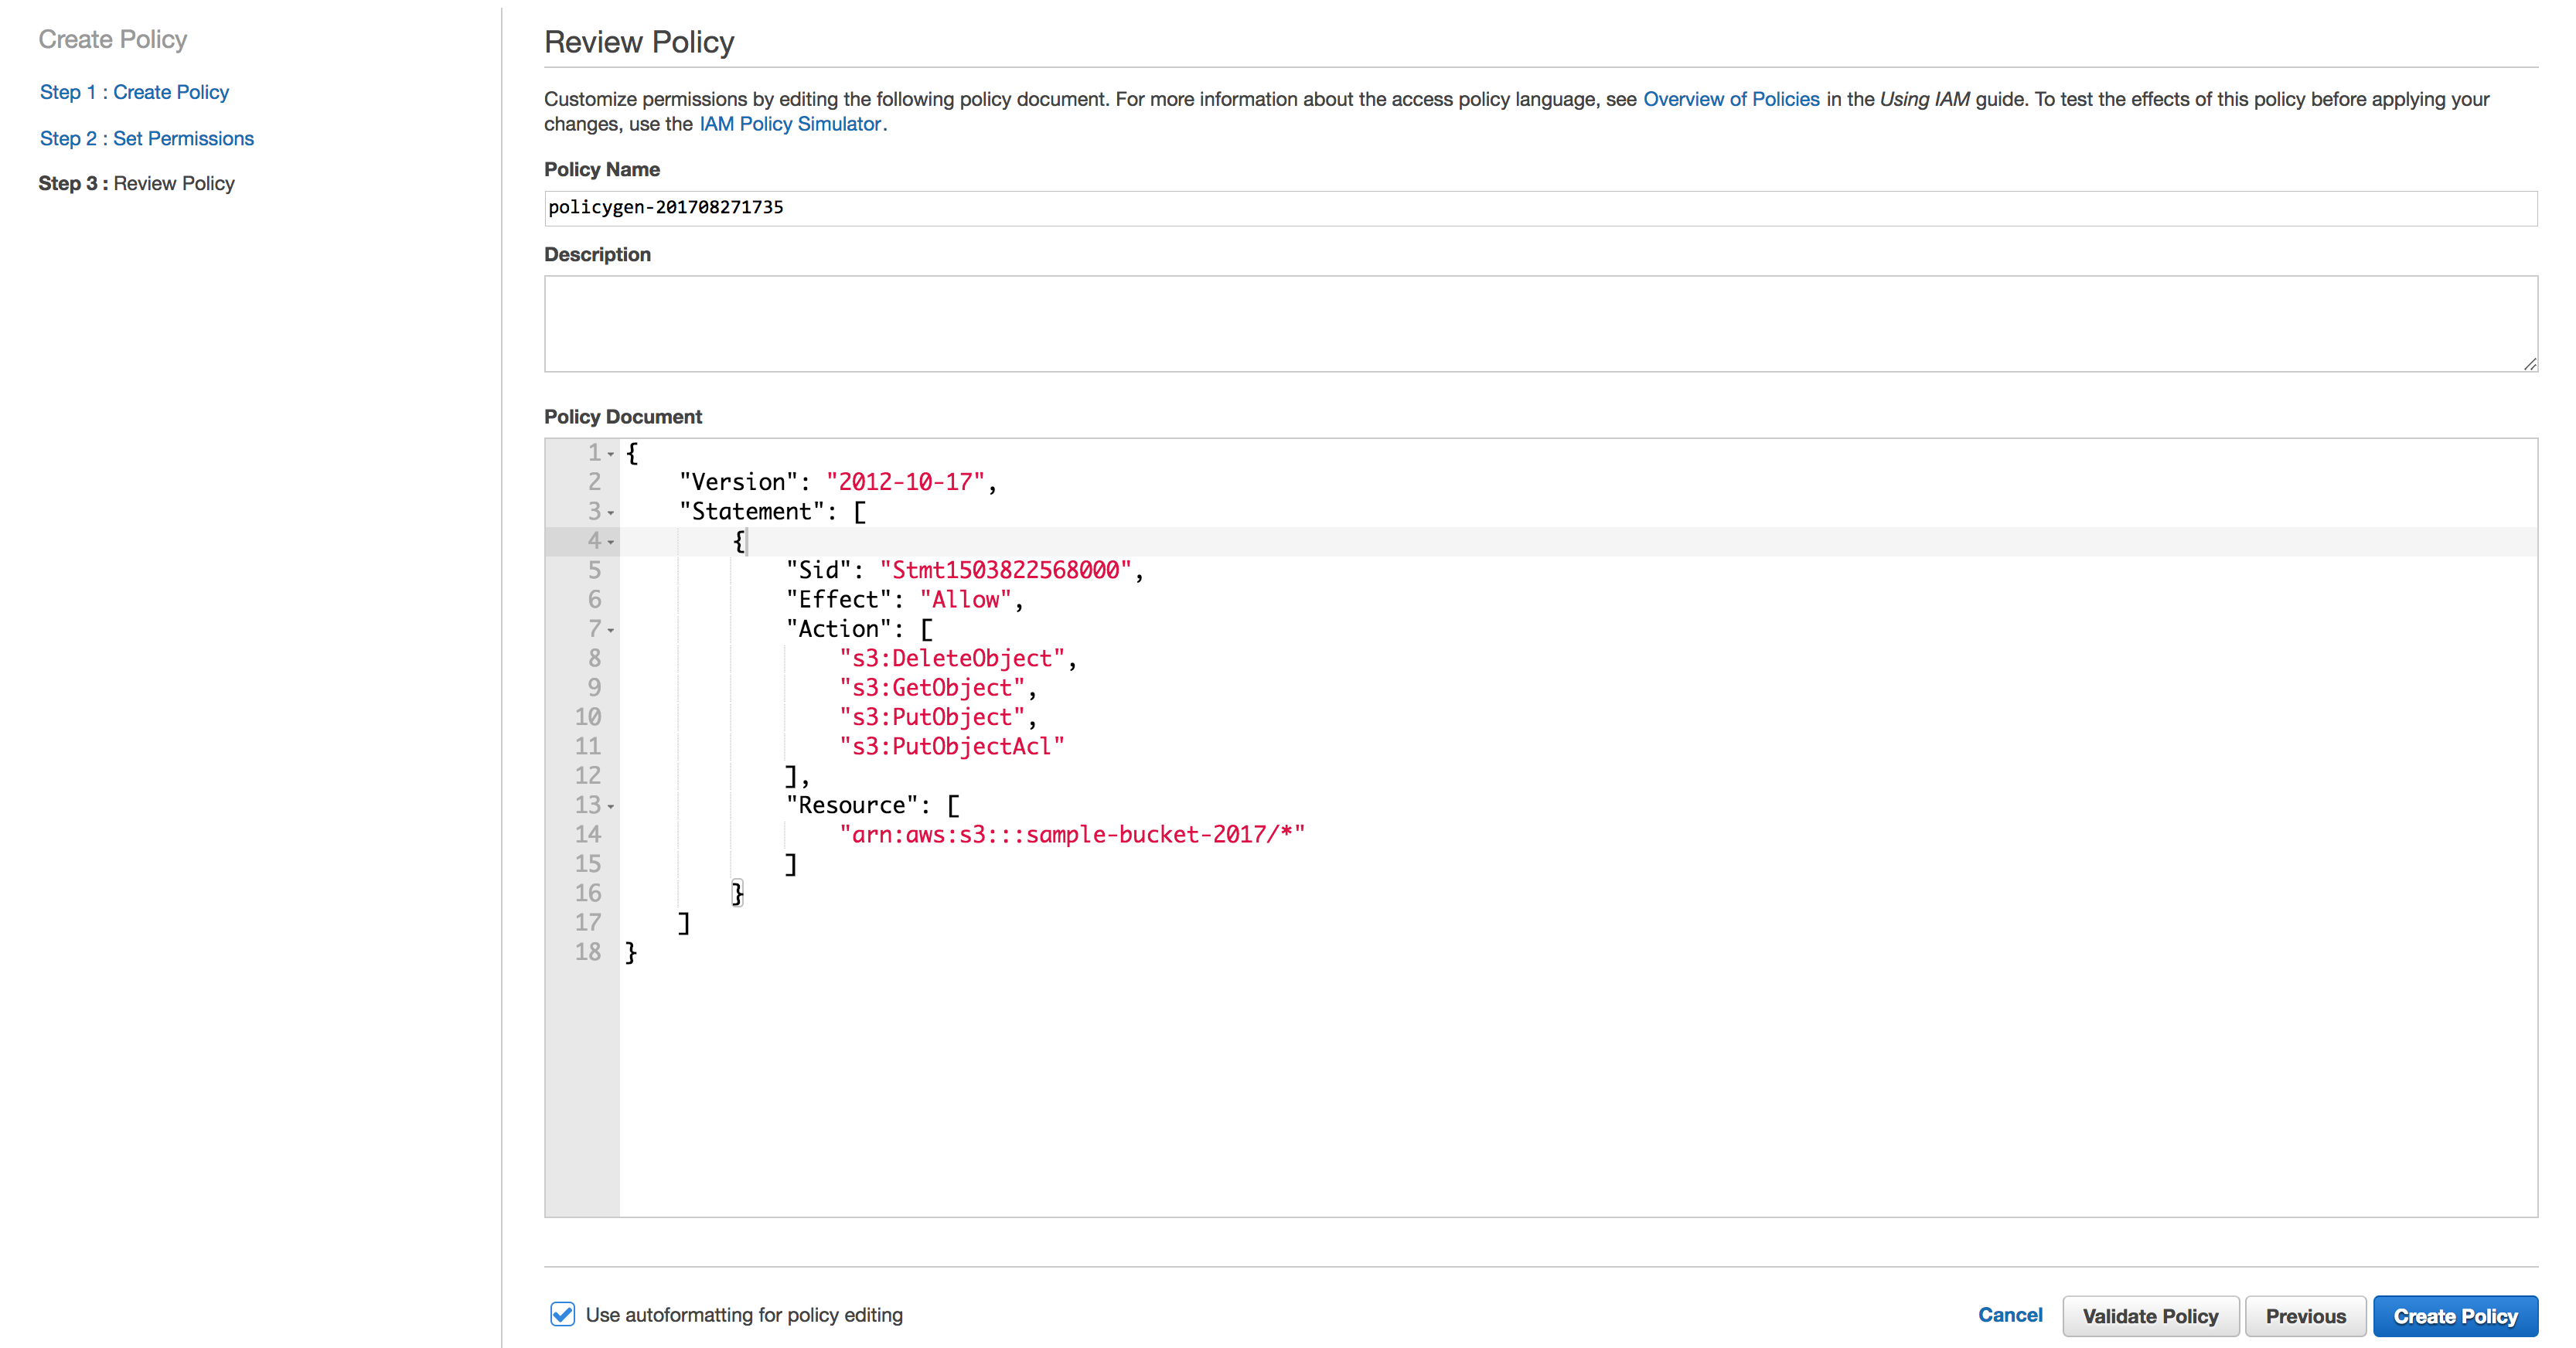
s3:GetObject,s3:PutObject,s3:PutObjectAcl,s3:DeleteObjectの4つを指定 - Resource:
arn:aws:s3:::sample-bucket-2017/*- 最後の
*も必要 - 特定のディレクトリだけに制限したい場合は
*の代わりにパス名を指定する
- 最後の
Add Statement をクリックして追加し, Next Step をクリック.

Policy Name や Description を設定して保存.
なお,Policy Generator を使わなくても直接生成や編集もできる.
編集する場合は,IAM のユーザーを選択 > Policyを選択 > Edit policy から編集可能.
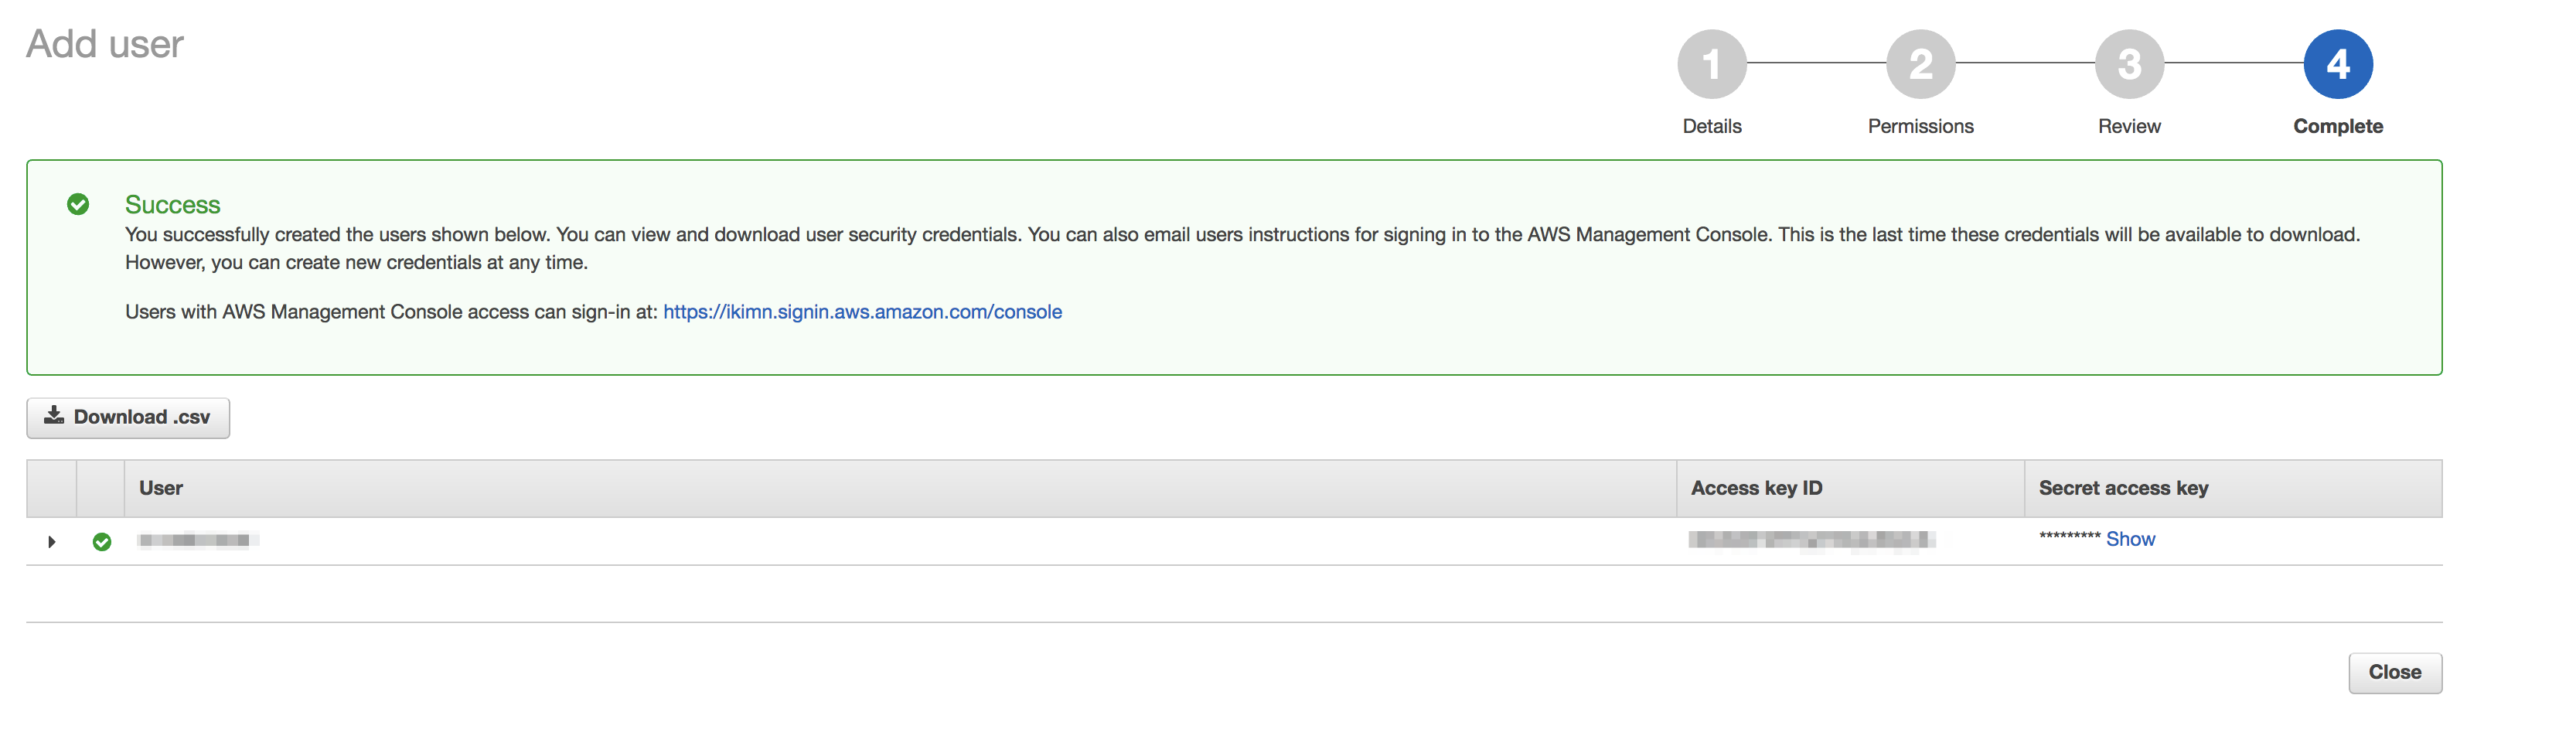
作成が完了すると, Access key ID と Secret access key が発行される.
後者はマネジメントコンソール上から確認できなくなるので,必ずCSVデータとしてダウンロードしておく.
動作確認
- Rails 5.1.3
- carrierwave 0.10.0
Railsアプリケーションから,carrierwave > Using Amazon S3で動作確認した.
- IAM の credential は,
aws_access_key_id,aws_secret_access_keyに設定 -
regionは S3 を作成したリージョンを指定 -
fog_directoryは bucket名を指定
IAM の permission に設定したバケットにのみアクセスでき,それ以外は下記のように 403 エラーになる.
Excon::Error::Forbidden - Expected(200) <=> Actual(403 Forbidden)
excon.error.response
  :body          => "<?xml version=\"1.0\" encoding=\"UTF-8\"?>\n<Error><Code>AccessDenied</Code><Message>Access Denied</Message><RequestId>F955E426D1B1BD15</RequestId><HostId>/2yU0WpD3U1IQLOt3HncofPqyGGcXZjJt+FWxqQje0IN6XFUAcLTs0YRzTW1H25JfnxBgCgb2+k=</HostId></Error>"
  :cookies       => [
  ]
  :headers       => {
    "Connection"       => "close"
    "Content-Type"     => "application/xml"
    "Date"             => "Sun, 27 Aug 2017 06:04:32 GMT"
    "Server"           => "AmazonS3"
    "x-amz-id-2"       => "/2yU0WpD3U1IQLOt3HncofPqyGGcXZjJt+FWxqQje0IN6XFUAcLTs0YRzTW1H25JfnxBgCgb2+k="
    "x-amz-request-id" => "F955E426D1B1BD15"
  }
  :host          => "s3-ap-northeast-1.amazonaws.com"
  :local_address => "10.0.1.2"
  :local_port    => 59226
  :path          => "/bucket-name/uploads/model_name/column_name/model_id/xxxxxxxxxxxxxxxxxxxxxx.png"
  :port          => 443
  :reason_phrase => "Forbidden"
  :remote_ip     => "52.219.4.88"
  :status        => 403
  :status_line   => "HTTP/1.1 403 Forbidden\r\n"
アップロードしたデータは https://bucket-name.s3-ap-northeast-1.amazonaws.com/uploads/model_name/column_name/model_id/xxxxxxxxxxxxxxxxxxxxxx.png のような形式でアクセスできる.
TODO: サンプルアプリを掲載
参考
- How to Restrict Amazon S3 Bucket Access to a Specific IAM Role
- S3のアクセスコントロールまとめ ← コントロール関連よくわかってなかったので,参考になった.
- S3特定バケットにアップロードできるだけの権限のユーザを作成する