CentOS 6.7に389 Directory Serverをインストール、セットアップしてみたので、その記録を残しておきます。
インストール要件
サポートしているOS
2015年12月6日現在、公式サイトに記載されているサポート対象のOSは以下の通りです。
- Linux
- Fedora 4 以降 ( x86、x86_64 )
- Red Hat Enterprise Linux 3 以降 ( x86、86_64 )
- その他 - debian、 gentoo、 ubuntu など
- Solaris 2.8、2.9 (32 / 64 bit) ( sparc )
- HP/UX 11 ( pa-risc / ia64 )
※以前のバージョンではAIXやWindowsなどもサポートしていたらしく、ソースコードからビルドすれば、他のプラットフォーム上でも動作する可能性があるようです。
ハードウェア要件
メモリは最低256MB、1GBを推奨しています。ディスク領域は少なくとも300MB程度は必要になります。本番システムでは1GB、大規模なシステムでは4GBは少なくとも必要になります。
事前準備
ファイルディスクリプタの最大値の設定
ファイルディスクリプタが十分であることを確認して下さい。多くのLinuxでは、ユーザーあたり1024に制限されていますが、この値ではインストール後のセットアップスクリプトで警告が出ます。以下のコマンドで確認して下さい。
ulimit -n
1024
/etc/security/limits.confが使用されている場合は、次の行を追加することでソフト制限とハード制限を設定できます。
vi /etc/security/limits.conf

# 以下を追記して保存
* soft nofile 16384
* hard nofile 32768
以下のコマンドで変更を反映します。
ulimit -a
名前解決の設定
389 Directory ServerにはFQDNでアクセスできる必要があります。/etc/hostsファイルにIPアドレスとFQDNを追記して下さい。
vi /etc/hosts

192.168.1.12     389ds.example.co.jp
管理ユーザーの作成
次にディレクトリサーバーの管理ユーザー(とグループ)を作成し、パスワードを設定します。
useradd ldapadmin
passwd ldapadmin
インストール
インストールはyumコマンドを実行するだけです。
yum install 389-ds-base
セットアップ
セットアップスクリプト(setup-ds.pl)を実行すると、ホスト名やポート番号などを入力が求められるので、適宜入力して下さい。
setup-ds.pl

==============================================================================
This program will set up the 389 Directory Server.

It is recommended that you have "root" privilege to set up the software.
Tips for using this  program:
  - Press "Enter" to choose the default and go to the next screen
  - Type "Control-B" or the word "back" then "Enter" to go back to the previous screen
  - Type "Control-C" to cancel the setup program

Would you like to continue with set up? [yes]:

==============================================================================
Your system has been scanned for potential problems, missing patches,
etc.  The following output is a report of the items found that need to
be addressed before running this software in a production
environment.

389 Directory Server system tuning analysis version 23-FEBRUARY-2012.

NOTICE : System is x86_64-unknown-linux2.6.32-573.8.1.el6.x86_64 (2 processors).

NOTICE : The net.ipv4.tcp_keepalive_time is set to 7200000 milliseconds
(120 minutes).  This may cause temporary server congestion from lost
client connections.

Would you like to continue? [yes]:

==============================================================================
Choose a setup type:

   1. Express
       Allows you to quickly set up the servers using the most
       common options and pre-defined defaults. Useful for quick
       evaluation of the products.

   2. Typical
       Allows you to specify common defaults and options.

   3. Custom
       Allows you to specify more advanced options. This is
       recommended for experienced server administrators only.

To accept the default shown in brackets, press the Enter key.

Choose a setup type [2]:

==============================================================================
Enter the fully qualified domain name of the computer
on which you are setting up server software. Using the form
<hostname>.<domainname>
Example: eros.example.com.

To accept the default shown in brackets, press the Enter key.

Warning: This step may take a few minutes if your DNS servers
can not be reached or if DNS is not configured correctly.  If
you would rather not wait, hit Ctrl-C and run this program again
with the following command line option to specify the hostname:

    General.FullMachineName=your.hostname.domain.name

Computer name [389ds.example.co.jp]:

==============================================================================
The server must run as a specific user in a specific group.
It is strongly recommended that this user should have no privileges
on the computer (i.e. a non-root user).  The setup procedure
will give this user/group some permissions in specific paths/files
to perform server-specific operations.

If you have not yet created a user and group for the server,
create this user and group using your native operating
system utilities.

System User [nobody]: ldapadmin
System Group [nobody]: ldapadmin

==============================================================================
The standard directory server network port number is 389.  However, if
you are not logged as the superuser, or port 389 is in use, the
default value will be a random unused port number greater than 1024.
If you want to use port 389, make sure that you are logged in as the
superuser, that port 389 is not in use.

Directory server network port [389]:

==============================================================================
Each instance of a directory server requires a unique identifier.
This identifier is used to name the various
instance specific files and directories in the file system,
as well as for other uses as a server instance identifier.

Directory server identifier [389ds]:

==============================================================================
The suffix is the root of your directory tree.  The suffix must be a valid DN.
It is recommended that you use the dc=domaincomponent suffix convention.
For example, if your domain is example.com,
you should use dc=example,dc=com for your suffix.
Setup will create this initial suffix for you,
but you may have more than one suffix.
Use the directory server utilities to create additional suffixes.

Suffix [dc=example, dc=co, dc=jp]:

==============================================================================
Certain directory server operations require an administrative user.
This user is referred to as the Directory Manager and typically has a
bind Distinguished Name (DN) of cn=Directory Manager.
You will also be prompted for the password for this user.  The password must
be at least 8 characters long, and contain no spaces.
Press Control-B or type the word "back", then Enter to back up and start over.

Directory Manager DN [cn=Directory Manager]:
Password:
Password (confirm):
Your new DS instance '389ds' was successfully created.
Exiting . . .
Log file is '/tmp/setupEF0u8T.log'
以上で完了です。
動作確認
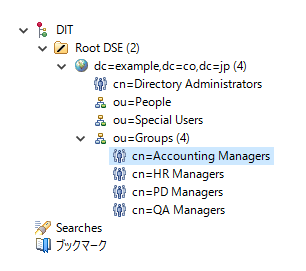
セットアップが完了するとサーバーは起動しているので、LDAPクライアントツールでアクセスすると以下のようなDITでデータが登録されていることが確認できます。

サーバーは、stop-dirsrvコマンドで停止し、start-dirsrvコマンドで起動することができます。
参考資料