Twitterクライアントの内部DBをSQLiteからRealmに移行したときのノウハウまとめ - Qiita
Realm公式の解説通りに下記のように build.gradle に記述して Realm を導入すると APK サイズが数MBほど大きくなります。
compile 'io.realm:realm-android:0.82.0'
これは Realm の Core 部分が NDK で書かれており、全アーキテクチャ用の .so ファイルが含まれているためです。
そこでアーキテクチャ別に APK を用意する(分割する)ことで APK サイズの増加量を 700 KB 程度まで抑えることができました。
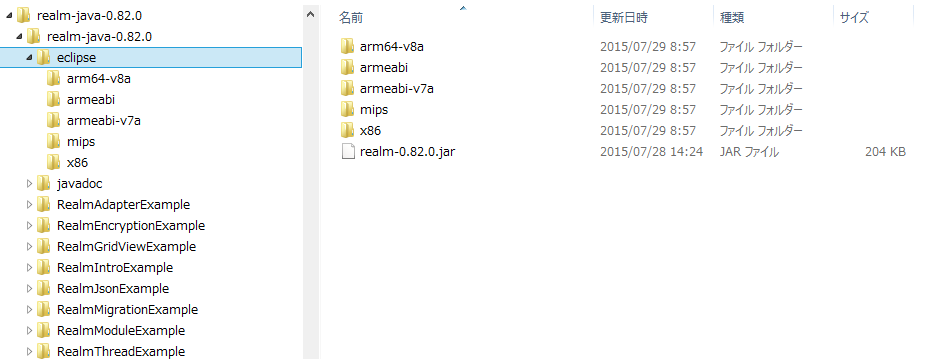
Our distribution package (available on our website under Download->Java) contains a folder called ‘eclipse’. This folder contains a split version of the Realm library. All you need to do is to copy the small jar file into the libs folder of your app and copy the four folders in the src/main/jniLibs directory.
ZIP版をダウンロードし、配置する
gradleにcompileの1行で導入するのはお手軽なんですが、残念ながら全アーキテクチャの .so ファイルを含む jar が利用されるため APK が肥大化してしまいます。
そこで ZIP 版を展開してアーキテクチャ毎の .so ファイルを配置します。
- 公式サイト のトップにあるリンクから ZIP 版をダウンロードします。
- ZIP を展開し、eclipse フォルダにある realm-0.82.0.jar をアプリの libs フォルダに、各アーキテクチャのフォルダを src/main/jniLibs ディレクトリにコピーします。

APK分割設定を行う
公式に書いてあるとおり、下記のように記述します。
android {
    // Some other configuration here...

    splits {
        abi {
            enable true
            reset()
            include 'x86', 'armeabi', 'armeabi-v7a'
            universalApk false
        }
    }
}
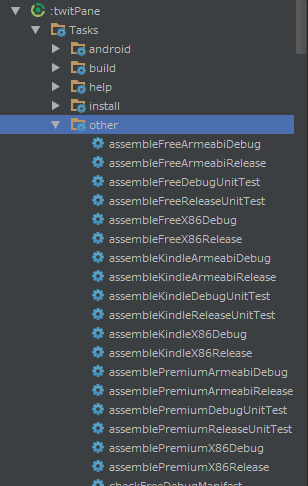
上記を記述後に "Sync Project with Gradle Files" を実行すると assembleFreeArmabiRelease 等のタスクができます。
アーキテクチャ毎にバージョンコードを変更する
以降はPlayストアで公開するためのお作法です。
Playストアでアーキテクチャ別の複数のAPKを登録する場合、各アーキテクチャのAPKが異なるバージョンコードを持つ必要があります。そこで、下記のように記述してバージョンコードを自動設定されるようにしました。
ext {
    versionCode = 458
    versionName = '8.1.2'

    // map for the version code
    versionCodes = ['armeabi':0, x86:1]
}
    android.applicationVariants.all { variant ->
        // assign different version code for each output
        variant.outputs.each { output ->
            def arch = output.getFilter(com.android.build.OutputFile.ABI)
            output.versionCodeOverride = android.defaultConfig.versionCode * 10 + rootProject.ext.versionCodes.get(arch)
        }
    }
こうして作成した APK をストアのアドバンスドモードのほうで登録すると下記のようになりました。
ほうほう、APK分割するとストアではこう登録するのか。 pic.twitter.com/flSytm49vl
— 竹内裕昭 (@takke) August 3, 2015
APKファイル名の変更
各アーキテクチャ毎にAPKファイル名を変更するために私は下記のようにしています。
    applicationVariants.all { variant ->
        if (variant.buildType.name.equals("release")) {

            variant.outputs.each { output ->
                if (output.outputFile != null && output.outputFile.name.endsWith('.apk')) {
                    System.println("* output filename update : [${variant.buildType.name}]" +
                            "[${variant.productFlavors[0].name}]" +
                            "[${variant.productFlavors[0].applicationId}]"
                    )

                    def file = output.outputFile
                    def d = new java.text.SimpleDateFormat("yyyyMMdd_HHmm").format(new Date())
                    def flavor = variant.productFlavors[0]
                    def shortVersionName = defaultConfig.versionName.replaceAll('\\.', '')
                    def arch = output.getFilter(com.android.build.OutputFile.ABI)
                    def newName = "TwitPane_${flavor.name}_${shortVersionName}_${d}_${arch}.apk"
                    output.outputFile = new File(file.parent, newName)
                }
            }
        }
    }