Zabbix Server のインストール
以下を参考に
Zabbixのインストール
Zabbix 2.4の場合は、以下からrpmをそれぞれインストール
# 前提パッケージのインストール
yum install -y httpd, php, mariadb-server

# zabbix本体
rpm -ivh http://repo.zabbix.com/zabbix/2.4/rhel/7/x86_64/zabbix-2.4.4-1.el7.x86_64.rpm

# zabbix-web
yum install -y dejavu-sans-fonts php-bcmath php-mbstring  # zabbix-web 前提パッケージ
rpm -ivh http://repo.zabbix.com/zabbix/2.4/rhel/7/x86_64/zabbix-web-mysql-2.4.4-1.el7.noarch.rpm http://repo.zabbix.com/zabbix/2.4/rhel/7/x86_64/zabbix-web-2.4.4-1.el7.noarch.rpm

# zabbix-agent
rpm -ivh http://repo.zabbix.com/zabbix/2.4/rhel/7/x86_64/zabbix-agent-2.4.4-1.el7.x86_64.rpm

# zabbix-server
yum install -y OpenIPMI-libs fping iksemel net-snmp unixODBC  # zabbix-server 前提パッケージ
rpm -ivh http://repo.zabbix.com/zabbix/2.4/rhel/7/x86_64/zabbix-server-2.4.4-1.el7.x86_64.rpm http://repo.zabbix.com/zabbix/2.4/rhel/7/x86_64/zabbix-server-mysql-2.4.4-1.el7.x86_64.rpm

# zabbix-web-japanese
yum install -y vlgothic-p-fonts  # zabbix-web-japanese 前提パッケージ
rpm -ivh http://repo.zabbix.com/zabbix/2.4/rhel/7/x86_64/zabbix-web-japanese-2.4.4-1.el7.noarch.rpm
Zabbix 2.2の場合は、EPEL登録してyumでインストールでOK。簡単。
# EPEL
yum install -y epel-release

# yumでインストール
yum install -y zabbix22 zabbix22-web zabbix22-agent zabbix22-server
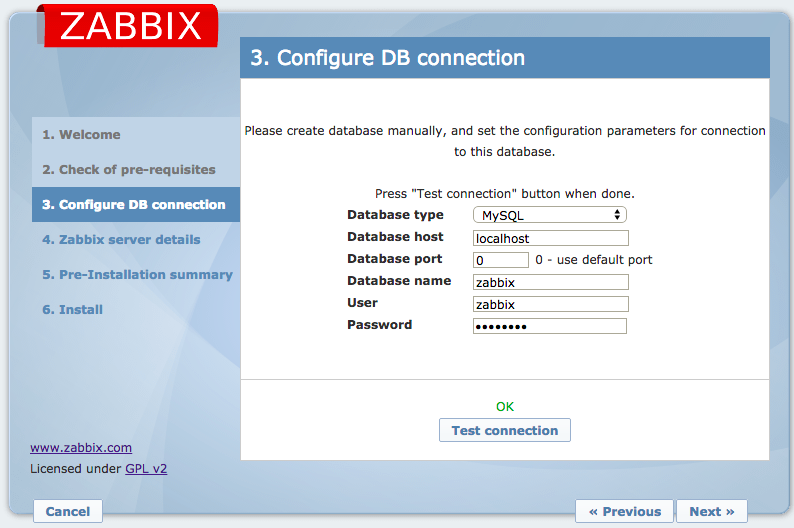
データベース設定
データベースはmariadbを使用
mariadbサービスの開始
systemctl enable mariadb
systemctl restart mariadb
データベースの作成
CREATE DATABASE zabbix CHARACTER SET utf8 COLLATE utf8_bin;
GRANT ALL ON zabbix.* TO 'zabbix'@'localhost' IDENTIFIED BY '<password>';
初期データの投入
mysql -uzabbix -p<password> zabbix < /usr/share/doc/zabbix-server-mysql-2.4.4/create/schema.sql
mysql -uzabbix -p<password> zabbix < /usr/share/doc/zabbix-server-mysql-2.4.4/create/images.sql
mysql -uzabbix -p<password> zabbix < /usr/share/doc/zabbix-server-mysql-2.4.4/create/data.sql
Zabbixの設定
/etc/zabbix/zabbix_server.conf にDBパスワードを追記
/etc/zabbix/zabbix_server.conf
  # DBPassword=
+ DBPassword=<password>
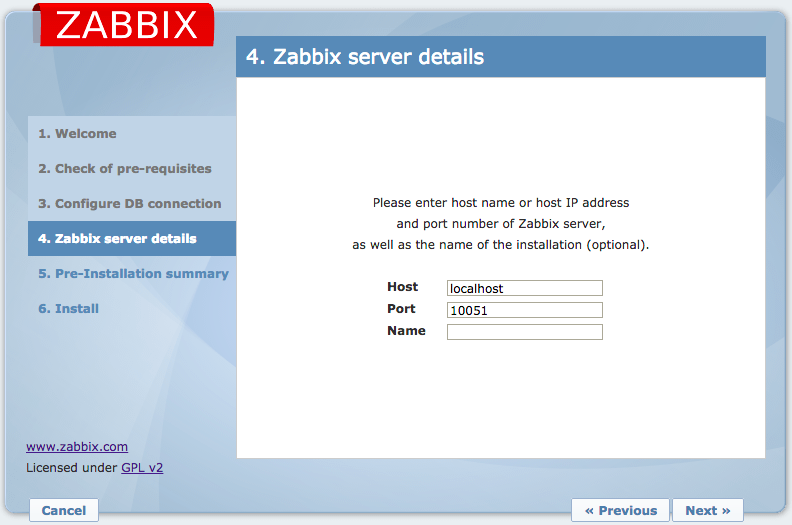
Zabbixサービスの起動
systemctl enable zabbix-agent
systemctl restart zabbix-agent
systemctl enable zabbix-server
systemctl restart zabbix-server
HTTPD設定
HTTPD設定ファイル
/etc/httpd/conf.d/zabbix.conf に以下を追加
/etc/httpd/conf.d/zabbix.conf
php_value date.timezone Asia/Tokyo
HTTPDの起動
systemctl enable httpd
systemctl restart httpd
firewalld の設定
外部からのHTTP, HTTPS, 10050/TCP. 10051/TCPへのアクセスを許可
# firewall-cmd --get-default-zone
public
# firewall-cmd --add-service=http --permanent
success
# firewall-cmd --add-service=https --permanent
success
# firewall-cmd --add-port=10050/tcp --permanent
success
# firewall-cmd --add-port=10051/tcp --permanent
success
# firewall-cmd --list-service
dhcpv6-client http https ssh
# firewall-cmd --list-port
10050/tcp 10051/tcp
ファイルを確認
# cat /etc/firewalld/zones/public.xml
<?xml version="1.0" encoding="utf-8"?>
<zone>
  <short>Public</short>
  <description>For use in public areas. You do not trust the other computers on networks to not harm your computer. Only selected incoming connections are accepted.</description>
  <service name="dhcpv6-client"/>
  <service name="http"/>
  <service name="ssh"/>
  <service name="https"/>
  <port protocol="tcp" port="10050"/>
  <port protocol="tcp" port="10051"/>
</zone>
firewalldの再起動
systemctl restart firewalld
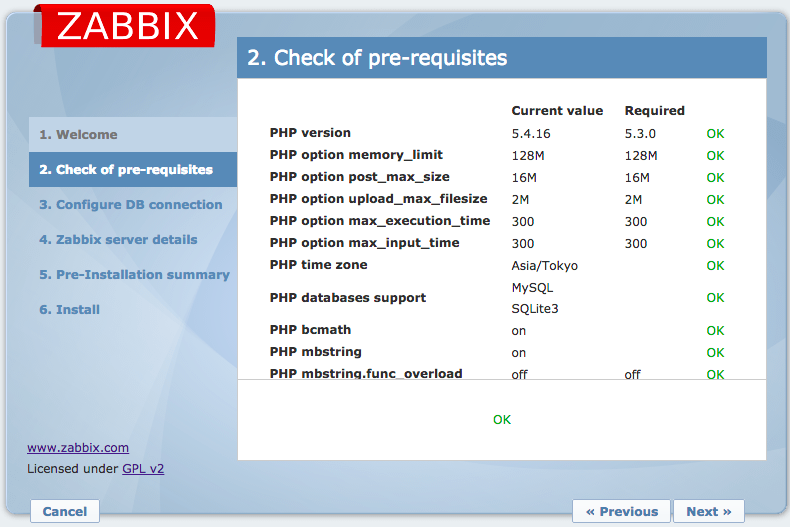
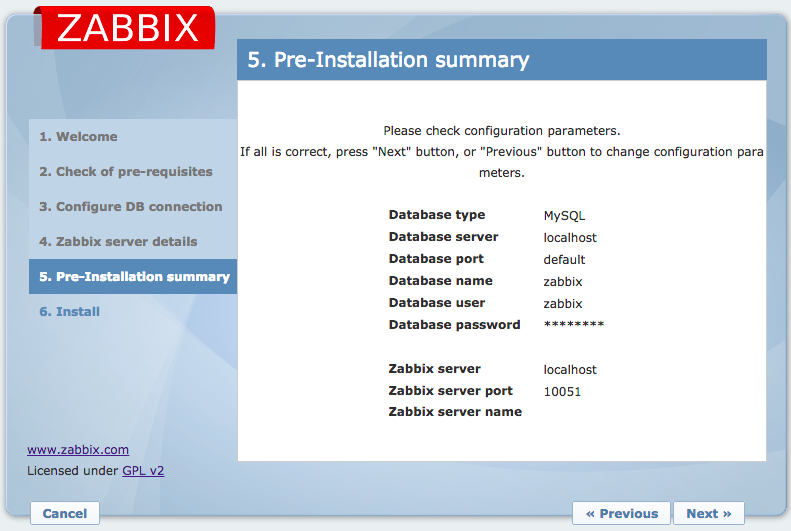
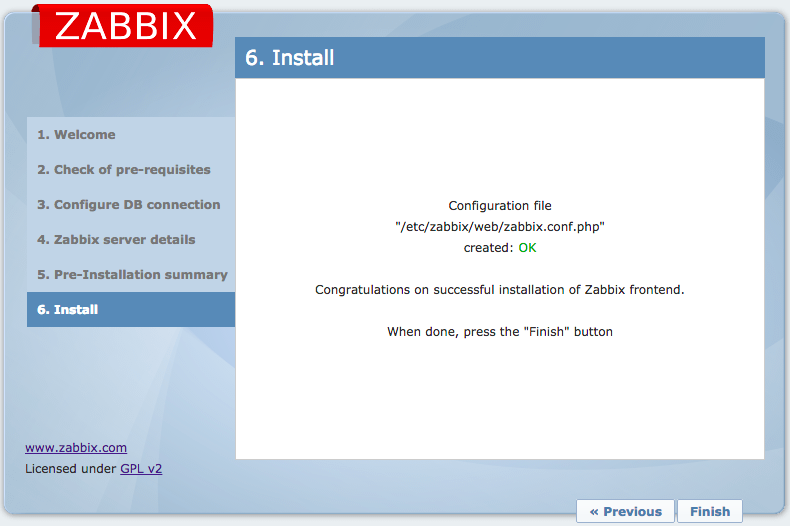
Web UI からセットアップ
https://<Zabbix server hostname or IP address>/zabbix/
または
http://<Zabbix server hostname or IP address>/zabbix/setup.php
にブラウザからログイン
デフォルトのユーザー、パスワードは
User: Admin
Password: zabbix
Web UI 画面
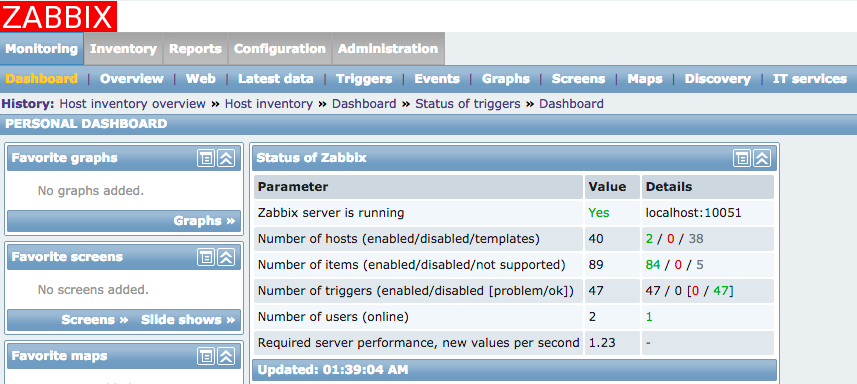
Zabbixの監視を有効化する
Configuration > Host > Zabbix server > Disabledをクリック
Zabbix Agent のセットアップ
Cent OS 7
パッケージのインストール
rpm -ivh http://repo.zabbix.com/zabbix/2.4/rhel/7/x86_64/zabbix-2.4.4-1.el7.x86_64.rpm
rpm -ivh http://repo.zabbix.com/zabbix/2.4/rhel/7/x86_64/zabbix-agent-2.4.4-1.el7.x86_64.rpm
/etc/zabbix/zabbix_agentd.conf にZabbix Serverを設定
# Server=127.0.0.1
Server=10.132.75.71

# ServerActive=127.0.0.1
ServerActive=10.132.75.71
zabbix-agent サービスの開始
# systemctl enable zabbix-agent
ln -s '/usr/lib/systemd/system/zabbix-agent.service' '/etc/systemd/system/multi-user.target.wants/zabbix-agent.service'
# systemctl start zabbix-agent
# systemctl |grep zabbix
zabbix-agent.service                                                                      loaded active running   Zabbix Agent
zabbix-agent の自動起動設定
chkconfig zabbix-agent on
Cent OS 6.4
パッケージのインストール
Zabbix 2.4 は systemd が必要なので、Cent OS 6.4 ではrpmパッケージからは Zabbix 2.4はインストールできない。
# rpm -ivh http://repo.zabbix.com/zabbix/2.4/rhel/7/x86_64/zabbix-2.4.4-1.el7.x86_64.rpm
Retrieving http://repo.zabbix.com/zabbix/2.4/rhel/7/x86_64/zabbix-2.4.4-1.el7.x86_64.rpm
warning: /var/tmp/rpm-tmp.I9lWFh: Header V4 DSA/SHA1 Signature, key ID 79ea5ed4: NOKEY
Preparing...                ########################################### [100%]
   1:zabbix                 ########################################### [100%]

# rpm -ivh http://repo.zabbix.com/zabbix/2.4/rhel/7/x86_64/zabbix-agent-2.4.4-1.el7.x86_64.rpm
Retrieving http://repo.zabbix.com/zabbix/2.4/rhel/7/x86_64/zabbix-agent-2.4.4-1.el7.x86_64.rpm
warning: /var/tmp/rpm-tmp.9StLkq: Header V4 DSA/SHA1 Signature, key ID 79ea5ed4: NOKEY
error: Failed dependencies:
	libc.so.6(GLIBC_2.14)(64bit) is needed by zabbix-agent-2.4.4-1.el7.x86_64
	libc.so.6(GLIBC_2.15)(64bit) is needed by zabbix-agent-2.4.4-1.el7.x86_64
	libc.so.6(GLIBC_2.17)(64bit) is needed by zabbix-agent-2.4.4-1.el7.x86_64
	systemd is needed by zabbix-agent-2.4.4-1.el7.x86_64
代わりにZabbix 2.2をインストール。
yum install -y epel-release
yum install -y zabbix22 zabbix22-agent
zabbix-agent の自動起動設定の確認
zabbix-agent が on になっていることを確認
# chkconfig --list | grep zabbix
zabbix-agent   	0:off	1:off	2:on	3:on	4:on	5:on	6:off
zabbix-agentd  	0:off	1:off	2:off	3:off	4:off	5:off	6:off
/etc/zabbix/zabbix_agentd.conf にZabbix Serverを設定
# Server=127.0.0.1
Server=10.132.75.71

# ServerActive=127.0.0.1
ServerActive=10.132.75.71
zabbix-agent サービスを再起動
# service zabbix-agent restart
Shutting down Zabbix agent:                                [  OK  ]
Starting Zabbix agent:                                     [  OK  ]
Windows
- 2 Zabbix agent on Microsoft Windows [Zabbix Documentation 2.4]
- http://www.zabbix.com/jp/download.php
インストール
- Zabbix Agentを http://www.zabbix.com/jp/download.php からダウンロード
-
C:\zabbix_agentdに解凍 -
conf\zabbix_agentd.win.confをconf\zabbix_agentd.confにコピー
zabbix_agentd.conf 設定
設定ファイルの変更
```diff
$ diff -U 1 zabbix_agentd.win.conf zabbix_agentd.conf
--- zabbix_agentd.win.conf      2015-03-29 07:27:41.906000000 -0500
+++ zabbix_agentd.conf  2015-03-29 07:39:03.194000000 -0500
@@ -13,3 +13,3 @@

-LogFile=c:\zabbix_agentd.log
+LogFile=c:\zabbix_agentd\logs\zabbix_agentd.log

@@ -73,3 +73,3 @@

-Server=127.0.0.1
+Server=10.132.75.71

@@ -114,3 +114,3 @@

-ServerActive=127.0.0.1
+ServerActive=10.132.75.71

@@ -125,3 +125,4 @@

-Hostname=Windows host
+#Hostname=Windows host
+

@@ -134,2 +135,3 @@
 # HostnameItem=system.hostname
+HostnameItem=system.hostname

@@ -145,2 +147,3 @@
 # HostMetadata=
+HostMetadata=Windows
Zabbix Agent を Windows サービスへ登録
PS C:\> cd C:\zabbix_agentd
PS C:\zabbix_agentd> .\bin\win64\zabbix_agentd.exe -i -c .\conf\zabbix_agentd.conf
zabbix_agentd.exe [3340]: service [Zabbix Agent] installed successfully
zabbix_agentd.exe [3340]: event source [Zabbix Agent] installed successfully
PS C:\zabbix_agentd> .\bin\win64\zabbix_agentd.exe -s -c .\conf\zabbix_agentd.conf
zabbix_agentd.exe [3384]: service [Zabbix Agent] started successfully
Zabbix Agent の動作確認
Agent側で 10050/TCP を Listen していることを確認
# netstat -nat | grep 10050
tcp        0      0 0.0.0.0:10050           0.0.0.0:*               LISTEN
tcp6       0      0 :::10050                :::*                    LISTEN
Zabbix Serverから、10050/TCP に TCPセッションを確立し、バージョンを取得できることを確認
(Zabbix Server)$ telnet 10.132.75.81 10050
Trying 10.132.75.81...
Connected to 10.132.75.81.
Escape character is '^]'.
agent.version
ZBXD2.4.4Connection closed by foreign host.