VirtalBox Guest Additions のインストール
開発ツールのインストール
Guest Additionsをコンパイルするのに必要な開発ツールを入れたら一度再起動する
yum install -y bzip2 gcc make kernel-devel kernel-headers dkms gcc-c++
shutdown -h now
バージョン確認
VirtualBox のバージョンと同じバージョンの Guest Additions の iso をダウンロードしてマウントする
ホストOS側(mac)で確認する
[ookubo@macbook ~]$ VirtualBox --help
Oracle VM VirtualBox Manager 5.1.12
今回は 5.1.12 が対象
ゲストOS側(CentOS)
curl http://download.virtualbox.org/virtualbox/5.1.12/VBoxGuestAdditions_5.1.12.iso -o VBoxGuestAdditions_5.1.12.iso
mount -t iso9660 -o loop VBoxGuestAdditions_5.1.12.iso /media
export KERN_DIR=/usr/src/kernels/3.10.0-514.2.2.el7.x86_64/
sh /media/VBoxLinuxAdditions.run
3.10.0-514.2.2.el7.x86_64 は、環境によりバージョンが異なるので適宜編集する
共有フォルダーの設定
VirtualBox の設定から共有フォルダー >> 追加アイコンから下記の様に入力する
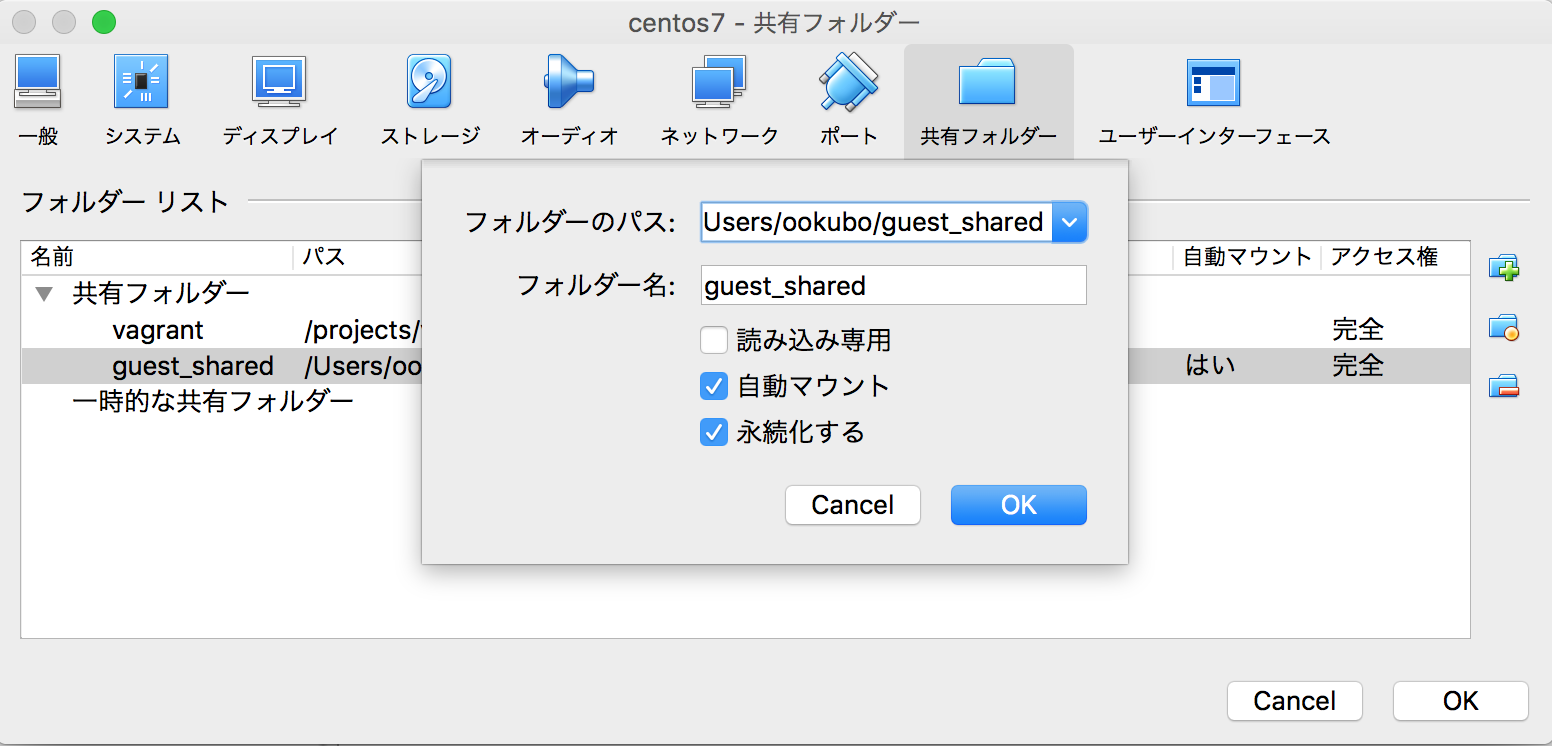
フォルダーのパス(ホストOS側): /Users/ookubo/guest_shared/
フォルダー名(ゲストOS側): guest_shared
読み込み専用: チェック外す
自動マウント: チェックする
永続化する: チェックする
/Users/ookubo と guest_shared の箇所は、自分の好きなフォルダー名で構いません
「OK」で設定したら、ゲストOSでマウントを実行する
mkdir /guest_shared
mount -t vboxsf guest_shared /guest_shared
ファイルを作成して確認する
ホストOS側(mac)で、適当にファイルを作成する
touch ~/guest_shared/test.txt
ゲストOS側(centos)で、ファイルが参照できるか確認する
[root@localhost ~]$ ls -alp /guest_shared/
合計 12
drwxr-xr-x   1 root root  136  1月 14 00:34 ./
drwxr-xr-x. 19 root root 4096  1月 14 00:27 ../
-rw-r--r--   1 root root    0  1月 14 00:34 test.txt
後はホストOS・ゲストOS側でそれぞれ読み書きして、更新が同期されているか確認する
余談で apache で使用する HTML ファイルを共有できるようにしてみる
一度アンマウントして、マウント時に読み書きするユーザに apache を指定する
umount -t vboxsf guest_shared
mount -t vboxsf -o uid=$(id apache -u),gid=$(id apache -g) guest_shared /guest_shared
vi などで apche の設定ファイルを編集して、 DocumentRoot を共有フォルダーのマウント先にする
既存の DocumentRoot はコメントアウトして、<Directory> ディレクティブを、追記します
/etc/httpd/conf/httpd.conf
#DocumentRoot "/var/www/html"
DocumentRoot "/guest_shared"

<Directory "/guest_shared">
    Require all granted
</Directory>
テスト用の index.html を作成する
/guest_shared/index.html
<html><body>Hello World</body></html>
apche の設定を再読みします
systemctl reload httpd
ゲストOS側で index.html が取得できるか確認する
[root@localhost ~]# curl http://127.0.0.1
<html><body>Hello World</body></html>
後は index.html をホストOS側で sublime などを使って手軽に編集する
※実際の本番環境などで実行する人はいないと思いますが、セキュリティ的にもパフォーマンス的にもザルなので気をつけてください、あくまでも練習用です