CleanArchitectureは一度は読んでおくべきだと思ったので、読んでみます。
CleanArchitectureといえば、多分このGitHubにあがっているアプリがすごく有名なんじゃないかなと思っています。
https://github.com/android10/Android-CleanArchitecture
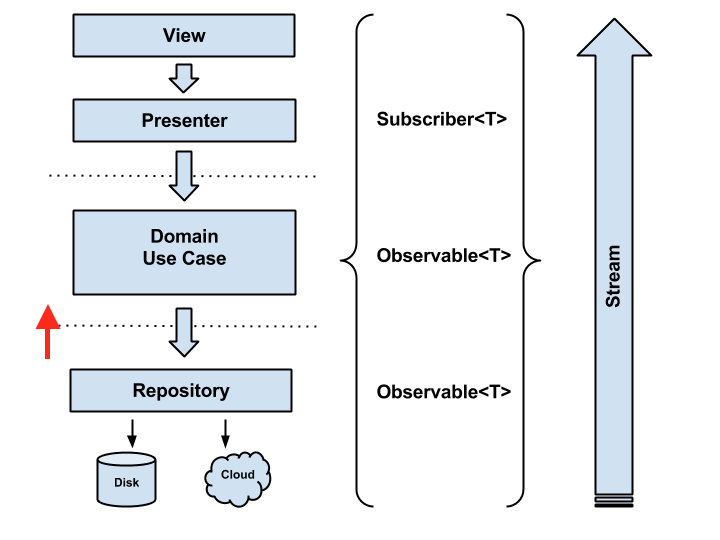
以下の流れで作られていますが、どういう単位でUseCaseを作るかなど具体的なイメージが難しいので、実際にコードを追いながら見ていきます。
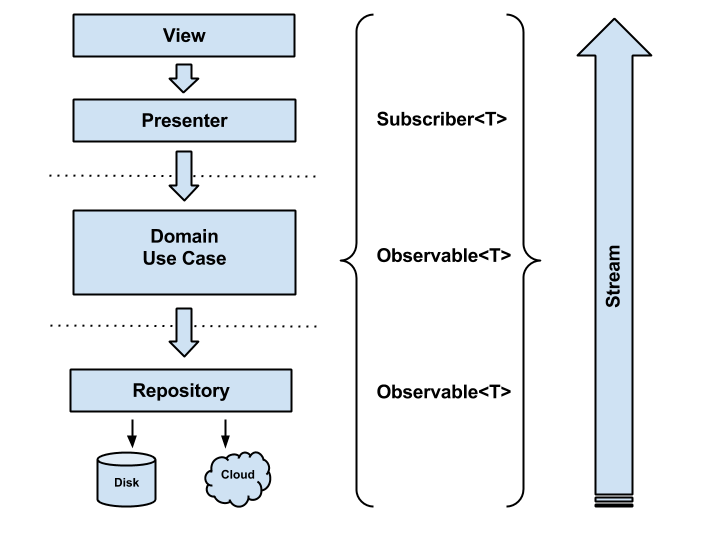
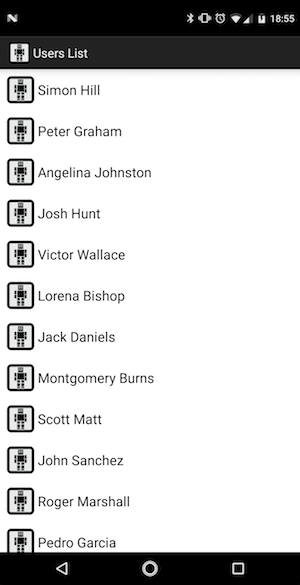
このサンプルアプリは表示すると以下のようになっていて、これを表示するまでの流れを見ていきます。
View -> Presenter

ViewやPresenterはpresentationというモジュールに入っています。
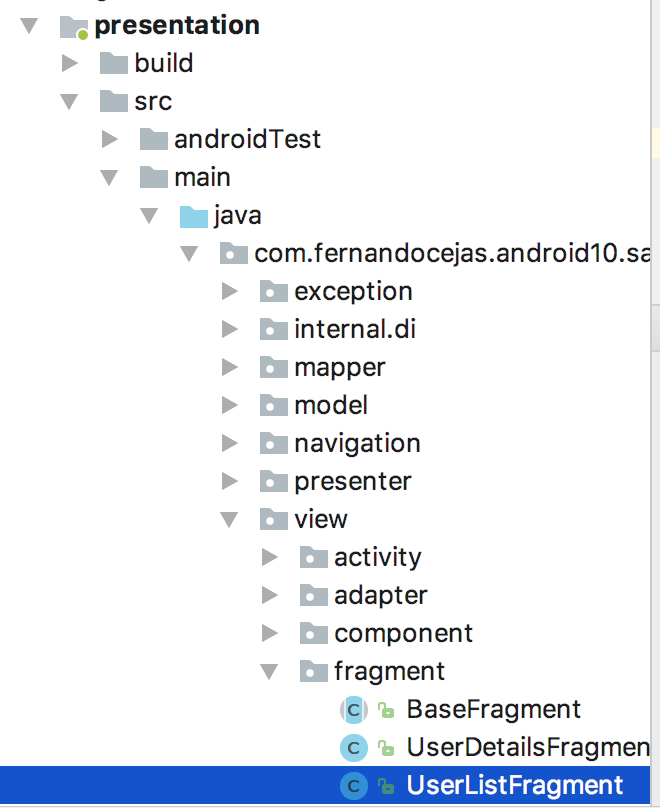
UserListFragmentのonViewCreatedでPresenter#initialize()を普通にに呼び出すだけみたいです。
  @Override public void onViewCreated(View view, Bundle savedInstanceState) {
    super.onViewCreated(view, savedInstanceState);
    this.userListPresenter.setView(this);
    if (savedInstanceState == null) {
      this.loadUserList();
    }
  }

  private void loadUserList() {
    // Presenterへの呼び出し!!
    this.userListPresenter.initialize();
  }
Presenter -> Domain/Use Case

GetUserList.getUserListUseCase()への呼び出しで、RxJavaのObserverを渡して、呼び出します。
渡したUserListObserverでの処理については後述します。
  /**
   * Initializes the presenter by start retrieving the user list.
   */
  public void initialize() {
    this.loadUserList();
  }

  /**
   * Loads all users.
   */
  private void loadUserList() {
    this.hideViewRetry();
    this.showViewLoading();
    this.getUserList();
  }
  private void hideViewRetry() {
    this.viewListView.hideRetry();
  }
  private void showViewLoading() {
    // ViewでProgressBarを出す
    this.viewListView.showLoading();
  }
  private void getUserList() {
    // UseCaseの呼び出しして、RxJavaのObserverを渡す
    this.getUserListUseCase.execute(new UserListObserver(), null);
  }
Domain/Use Case -> Repository

UseCaseでは、FragmentやPresenterが入っていたpresentationではなく、domainというモジュールに入っています

Android-CleanArchitectureでのUseCaseの役割は基本的にuserRepository.users()を呼び出して、Repositoryから取ってくるのみで、あとはRxJavaとAndroidのライフサイクルのつなぎ込みという感じになっています。
本当はアプリケーション固有のビジネスルールを書くところなので、本当はここで業務ロジックがあればかけるはずです。
ここでは紹介しませんが、実際にGetUserDetailsでは引数がnullだったらNullPointerExceptionを投げるというルール?が書かれています。
public abstract class UseCase<T, Params> {
  // このメソッドはそれぞれのUseCaseが実装する
  abstract Observable<T> buildUseCaseObservable(Params params);

  public void execute(DisposableObserver<T> observer, Params params) {
    Preconditions.checkNotNull(observer);
    // buildUseCaseObservable()を引数のobserverで観測する。
    final Observable<T> observable = this.buildUseCaseObservable(params)
        .subscribeOn(Schedulers.from(threadExecutor))
        .observeOn(postExecutionThread.getScheduler());
    addDisposable(observable.subscribeWith(observer));
  }
public class GetUserList extends UseCase<List<User>, Void> {

  private final UserRepository userRepository;

  @Inject
  GetUserList(UserRepository userRepository, ThreadExecutor threadExecutor,
      PostExecutionThread postExecutionThread) {
    super(threadExecutor, postExecutionThread);
    this.userRepository = userRepository;
  }

  @Override Observable<List<User>> buildUseCaseObservable(Void unused) {
    return this.userRepository.users();
  }
}
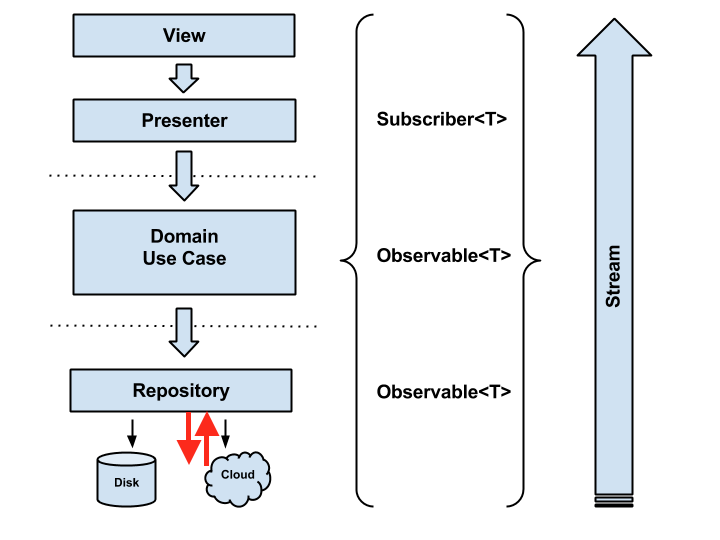
Repository <-> Disk/Cloud

Repositoryは実装クラスのUserDataRepositoryはdata.repositoryパッケージにあり、インターフェースのUserRepositoryはdomain.repositoryパッケージにあります。
実装の詳細はdataレイヤーになるが、インターフェースはdomainのレイヤーということだと思います。
Repository自体の実装はシンプルですが、UserDataStoreFactoryとUserEntityDataMapperが登場します、
UserDataStoreFactoryからUserDataStoreを取得して、そこからuserEntityList()を呼び出してUserEntityを取得します。
UserEntityDataMapperはそのUserEntityクラスをUserクラスへの変換を行います。
@Singleton
public class UserDataRepository implements UserRepository {
  @Override public Observable<List<User>> users() {
    //we always get all users from the cloud
    final UserDataStore userDataStore = this.userDataStoreFactory.createCloudDataStore();
    // ここでUserEntityの取得とUserクラスへの変換を行う!!
    return userDataStore.userEntityList().map(this.userEntityDataMapper::transform);
  }
UserDataStoreFactoryではざっくり、どのDataSourceから取得するか決めます。つまりAPIから取得するかDBから取得するかを決めています。今回は固定でAPIから取得するので、CloudDataStoreを取得します。
  // こちらは今回使わないが、参考のため。
  // DiskにあればDBをDataSourceに使い、なければAPIを使う
  /**
   * Create {@link UserDataStore} from a user id.
   */
  public UserDataStore create(int userId) {
    UserDataStore userDataStore;

    if (!this.userCache.isExpired() && this.userCache.isCached(userId)) {
      userDataStore = new DiskUserDataStore(this.userCache);
    } else {
      userDataStore = createCloudDataStore();
    }

    return userDataStore;
  }

  // こちらが今回使うメソッド。基本的にAPIアクセスを行うCloudUserDataStoreを返す
  /**
   * Create {@link UserDataStore} to retrieve data from the Cloud.
   */
  public UserDataStore createCloudDataStore() {
    final UserEntityJsonMapper userEntityJsonMapper = new UserEntityJsonMapper();
    final RestApi restApi = new RestApiImpl(this.context, userEntityJsonMapper);

    return new CloudUserDataStore(restApi, this.userCache);
  }
UserEntityがCloudUserDataStoreによって取得できるので、UserEntityDataMapperを使ってAPIから取得したUserEntityクラスをUserクラスにアプリ内用に変換を行います。
  /**
   * Transform a {@link UserEntity} into an {@link User}.
   *
   * @param userEntity Object to be transformed.
   * @return {@link User} if valid {@link UserEntity} otherwise null.
   */
  public User transform(UserEntity userEntity) {
    User user = null;
    if (userEntity != null) {
      user = new User(userEntity.getUserId());
      user.setCoverUrl(userEntity.getCoverUrl());
      user.setFullName(userEntity.getFullname());
      user.setDescription(userEntity.getDescription());
      user.setFollowers(userEntity.getFollowers());
      user.setEmail(userEntity.getEmail());
    }
    return user;
  }

  /**
   * Transform a List of {@link UserEntity} into a Collection of {@link User}.
   *
   * @param userEntityCollection Object Collection to be transformed.
   * @return {@link User} if valid {@link UserEntity} otherwise null.
   */
  public List<User> transform(Collection<UserEntity> userEntityCollection) {
    final List<User> userList = new ArrayList<>(20);
    for (UserEntity userEntity : userEntityCollection) {
      final User user = transform(userEntity);
      if (user != null) {
        userList.add(user);
      }
    }
    return userList;
  }
public class UserEntity {

  @SerializedName("id")
  private int userId;

  @SerializedName("cover_url")
  private String coverUrl;

  @SerializedName("full_name")
  private String fullname;
public class User {

  private final int userId;

  public User(int userId) {
    this.userId = userId;
  }

  private String coverUrl;
  private String fullName;
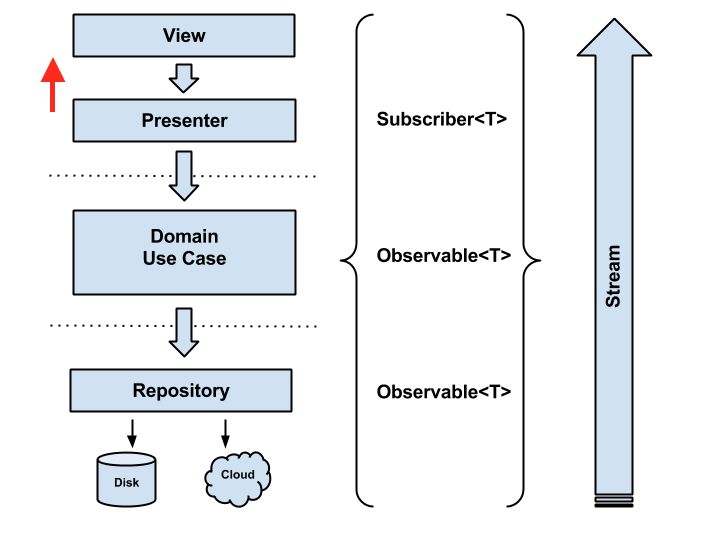
Presenter -> View
取得してきたUserクラスを表示用のUserModelクラスに変換する処理もPresenterに存在しているので紹介しておきます。
以下のようにonNext()で取得してきたUserクラスのインスタンスをUserModelに変換して表示を行います。
  private void getUserList() {
    // UseCaseの呼び出しして、RxJavaのObserverを渡す
    this.getUserListUseCase.execute(new UserListObserver(), null);
  }

  private final class UserListObserver extends DefaultObserver<List<User>> {

   ...
    @Override public void onNext(List<User> users) {
      UserListPresenter.this.showUsersCollectionInView(users);
    }
  }

  private void showUsersCollectionInView(Collection<User> usersCollection) {
    // ここでUserクラスからUserModelクラスへ変換を行う!!
    final Collection<UserModel> userModelsCollection =
        this.userModelDataMapper.transform(usersCollection);
    this.viewListView.renderUserList(userModelsCollection);
  }
  /**
   * Transform a {@link User} into an {@link UserModel}.
   *
   * @param user Object to be transformed.
   * @return {@link UserModel}.
   */
  public UserModel transform(User user) {
    if (user == null) {
      throw new IllegalArgumentException("Cannot transform a null value");
    }
    final UserModel userModel = new UserModel(user.getUserId());
    userModel.setCoverUrl(user.getCoverUrl());
    userModel.setFullName(user.getFullName());
    userModel.setEmail(user.getEmail());
    userModel.setDescription(user.getDescription());
    userModel.setFollowers(user.getFollowers());

    return userModel;
  }

  /**
   * Transform a Collection of {@link User} into a Collection of {@link UserModel}.
   *
   * @param usersCollection Objects to be transformed.
   * @return List of {@link UserModel}.
   */
  public Collection<UserModel> transform(Collection<User> usersCollection) {
    Collection<UserModel> userModelsCollection;

    if (usersCollection != null && !usersCollection.isEmpty()) {
      userModelsCollection = new ArrayList<>();
      for (User user : usersCollection) {
        userModelsCollection.add(transform(user));
      }
    } else {
      userModelsCollection = Collections.emptyList();
    }

    return userModelsCollection;
  }
public class UserModel {

  private final int userId;

  public UserModel(int userId) {
    this.userId = userId;
  }

  private String coverUrl;
  private String fullName;
そして最終的にRecyclerViewのAdapterで表示を行います。
  @Override public void onBindViewHolder(UserViewHolder holder, final int position) {
    final UserModel userModel = this.usersCollection.get(position);
    holder.textViewTitle.setText(userModel.getFullName());
    holder.itemView.setOnClickListener(new View.OnClickListener() {
      @Override public void onClick(View v) {
        if (UsersAdapter.this.onItemClickListener != null) {
          UsersAdapter.this.onItemClickListener.onUserItemClicked(userModel);
        }
      }
    });
  }
まとめ
かなりざっくりした感想になるのですが、確かにこのぐらいきっちりしていれば大きくなっても大丈夫そうではあるなと感じました。
印象に残っているのはAPIから取得してから表示するまでに同じユーザーのデータをdata.entity.UserEntity -> domain.User -> presentation.model.UserModelに変換するところです。
大きい場合には効いてくると思うのですが、ちょっとしんどい気がしました。ただ、Entityの変換とモジュールも分かれていることで、APIやDBとビジネスロジックを切り離し、更にViewとも切り離すというとてもCleanな作りなのかなと思いました。