APIドキュメントツールにswaggerというものがあります。
ドキュメントに記載したAPIの一覧を表示し
パラメータなどを直接入力してその場で試せるというものです。
facebookのGraph API Explorerや
twitterの https://dev.twitter.com/console と同じような位置づけです。
すべて設定するととても便利なのですが、
ドキュメント元となるJSONの作成が必要であったり、
使いこなすのが結構大変だったりします。
ただswagger-expressを使うと
出来るだけ簡単にドキュメント化することができます。
swaggerの構成
- ブラウザでの表示のためのindex.htmlやjs,css,imgなどがある、swagger-ui
- APIの情報がまとめられている
設置の仕方
expressを使ったアプリ sampleApp 上で、expressを使う前提で話を進めます。
アプリの作成と必要なパッケージのインストール
$ mkdir sampleApp
$ npm init
$ npm install express --save
$ npm install swagger-express --save-dev
swagger-ui の用意
https://github.com/wordnik/swagger-ui からuiを取得する。
$ cd ..
$ git clone git@github.com:wordnik/swagger-ui.git
$ cp -R swagger-ui/dist sampleApp/dist
※ swagger-uiは、ドキュメント上ではbuildを行うが、Javaが必要だったりするので、今回はそのまま distディレクトリ以下を利用してます。
app.js
var app = require('express')();
var swagger = require('swagger-express');

app.use(swagger.init(app, {
  apiVersion: '1.0',
  swaggerVersion: '1.0',
  swaggerURL: '/docs',           // swaggerページのパス
  swaggerJSON: '/api-docs',      // swagger表示用のデータアクセス先
  swaggerUI: './dist',           // swagger-uiが置いてあるパス
  basePath: 'http://localhost:3000',
  apis: ['./api.js'],            // ドキュメントが記載されているファイル
  middleware: function(req, res){}
}));

app.listen(3000);
apis に指定したファイルの中に記載されているコメントを見て、swaggerJSONのレスポンスを返します。
api.js
/**
 * @swagger
 * resourcePath: /api
 * description: All about API
 */

/**
 * @swagger
 * path: /login
 * operations:
 *   -  httpMethod: POST
 *      summary: Login with username and password
 *      notes: Returns a user based on username
 *      responseClass: User
 *      nickname: login
 *      consumes:
 *        - text/html
 *      parameters:
 *        - name: username
 *          description: Your username
 *          paramType: query
 *          required: true
 *          dataType: string
 *        - name: password
 *          description: Your password
 *          paramType: query
 *          required: true
 *          dataType: string
 */
exports.login = function (req, res) {
  var user = {};
  user.username = req.param('username');
  user.password = req.param('password');
  res.json(user);
}

/**
 * @swagger
 * models:
 *   User:
 *     id: User
 *     properties:
 *       username:
 *         type: String
 *       password:
 *         type: String
 */
コメント欄にある@swaggerより後ろにYAML形式のように書くことで
ドキュメントを作成していきます。
yamlファイルやcoffeeでも記載が可能です。
詳しくはswagger-expressのREADMEを。
swagger-ui側のapi-docsのURLを変更
dist/index.htmlの中に記載されているnew SwaggerUiにある
urlの値をapp.jsで記載したswaggerJSONと統一させます。
      $(function () {
        window.swaggerUi = new SwaggerUi({
        url: "http://localhost:3000/api-docs", // ここを書き換える
        dom_id: "swagger-ui-container",
        ...
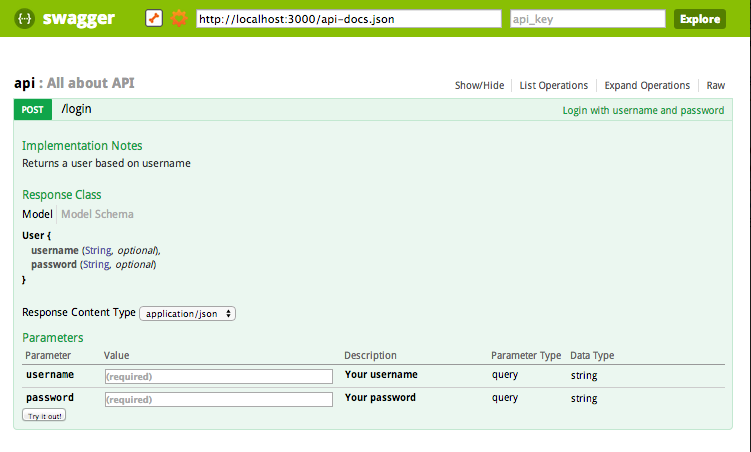
アクセス
node app で動くので、
http://localhost:3000/docs でアクセスすれば以下のような画面が表示されます。