この記事の概要
日本で正式リリースされたStripeをRuby on Railsに導入し、サブスクリプション型(月額定期課金)の決済システムを組み込む方法を説明します。
私が開発している formrun(フォーム・ラン) というサービスにて、2016春頃から実際にオープンβ版のStripeを利用してきた経験をもとに、具体的なコードとともに解説していきます。
実際のコードを使ったサブスクリプション型決済の説明は例が少なく、自分も実装に非常に苦労しました。これを参考にしていただいたり、ツッコミをいただけると幸いです。
対象読者
- Ruby on Railsにサブスクリプション型の決済システムを組み込みたいエンジニア
Stripeで出来ること
- 1回限りの決済(この記事の対象外)
- サブスクリプション型決済(この記事の対象)
- クレジットカード情報の保持(不可逆トークン化)
- クーポンコード(割引)の発行・適用
- 複数通貨対応・通貨変換
- 柔軟なAPI/Webhook
Stripeの注意点
- 決済手数料が比較的高い
- 現在のところ、日本利用では利用できるカードブランドがVisa, Master, Amexに限られる
ただ,決済手数料としてではなく,「 課金ユーザーの推移を管理するダッシュボード 」として考えると,少々高い手数料の価値はあると考えられます。Stripeのダッシュボードまじ神です。
※ 2018年5月17日追記
StripeでJCBが利用可能になるそうです!
http://b.hatena.ne.jp/entry/s/internet.watch.impress.co.jp/docs/news/1122126.html
これで,デメリットが1つ減りますね。
各種サービスとの比較
ごく最近の比較表を作成している方がいらっしゃるのでリンクを張っておきます。
Stripeは決済手数料(3.6%)が競合サービスに比べ高いですが、ライブラリやStackOverflowなどでのコミュニティが活発なため、困ったときのトラブルシューティングは比較的容易です。
https://github.com/stripe/stripe-ruby
http://stackoverflow.com/questions/tagged/stripe-payments
また日本法人もあるので、日本語でのサポートも柔軟に対応してくれるようです。
Stripeアカウント作成から利用まで
驚くべきことに、Stripeを使って本番サービスとして提供するために審査は必要ありません。(PAY.JPなども同様なようです)
本番利用開始と並行して、サービス提供主の審査をWeb上から行うことができ、数日以内に審査が完了し設定した銀行口座に振り込まれます。
RailsサービスにStripeを組み込む
サービスの仕様
StripeのAPIを利用することで、差額の扱いや決済日の設定など様々な設定が可能ですが、ここでは、一番シンプルに以下のようなサービスと決済の仕様を考えます:
- サービスには
UserとTeamがあり、Team毎に決済を設定できる - サブスクリプション型は前払いの月額(monthly)で自動的に更新する
- サービスには無料プランと有料プランがあり、無料プランはクレジットカードを登録せずに使える
- ユーザーは無料プランと有料プランを任意のタイミングで切り替えることができる
差額についての仕様
Stripeがデフォルトで推奨する差額の扱いは、「決済日は変えずに金額の増減で対応する」というコンセプトです。
プラン変更と同時に差額を請求・返金することもできますが、そのためにはAPIやWebhookを利用した追加開発が必要です。
ここでは、Stripeの推奨する方式で対応してみます。
- パターンA: プラン変更時に不足の差額が発生した場合
- 次回決済時に上乗せして請求する
- パターンB: プラン変更時に過剰の差額が発生した場合
- 次回以降の決済から相殺する
具体的に、1,000円と4,000円のプランがある時に、これらの間でプラン変更したらどうなるか図で示してみます。

注意が必要なのは、「余剰残高」が発生した状態でユーザーがアカウント削除(退会)してしまうと、その権利が消滅することになります。
詳細はStripe docs内の Upgrading and Downgrading Plans に記載されています。
(図中ではわかりにくいですが、差額の計算は「秒単位」で行われるようです)
Rails側のモデル
Rails側にはもともと利用者を表すUserモデルと、Userが複数集まり組織を表すTeamモデルがあるとします。
決済はTeam単位で行うとし、決済に関する権限はTeamに紐づくUserが行えるとします。
- User
- サービスの利用ユーザーを表すモデル
- Team
-
Userを束ねる組織を表すモデル
-
- Plan
- 料金プランを表すマスタデータ
- 金額が含まれる
- Invoice
- 請求情報
- サブスクリプションが更新される毎に作成される
- このデータをもとにサービス上やメールでの請求書情報を生成する
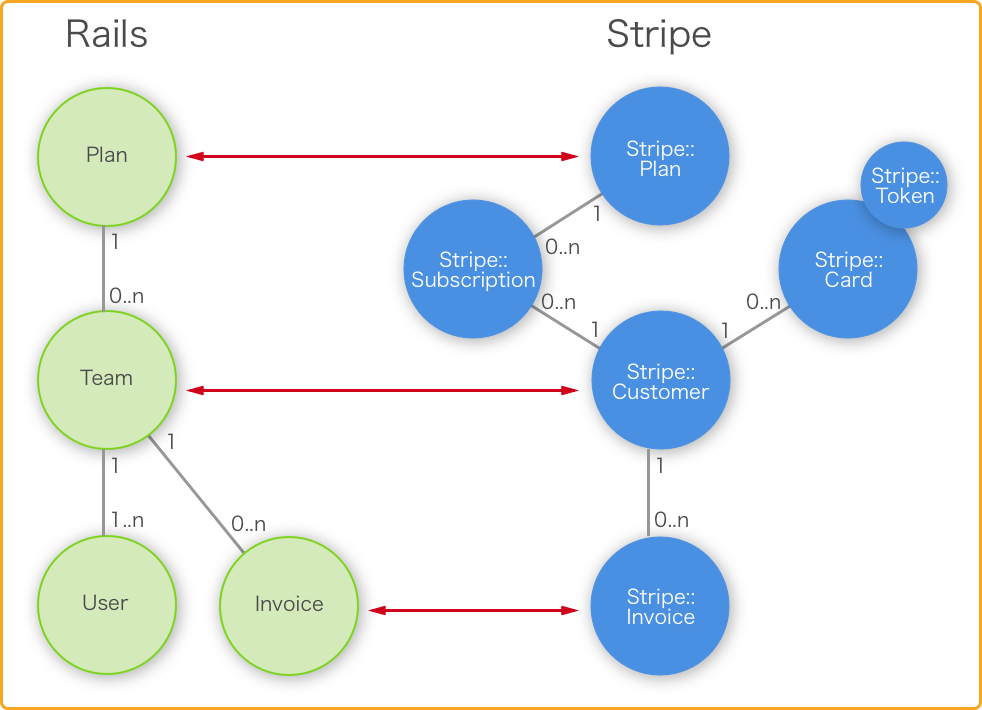
Stripe側のモデル
Stripe側には、サブスクリプション型決済のためのいくつかのモデルが存在し、いくつかのデータはRails側と同期する必要があります。
Stripeには充実したAPIドキュメントがありますが、サブスクリプション型決済を実装するだけなら、以下のモデルだけ知っておけば十分です。
(以降、Rails側のモデルと区別するためにStripe::というprefixを付けます)
- Stripe::Plan
- サブスクリプションの料金プランを表すモデル
- 決済周期(monthly)や金額、通貨、税額(消費税・付加価値税)など
- https://stripe.com/docs/api#plans
- Stripe::Customer
- 決済アカウントにあたるモデル。Rails側の
Teamと1対1で対応 - 無料プランでも対応する
Stripe::Customerが存在する - https://stripe.com/docs/api#customers
- 決済アカウントにあたるモデル。Rails側の
- Stripe::Token
- クレジットカード情報をトークン化したデータ
- ブラウザからJavaScriptを使ってクレジットカード情報をStripeに送ると取得できる
- Rails側はこの
Stripe::Tokenを使ってやり取りするためカード情報を取得する必要はない - https://stripe.com/docs/api#tokens
- Stripe::Card
- トークン化されたクレジットカード情報
- 住所やカードブランド・カードの下4桁など
-
Stripe::Tokenを使ってやり取りする - https://stripe.com/docs/api#cards
- Stripe::Subscription
-
Stripe::Customerのプラン状況や次の決済日などの情報を持つ -
Stripe::CustomerとStripe::Planに紐づく - https://stripe.com/docs/api#subscriptions
-
- Stripe::Invoice
- 請求情報
- サブスクリプションの更新時(monthlyの場合は毎月1回)に作成される
- 小計・税額・合計金額・請求のステータスなどの情報を持つ
- https://stripe.com/docs/api#invoices
料金プランをStripeに同期する
Stripeでサブスクリプション型決済を導入するためには、料金プラン情報をStripe側に同期しておく必要があります。
Stripeには公式のgemがあるので、これを使ってStripe::Planの登録しましょう。
APIキーの設定などは事前に済ませておいてください。
Stripe.api_key = ENV.fetch('STRIPE_SECRET_KEY')
まず、Planモデルは以下のような構造になっています。
# == Schema Information
#
# Table name: plans
#
#  id                        :integer          not null, primary key
#  stripe_plan_id            :string(255)      not null
#  name                      :string(255)      not null
#  amount                    :integer          not null
#  currency                  :integer          not null
#  interval                  :string(255)      not null
#  statement_descriptor      :string(22)       not null
#
class Plan < ActiveRecord::Base
  has_many   :teams

  FREE_PLAN_ID = 1

  ...
end
Stripe::Planのidを保存するためにstripe_plan_id というカラムがあります。
このPlanモデルに料金データを追加し、Stripe::Planに同期します。
Plan.create(
    id: 1,
    stripe_plan_id: 'start-plan',
    name: 'Start Plan',
    amount: 1000,
    currency: :jpy,
    interval: 'month',
    statement_descriptor: 'Start Plan',
)
...

Plan.find_each do |plan|
  Stripe::Plan.create(
    id:       plan.stripe_plan_id,
    amount:   plan.amount, # e.g. 1000
    currency: plan.currency, # e.g. 'jpy'
    interval: plan.interval, # e.g. 'month
    name:     plan.name,
    statement_descriptor: plan.statement_descriptor
  )
end
正常に同期されたかどうか、Stripeの管理画面から確認してみましょう。

Stripe::Customerを作成する
ここでは、先に無料プランになってサービスを体験してもらってから有料プランに移行するというシナリオを考えてみます。直接有料プランになる場合は、次のセクションと一緒に進めてください。
Team作成時にコールバックでStripe::Customerを作成します。
TeamにはStripe::Card、Stripe::CustomerとStripe::Subscriptionを保存するために、stripe_card_id、stripe_customer_id、stripe_subscription_idがあります。
また、サブスクリプションの更新日となる情報としてactive_untilを持ち、Stripeの決済が正常に完了した時に更新されるようにする。
# == Schema Information
#
# Table name: teams
#
#  id                        :integer          not null, primary key
#  plan_id            :integer
#  stripe_card_id            :string(255)
#  stripe_customer_id        :string(255)
#  stripe_subscription_id        :string(255)
#  active_until            :datetime         not null
#
class Team < ActiveRecord::Base
  belongs_to :owner,            class_name: 'User'
  belongs_to :plan
  before_validation :create_stripe_customer_and_subscription, if: :new_record?

  private

    # Team作成時にStripe::Customer, Stripe::Subscriptionを作成し、ひも付け
    def create_stripe_customer_and_subscription
      # Stripe::Customer 作成
      stripe_customer = Stripe::Customer.create(
        email:       owner.email,
        plan:        Plan::FREE_PLAN_ID,
        tax_percent: 8.0,
        metadata: {
          owner_id: owner.id,
          rails_env: Rails.env.to_s
        } # デバッグや管理のためmetadataを任意に追加できる
      )

      self.plan = Plan.free_plan
      self.stripe_customer_id = stripe_customer.id
      stripe_subscription = stripe_customer.subscriptions.data.first
      self.stripe_subscription_id = stripe_subscription.id
      self.active_until = Time.zone.at(stripe_subscription.current_period_end)
    end
end
有料プランに変更する
有料プランに変更するためには、クレジットカードを登録しないといけませんが、その前にクレジットカードのトークン化を行う必要があります。
StripeはStripe.jsというJavaScriptのライブラリを提供していて、これを利用してRails側とやりとりせずに、直接Stripeと通信してクレジットカード情報をトークン(Stripe::Token)に変換します。
詳細はStripeのDocsの Creating a Custom Payment Form with Stripe.js にありますので、ここでは流れの概要を説明します。
まず、クレジットカード情報を入力するフォームとStripe.jsを読み込むscriptタグを設置します。
<%= form_tag(subscription_path, method: 'post', id: 'payment-form') do %>
  <%# Planを選択 %>
  <%= select_tag 'plan_id', Plan.all.map{|i| [i.name, i.id]} %>

  <%# カード情報を入力 (Railsサーバには送信されない) %>
  Card Number: <input type="text" size="20" data-stripe="number">
  Expire: <input type="text" size="2" data-stripe="exp_month">/<input type="text" size="2" data-stripe="exp_year">
  CVC: <input type="text" size="4" data-stripe="cvc">

  <input type="submit" class="submit" value="Submit Payment">
</form>

<script type="text/javascript" src="https://js.stripe.com/v2/"></script>
この時に各フィールドタグにname属性を指定しないのがポイントです。それによって、カード情報がサーバに送信されるのを防ぎます。
次にJavaScriptでカード情報をStripe::Tokenに変換します。
Stripe.card.createTokenというメソッドにFormオブジェクトを渡すと、必要なパラメータを取得し、コールバックでStripe::Tokenを返してくれます。
<script type="text/javascript">
  Stripe.setPublishableKey('<ここにAPIキーを入れる>');

  var $form = $('#payment-form');

  $form.submit(function(event) {
    Stripe.card.createToken($form, function (status, response) {

    // JSONレスポンスからトークンを取得
    var token = response.id;

    // フォームにトークンを挿入
    $form.append($('<input type="hidden" name="stripeToken">').val(token));

    // フォームを送信
    $form.get(0).submit();
    );
  });
};
</script>
サーバ側ではStripe::Tokenを受け取って、Stripe::Customerに設定、さらにプラン変更を行います。
stripe_customer = Stripe::Customer.retrieve(@team.stripe_customer_id)
stripe_customer.source = params[:stripeToken] # Stripe.jsで変換したトークンを渡すだけ
stripe_customer.save

stripe_subscription = Stripe::Subscription.retrieve(@team.stripe_subscription_id)
stripe_subscription.plan = Plan.find(params[:plan_id])
stripe_subscription.save
最初の決済日
StripeはWebhookの仕組みを持っているので、決済が実行されるとその情報をRailsで受け取る事ができます。
なので、Rails側のcronなどの仕組みを持つ必要はありません。
これを使って、サブスクリプションの有効期限であるTeam#active_untilの更新を行います。それと同時に請求書に利用するInvoice情報を保存します。
また、決済が失敗した場合には、お知らせメールをユーザーに送ることもできます。
def create
    event_json = JSON.parse(request.body.read)
    event = Stripe::Event.retrieve(event_json['id'])

    ActiveRecord::Base.transaction do
      case event.type

      # subscriptionの更新
      #   => Invoice情報を保存
      when 'customer.subscription.updated'
        stripe_subscription = event.data.object

        team = Team.find_by!(stripe_subscription_id: stripe_subscription.id)
        team.update!(
          active_until: Time.zone.at(stripe_subscription.current_period_end)
        )

      # 決済成功
      #   => DB内の有効期限を延長
      when 'invoice.payment_succeeded'
        stripe_invoice = event.data.object

        team = Team.find_by!(stripe_subscription_id: stripe_invoice.subscription)
        stripe_subscription = stripe_invoice.lines.data.detect { |d| d.type == 'subscription' }

        invoice = team.invoices.find_or_initialize_by(stripe_invoice_id: stripe_invoice.id)
        invoice.amount_due           = stripe_invoice.amount_due
        invoice.stripe_invoice_id    = stripe_invoice.id
        invoice.stripe_charge_id     = stripe_invoice.charge
        invoice.closed               = stripe_invoice.closed
        invoice.currency             = stripe_invoice.currency
        invoice.payment_processed_at = Time.zone.at(stripe_invoice.date)
        invoice.stripe_customer_id   = stripe_invoice.customer
        invoice.next_payment_attempt = stripe_invoice.next_payment_attempt
        invoice.paid                 = stripe_invoice.paid
        invoice.subtotal             = stripe_invoice.subtotal
        invoice.tax                  = stripe_invoice.tax || 0
        invoice.tax_percent          = stripe_invoice.tax_percent || 0
        invoice.total                = stripe_invoice.total
        invoice.subscription_period_start_at = Time.zone.at(stripe_subscription.period.start)
        invoice.subscription_period_end_at   = Time.zone.at(stripe_subscription.period.end)
        invoice.starting_balance     = stripe_invoice.starting_balance
        invoice.ending_balance       = stripe_invoice.ending_balance
        invoice.save!

      # 決済失敗
      #   => ユーザーにメールを送る
      when 'invoice.payment_failed'
        stripe_invoice = event.data.object

        team = Team.find_by!(stripe_subscription_id: stripe_invoice.subscription)
        PaymentMailer.payment_failed_email(team).deliver_now
      end
    end
  end
end
プラン変更する
既にクレジットカード情報がStripe::Customerに紐付いていれば、プラン変更はそのまま実行できます。
stripe_subscription = Stripe::Subscription.retrieve(@team.subscription_id)
stripe_subscription.plan = Plan.find(params[:plan_id])
stripe_subscription.save
アカウント削除時にStripe::Subscriptionも削除する
残念ながらサービスから退会されてしまうユーザーがいたときには、対応するサブスクリプション決済も削除しないといけません。
これはTeamモデルの削除コールバックで行いましょう。
class Team < ActiveRecord::Base
  around_destroy :delete_stripe_subscription_before_destroy

  private

  # Team削除時にStripe::Subscriptionも削除
  def delete_stripe_subscription_before_destroy
    ActiveRecord::Base.transaction do
      deleting_stripe_subscription = Stripe::Subscription.retrieve(stripe_subscription_id)
      yield
      deleting_stripe_subscription.delete
    end
  end
end
まとめ
Stripeが日本に上陸したことで、決済系サービスのプレーヤーが出揃った感じがあります。
ブログ等で個人的に出品するような目的での決済サービスに比べ、商用利用でのサービスに組み込むための決済システムに関する情報は極端に少ないのが現状です。
カードブランドや決済手数料などの問題で必ずしもStripeがベストな選択肢ではない場合もありますが、ライブラリやコミュニティの発展で安心感があるというポイントもあります。
とはいうものの、ここで説明した内容はどんな決済サービスを利用しても応用可能だと思われるので、開発者同士のコミュニケーションが活発になればうれしいです。
参考
- ドル決済サービスStripeの全容をざっくり把握する
- オンライン決済サービスの比較(2016年9月)
- 【日本上陸】オンライン決済サービスStripeによる円決済の実装 入門
追記
- 2016-11-10
- コード内のハードコードされたコードを文脈に合うように修正