Ubuntu 16.04でErlangのインストールから簡単なサンプルアプリケーションの作成まで行ってみます。
Erlang開発環境構築(初期設定)
依存ファイルをインストール
sudo apt-get install build-essential libncurses5-dev openssl libssl-dev
sudo apt-get install curl git-core
Erlangのバージョン管理、Kerlをインストール
mkdir -p ~/local/bin
cd ~/local/bin
curl -O https://raw.githubusercontent.com/kerl/kerl/master/kerl
chmod a+x kerl
kerlでErlang 19.1をインストール
./kerl list releases
./kerl install 19.1 19.1
./kerl build 19.1 19.1
./kerl install 19.1 ~/erlang/19.1
インストールした Erlang 19.1 を有効化します。
. ~/erlang/19.1/activate
whichでerlコマンドが使える事が分かり開発環境が整いました。
which erl
# /home/username/erlang/19.1/bin/erl
簡単なネットワークアプリケーションの開発
Erlangで簡単なhttpdサーバを作ってみます。
ビルドツールのrebarを使う
rebarを使うとコンパイル、テスト、配布用のtar.gzの作成などがコマンド一つでできるので便利です。
mkdir project
cd project
wget https://s3.amazonaws.com/rebar3/rebar3
chmod 0755 rebar3
rebarで定形ファイル作成
./rebar3 new app httpd
# ===> Writing httpd/src/httpd_app.erl
# ===> Writing httpd/src/httpd_sup.erl
# ===> Writing httpd/src/httpd.app.src
# ===> Writing httpd/rebar.config
# ===> Writing httpd/.gitignore
# ===> Writing httpd/LICENSE
# ===> Writing httpd/README.md
実装
今回は簡単なhttpサーバを実装してみます。
処理の流れは以下のイメージ。
- httpd_tcp_listener が新規接続してきたHTTPクライアントを受付
- httpd_tcp_worker_sup の start_child() で1つのTCPストリームを処理するプロセスを起動(Erlangのプロセスはマイクロスレッドを意味します)
- 起動したプロセスは httpd_tcp_worker の start_link() でTCPストリームからHTTPリクエストを読み込み、HTTPレスポンスを書き込む
以下の3ファイルを追加します。
src/httpd_tcp_listener.erl
-module(httpd_tcp_listener).

-export([start_link/0]).

start_link() ->
    Pid = spawn_link(fun init/0),
    {ok, Pid}.

init() ->
    Port = 8888,
    Backlog = 10244,
    Options = [binary,
              inet6, % support both ipv4 and ipv6
              {active, false},
              {reuseaddr, true},
              {backlog, Backlog}
             ],
    {ok, Listen} = gen_tcp:listen(Port, Options),
    accept(Listen).

accept(Listen) ->
    case gen_tcp:accept(Listen) of
        {ok, Socket} ->
            {ok, Pid} = httpd_tcp_worker_sup:start_child(Socket),
            gen_tcp:controlling_process(Socket, Pid);
        {error, Reason} ->
            io:format("fail accept ~p~n", [Reason])
    end,
    accept(Listen).
src/httpd_tcp_worker.erl
-module(httpd_tcp_worker).

-export([start_link/1]).

start_link(Socket)->
    Pid = spawn_link(fun() -> process(Socket, 0, 30 * 1000) end),
    {ok, Pid}.

process(Socket, Size, Timeout) ->
    case gen_tcp:recv(Socket, Size, Timeout) of
        {ok, Packet} ->
            Response = response(Packet),
            gen_tcp:send(Socket, Response),
            gen_tcp:close(Socket);
        {error, Reason} ->
            io:format("fail recv ~p~n", [Reason]),
            gen_tcp:close(Socket)
    end.

response(_Request) ->
    <<"HTTP/1.0 200 OK\r\nDate: Tue, 25 Oct 2016 10:21:33 GMT\r\nConnection: close\r\nContent-Type: text/plain; charset=utf-8\r\nContent-Length: 11\r\n\r\nhello world">>.
src/httpd_tcp_worker_sup.erl
-module(httpd_tcp_worker_sup).

-export([start_link/0, start_child/1, init/1]).

start_link() ->
    supervisor:start_link({local, ?MODULE}, ?MODULE, []).

start_child(Socket) ->
    supervisor:start_child(?MODULE, [Socket]).

init([]) ->
    Children = [
                {"httpd_tcp_worker", {httpd_tcp_worker, start_link, []}, temporary, 5, worker, []}
               ],
    {ok, {{simple_one_for_one, 0, 1}, Children}}.
また httpd_sup.erl の init([]) を編集し、追加実装した部分の起動処理を加えます。
src/httpd_sup.erl
%% ...(省略)...
init([]) ->
    Children = [
                {"httpd_tcp_listener", {httpd_tcp_listener, start_link, []}, permanent, 5, worker, []},
                {"httpd_tcp_worker_sup", {httpd_tcp_worker_sup, start_link, []}, permanent, 5, supervisor, []}
               ],
    {ok, { {one_for_all, 0, 1}, Children} }.
動作確認
アプリケーションの実装が終わったので起動してみます。
../rebar3 compile && erl -pa _build/default/lib/*/ebin -eval 'application:start(httpd).' -noshell
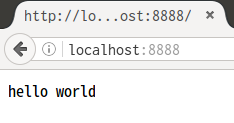
ブラウザからアクセスするとhello worldと表示されました。

まとめ
Erlangでネットワーク・サーバを実装するのは難しくない印象です。
ただsupervisorを理解して使いこなすのはある程度の経験が必要そうです。