はじめに
この記事はHamee Advent Calendar 2016の8日目の記事です。
最近、Reactが熱いですね!
今回は、前から気になっていたReactと相性が良いと言われるfluxフレームワークのReduxを使って、カウントアップタイマーを作ってみようと思います。
開発環境の構築
ビルドツールとしてwebpackを使っていきます。
またES6とReactのJSXは、webpackのbabel-loaderでコンパイルします。
$ npm i --save-dev webpack babel-core babel-loader babel-preset-es2015 babel-preset-react
webpackの設定をwebpack.config.jsに記述していきます。
module.exports = {
  entry: './js/main.js',
  output: {
    path: 'dist',
    filename: 'bundle.js'
  },
  module: {
    loaders: [
      {
        test: /\.js$/,
        exclude: /node_modules/,
        loader: 'babel-loader',
        query: {
          presets: ['es2015', 'react']
        }
      }
    ]
  }
}
続いて、react, reduxのインストールです。
$ npm i --save react react-dom redux react-redux
インストールしたライブラリの概要は以下の通りです。
react, react-dom: Reactのライブラリ
redux: Fluxフレームワーク
react-redux: ReactとReduxを連携させるためのライブラリ
packge.jsonのタスクコマンドにwebpackのbuildとwatchを追加します。
  (省略),
  "scripts": {
    "test": "echo \"Error: no test specified\" && exit 1",
    "build": "webpack",
    "watch": "webpack --watch"
  },
  (省略)
ディレクトリ構成
.
├── README.md
├── css
│   └── style.css
├── dist
│   └── bundle.js
├── index.html
├── js
│   ├── action.js
│   ├── components
│   │   ├── App.js
│   │   ├── Timer.js
│   │   └── timer-button.js
│   ├── container.js
│   ├── main.js
│   ├── reducer.js
│   └── timer-model.js
├── node_modules
├── package.json
└── webpack.config.js
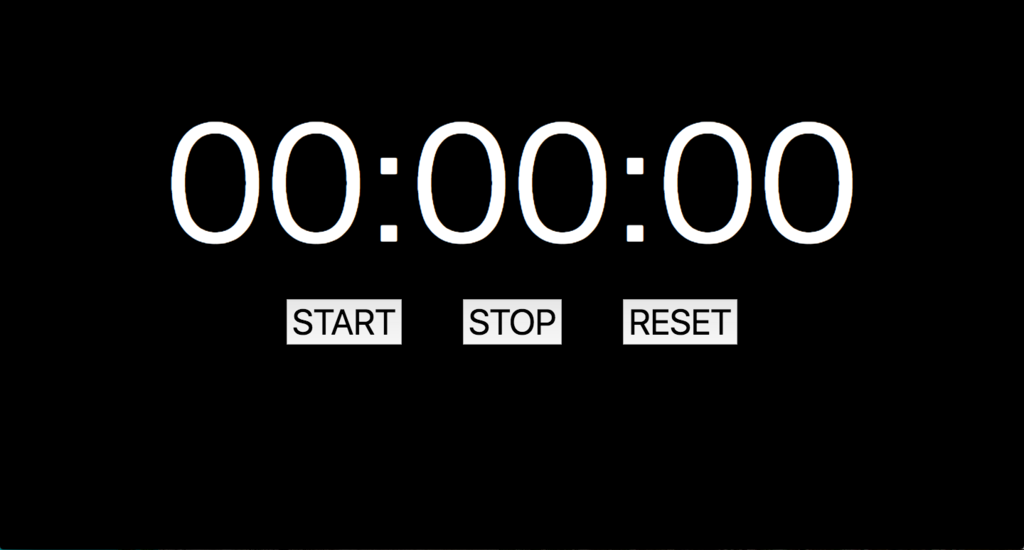
画面モックを作る
最初にHTMLとcssだけで画面のモックを作っていきます。
body {
  margin: 0;
  background-color: black;
}

.center-container {
  display: flex;
  flex-direction: column;
  justify-content: center;
  align-items: center;
}

.inline-block {
  display: inline-block;
}

.text-center {
  text-align: center;
}

.timer-number,
.timer-semicolon {
  color: white;
  font-size: 15vw;
}

.timer-button-container {
  width: 50vw;
  display: flex;
  justify-content: space-around;
}

.timer-button {
  font-size: 50px;
}
<!DOCTYPE html>
<html lang="en">
<head>
  <meta charset="UTF-8">
  <meta name="viewport" content="width=device-width, initial-scale=1.0">
  <meta http-equiv="X-UA-Compatible" content="ie=edge">
  <title>Document</title>
  <link rel="stylesheet" href="css/style.css">
</head>
<body>
  <div class="center-container" style="margin-top: 100px;">
    <div>
      <span class="timer-number" role="hour">00</span>
      <span class="timer-semicolon">:</span>
      <span class="timer-number" role="minute">00</span>
      <span class="timer-semicolon">:</span>
      <span class="timer-number" role="second">00</span>
    </div>
    <div class="timer-button-container">
      <button class="timer-button" type="button" name="button" >START</button>
      <button class="timer-button" type="button" name="button" >STOP</button>
      <button class="timer-button" type="button" name="button" >RESET</button>
    </div>
  </div>
</body>
</html>
Reactだけを使って実装
画面が完成したので、実装に入っていきます。
いきなりReact+Reduxでは難しいので、最初はReactだけで実装を行いそれをベースにReduxを導入していきたいと思います。
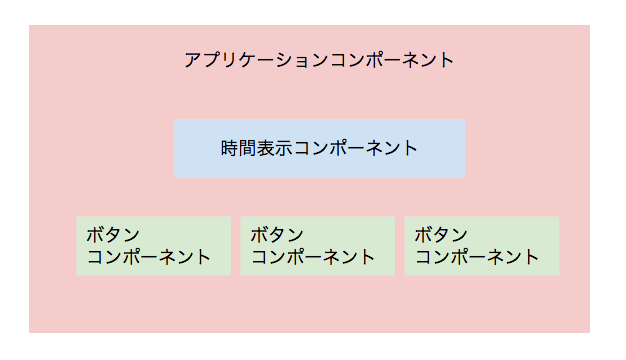
Reactを使う際に重要になってくるのがコンポーネントをどのように分割するかだと思います。
今回は時間表示、タイマーボタンを部品コンポーネントとして切り出し、全体部分をアプリケーションコンポーネントとします。
import {render} from 'react-dom'
import {App} from './components/App.js'

render(
  <App />,
  document.getElementById('timer-container')
)
import React from 'react'
import {Timer} from './timer.js'
import {TimerButton} from './timer-button.js'

export class App extends React.Component {

  render () {
    return (
      <div className='center-container' style={{marginTop: '100px'}} >
        <Timer hours={'00'} minutes={'00'} seconds={'00'} ref='timer' />
        <div className='timer-button-container'>
          <TimerButton text={'START'} handleClick={() => this.refs.timer.start()} />
          <TimerButton text={'STOP'} handleClick={() => this.refs.timer.stop()} />
          <TimerButton text={'RESET'} handleClick={() => this.refs.timer.reset()} />
        </div>
      </div>
    )
  }
}
import React from 'react'

export class Timer extends React.Component {
  constructor () {
    super()
    this.state = {hours: '00', minutes: '00', seconds: '00', time: 0}
  }

  start () {
    this.intervalTimer = setInterval(() => this.update(), 1000)
  }

  stop () {
    clearInterval(this.intervalTimer)
  }

  reset () {
    this.setState({
      hours: '00',
      minutes: '00',
      seconds: '00',
      time: 0
    })
  }

  update () {
    const time = this.state.time + 1
    const hours = this.toHours(time)
    const minutes = this.toMinutes(time)
    const seconds = this.toSeconds(time)

    this.setState({
      hours: this.toText(hours),
      minutes: this.toText(minutes),
      seconds: this.toText(seconds),
      time: time
    })
  }

  toHours (time) {
    return parseInt(time / 60 / 60)
  }

  toMinutes (time) {
    return parseInt(time / 60 % 60)
  }

  toSeconds (time) {
    return time % 60
  }

  toText (time) {
    return ('00' + time).slice(-2)
  }

  render () {
    return (
      <div>
        <span className='timer-number' role='hour'>{this.state.hours}</span>
        <span className='timer-semicolon'>:</span>
        <span className='timer-number' role='minute'>{this.state.minutes}</span>
        <span className='timer-semicolon'>:</span>
        <span className='timer-number' role='second'>{this.state.seconds}</span>
      </div>
    )
  }
}
import React from 'react'

export class TimerButton extends React.Component {
  render () {
    return (
      <button className='timer-button' type='button' name='button' onClick={() => this.props.handleClick()}>{this.props.text}</button>
    )
  }
}
Reactだけで実装した場合、Timerコンポーネントに状態管理の処理が記述されているため、少し複雑になってしまいました。
理想としては、コンポーネントはViewの記述のみにしたいです。
Redux + React で実装
それでは、今回の目的であるReduxの導入をしていきたいと思います。
Reduxの概念に関しては、次の記事が大変参考になりました。
Redux入門【ダイジェスト版】10分で理解するReduxの基礎
Reduxで登場する要素について簡単に説明します。
- state
- アプリケーションの状態
- Reduxでは一つのアプリケーションに対して一つのstateオブジェクトを持つ
- アプリケーションの状態
- sotre
- アプリケーション全体の状態を管理
- reducer
- 状態遷移を処理する役割を持つ
- 状態とアクションを受け取り、新たな状態を返す
- dispatcher
- reducerに対して、ユーザーアクションを通知
- action
- ボタンクリック等のアクションを表す
- typeプロパティとアクションに応じたデータを持つオブジェクト
- actionCreator
- Actionを生成するための関数
- container
- Reduxと連携するトップレイヤーのコンポーネント
reducerの実装
reducerではactionに応じた、タイマーの状態遷移の処理を記述しています。
import * as timerModel from './timer-model.js'

/**
 * Reduxのreducer タイマーの時間の状態遷移を処理する
 * @param state Reduxのstoreで管理されている状態
 * @param action アクションオブジェクト
 * @return actionに応じて変化させた新しい状態
 */
export function timer (state = timerModel.initialState(), action) {
  console.log(state)
  switch (action.type) {
    case 'START_TIMER':
      return timerModel.start(state, action.intervalID)
    case 'STOP_TIMER':
      return timerModel.stop(state)
    case 'UPDATE_TIMER':
      return timerModel.update(state)
    case 'RESET_TIMER':
      return timerModel.reset(state)
    default:
      return state
  }
}
ここで登場している、timer-model.jsはTimerコンポーネントから、タイマーの状態遷移ロジックを抽出した関数群になります。
Reduxでは状態遷移の関数は参照透過である必要があります。
そのため、Object.assign()では新しい空オブジェクトに対して、既存の値をコピーすることで、新たな状態を生成しています。
/**
 * タイマーの状態を開始状態に変更する
 * @param state タイマーの状態
 * @param {number} intervalID setInterval()で得られたID
 * @return タイマーの開始状態
 */
export function start (state, intervalID) {
  return Object.assign({}, state, {
    started: true,
    intervalID: intervalID
  })
}

/**
 * タイマーの状態を停止状態に変更する
 * @param state タイマーの状態
 * @return タイマーの停止状態
 */
export function stop (state) {
  clearInterval(state.intervalID)

  return Object.assign({}, state, {
    started: false,
    intervalID: -1
  })
}

/**
 * タイマーの時間を1秒進める
 * @param state タイマーの時間の状態
 * @return 時間を1秒進めた新しい状態
 */
export function update (state) {
  const time = state.time + 1
  const hours = toHours(time)
  const minutes = toMinutes(time)
  const seconds = toSeconds(time)

  return Object.assign({}, state, {
    hours: toText(hours),
    minutes: toText(minutes),
    seconds: toText(seconds),
    time: time
  })
}

/**
 * タイマーの時間をリセットする
 * @return タイマーの初期状態
 */
export function reset (state) {
  return Object.assign({}, initialState(), {
    started: state.started,
    intervalID: state.intervalID
  })
}

/**
 * タイマーの初期状態
 */
export function initialState () {
  return {
    hours: '00',
    minutes: '00',
    seconds: '00',
    time: 0,
    started: false,
    intervalID: -1
  }
}

function toHours (time) {
  return parseInt(time / 60 / 60)
}

function toMinutes (time) {
  return parseInt(time / 60 % 60)
}

function toSeconds (time) {
  return time % 60
}

function toText (time) {
  return ('00' + time).slice(-2)
}
actionCreatorの実装
actionオブジェクトを返す、関数を定義していきます。
startTimerAction()では停止処理を実行するために、setInterval()で取得したIDを受け取り、storeに渡しています。
export function startTimerAction (intervalID) {
  return {type: 'START_TIMER', intervalID: intervalID}
}

export function stopTimerAction () {
  return {type: 'STOP_TIMER'}
}

export function updateTimerAction () {
  return {type: 'UPDATE_TIMER'}
}

export function resetTimerAction () {
  return {type: 'RESET_TIMER'}
}
containerの実装
ReactとReduxの連携部分の実装をして、Redux側の実装は完了です。
mapStateToProprs(state)関数ではReduxのStoreで管理しているstateをReactのpropsに紐付けています。
今回は簡単なアプリケーションなので、そのまま返していますが、複雑になってきた場合はここで加工して、必要な状態をReact側に渡すことができます。
mapDispatchToProps(dispatch)関数にてReduxのdispatch処理をpropsに紐付けることで、Reactのコンポーネントがクリック等のイベントを受け取った際にdispatch処理を実行させることが出来るようになります。
connect()関数の詳細な仕様に関しては、githubのリポジトリにAPIドキュメントがあるのでそちらを参考にしてください。
import {connect} from 'react-redux'

import {App} from './components/app.js'
import * as action from './action.js'

/**
 * reduxで管理しているstateをreact側に渡す
 * @param state reduxのstoreで管理されている状態
 * @return react側で使う状態 this.prorpsで参照
 */
function mapStateToProps (state) {
  return state
}

/**
 * reactで受け取るユーザーアクションとreduxのアクションを連携させる
 * @param dispatch reduxのreducerにアクションを渡す関数
 */
function mapDispatchToProps (dispatch, props) {
  return {
    startTimer: () => {
      const intervalID = setInterval(() => dispatch(action.updateTimerAction()), 1000)
      dispatch(action.startTimerAction(intervalID))
    },
    stopTimer: () => dispatch(action.stopTimerAction()),
    resetTimer: () => dispatch(action.resetTimerAction())
  }
}

function mergeProps (stateProps, dispatchProps, ownProps) {
  return Object.assign({}, stateProps, dispatchProps, ownProps, {
    // タイマーが止まっていたら、カウントアップを開始する
    startTimer: () => {
      if (!stateProps.started) dispatchProps.startTimer()
    }
  })
}

// 上記で定義した関数を使って、ReduxとReactのコンポーネントを繋げる
export default connect(mapStateToProps, mapDispatchToProps, mergeProps)(App)
timer-model.jsでdispatch()関数を呼ぶ方法が思いつかなかったので、ここでsetInterval()関数にてタイマーの開始処理をしています。
理想としては、ここではactionをdispatchするだけにしたかったです。
React側のコンポーネントを修正
Reduxの導入が完了したので、それに合わせてReactのコンポーネントを修正します。
Redux側が状態管理をしてくれるため、Reactのコンポーネントは純粋に状態を受け取るだけで良くなりました。
import React from 'react'
import {Timer} from './timer.js'
import {TimerButton} from './timer-button.js'

export class App extends React.Component {

  render () {
    return (
      <div className='center-container' style={{marginTop: '100px'}}>
        <Timer hours={this.props.hours} minutes={this.props.minutes} seconds={this.props.seconds} ref='timer' />
        <div className='timer-button-container'>
          <TimerButton text={'START'} handleClick={this.props.startTimer} />
          <TimerButton text={'STOP'} handleClick={this.props.stopTimer} />
          <TimerButton text={'RESET'} handleClick={this.props.resetTimer} />
        </div>
      </div>
    )
  }
}
import React from 'react'

export class Timer extends React.Component {
  render () {
    return (
      <div>
        <span className='timer-number' role='hour'>{this.props.hours}</span>
        <span className='timer-semicolon'>:</span>
        <span className='timer-number' role='minute'>{this.props.minutes}</span>
        <span className='timer-semicolon'>:</span>
        <span className='timer-number' role='second'>{this.props.seconds}</span>
      </div>
    )
  }
}
import React from 'react'

export class TimerButton extends React.Component {
  render () {
    return (
      <button className='timer-button' type='button' name='button' onClick={this.props.handleClick}>{this.props.text}</button>
    )
  }
}
main処理を実装
最後にmainの処理を実装します。
const store = createStore(timer)にて、Reduxのstoreを生成します。
最後の<Provider store={store}>...</Proivder>にて、Reduxのstoreで管理している状態を子コンポーネントである<App />に対して状態を渡しています。
ここの記述はreact-reduxにて決められているため、必ずこのように書く必要があります。
import React from 'react'
import {Provider} from 'react-redux'
import {render} from 'react-dom'
import {createStore} from 'redux'

import App from './container.js'
import {timer} from './reducer.js'

const store = createStore(timer)

render(
  <Provider store={store}>
    <App />
  </Provider>,
  document.getElementById('timer-container')
)
さいごに
アプリケーションを作ってみての感想として、React, Redux 単体の場合は分かりやすかったのですが、ReactとReduxを連携させようとすると、難しくなるなと感じました。
ただ、状態管理の処理をReduxが担ってくれるので、Reactのコンポーネントからビジネスロジックが無くなり、純粋なViewに徹することが出来るようになるのは、シンプルになって扱いやすいなと思いました。
Reactを使っていて、状態管理に悩んでいる人はRedux(Fluxフレームワーク)を導入する価値は十分にあると思います。