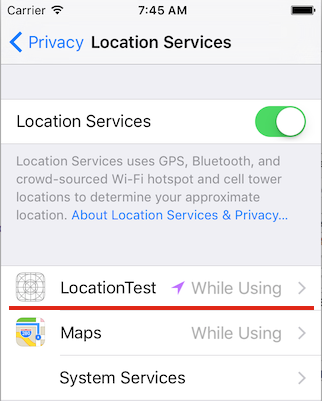
Location Service(位置情報サービス)は、iOS9から、「常に許可」、「このAppの使用中のみ許可」の2モードになり、バッテリーの減りを抑える工夫がこらされました。それにともない、CoreLocationのCLLocationManagerの実装のしかたに変更があります。新しい実装のしかたについて、かんたんにまとめてみました。
位置情報サービスを常に許可する##
アプリケーションがバックグラウンドにまわっても位置情報サービスを使い続けるモードです。
Xcodeプロジェクトの__Capabilities__を開き、
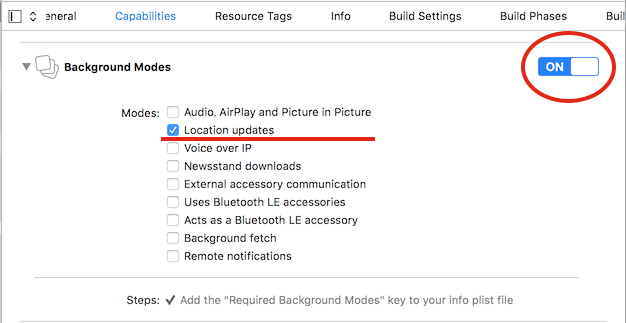
__Background Modes__をONにし、__Location updates__にチェックを入れます。次に同じくプロジェクトの__Info__を開き、
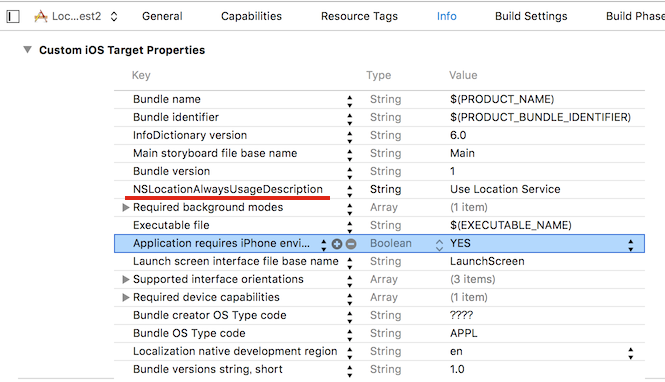
新規キーを追加します。キー値は__NSLocationAlwaysUsageDescription__とし、値(Value)は、任意の文字列を入力します。この任意の文字列は、後で説明します。
これでプロジェクトの設定ができました。次にプログラムコードの説明をします。ViewControllerに二つのラベルを置き、ボタンを押したら経度、緯度を表示するプログラムにします。
import UIKit
import CoreLocation // フレームワークのインポート
// Delegateプロトコルの追加
class ViewController: UIViewController, CLLocationManagerDelegate {

    @IBOutlet weak var latitudeLabel: UILabel!
    @IBOutlet weak var longitudeLabel: UILabel!

    var locationManager: CLLocationManager?

    override func viewDidLoad() {
        super.viewDidLoad()
        // Location Managerの生成、初期化
        locationManager = CLLocationManager()
        locationManager?.distanceFilter = 500 // 500m移動したら通知する。
        locationManager?.delegate = self
        if CLLocationManager.authorizationStatus() != CLAuthorizationStatus.AuthorizedAlways { // 注1
            locationManager?.requestAlwaysAuthorization()
            // 位置情報サービスを開始するか、ユーザに尋ねるダイアログを表示する。
        }
    }

    @IBAction func getLocation(sender: AnyObject) {
        // 位置情報更新を開始。
        locationManager?.startUpdatingLocation()
    }
    // Delegateメソッド
    func locationManager(manager: CLLocationManager, didUpdateLocations locations: [CLLocation]) {
        let cordinate = locations[0].coordinate
        latitudeLabel.text = "\(ordinate.latitude)" // 緯度表示。
        longitudeLabel.text = "\(ordinate.longitude)" // 経度表示。
    }

}
注1 この条件式は、位置情報サービスが「常に許可」になっていなければ、ダイアログを出す」という、ちょっと乱暴な条件です。「アプリが使用中許可」になっていたり、ユーザが使用を止めていたら、ダイアログを出すのは考えようという配慮が必要かもしれません。
アプリを起動すると、最初に下のダイアログが表示されます。
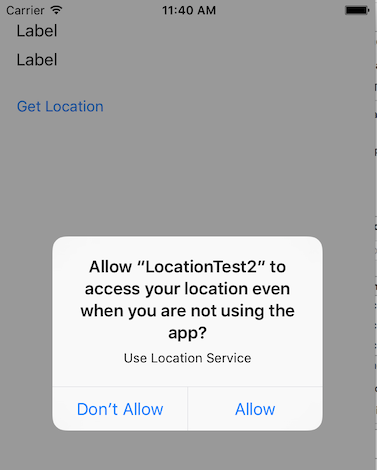
このダイアログは、Allowを選択すると、アプリのインストール直後、一度だけ表示されます。プロジェクトのInfoで入力した(任意の)文字列は、このダイアログの中のコメントになります。
このAppの使用中のみ許可##
位置情報サービスをバックグラウンドで動かす必要がないので、Background Modesの設定はしません。
プロジェクトの__Info__で、
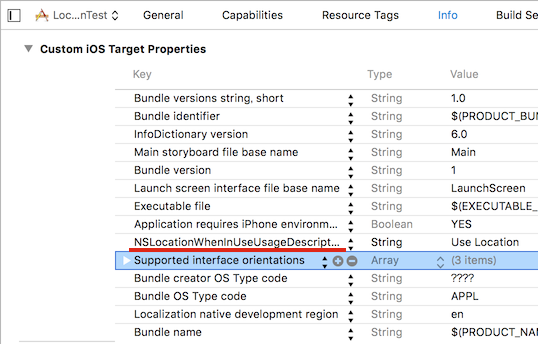
新規キーを追加し、__NSLocationWhenInUseUsageDescription__とします。値は任意の文字列を入力します。
プログラムコードは、「常に表示」とおおむね同じですが、iOS9より、「位置情報を一度だけ取得」という新しいメソッドが追加されたので、それを使ってみます。
import UIKit
import CoreLocation

class ViewController: UIViewController, CLLocationManagerDelegate {

    @IBOutlet weak var latitudeLabel: UILabel!
    @IBOutlet weak var longitudeLabel: UILabel!

    var locationManager: CLLocationManager?

    override func viewDidLoad() {
        super.viewDidLoad()

        locationManager = CLLocationManager()
        locationManager?.distanceFilter = 500
        // 「アプリ使用時のみ許可」でなかったら、ダイアログを出す。
        if CLLocationManager.authorizationStatus() != CLAuthorizationStatus.AuthorizedWhenInUse {
            locationManager?.requestWhenInUseAuthorization()
        }
        locationManager?.delegate = self
    }

    @IBAction func getLocation(sender: UIButton) {
        // 位置情報を一度だけ取得。
        locationManager?.requestLocation()
    }

    func locationManager(manager: CLLocationManager, didUpdateLocations locations: [CLLocation]) {
        if let location = locations.last {
            latitudeLabel.text = "\(location.coordinate.latitude)"
            longitudeLabel.text = "\(location.coordinate.longitude)"
        } else {
            print("Could't get any location services.")
        }
    }
    // 位置情報を一度だけ取得する場合、取得に失敗した時のDelegateメソッドの実装が必要。
    func locationManager(manager: CLLocationManager, didFailWithError error: NSError) {
        print("Failure")
    }

}
アプリ起動すると、最初に下のダイアログが出ます。
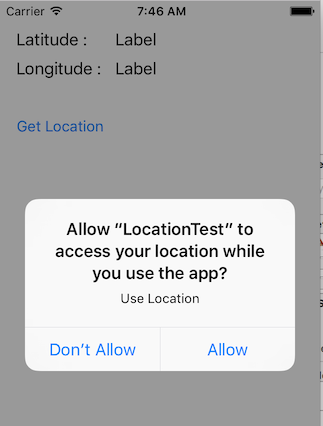
最後に、位置情報サービスの実装が成功すると、iOSのSetting>Privacy>Location Serviceに、開発中のアプリが追加されています。確認してください。
