この記事では、Label や Button などと同じように使いまわすことができる独自コントロールを作成します。コントロールに任意のプロパティを定義して、さらにデータバインディングもできるようにします。
サンプルコード
sukobuto/xf-user-control-example
※こちらのサンプルコードでは Prism.Forms (MVVMインフラ) と ReactiveProperty を使っています。
Prism.Forms はこの記事の前提ではないので、使わなくても同じことができます。今回は MVVM でのプロジェクト作成が楽になる上、説明もしやすいため使っています。Prism.Forms については以下の記事がとっても参考になりました。
XamarinでPrismを使ったHello world / かずきのBlog@hatena
Xamarin.Forms + Prism.FormsでVとVMを結びつける / かずきのBlog@hatena
※ Prism.Forms の正式リリースはまだなので、破壊的変更が入ってくるようなので注意してください。
この記事と同じ環境を作るには、以下の手順を行ってください。
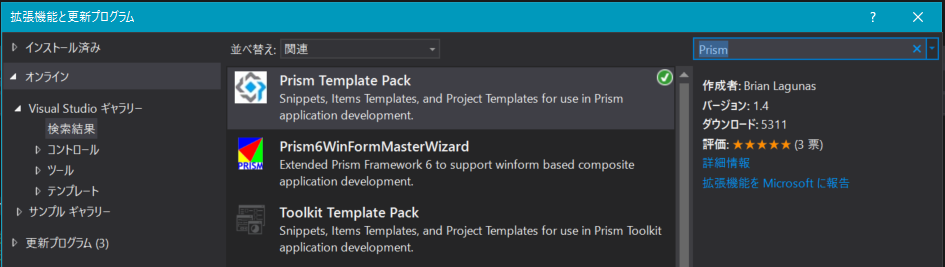
VisualStudio に拡張機能「Prism Template Pack」をインストール
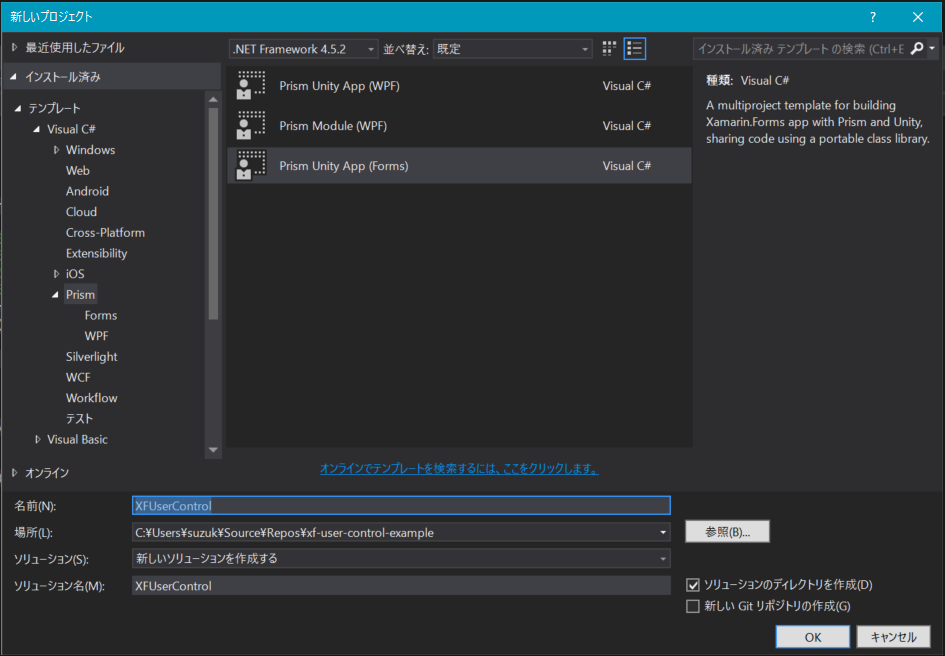
VisualStudio を再起動した後、新しいプロジェクトの作成で Prism Unity App (Forms) を選択して作成
ReactiveProperty については後述します。
独自コントロールは ContentView を継承すると自由に作れる
ContentView の追加 (Xaml Page)
ContentView は [追加] → [新しい項目] から新規作成できます。独自コントロールのための Controls フォルダを作っておくといいです。
今回は XAML を使いたいので、Forms ContentView ではなく敢えて Forms Xaml Page を選択します。
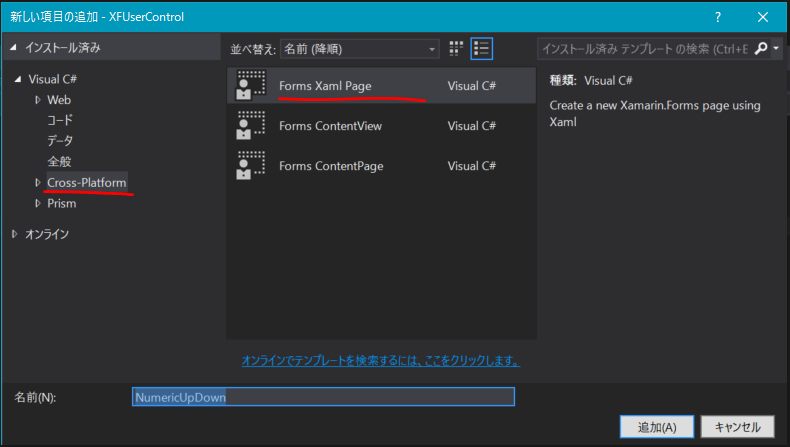
名前に NumericUpDown と入力して [追加] をクリックすると、NumericUpDown.xaml と NumericUpDown.xaml.cs ができます。

<?xml version="1.0" encoding="utf-8" ?>
<ContentPage xmlns="http://xamarin.com/schemas/2014/forms"
             xmlns:x="http://schemas.microsoft.com/winfx/2009/xaml"
             x:Class="XFUserControl.Controls.NumericUpDown">
  <Label Text="{Binding MainText}" VerticalOptions="Center" HorizontalOptions="Center" />
</ContentPage>
using System;
using System.Collections.Generic;
using System.Linq;
using System.Text;
using System.Threading.Tasks;

using Xamarin.Forms;

namespace XFUserControl.Controls
{
    public partial class NumericUpDown : ContentPage
    {
        public NumericUpDown()
        {
            InitializeComponent();
        }
    }
}
ContentPage → ContentView に変更
ContentPage のままだと都合が悪いので、XAML もコードビハインドも両方 ContentView に書き換えます。XAML はルート要素の
<ContentPage ~>...</ContentPage> を
<ContentView ~>...</ContentView> に。
コードビハインドは
public partial class NumericUpDown : ContentPage を
public partial class NumericUpDown : ContentView にしてください。
独自コントロール内のコントロールを配置
Button と Label を配置します。サンプルなのでてきとーです。
<?xml version="1.0" encoding="utf-8" ?>
<ContentView xmlns="http://xamarin.com/schemas/2014/forms"
             xmlns:x="http://schemas.microsoft.com/winfx/2009/xaml"
             x:Class="XFUserControl.Controls.NumericUpDown">
  <Grid>

    <Grid.ColumnDefinitions>
      <ColumnDefinition Width="*" />
      <ColumnDefinition Width="*" />
      <ColumnDefinition Width="*" />
    </Grid.ColumnDefinitions>

    <Button Grid.Column="0" Text="↓DOWN" Clicked="OnDownClicked" />
    <Label Grid.Column="1" x:Name="valueLabel" FontSize="Large" HorizontalOptions="CenterAndExpand" />
    <Button Grid.Column="2" Text="↑UP" Clicked="OnUpClicked" />

  </Grid>
</ContentView>
データバインディングができるプロパティを定義する
BindableProperty というクラスでコントロールに static メンバを定義することで、バインドできるプロパティを定義することができます。
// クラス定義のみ抜粋
public partial class NumericUpDown : ContentView
{
    #region Value BindableProperty
    public static readonly BindableProperty ValueProperty =
        BindableProperty.Create(
            nameof(Value),          // 対象のプロパティ名 (文字列)
            typeof(double),         // 対象のプロパティの型
            typeof(NumericUpDown),  // プロパティを定義する型(自クラス)
            0.0,                    // プロパティのデフォルト値
            propertyChanged: (bindable, oldValue, newValue) => { // 変更通知ハンドラ
                ((NumericUpDown)bindable).Value = (double)newValue;
            },
            defaultBindingMode: BindingMode.TwoWay  // デフォルトのバインディングモード
        );

    public double Value {
        get { return (double)GetValue(ValueProperty); }
        set {
            SetValue(ValueProperty, value);
            // 値が変更されるたびに Label のテキストを変更する
            this.valueLabel.Text = value.ToString();
        }
    }
    #endregion

    public NumericUpDown()
    {
        InitializeComponent();
        this.valueLabel.Text = Value.ToString(); // 初期テキストをセット
    }

    // 以下はボタンのイベントハンドラ定義

    void OnUpClicked(object sender, EventArgs e)
    {
        this.Value += 1;
    }

    void OnDownClicked(object sender, EventArgs e)
    {
        this.Value -= 1;
    }
}
つまり Hoge というプロパティをバインドできるように定義するには、Hoge という public プロパティとセットで HogeProperty という public static readonly BindableProperty を定義する必要があります。書くことが多くて面倒ですがパターンは決まっているので、コードスニペットを追加するとサクッと定義できるようになります。
使ってみる
これでほかのコントロールと同じように使うことができるようになりました。MainPage に表示してみましょう。
<?xml version="1.0" encoding="utf-8" ?>
<ContentPage xmlns="http://xamarin.com/schemas/2014/forms"
             xmlns:x="http://schemas.microsoft.com/winfx/2009/xaml"
             xmlns:prism="clr-namespace:Prism.Mvvm;assembly=Prism.Forms"
             xmlns:controls="clr-namespace:XFUserControl.Controls;assembly=XFUserControl"
             prism:ViewModelLocator.AutowireViewModel="True"
             x:Class="XFUserControl.Views.MainPage"
             Title="{Binding Title}">
  <ScrollView Padding="5">
    <StackLayout>

      <Frame>
        <StackLayout>
          <Label Text="{Binding NumDouble, StringFormat='NumDouble = {0:F1}'}" TextColor="Green" HorizontalOptions="CenterAndExpand" />
          <controls:NumericUpDown Value="{Binding NumDouble}" />
        </StackLayout>
      </Frame>

      <Frame>
        <StackLayout>
          <Label Text="{Binding NumInt, StringFormat='NumInt = {0:F0}'}" TextColor="Green" HorizontalOptions="CenterAndExpand" />
          <controls:NumericUpDown Value="{Binding NumInt}" />
        </StackLayout>
      </Frame>

    </StackLayout>
  </ScrollView>
</ContentPage>
MainPage の ViewModel に、バインドするプロパティ NumDouble, NumInt を定義します。今回は Prism が提供している BindableBase の機能を使って、変更通知プロパティとして定義しました。ほかのやり方でも INotifyPropertyChanged の実装があればOKです。(例:Xamarin 公式ドキュメントのやりかた)
using Prism.Commands;
using Prism.Mvvm;
using Prism.Navigation;
using System;
using System.Collections.Generic;
using System.Linq;

namespace XFUserControl.ViewModels
{
    public class MainPageViewModel : BindableBase, INavigationAware
    {
        private string _title;
        public string Title {
            get { return _title; }
            set { SetProperty(ref _title, value); }
        }

        private double _numDouble = 10.0;
        public double NumDouble {
            get { return _numDouble; }
            set { SetProperty(ref _numDouble, value); }
        }

        private int _numInt = 0;
        public int NumInt {
            get { return _numInt; }
            set { SetProperty(ref _numInt, value); }
        }

        public MainPageViewModel()
        {

        }

        public void OnNavigatedFrom(NavigationParameters parameters)
        {

        }

        public void OnNavigatedTo(NavigationParameters parameters)
        {
            if (parameters.ContainsKey("title"))
                Title = (string)parameters["title"] + " and Prism";
        }
    }
}
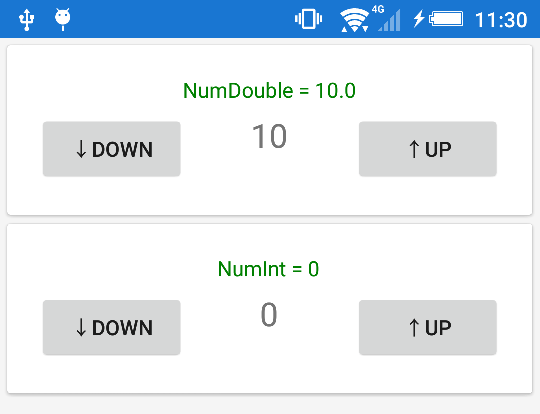
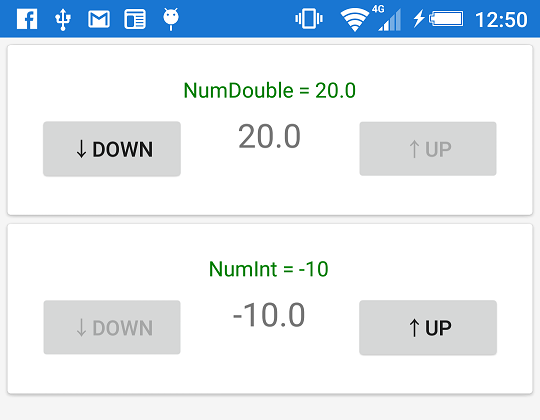
↓のように表示され、ボタンをタップすると数値が変化すれば成功です。
ここまでのサンプルコードは without-viewmodelブランチ として公開してます。
独自コントロールの作成でも MVVM の恩恵を受けたい
追記: 結論を言うと、この節は前提から間違っていることが分かりました。 Xamarin や WPF のような XAML プラットフォームにおいて独自コントロールはあくまでもデベロッパに提供するための View に閉じた部品であり、その内部はユーザーコードではないため MVVM のデザインパターンを適用するようなものではないということです。
Aurelia のような Web MVVM では、部品(Component)もユーザーコードの一級市民として扱われ、それぞれが専用の ViewModel を持ちます。Web はアプリのためのコントロールが豊富ではなく、自分で作っていくことが当たり前だという文化の違いがあるようですね。
以下のやり方は現時点ではいちおう成功しているように見えますが、XAML プラットフォームの思想とは異なるため複雑なことをやりだすと破綻するでしょう。たとえばコレクションをバインドしようとしたら、どうしたらよいのかさっぱりわかりません。
とはいえ Web Components のように、気軽に再利用できる部品を作りたい場合はどうしたらいいんでしょう。。。
これまでの部分で独自コントロールを定義する方法はわかりました。しかし、値のテキストの変更を手動でやっていたり、ボタン操作をイベントハンドラで書いていたりと、ちっとも MVVM の恩恵を生かせていません。
このままでは、例えば値に最小値・最大値を設定したり、最小の場合は DOWN できないようにしたりといったことまで手動で切り替えるコードを記述していかねばなりません。そこで、次の手順で独自コントロール自体の実装もデータバインディングやコマンドを駆使できるようにしてみましょう。
- コントロール専用の ViewModel を作って子要素のコンテキストに設定
- BindableProperty の 変更を ViewModel に中継, ViewModel の変更を監視
コントロール専用の ViewModel を作って子要素のコンテキストに設定
Controls フォルダの中に、新しいクラス NumericUpDownViewModel.cs を作成してください。NumericUpDown コントロール専用の ViewModel です。
using System;
using System.Collections.Generic;
using System.Linq;
using System.Text;
using System.Threading.Tasks;

using Reactive.Bindings;
using System.Reactive.Linq;

namespace XFUserControl.Controls
{
    public class NumericUpDownViewModel
    {
        public ReactiveProperty<double> Value { get; } = new ReactiveProperty<double>(0.0);

        public double Minimum { get; set; } = double.MinValue;

        public double Maximum { get; set; } = double.MaxValue;

        public double Step { get; set; } = 1.0;

        public ReactiveCommand Up { get; private set; }

        public ReactiveCommand Down { get; private set; }

        public NumericUpDownViewModel()
        {
            this.Up = this.Value
                .Select(x => x < this.Maximum)
                .ToReactiveCommand();

            this.Up
                .Subscribe(_ => {
                    var value = this.Value.Value + this.Step;
                    if (value > this.Maximum) value = this.Maximum;
                    this.Value.Value = value;
                });

            this.Down = this.Value
                .Select(x => x > this.Minimum)
                .ToReactiveCommand();

            this.Down
                .Subscribe(_ => {
                    var value = this.Value.Value - this.Step;
                    if (value < this.Minimum) value = this.Minimum;
                    this.Value.Value = value;
                });
        }
    }
}
ReactiveProperty とは
ReactiveProperty は複雑な UI 事情を宣言的に記述するためのライブラリです。詳しくは MVVMをリアクティブプログラミングで快適にReactivePropertyオーバービュー / かずきのBlog@hatena を参照してください。
このサンプルでは「最小値に達していたら DOWN ボタンを非アクティブにする」部分を宣言的に書いたりするのに利用しています。
続いて、定義した ViewModel を NumericUpDown コントロールで使います。
<?xml version="1.0" encoding="utf-8" ?>
<ContentView xmlns="http://xamarin.com/schemas/2014/forms"
             xmlns:x="http://schemas.microsoft.com/winfx/2009/xaml"
             xmlns:controls="clr-namespace:XFUserControl.Controls;assembly=XFUserControl"
             x:Class="XFUserControl.Controls.NumericUpDown">
  <Grid>
    <Grid.BindingContext>
      <!--
      ContentView.BindingContext に ViewModel を設定してしまうと、
      この NumericUpDown を利用する側で BindableProperty にバインドできなくなってしまう。
      その代わりに一つ下の階層の BindingContext に ViewModel を設定する。
      -->
      <controls:NumericUpDownViewModel x:Name="viewModel" />
    </Grid.BindingContext>

    <Grid.ColumnDefinitions>
      <ColumnDefinition Width="*" />
      <ColumnDefinition Width="*" />
      <ColumnDefinition Width="*" />
    </Grid.ColumnDefinitions>

    <Button Grid.Column="0" Text="↓DOWN" Command="{Binding Down}" />
    <Label Grid.Column="1" Text="{Binding Value.Value, StringFormat='{0:F1}'}" FontSize="Large" HorizontalOptions="CenterAndExpand" />
    <Button Grid.Column="2" Text="↑UP" Command="{Binding Up}" />

  </Grid>
</ContentView>
変更点:
- 4行目:
xmlns:controls="clr-namespace:XFUserControl.Controls;assembly=XFUserControl"を追記。これで Controls 名前空間のクラスを XAML で使えるようになる。 - 7~14行: Grid の BindingContext に NumericUpDownViewModel のインスタンスを設定。名前
viewModelを設定し、コードビハインドからもアクセスできるようにした。 - 22~24行: Button のクリックイベントハンドラを削除し、代わりに Command を設定。Label.Text のデータバインディングも追加。
※ReactiveProperty をバインドする場合、プロパティ.Value をバインドする必要があります。今回はプロパティ名も Value にしたため、Value.Value をバインドしています。
BindableProperty の 変更を ViewModel に中継, ViewModel の変更を監視
最後に独自コントロールのコードビハインドで定義した BindableProperty と、今回追加した専用 ViewModel のプロパティを接続します。同時に最大値や最小値などのプロパティも追加定義しています。ボタンクリックのイベントハンドラは不要になったので削除しました。
// クラス定義のみ抜粋
public partial class NumericUpDown : ContentView
{

    #region Value BindableProperty
    public static readonly BindableProperty ValueProperty =
        BindableProperty.Create(
            nameof(Value), typeof(double), typeof(NumericUpDown), 0.0,
            propertyChanged: (bindable, oldValue, newValue) => {
                ((NumericUpDown)bindable).Value = (double)newValue;
            },
            defaultBindingMode: BindingMode.TwoWay
        );

    public double Value {
        get { return (double)GetValue(ValueProperty); }
        set {
            SetValue(ValueProperty, value);
            this.viewModel.Value.Value = value;
        }
    }
    #endregion

    #region Minimum BindableProperty
    public static readonly BindableProperty MinimumProperty =
        BindableProperty.Create(
            nameof(Minimum), typeof(double), typeof(NumericUpDown), double.MinValue,
            propertyChanged: (bindable, oldValue, newValue) => {
                ((NumericUpDown)bindable).Minimum = (double)newValue;
            }
        );

    public double Minimum {
        get { return (double)GetValue(MinimumProperty); }
        set {
            SetValue(MinimumProperty, value);
            this.viewModel.Minimum = value;
        }
    }
    #endregion

    #region Maximum BindableProperty
    public static readonly BindableProperty MaximumProperty =
        BindableProperty.Create(
            nameof(Maximum), typeof(double), typeof(NumericUpDown), double.MaxValue,
            propertyChanged: (bindable, oldValue, newValue) => {
                ((NumericUpDown)bindable).Maximum = (double)newValue;
            }
        );

    public double Maximum {
        get { return (double)GetValue(MaximumProperty); }
        set {
            SetValue(MaximumProperty, value);
            this.viewModel.Maximum = value;
        }
    }
    #endregion

    #region Step BindableProperty
    public static readonly BindableProperty StepProperty =
        BindableProperty.Create(
            nameof(Step), typeof(double), typeof(NumericUpDown), 1.0,
            propertyChanged: (bindable, oldValue, newValue) => {
                ((NumericUpDown)bindable).Step = (double)newValue;
            }
        );

    public double Step {
        get { return (double)GetValue(StepProperty); }
        set {
            SetValue(StepProperty, value);
            this.viewModel.Step = value;
        }
    }
    #endregion

    public NumericUpDown()
    {
        InitializeComponent();
        this.viewModel.Value
            .Subscribe(x => this.Value = x);
    }
}
ポイントはバインド可能プロパティの set で ViewModel の対応するプロパティを更新することと、ViewModel 側で変化する可能性のあるプロパティ(今回は Value プロパティ)を監視して自身のプロパティに反映することです。NumericUpDownViewModel.Value プロパティは ReactiveProperty として定義したので、↑の最後の行のように Subscribe で値の変更をハンドルすることができます。
さて、新たに NumericUpDown に BindableProperty (Minimum, Maximum, Step) を追加定義したので、MainPage.xaml でそれぞれ設定して実行してみましょう。Step は "2" とすれば、ボタンを押したときの変化量が ±2 になります。
<?xml version="1.0" encoding="utf-8" ?>
<ContentPage xmlns="http://xamarin.com/schemas/2014/forms"
             xmlns:x="http://schemas.microsoft.com/winfx/2009/xaml"
             xmlns:prism="clr-namespace:Prism.Mvvm;assembly=Prism.Forms"
             xmlns:controls="clr-namespace:XFUserControl.Controls;assembly=XFUserControl"
             prism:ViewModelLocator.AutowireViewModel="True"
             x:Class="XFUserControl.Views.MainPage"
             Title="{Binding Title}">
  <ScrollView Padding="5">
    <StackLayout>

      <Frame>
        <StackLayout>
          <Label Text="{Binding NumDouble, StringFormat='NumDouble = {0:F1}'}" TextColor="Green" HorizontalOptions="CenterAndExpand" />
          <controls:NumericUpDown Value="{Binding NumDouble}" Minimum="-20.0" Maximum="20.0" Step="2.0" />
        </StackLayout>
      </Frame>

      <Frame>
        <StackLayout>
          <Label Text="{Binding NumInt, StringFormat='NumInt = {0:F0}'}" TextColor="Green" HorizontalOptions="CenterAndExpand" />
          <controls:NumericUpDown Value="{Binding NumInt}" Minimum="-10" Maximum="10" Step="2" />
        </StackLayout>
      </Frame>

    </StackLayout>
  </ScrollView>
</ContentPage>
↓のように、最大値に達していたら UP が押せなくなる。最小値も然り。となっていたら成功です。
ここまでを with-viewmodelブランチ で公開してます。今回の紹介内容は以上となります。
余談:サンプルの不具合について
上記までのところでは大丈夫なんですが、さらにいじっていたら以下の問題に当たりました。
- double 型を複数の要素にバインドするとフリーズすることがある
- decimal 型だと闇から NullReferenceException が飛んでくる
double 型を複数の要素にバインドするとフリーズすることがある
これは NumericUpDown と同時に Slider に double 型の NumDouble をバインドしたときに起きました。現在の master ブランチの状態です。
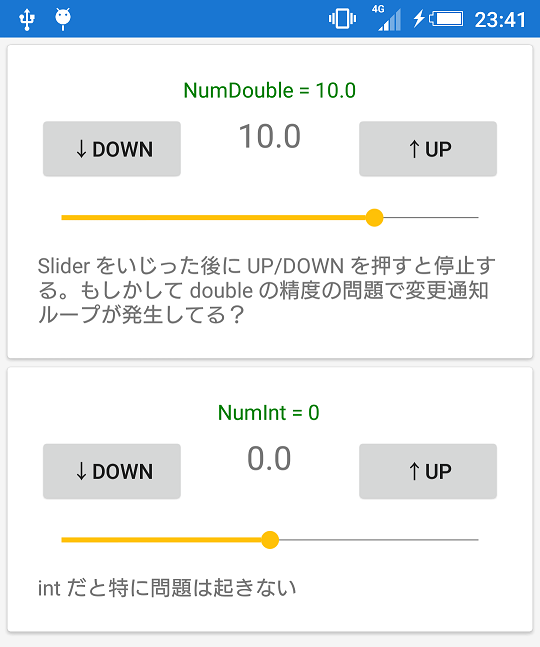
↑のように整数の時は大丈夫なんですが、Slider を操作すると 10.2... のような値になります。このときに DOWN/UP ボタンをタップすると、もれなくフリーズします。
推測ですが、double 型は float 型同様に精度に限界があるため、2つのコントロールの中にほぼ等しい値が設定され、しかしイコールと判定されないために変更通知が無限ループしてしまっているのかもしれません。
decimal 型だと闇から NullReferenceException が飛んでくる
上記 double 型の問題の対策として、BindableProperty も MainPageViewModel のプロパティも double じゃなくて decimal で定義したらどうだろうと試したところ、デバッグ実行すると必ずどこからともなく NullReferenceException が飛んできてアプリが起動できなくなりました。
decimal は使えないってことなんでしょうかね。
詳しい方、ぜひコメントで教えてくださいm(_ _)m
また「こんなやり方もあるよ」というのがありましたらコメントでもプルリクでも、ぜひ教えてください!!