前回 に引き続きひな形について、今回は構造を見ていきましょう。
何を書けばどう動くのか
まずソースコードの全体的な構造です。
実際にソースコードをのぞきながら読み進めてみてください。
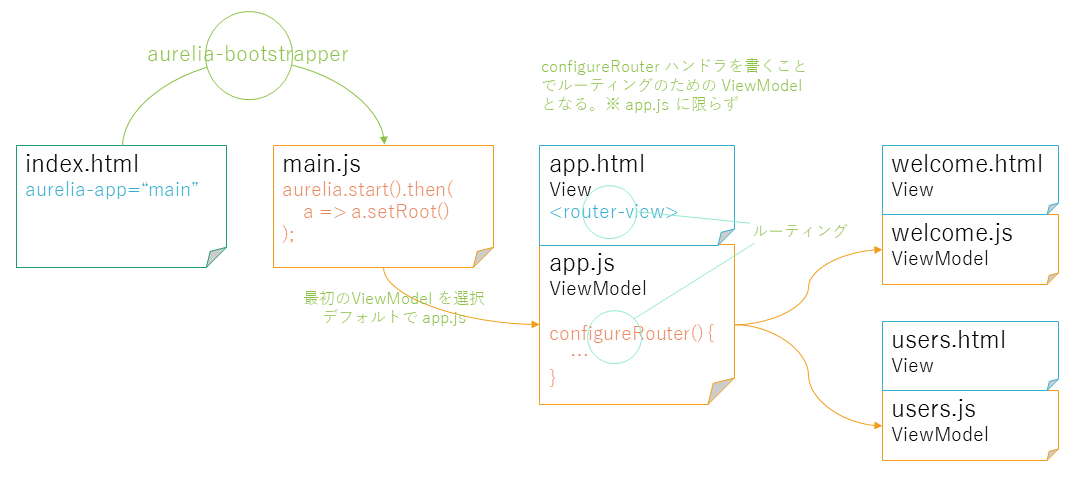
index.html -> main.js
index.html がブラウザに読み込まれると aurelia-bootstrapper によって aurelia-app 属性に従ってエントリポイントが呼び出されます。今回は aurelia-app="main" の記述に従って main.js が読み込まれます。
main.js -> app
続いて画面の外枠と、内側に表示する画面のルーティングを行う app モジュールが読み込まれます。
import 'bootstrap';

export function configure(aurelia) {
  aurelia.use
    .standardConfiguration()
    .developmentLogging();

  //Uncomment the line below to enable animation.
  //aurelia.use.plugin('aurelia-animator-css');

  //Anyone wanting to use HTMLImports to load views, will need to install the following plugin.
  //aurelia.use.plugin('aurelia-html-import-template-loader')

  aurelia.start().then(a => a.setRoot());
}
この a.setRoot() が最初の画面を決定しますが、引数がなければ自動的に app が選択されるようになっています。
例えば welcome から起動したい場合は a => a.setRoot('welcome') と書きます。
各モジュールの記述はコンパイル済みファイルが展開される
distディレクトリからの相対パスになっています。
例えばsrc/routes/sample.js (&.html)を指定する場合はroutes/sampleと書いてください。
app -> welcome
ルーティング
app.js を見てみると、App クラスに configureRouter() というメソッドが定義されています。
ViewModel に configureRouter() が定義されていると、Aurelia は「この画面ではルーティングをやりたいんだな?」と判断してくれます。
ひな形では最初のルートに対して welcome を設定していますので、app.html の <router-view></router-view> の部分に welcome が表示されるという流れになります。
View と ViewModel
Aurelia は MVVM (Model View ViewModel) という発想に基づいています。
app や welcome はそれぞれ View (.htmlファイル) と ViewModel (.js) ファイルに分かれています。
- View welcome.html (表示内容のテンプレート)
<template>
  <section class="au-animate">
    <h2>${heading}</h2>
    ~省略~
  </section>
</template>
- ViewModel welcome.js (表示するデータやユーザの操作に対応するアクション)
export class Welcome {
  heading = 'Welcome to the Aurelia Navigation App!';
  firstName = 'John';
  lastName = 'Doe';
  previousValue = this.fullName;
  // ~省略~
}
これらは基本的に同じ名前を付けることでペアとなります。ファイル名はそれぞれハイフン区切りのスネークケース snake-case.js, snake-case.html で、ViewModel のクラス名はパスカルケース export class PascalCase にします。
もちろん、別の名前を付けたり別の場所にある View を設定したりすることも可能です。
Aurelia は Angular2 によく似ていますが、この「特に注文がなければ名前だけで役割を決定する」という規約志向なところが Aurelia の特徴となっています。
これは各画面だけでなく、その中で使う部品についても同様です。
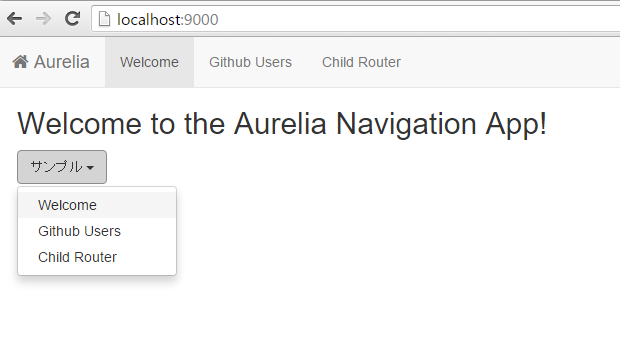
画面に表示する部品を作ってみよう
ひな形ではCSSフレームワークとして Twitter Bootstrap が使われています。Twitter Bootstrap は CMS なんかを作るときにとくに助かるのですが、構造的な意味の薄い(見た目のためだけの)コードによって HTML が冗長になりがちです。
dropdown custom element を作る
こちら の例を引用します。そのまま記述するとしたら以下のようになります。
<div class="dropdown">
  <button class="btn btn-default dropdown-toggle" type="button"
    data-toggle="dropdown" aria-haspopup="true" aria-expanded="true">
    サンプル
    <span class="caret"></span>
  </button>
  <ul class="dropdown-menu">
      <li><a href="#">Welcome</a></li>
      <li><a href="#users">Github Users</a></li>
      <li><a href="#child-router">Child Router</a></li>
  </ul>
</div>
これを部品 (custom element) として定義することで、以下のように使うことができます。
<template>
  <!--作った部品を読み込む-->
  <require from="dropdown"></require>
  <section class="au-animate">
    <h2>${heading}</h2>

    <!--作った部品を使う-->
    <dropdown label="サンプル">
      <li><a href="#">Welcome</a></li>
      <li><a href="#users">Github Users</a></li>
      <li><a href="#child-router">Child Router</a></li>
    </dropdown>
  </section>
</template>
ボタン部分を表現するためのコードがごそっとなくなって、ドロップダウンメニューの内容に集中できるようになります。
- View 新規作成: src/dropdown.html
<template>
    <div class="dropdown">
        <button class="btn btn-default dropdown-toggle" type="button"
                data-toggle="dropdown" aria-haspopup="true" aria-expanded="true">
            ${label}
            <span class="caret"></span>
        </button>
        <ul class="dropdown-menu">
            <content></content>
        </ul>
    </div>
</template>
- ViewModel 新規作成: src/dropdown.js
import {bindable} from 'aurelia-framework'

export class Dropdown {

    @bindable label;

}
ドロップダウンボタンのタイトル部分に表示するラベルと、それからドロップダウンメニューの内容を外部から設定できるようになっています。
knockout.js Components などでは作った custom-element はフレームワークに登録する処理を書く必要がありますが、それらは Aurelia では必要ありません。
@bindable
ViewModel のプロパティに @bindable を付けることで、プロパティを外部から設定・バインドすることができるようになります。
つまり、<dropdown label="サンプル"> のように書けばOKです。
動的に変更するなら <dropdown label="${sampleLabel}"> でもいいですし、<dropdown label.bind="sampleLabel"> でもOKです。
<content></content>
custom element の中身を使うには、中身を配置したい場所に <content></content> を記述します。下記の「ここから~ここまで」の部分が上記 dropdown.html の <content></content> の部分に配置されます。
<dropdown label="サンプル">
  <!--ここから-->
  <li><a href="#">Welcome</a></li>
  <li><a href="#users">Github Users</a></li>
  <li><a href="#child-router">Child Router</a></li>
  <!--ここまで-->
</dropdown>
ViewModel を省略することもできるよ
今回の ViewModel は bindable なプロパティが一つあるだけです。ロジックがまったくいらないので、ViewModel を省略することもできます。
まずは dropdown.html の template エレメントに bindable="label" を追加します。ViewModel の @bindable label と同義です。
<template bindable="label">
複数ある場合は bindable="label,foo,bar" のようにカンマ区切りで記述します。
~省略~
</template>
src/dropdown.js は消してしまって大丈夫です。その代わり custom element としてちゃんと見つけられるように、読み込み部分を from="dropdown" から from="dropdown.html" に変更します。
<template>
  <!--作った部品を読み込む-->
  <require from="dropdown.html"></require>
  ~省略~
</template>
部品をどこでも使えるようにするには
追加した部品を使うためには <require from="dropdown"></require> のようにモジュール参照を書く必要がありますが、以下の方法で <require> を書かなくても、いつでもどこでも custom element を使えるようにすることができます。
まず、いろんな場所で使いたい部品は1か所にまとめましょう。さらにまとめたフォルダに index.js を新規作成します。
src/
 └─ resources/   ...共通部品置き場
     ├─ dropdown.html
     ├─ ...
     └─ index.js
新規作成した index.js は以下のように記述します。
export function configure(aurelia) {
    aurelia.globalResources('dropdown.html');    // ViewModel 省略したなら .html をつけよう
    // 部品が増えたら同じようにここに追加していく
}
最後に main.js に1行追加します。
import 'bootstrap';

export function configure(aurelia) {
  aurelia.use
    .standardConfiguration()
    .developmentLogging()
    .feature('resources');    // feature として resources/index.js を登録する

  aurelia.start().then(a => a.setRoot());
}
これで <require from="dropdown.html"></require> は不要になり、管理が楽になりました。
今後のサンプルも resources ディレクトリを使っていきます。