AlertやActionSheetの表示をする時にUIAlertControllerを使いますが、毎回UIAlertControllerを作って、UIAlertActionを作って追加して...という記述が長くなったりして面倒ですよね。
ということで、コードの記述量を減らしつつ、スッキリ書けるラッパーライブラリを作ってみました。
Swift3.1以降、iOS9以上で動作します。CocoaPods or Carthageで導入してください。
BeforeとAfter
では実際にどう変わるのか同じ内容のAlertを出す処理のbeforeとAfterを示してみます。
- Before
let alert = UIAlertController(title: "Confirm", message: "Do you want to delete this post?", preferredStyle: .alert)
alert.addAction(UIAlertAction(title: "Delete", style: .destructive) { [unowned self] _ in
    self.delete(post)
})
alert.addAction(UIAlertAction(title: "Cancel", style: .cancel, handler: nil))
self.present(alert, animated: true, completion: nil)
- After
Alertift.alert(title: "Confirm", message: "Do you want to delete this post?")
    .action(.destructive("Delete")) { [unowned self] in
        self.delete(post)
    }
    .action(.cancel("Cancel"))
    .show(on: self)
行数は変わらないものの、全体的に スッキリ と書けるようになっています。UIAlertController や UIAlertAction を書くことから解放されています。
また、アクションの追加や、後述するUITextFieldのハンドリングの処理やpopoverの設定、Alert(ActionSheet)の色の変更等がメソッドチェーン的に繋いでいくことができて、最後にshowメソッドを呼び出せば表示されます。
共通: アクションの追加と表示
アクションの追加を行うには、action関数にアクションの種類と必要に応じてボタンを押したときのハンドラを渡します。複数のアクションを追加する場合はメソッドチェーンでどんどん繋いでいきます。
actionはdefault, cancel,destructive`の3種類でそれぞれボタンのタイトルをAssociated Valueとして渡します。
Alertift.alert(title: "Sample", message: "sample alert.")
    .action(.default("通常のボタンです")) {
        print("!!!")
    }
    .action(.cancel("キャンセルボタン"))
    .action(.destructive("破壊的な行動を行う時のボタン(赤文字)"))
表示する場合は最後にshow(on:completion:)関数を呼び出します。on: にアラートを表示するViewControllerを指定します。
Alertift.alert(title: "Sample", message: "sample alert.")
    .action(.default("OK"))
    .show(on: self)

Alertift.actionSheet(title: "Sample", message: "sample action sheet.")
    .action(.default("1"))
    .action(.default("2"))
    .show(on: self)
showに引数を渡さなかった場合は UIApplication.shared.keyWindow?.rootViewController 上に表示しようと試みます。
Alertift.alert(title: "Sample", message: "sample alert.")
    .action(.default("OK"))
    .show() // UIApplication.shared.keyWindow?.rootViewController 上に表示
finally
いずれかのアクションボタンを押した時に最後に呼び出す処理をfinally関数で追加することができます。ハンドラの引数には押されたUIAlertActionとそのアクションのindexが渡ってきます。
また、actionのハンドラも呼ばれるので、
Alertift.actionSheet(message: "Which food do you like?")
    .action(.default("🍣")) {
        print("Sushi")
    }
    .action(.default("🍎"))
    .action(.default("🍖"))
    .action(.default("🍅"))
    .action(.cancel("None of them"))
    .finally { action, index in
        if action.style == .cancel {
            return
        }
        print(action.title, index)
    }
    .show()
と記述して🍣を押した場合の出力結果は、
"Sushi"
"🍣, 0"
となります。
Alert
UITextFieldを使う
アラートにUITextFieldを表示するには、textField(configurationHandler:)を使います。ハンドラでUITextFieldが渡ってくるので、それを基にUITextFieldをカスタマイズすることも可能です。
Alertift.alert(title: "Sign in", message: "Input your ID and Password")
    .textField { textField in
        textField.placeholder = "ID"
    }
UITextFieldに入力された文字列を受け取るには2通りの方法があります。
-
handleTextFieldTextDidChange(textFieldTextDidChangeHandler:)で変更を受け取る
handleTextFieldTextDidChange(textFieldTextDidChangeHandler:)で追加したいずれかのtextfieldのtextの変更を受け取ることができます。ハンドラの引数には、変更があった UITextFieldとそのUITextFieldのindex番号が渡ってきます。
Alertift.alert(title: "Sign in", message: "Input your ID and Password")
    .handleTextFieldTextDidChange { textField, index in
        let text = textField.text ?? ""
        print("\(index), \(text)")
    }
なお、UITextFieldの変更の監視は内部で行っているため、Alertiftのメソッドチェーンの外で別途delegateやNotificationCenterで監視する必要はありません。
-
action(_: textFieldsHandler:)でボタンが押された時にUITextFieldに入力された値を取得する
通常はアクションの ハンドラでは引数なしのものを用いますが、textFieldsHandler:として、UITextFieldの配列を引数にもつclosureを渡してあげると、ボタンが押されたときに追加したUITextFieldの配列を追加で受け取ることができます。
.action(.default("Sign in"), textFieldsHandler: { textFields in
        let id = textFields?.first?.text ?? ""
        let password = textFields?.last?.text ?? ""
        let title = "Sign in successfully"
        let message = "ID: \(id)\nPassword: \(password)"
        Alertift.alert(title: title, message: message)
            .action(.default("OK"))
            .show()
    })
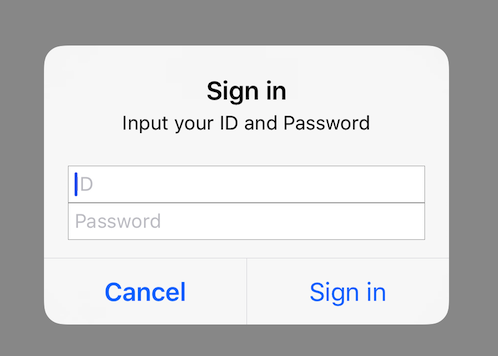
最終的な例として、以下にユーザーのIDとpassword入力を行わせ、入力した文字列を取得する処理を示します。
Alertift.alert(title: "Sign in", message: "Input your ID and Password")
    .textField { textField in
        textField.placeholder = "ID"
    }
    .textField { textField in
        textField.placeholder = "Password"
        textField.isSecureTextEntry = true
    }
    .handleTextFieldTextDidChange { textField, index in
        let text = textField.text ?? ""
        print("\(index), \(text)")
    }
    .action(.cancel("Cancel"))
    .action(.default("Sign in"), textFieldsHandler: { textFields in
        let id = textFields?.first?.text ?? ""
        let password = textFields?.last?.text ?? ""
        let title = "Sign in successfully"
        let message = "ID: \(id)\nPassword: \(password)"
        Alertift.alert(title: title, message: message)
            .action(.default("OK"))
            .show()
    })
.show()
その他
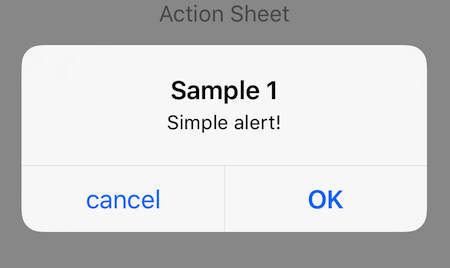
また、iOS9から使用可能な、preferredActionを変更する実装も備えているので、キャンセルのボタンではない任意のボタンの文字を太字にすることも可能です。アクションを追加するときに、isPreferredをtrueにします。
Alertift.alert(title: "Sample 1", message: "Simple alert!")
    .action(.default("OK"), isPreferred: true)
    .action(.cancel("cancel"))
    .show()
ActionSheet
iPadの場合
iPadの場合(或いはUniversal対応アプリの場合)は別途popoverのanchorViewを指定する必要があります。具体的には、alertControllerの
popoverPresentationController.sourceViewpopoverPresentationController.sourceRect- (或いは)
popoverPresentationController.barButtonItem
に適切なview,rectを指定する必要があります。そのための関数も別途用意しています。popover(anchorView:)を用いるのが1番簡単です。
万一設定し忘れてもcrashしないように内部的に処理しています。(表示位置は左上になってしまいますが。)
また、以下のように実行端末に応じてコードを分ける必要はありません。(iPhoneの場合は、alertController.popoverPresentationController がnilになるため影響が及ばない。)
// good!
Alertift.actionSheet(message: "Which food do you like?")
    .popover(anchorView: button)
    .action(...)
    .show()


// not good
if isIphone {
    Alertift.actionSheet(message: "Which food do you like?")
        .action(...)
        .show()
} else {
    Alertift.actionSheet(message: "Which food do you like?")
        .popover(anchorView: button) // この部分の有無を端末判定で分ける必要はなし
        .action(...)
        .show()
}
色変更
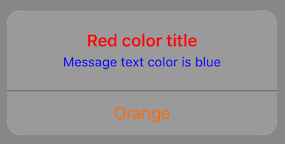
また、Alertのtitleやmessageの文字色、ボタンの文字色、背景色を変えることができます。
private APIは使っていません。
Alertift.alert(title: "Red color title", message: "Message text color is blue")
    .titleTextColor(.red)
    .messageTextColor(.blue)
    .backgroundColor(.lightGray)
    .buttonTextColor(.orange)
    .action(.default("orange color button"))
    .show()
よかったら
使ってみて下さい!PR等もお待ちしております。